
Turn on suggestions
Auto-suggest helps you quickly narrow down your search results by suggesting possible matches as you type.
Showing results for
Turn on suggestions
Auto-suggest helps you quickly narrow down your search results by suggesting possible matches as you type.
Showing results for
Community Tip - You can subscribe to a forum, label or individual post and receive email notifications when someone posts a new topic or reply. Learn more! X
- Community
- Creo+ and Creo Parametric
- 3D Part & Assembly Design
- Re: Help with surfaces and curves
Options
- Subscribe to RSS Feed
- Mark Topic as New
- Mark Topic as Read
- Float this Topic for Current User
- Bookmark
- Subscribe
- Mute
- Printer Friendly Page
Help with surfaces and curves
Jun 22, 2013
02:23 PM
- Mark as New
- Bookmark
- Subscribe
- Mute
- Subscribe to RSS Feed
- Permalink
- Notify Moderator
Jun 22, 2013
02:23 PM
Help with surfaces and curves
Hello. I am relatively new to Creo and I need help with my model.
My projects is to make a CAD model of a masku that I want CNC cut and put up on my wall at home.
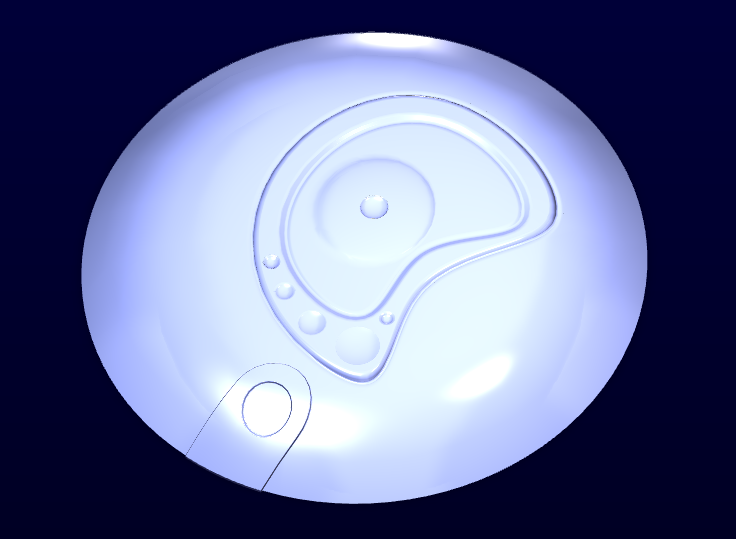
Here is a rendering of the mask:

At the moment my model looks like this.

I have sketched some curves and made surfaces between them. Then I sketched the contours of the mask's eyes and lines, etc on a plane and projected them down on the surfaces.
My question is now; how do I get these contours, say the pupils, to have an offset/be above the main surface of the mask/ "higher" up? (I need these contour changes so the CNC machine can pick them up).
Thanks alot!
Labels:
- Labels:
-
Surfacing
8 REPLIES 8
Jun 22, 2013
02:25 PM
- Mark as New
- Bookmark
- Subscribe
- Mute
- Subscribe to RSS Feed
- Permalink
- Notify Moderator
Jun 22, 2013
02:25 PM
I am very sorry if this is not the right place for this kind of questions, but I couldnt find my way around the forum 😕
Jun 22, 2013
02:42 PM
- Mark as New
- Bookmark
- Subscribe
- Mute
- Subscribe to RSS Feed
- Permalink
- Notify Moderator
Jun 22, 2013
02:42 PM
This is the perfect place for these questions. It is just a little quiet around here on the weekends.
In short, you want to use the offset feature... but not generically...
Take a look at the offset command and use the button that depicts a drafted/lofted feature. This will allow you to change raise or lower a sketched feature on the quilt (combined surface) of your choice. It is very powerful when you start looking at the options, including projection direction, applied draft, and even radius' on the edges. It is primarily a "stamping" type tool and is perfect for your application. in fact, it will likely take place of all those sketches you extruded to the surface since it uses flat sketches which act on the surface. The key is selecting the right button in the dialog:
Would love to see what you come up with when you are done. Please share the process in a document or blog.
Jun 22, 2013
02:48 PM
- Mark as New
- Bookmark
- Subscribe
- Mute
- Subscribe to RSS Feed
- Permalink
- Notify Moderator
Jun 22, 2013
02:48 PM
...and if you want more controlled contours, of course you still have the trim and merge options. In that case, you will want to learn about variable section sweeps... or VSS. Another very powerful tool but requires a little research to make the most of it. A search for VSS in the forum will bring up a lot of information. This will be useful in joining some of the protrusion features to the surface.
Jun 23, 2013
08:43 AM
- Mark as New
- Bookmark
- Subscribe
- Mute
- Subscribe to RSS Feed
- Permalink
- Notify Moderator
Jun 23, 2013
08:43 AM
Thanks alot for your reply.
I have looked more into the offset button and seen some videos of how to use it, and I am definitely getting closer!
I did a test in another document and it went well as you can see.

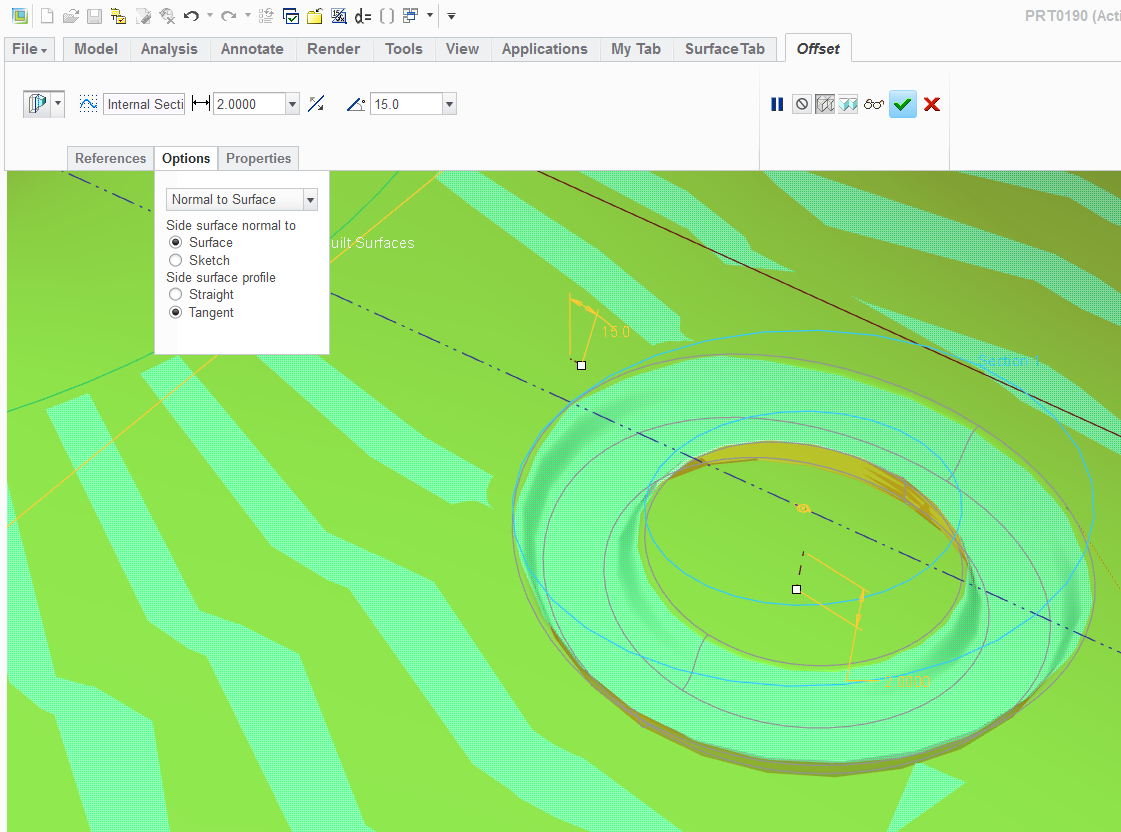
I do however get this error message when I have selected surface and a sketch:
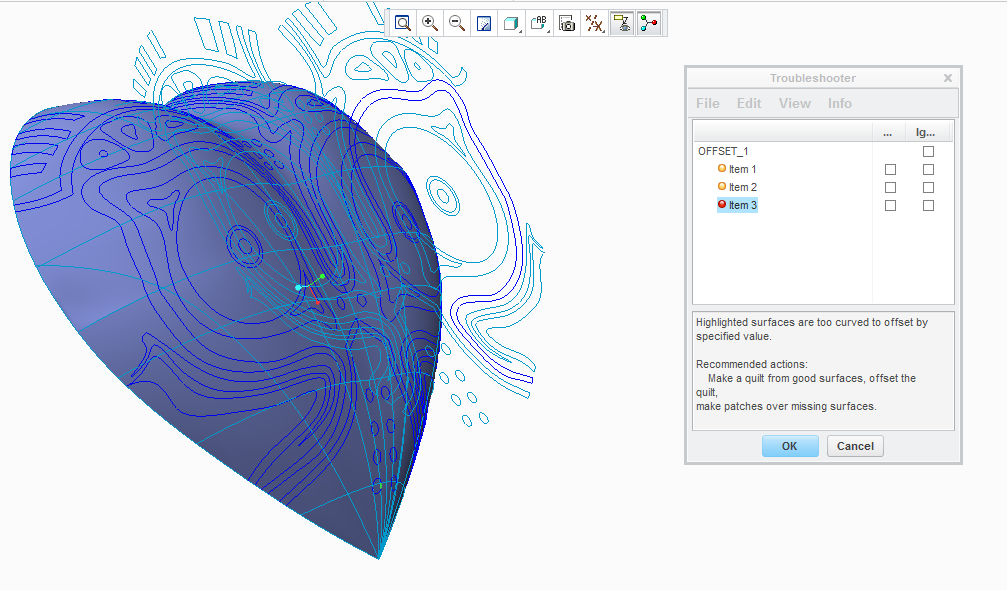
The other errors are typically "geometry could not be constructed" etc.. Seems like there is something the matter with my surfaces, since i can only get to offset the the eye circles and nostrils..
Any thoughts?
Thank you!
Jun 23, 2013
01:25 PM
- Mark as New
- Bookmark
- Subscribe
- Mute
- Subscribe to RSS Feed
- Permalink
- Notify Moderator
Jun 23, 2013
01:25 PM
Unfortunately, this is a very sensitive command. 1st of all, You might extend the edges of the primary surface so you are not trying to deform the edge. This can be trimmed later.
As for channels, the variable section sweeps might serve you better. This requires trims and merge features as well as rounds to sew everything back together.
Before all is said and done, you will have a lot of features of different types to bring it all together. This certainly falls under the advanced Creo surfacing classification. Save often and if you suspect a serious corruption has occurred, backtrack to an earlier version.
How much contour are you shooting for?
Jun 23, 2013
04:12 PM
- Mark as New
- Bookmark
- Subscribe
- Mute
- Subscribe to RSS Feed
- Permalink
- Notify Moderator
Jun 23, 2013
04:12 PM
If you are using Creo 2.0 full version, I've attached a reference file for some ideas.
Jun 24, 2013
02:21 AM
- Mark as New
- Bookmark
- Subscribe
- Mute
- Subscribe to RSS Feed
- Permalink
- Notify Moderator
Jun 24, 2013
02:21 AM
I am running the student version of Creo 2.0.
How do you extend the edges of the surfaces and what would that do?
I am not familiar with this function 
The same goes for channels..
Regarding contours I "just" need the sketched curves seen on the mask in my previous curve to either offset out from the model or down into the model. The deepest offset into the model would be 4mm i think. The biggest offset out would be 2mm.
I tried remaking the Mask's surface by merging each of the small surface parts, but that only helped a few places (typically the flat areas without too many curves).
Jun 24, 2013
10:47 AM
- Mark as New
- Bookmark
- Subscribe
- Mute
- Subscribe to RSS Feed
- Permalink
- Notify Moderator
Jun 24, 2013
10:47 AM
Like I said before, you are embarking on a significant task within Creo not that it can't be a rewarding experience.
In my example above, I was able to offset the feature past the edge. Try extending the sketch somewhat past the edge and it should work.
In my session, the curvy "D" was first offset into the part and I used the edges to create a new surface with a variable section sweep. This new raised surface was merged with the original. The dots in the curvy "D" were done with an offset and rounds were used to clean up the edges.
Every feature is its own challenge. By no means is the few techniques I just defined as the only methods. Every surfacing tool is at your disposal. How to best use them is up to you.
I will add that you want your master furface to be clean. I see a wrinkle in there you may want to address (left center). I suggest the master quilt (surface) is a single feature so that your manipulation is not interupted. As you get more intricate with your features, you will want a very stable base to apply your new features to.
