
Turn on suggestions
Auto-suggest helps you quickly narrow down your search results by suggesting possible matches as you type.
Showing results for
Turn on suggestions
Auto-suggest helps you quickly narrow down your search results by suggesting possible matches as you type.
Showing results for
Community Tip - You can Bookmark boards, posts or articles that you'd like to access again easily! X
Options
- Subscribe to RSS Feed
- Mark as New
- Mark as Read
- Bookmark
- Subscribe
- Printer Friendly Page
- Notify Moderator
Drag and Drop Edge Device Development with ThingWorx, Node.js and Node Red
No ratings
Javascript, everyone knows it, at least a little bit. What if I told you that you could do serious data acquisition with just a little bit of Javascript and you may already have the tools to do it, right now on your "Off the Shelf" device. Node.js is a command line implementation of Javascript that can be run on common, credit card sized devices like the Raspberry PI or the Intel Edison.
I suspect that if you already know about Node.js, you may have encountered its non-blocking asynchronous, "Call back", style of programming which can be a little different that most other languages which block or wait for commands to complete. While this can be a benefit for increasing performance, it can also be a barrier to entry for new users.
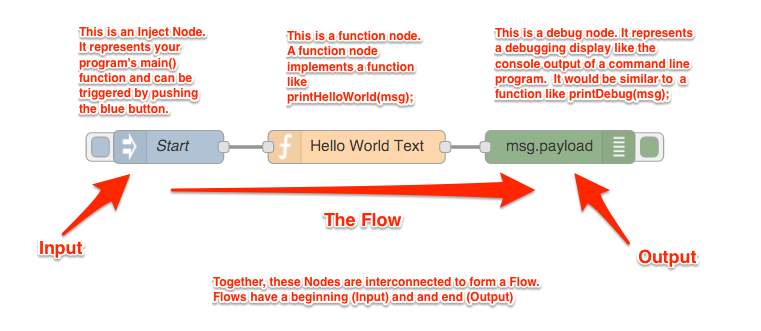
This is the problem that Node Red really solves. Node Red is a web based Integrated Development Environment (IDE) that turns the "Call Back" style Javascript programming of Node.js into a series of interconnected Nodes, each Node of which represents a Javascript function which is connected by a callback to another node/function. A simple hello world program in Node Red would look something like this ( with annotations in red) :
You can re-create this program using the Node Red IDE yourself. Here is a brief video (with no sound) which should familiarize you with how to create your own hello world flow.
How can you install Node Red on your own system to try it out?
The good news is, if you have a Raspberry PI 2 with a NOOBS installed on it, Node.js and Node Red come pre-installed. If you do not already have it installed, or want to install it on your own system it is still pretty simple. Here are the steps:
1. Download and install Node.js (https://nodejs.org/en/download/)
2. Run the command: sudo npm install -g --unsafe-perm node-red
Omit the sudo on windows (see http://nodered.org/docs/getting-started/installation.html for more info)
3. You now have Node Red. To run it, just type: node-red on your command line.
4. Using your web browser goto http://localhost:1880 and the Node Red IDE will appear in your browser.
How about a real hardware integration example?
Node Red comes with many built in Nodes and many more nodes you can add to connect to specific peripherals you may have on your device. Rather than provide a complete tutorial on Node Red, I will focus on discussing using this IDE to re-create a hardware integration that I created in the past using the Java SDK, The Raspberry PI, AM2302 Weather Station (see Weather Applications with Raspberry Pi | ThingWorx). This example contains detailed specifics on the attachment of the AM2302 Temperature/Humidity sensor to your Raspberry PI. I am going to assume you have the hardware already attached to your Raspberry PI as described in this tutorial ( https://learn.adafruit.com/dht-humidity-sensing-on-raspberry-pi-with-gdocs-logging/overview ). I am also assuming that you have installed the python based sample program described in this tutorial as well and you now have a python script called "AdafruitDHT.py" installed on your PI that produces the following output when it is run.
pi@raspberrypi:~/projects/Adafruit_Python_DHT/examples $ sudo ./AdafruitDHT.py 2302 4
Temp=22.3* Humidity=30.6%
pi@raspberrypi:~/projects/Adafruit_Python_DHT/examples $
If you don't have any of this hardware installed, you can still proceed with this example and just create your own temperature and humidity values manually. We are going to connect the output of this python script directly to ThingWorx and sample its output value every 5 seconds. I will start assuming you do not have the Am2302 hardware and create simulated values. I will then replace them with the actual output of the python script as a final step.
Polling versus Interrupt Driven Data Collection
In the Java SDK version of this example, we are polling for changes in data. Every so many seconds our device will wake up and take a reading. How do we recreate the same effect in Node Red without having to push an inject button every 5 seconds. No. We need an input node that activates on its own every 5 seconds. The Inject Node will do this. Drag out an inject node and configure it as shown below.
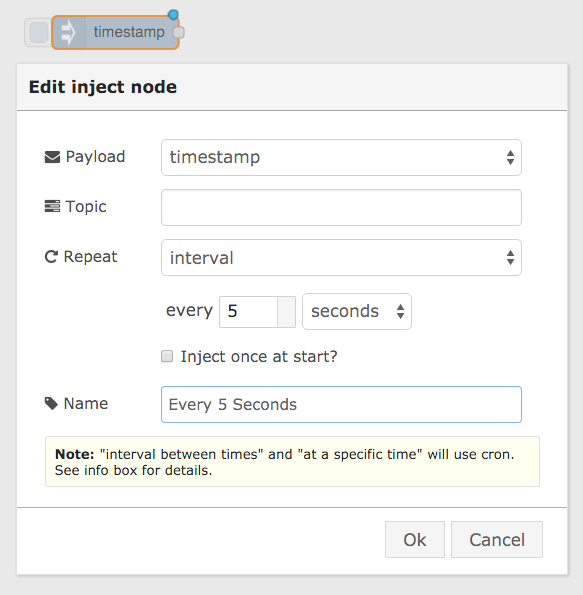
This is an input node so it will be starting a new flow. It will fire off every 5 seconds from the minute this sheet is deployed.
Simulate Data Collection
Lets generate a random humidity and temperature value before getting the actual data. For this node we will use a Function node. Drag one out and configure it as shown below.
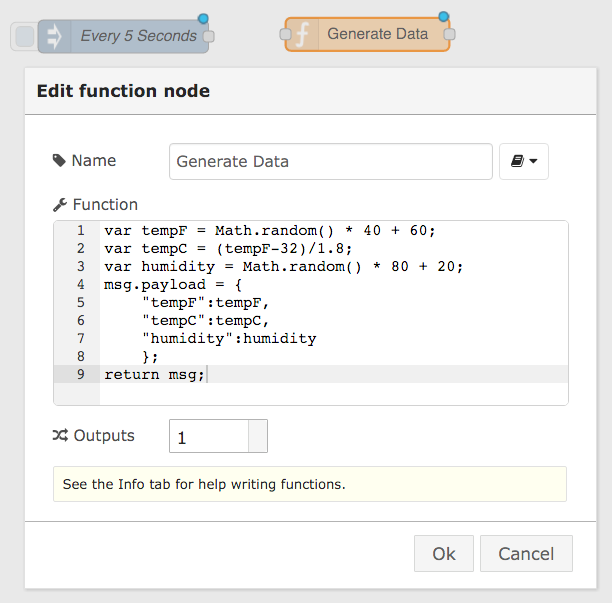
Here is the Javascript for this node so you can cut and paste it into this dialog.
var tempF = Math.random() * 40 + 60;
var tempC = (tempF-32)/1.8;
var humidity = Math.random() * 80 + 20;
msg.payload = {
"tempF":tempF,
"tempC":tempC,
"humidity":humidity
};
return msg;
Remember that the returned message is the message that the next node will receive. The payload property is the standard or default property of a message that most nodes use to pass data between each other. Here, our payload is an object with all of our simulated data in it.
Lets Test it Out
Connect the two nodes together and add a debug output node and deploy your sheet. The completed flow will look like this.

As soon as you deploy you should see the following output in your debug tab and every five seconds another data sample will be generated.

So how does this data get to ThingWorx?
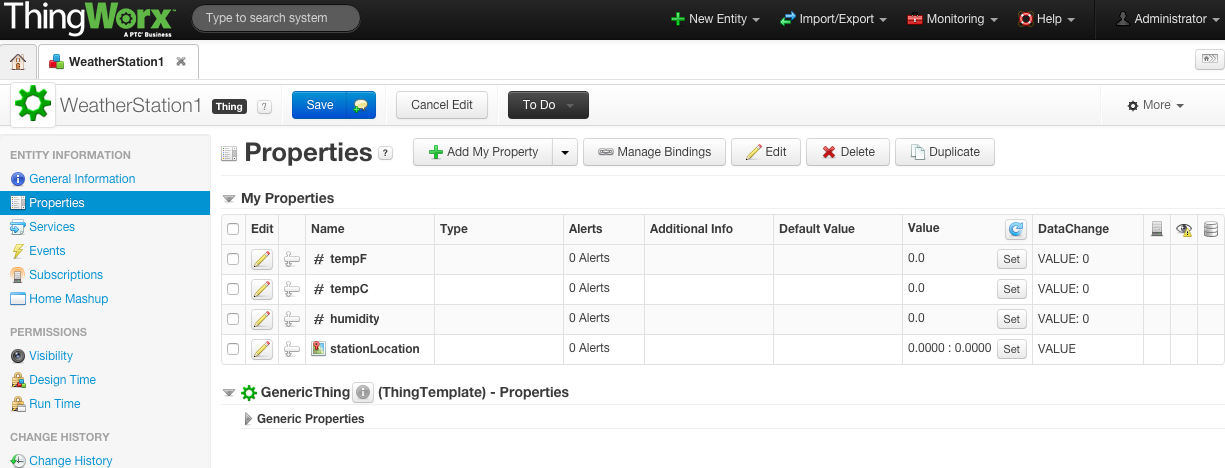
What we need to do is take this data and deliver it to ThingWorx in the form of a REST web service call. This is easier to do than it sounds. First off, lets create a Thing on your ThingWorx server that looks like this.

Now give it these properties.
Next, create an Application Key in the application keys section of the composer. Assign it to the "Administrator" user.

Your keyId will of course be different. This key will be the credential you need to post your data.
Installing the ThingRest Node Red Node
To simplify the process of posting the data to ThingWorx, I have created my own custom node to post data. To install a custom node into your Node Red installation you have to find the directory Node Red is using to store your sheets in. By default this is a directory called ".node-red" in your home directory. On a Raspberry PI this directory would be /home/pi/.node-red. If you are running Node Red now, quit it by hitting control-c and cd into the .node-red directory. Below is the sequence of commands you would issue on your PI to install the ThingRest node.
cd ~/.node-red
npm install git+https://git@github.com/obiwan314/node-red-node-thingrest.git
node-red
The node package manager (npm) will install this new node automatically into your .node-red directory. Now re-run node-red and go back to your browser and refresh your Node Red IDE. You should now have a "REST Thing" node.
Adding a REST Thing node to your flow
Drag a REST Thing output node into your flow and configure it as shown below. Remember, your Application Key will be different than the one shown here. Also, your ThingWorx server URL may be different if your server is not on the same machine you are working on.
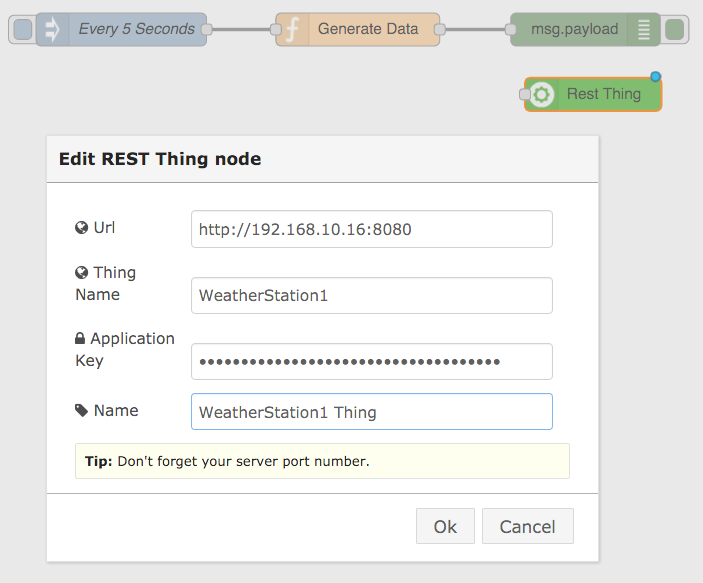
Now connect it as shown below. When you deploy this sheet, you will be posting data to ThingWorx.

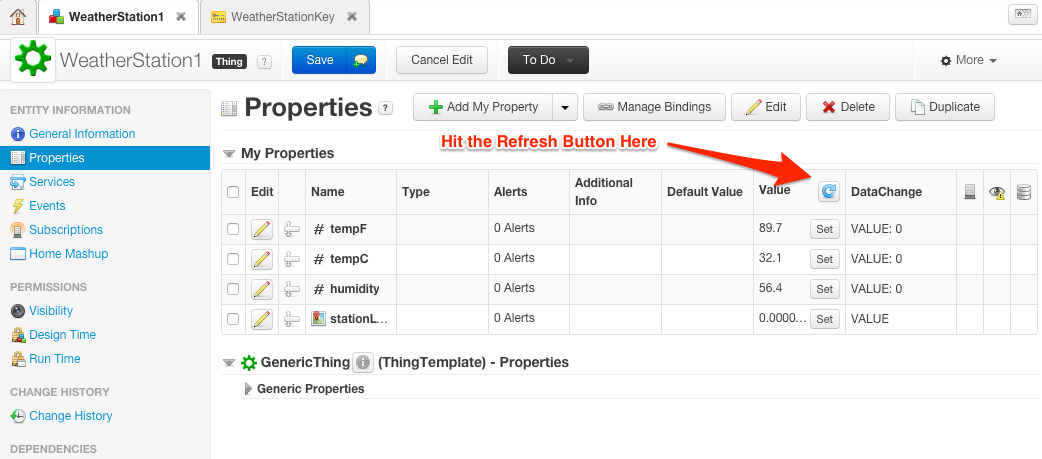
Go back to your WeatherStation1 Thing in ThingWorx and use the Refresh button shown below to see your data changing.
Wait, that is? Thats the whole data collection program? Yes. The flow above is the equivalent of the Java SDK code from the Java weather station example.
Now for Some Real Data
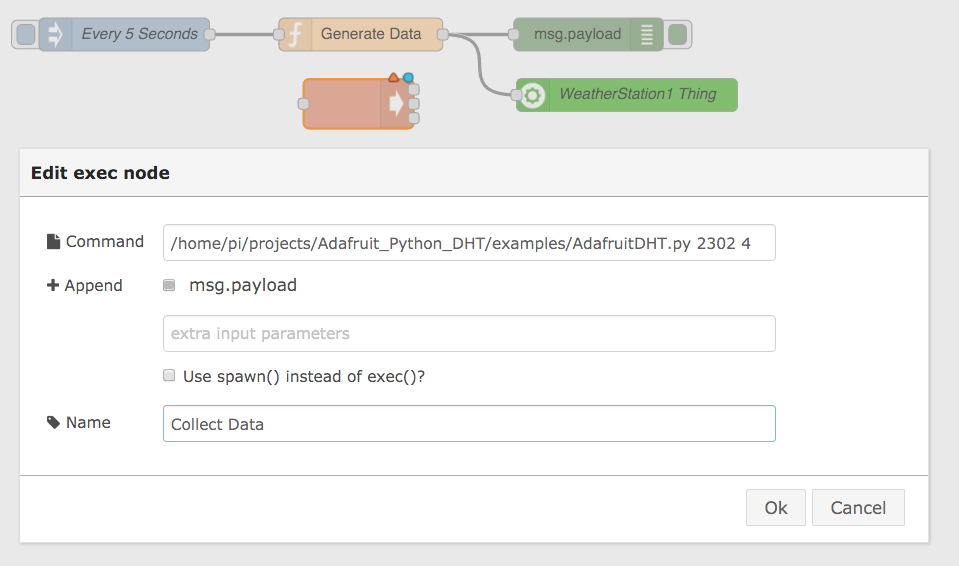
As promised, we will now replace the simulated data in the Generate Data node with real data obtained from the "~/projects/Adafruit_Python_DHT/examples/AdafruitDHT.py 2302 4" python command on your Raspberry PI using an Exec node. The exec node can be found at the very bottom of your node palette. It executes a command and returns the results as msg.payload to the next node in the flow. You may have noticed it has three outputs instead of one. In order these outputs are your Standard output, Standard Error and the integer return code of the process. Use the first output node to get the results of this command.
Now Connect this in place of the Generate Data Node as shown below.

At this point, we can't connect the collected data to the WeatherStation1 Thing because it is in the wrong format. It is console output and we need it in the form of a Javascript object. We are going to need a function to parse the console output into a Javascript object. Add the function node shown below.

Here is the Javascript for cut and paste convenience.
var temphumidArray=msg.payload.split(" ");
var tempC = parseFloat(temphumidArray[0].replace("*","").split('=')[1]);
var tempF = tempC *1.8 + 32;
var humidity = parseFloat(temphumidArray[2].replace("%","").replace("\n","").split('=')[1]);
msg.payload = {
"humidity":humidity,
"tempF":tempF,
"tempC":tempC
};
return msg;
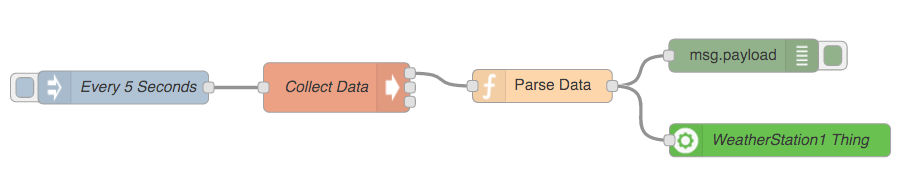
Now msg.payload contains a javascript object identical to the one we were generating at random but now it is using real data. Connect up your nodes so they appear as shown below but when you deploy, don't expect it to work yet because there is still one problem you will have to get around. This python script expects to be run as the root user.
How to run Node Red as Root
You can start Node Red as root with the following command
sudo node-red -u /home/pi/.node-red
Note that the -u argument is required to make sure you keep using the pi user's .node-red directory. If you loose your REST Thing node, you are not using the pi user's .node-red directory, but root's instead. If you see any error messages in your debug window, try re-attaching the the debug node to the Collect Data node and see what is being produced by the exec node. Don't forget to verify that your tempC,tempF and humidity properties are updating in ThingWorx.
Lets Add a GPS Location
You may have noticed that there is a stationLocation property on the WeatherStation1 Thing. Lets set that to a fixed location to complete this example of 40.0568764,-75.6720953,18. Below is the modified Javascript to update in the Parse Data node to add this location.
var temphumidArray=msg.payload.split(" ");
var tempC = parseFloat(temphumidArray[0].replace("*","").split('=')[1]);
var tempF = tempC *1.8 + 32;
var humidity = parseFloat(temphumidArray[2].replace("%","").replace("\n","").split('=')[1]);
msg.payload = {
"humidity":humidity,
"tempF":tempF,
"tempC":tempC,
"stationLocation":"40.0568764,-75.6720953,18"
};
return msg;
What's Next?
Node Red has many more nodes that you can add to your project through the use of the npm command.
There is a GPIO node library you can install at https://github.com/monteslu/node-red-contrib-gpio which will give you input and output nodes for the GPIO pins on your PI as well, This library also supports accessing Arduino's attached to the PI over a USB cable which expand the possibilities for data collection and peripheral control.Hopefully this article has exposed you to the many other possibilities for connecting devices to your ThingWorx Server.
The Rest Thing node is using the HTTP REST protocol to talk to ThingWorx. In the near future, with the Introduction of the ThingWorx Javascript SDK, a Node Red library can be created that uses ThingWorx AlwaysOn WebSockets protocol to communicate with your ThingWorx server which will offer even more capabilities and better performance.
Comments
Mar 04, 2016
12:29 PM
- Mark as Read
- Mark as New
- Bookmark
- Permalink
- Notify Moderator
Mar 04, 2016
12:29 PM
Actually we are using CloudGate devices which includes a custom version of NodeRed called LuvitRED, and it already has TW Edge SDK integrated on it as a Node
Mar 04, 2016
01:33 PM
- Mark as Read
- Mark as New
- Bookmark
- Permalink
- Notify Moderator
Mar 04, 2016
01:33 PM
You integrated the C-SDK into node via FFI? That work is going on internally right now. Would you be interested in sharing your experience?
Mar 04, 2016
01:39 PM
- Mark as Read
- Mark as New
- Bookmark
- Permalink
- Notify Moderator
Mar 04, 2016
01:39 PM
Not me, the Option guys did it last Summer, are your partners I'm using it right now, to establish a VPN connection on demand to the CloudGate, I've also use it to send and receive data, to control the device, .... You should speak with Option guys.

Mar 05, 2016
05:34 PM
- Mark as Read
- Mark as New
- Bookmark
- Permalink
- Notify Moderator
Mar 05, 2016
05:34 PM
Just have a look on The ThingBox Project which integrates node-red and a lot of other tools for Rapsberry PI.
This project provides an "all in One" SD Card for Rapsberry PI 2 based on the Raspbian wheezy distribution.
Note that new Raspbian Jessie distribution integrates the NodeRED IDE but this Open Source project
(The ThingBox Project) provides NodeRED but also a lot of additional features (as MQTT server…) .
Oct 11, 2017
04:04 PM
- Mark as Read
- Mark as New
- Bookmark
- Permalink
- Notify Moderator
Oct 11, 2017
04:04 PM
This article was written way before trials existed but the interface it uses is the same one that composer uses and that is working in your web browser. Can you post any error messages for me to work off of?
Oct 12, 2017
03:38 PM
- Mark as Read
- Mark as New
- Bookmark
- Permalink
- Notify Moderator
Oct 12, 2017
03:38 PM
Hi Bill,
The article is still up-to-date right now, I didn't followed your guidance accuratly. I missed that part to create a new user and the key id was generated to the new user instead of Administrator. If I generated a key-id to Administrator the node-red connection established.
Thnaks!
Roland
Nov 02, 2017
05:39 AM
- Mark as Read
- Mark as New
- Bookmark
- Permalink
- Notify Moderator
Nov 02, 2017
05:39 AM
Hello guys, anyone attempted to port EDGE SDK to nodered as custom node just like in mentioned Cloudgate?
Nov 03, 2017
03:45 PM
- Mark as Read
- Mark as New
- Bookmark
- Permalink
- Notify Moderator
Nov 03, 2017
03:45 PM
I can confirm that ThingWorx does not have a NodeRed Node based on any SDK. This example is based on the REST interface for the ThingWorx platform.
Dec 22, 2018
09:16 AM
- Mark as Read
- Mark as New
- Bookmark
- Permalink
- Notify Moderator
Dec 22, 2018
09:16 AM
Hi,
I am using PTC Thingworx academic Edition to explore possibilities with Thingworx and Node RED.
I followed same steps as mentioned on this page, except user name Administrator.
As per description, does the Administrator is just a user name or there is some concept of Administrator user in thingworx.
In REST thing Node,
Url is https://ptcu-thingworx74-fundamentals.portal.ptc.io:8080/Thingworx/
Thing Name Weather_Station1_sbidwaik
Application key which is generated for WeatherStationKey
But it is connected to thingworx and I could not see, change in value.
Please help to fix it.
Thanks
Satish
Aug 03, 2019
12:42 AM
- Mark as Read
- Mark as New
- Bookmark
- Permalink
- Notify Moderator
Aug 03, 2019
12:42 AM
Hello,
You are using the academic version of thingworx which is only provided for the demonstration purpose, in this version you cannot bind the key to Administrator as Thingworx gives only you a User.
Instead of this you can use the Hosted Server trial (30 days) or the local Server Trial (90 days) in these versions of Thingworx you can able to bind your Application key to the Administrator.
You can find this below,
https://developer.thingworx.com/en/resources/downloads
Hope this will solve your problem.
Thank You!!
- Saurav Kukkar
