
Turn on suggestions
Auto-suggest helps you quickly narrow down your search results by suggesting possible matches as you type.
Showing results for
Turn on suggestions
Auto-suggest helps you quickly narrow down your search results by suggesting possible matches as you type.
Showing results for
Community Tip - Did you get an answer that solved your problem? Please mark it as an Accepted Solution so others with the same problem can find the answer easily. X
Options
- Subscribe to RSS Feed
- Mark as New
- Mark as Read
- Bookmark
- Subscribe
- Printer Friendly Page
- Notify Moderator
Trust & Encryption - Hands On
No ratings
In this blog post I'm covering the pratical aspects of setting up a Chain of Trust and configure ThingWorx to use it.
There are already some examples available on how to do this via command line using a self-signed certificate, e.g. https://support.ptc.com/appserver/cs/view/solution.jsp?n=CS193947
In this example I'll be using the KeyStore Explorer, a graphical tool for managing keystores.
To learn more about the theory behind trust and encryption, see also Trust & Encryption - Theory
![]()
The Chain of Trust
Creating a Root CA
Open the KeyStore Explorer and create a new jks KeyStore
File > New > JKS
Via Tools > Generate Key Pair create a new key-pair.
Use the RSA algorithm with a key size of 4096. This size is more than sufficient.
Set a validity period of e.g. 302 days.
It's important that all subsequent certificates have a lower validity period than the original signer.
Leave the other defaults and fill out the Name (addressbook icon).
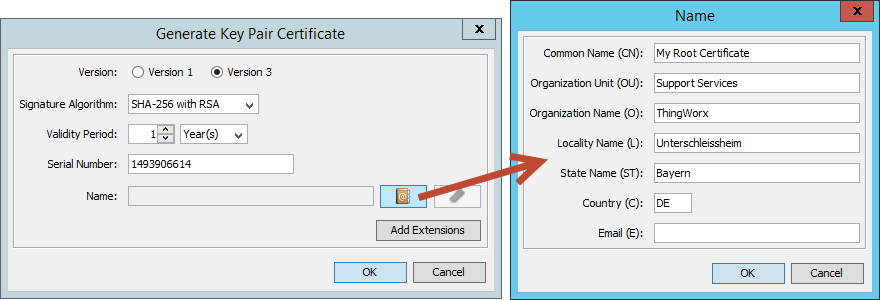
Only the Common Name is required - usually I never use the Email field, as I want to avoid receiving more spam than necessary.
Click OK and enter an alias for the Root CA (leave the default).
A new password needs to be set for the private key part of the certificate.
The new Root CA will now show up in the list of certificates.
Creating an Intermediate CA
The intermediate CA is signed by the Root CA and used to sign the server specific certificate.
This is a common approach as - in case the signing CA for the server specific certificate gets corrupted, not all of the created certificates are affected, but only the ones signed by the corrupted CA.
In the list right-click the Root CA and Sign > Sign New Key Pair
Use the RSA algorithm with a key size of 4096 again.
Ensure the validity period is less than for the Root CA, e.g. 301 days.
(Because every second counts)
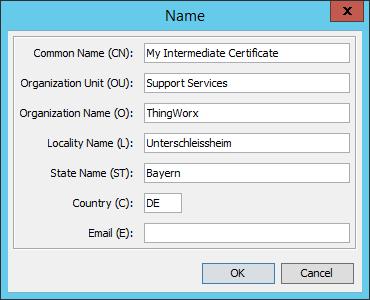
Fill out the Name again - this time as Intermediate Certificate.
A Intermediate Certificate is a Certification Authority (CA) in itself.
To reflect this, a Basic Constraint must be added via Add Extensions.
Mark the checkbox for Subject is a CA
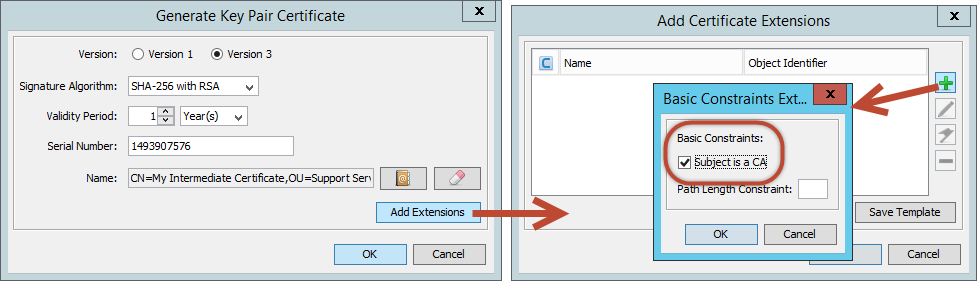
Confirm with OK, set the alias (or leave the default) and set the password for the private key part.
The new Intermediate CA will now show up in the list of certificates.
Creating a Server Specific Certificate
In the list right-click the Intermediate CA and Sign > Sign New Key Pair
Use the RSA algorithm with a key size of 4096 again.
Ensure the validity period is less than for the Root CA, e.g. 300 days.
(Because still, every second counts)
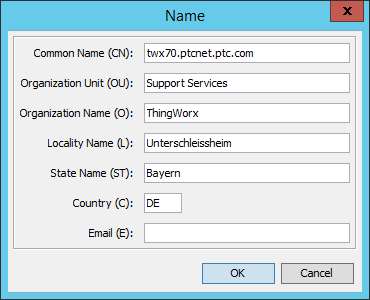
Fill out the Name again - this time it's important to actually use the public servername, so that browsers can match the server identity with its name in the browser's address bar.
If the servername does not match exactly, the certificates and establishing trust will not work!
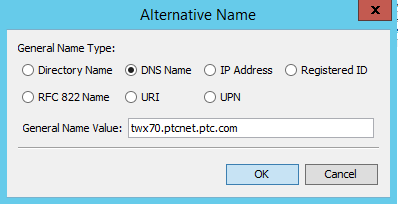
In addition to this, a Subject Alternative Name must be defined - otherwise the latest Chrome versions consider the certificate as invalid.
Click on Add Extensions and the + sign, choose Subject Alternative Name.
Add a new name with the + sign. Make it the same as the Common Name (CN) above.

As before, confirm everything with OK, enter an alias and a password for the private key part.
Saving the keystore
All certificates should now show with their corresponding properties in the certificate list:
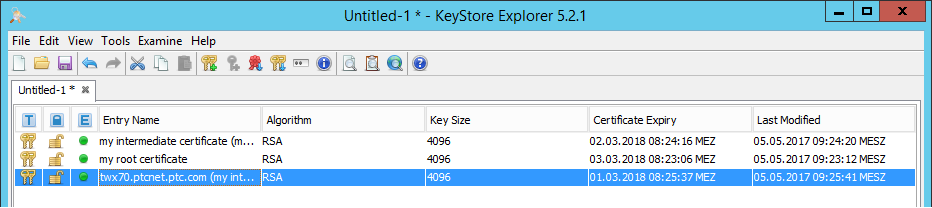
Notice the expiry date - the higher up the chain, the sooner the expiry date.
If this is not the case - the certificates and establishing trust will not work!
Save the keystore via File > Save As and set a password - this time for the keystore itself.
As Tomcat has a restriction the password for the keystore must be the password for the private key of the server specific certificate.
It's highly recommended and (hopefully) obvious that passwords for the other private keys should be different and that the password for the keystore should be completely different as well.
The keystore password will be shared with e.g. Tomcat - the private key password should never be shared with a source you do not trust!
Configuring ThingWorx
In ThingWorx, configure the <Tomcat>/conf/server.xml as e.g. mentioned in https://support.ptc.com/appserver/cs/view/solution.jsp?n=CS193947
I'm using a connector on port 443 (as it's the default HTTPS port):
<Connector port="443" protocol="org.apache.coyote.http11.Http11NioProtocol" maxThreads="150"
SSLEnabled="true" scheme="https" secure="true" clientAuth="false" sslProtocol="TLS" enableLookups="false"
connectionTimeout="20000" keystoreFile="C:\ThingWorx\myKeystore.jks" keystorePass="changeme" redirectPort="8443" />
Restart Tomcat to consider the new configuration.
ThingWorx can now be called via https://<myserver.com>/Thingworx
It's not yet trusted by the client - so it shows as potentially unsafe, and for me it shows in German as well *sorry*
However, it's already using encrypted traffic as every HTTPS connection will use TLS.
In this case we're communicating in a secure way, but do not know if the server (and its providers) can be trusted or not. Sharing credit card information or other personal details could be dodgy in such a scenario.

Trusting the Root CA
To trust our Root CA, we first have to export it.
Every browser allows to view the certificate, e.g. in Chrome this is done via the Developer Tools > Security
As we're using KeyStore Explorer, we can use it to export the Root CA. Right-click it in the certificate list and Export > Export Certificate Chain. Leave the defaults and export as .cer file.
Open the Certificate Manager, by typing certmgr into the Windows search field. Open the Trusted Root Certification Authorities and right-click on the Certificates folder. Under All Tasks > Import. Choose the file you've just exported for the Root CA.
The Root CA is now a trusted certificate authority.
As the ThingWorx server specific certificate will fall back to the Root CA, it's now also recognized by the browser and the connection is now considered as secure and trustworthy. Congratulations!

Comments
Jan 12, 2018
01:25 AM
- Mark as Read
- Mark as New
- Bookmark
- Permalink
- Notify Moderator
Jan 12, 2018
01:25 AM
The command certmgr in Trusting the Root CA section is not available on my Windows 7 but I was able to achieve the same by doing following operation.
- Open Control Panel > Internet Options
- Open Certificates in Content tab
- Open Trusted Root Certification Authorities and click on Import button
- Import your Certificate Chain (.cer)
Or if you have Visual Studio 2015 installed, type certmgr in MSBuild Command Prompt for VS2015 to open Trusted Root Certification Authorities
Jun 21, 2018
10:18 AM
- Mark as Read
- Mark as New
- Bookmark
- Permalink
- Notify Moderator
Jun 21, 2018
10:18 AM
I needed to do the same but on Suse using java keytool and to have the certificates signed by an external CA:
Create the keystore and the private key pair:
keytool -genkey -alias hostname -ext san=dns:hostname -keyalg RSA -sigalg SHA256withRSA -keystore KeyStore.jks -keysize 2048 -validity 1095
Review what you just created:
keytool -list -v -keystore KeyStore.jks
Create the certificate signing request:
keytool -certreq -alias hostname -keystore KeyStore.jks -ext san=dns:hostname -sigalg SHA256withRSA -file filename.csr
Review the certificate signing request created:
keytool -printcertreq -file filename.csr -v
Jun 21, 2018
10:20 AM
- Mark as Read
- Mark as New
- Bookmark
- Permalink
- Notify Moderator
Jun 21, 2018
10:20 AM
The csr file is sent to the CA. The answer will be either a crt file or a binary chain like
-----BEGIN CERTIFICATE-----
-----END CERTIFICATE-----
containing the Root and Intermediate certificates.
Then I used the Keystore explorer to import the CA reply (right click on the key pair) and copied the keystore via ftp to the server.
Restart tomcat and done.
Option with keytool: -importcert https://docs.oracle.com/javase/7/docs/technotes/tools/windows/keytool.html
Jun 21, 2018
10:25 AM
- Mark as Read
- Mark as New
- Bookmark
- Permalink
- Notify Moderator
Jun 21, 2018
10:25 AM

