
Turn on suggestions
Auto-suggest helps you quickly narrow down your search results by suggesting possible matches as you type.
Showing results for
Turn on suggestions
Auto-suggest helps you quickly narrow down your search results by suggesting possible matches as you type.
Showing results for
Community Tip - Learn all about the Community Ranking System, a fun gamification element of the PTC Community. X
- Community
- Creo+ and Creo Parametric
- 3D Part & Assembly Design
- How can I "pattern" on this curved surface?
Options
- Subscribe to RSS Feed
- Mark Topic as New
- Mark Topic as Read
- Float this Topic for Current User
- Bookmark
- Subscribe
- Mute
- Printer Friendly Page
How can I "pattern" on this curved surface?
Jan 25, 2012
12:36 PM
- Mark as New
- Bookmark
- Subscribe
- Mute
- Subscribe to RSS Feed
- Permalink
- Notify Moderator
Jan 25, 2012
12:36 PM
How can I "pattern" on this curved surface?
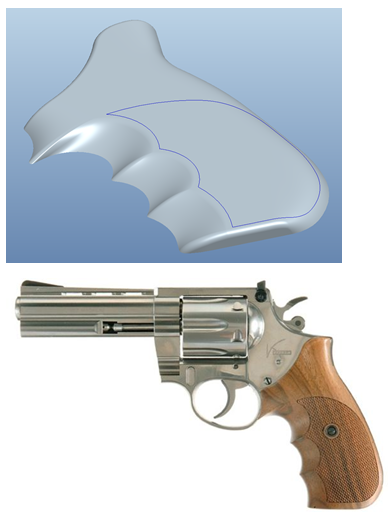
How would I model the portion of the handgrip that would be inside the blue curve? Pattern is in quotations in the subject line because your suggestion does not have to involve an actual Pro/E pattern. Just explain how you would accomplish this, but I don't want to use a textured image. I want to explore the solid modeling options.
I'm using Creo Elements/pro 5.0 with ProE/Foundation Advanced
Details:
This is just for learning and fun. I created the surfaces and had to stop because I don't know how to get the texture on there. I don't know the shape of the individual pieces that make up the texture, but I think its a 4-sided pyramid. Make the shape be whatever makes your solution possible.
Goals:
1. The patterned entitites should have no space between them.
2. The entities should have a constant height as measured from the curved surface.
3. Try to make the entities terminate at the blue curve, not before or after.
* The .prt file is attached.
Have fun and teach me and the other readers a few things.
Regards,
Kevin
This thread is inactive and closed by the PTC Community Management Team. If you would like to provide a reply and re-open this thread, please notify the moderator and reference the thread. You may also use "Start a topic" button to ask a new question. Please be sure to include what version of the PTC product you are using so another community member knowledgeable about your version may be able to assist.
Solved! Go to Solution.
Labels:
- Labels:
-
General
1 ACCEPTED SOLUTION
Accepted Solutions
Jan 26, 2012
01:40 PM
- Mark as New
- Bookmark
- Subscribe
- Mute
- Subscribe to RSS Feed
- Permalink
- Notify Moderator
Jan 26, 2012
01:40 PM
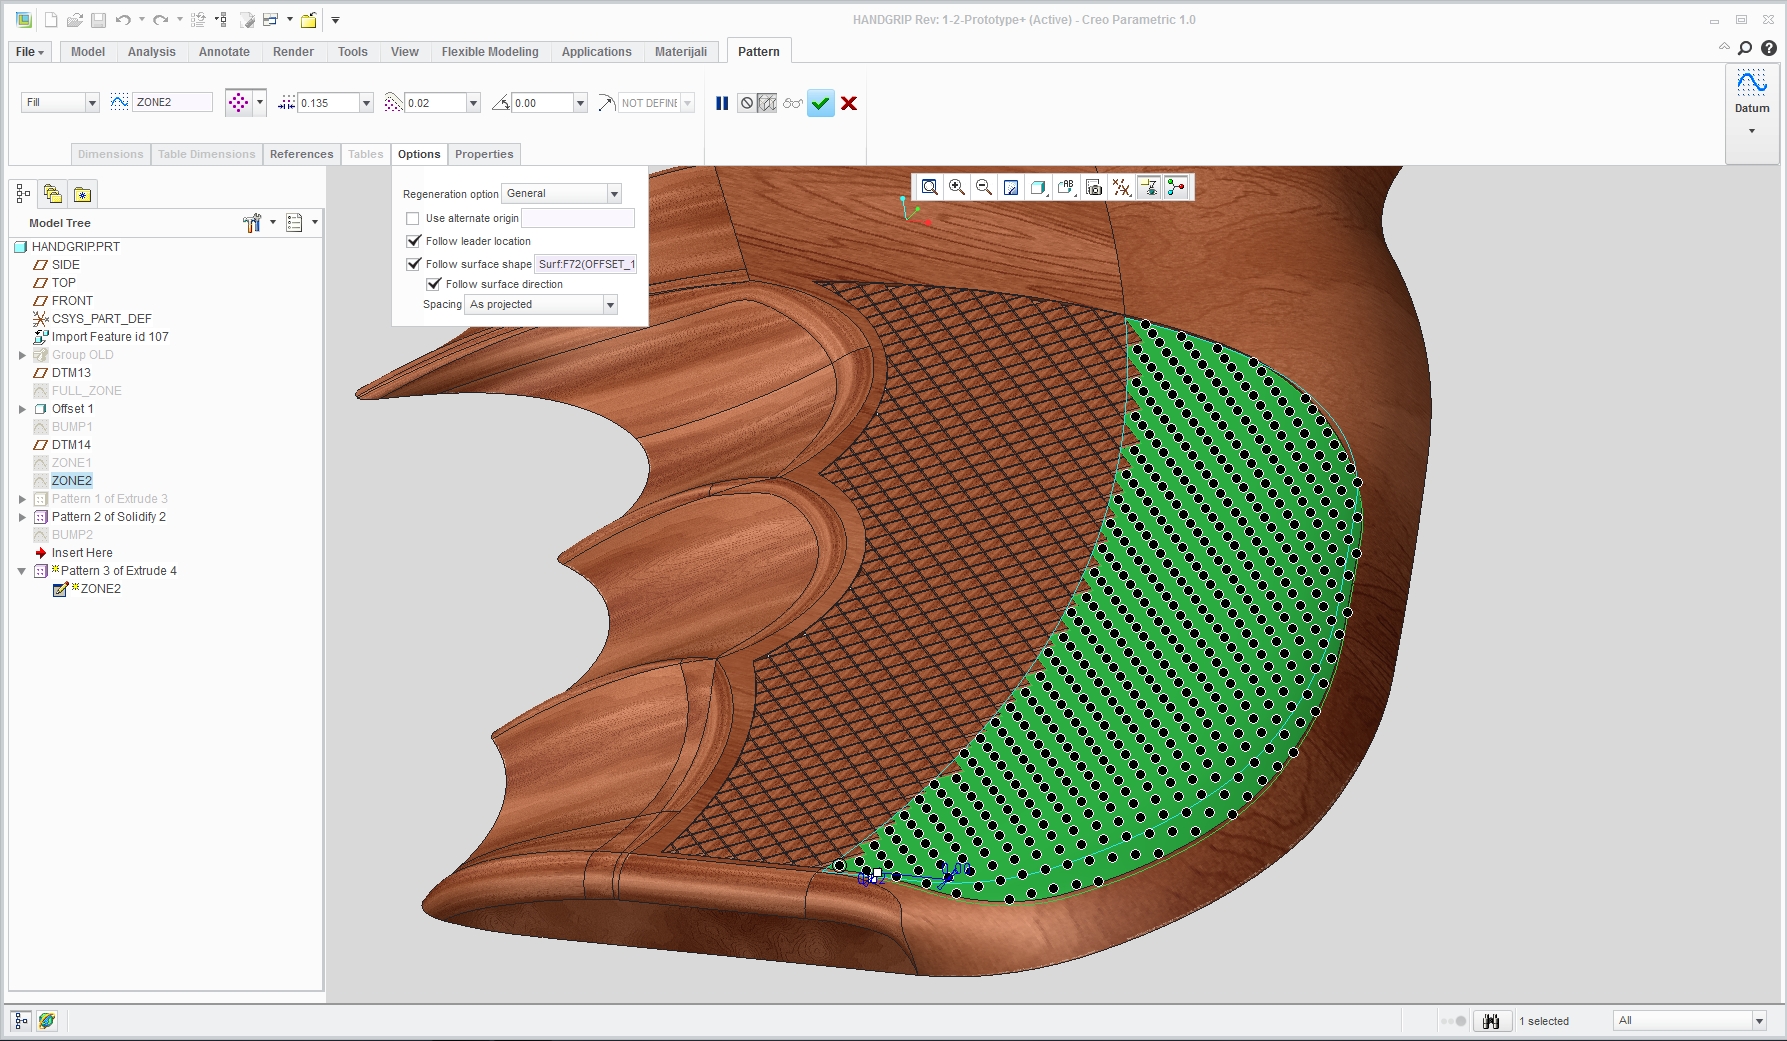
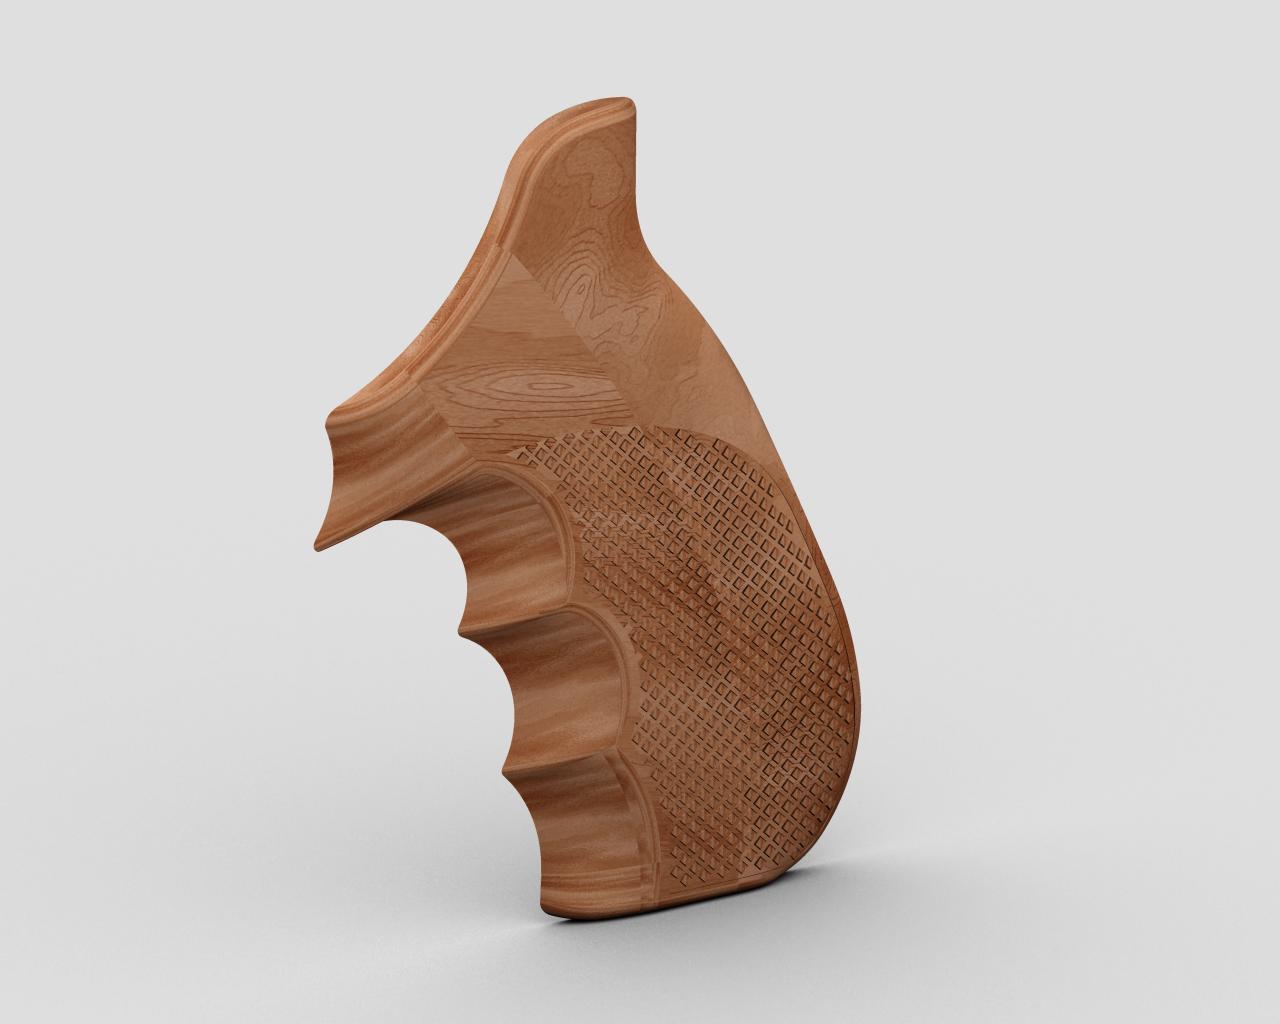
Here is screenshot of dashboard. Here i made pattern with no gap between entities.
Its basicly 2 patterns. I had to pattern extrudes that are surfaces not solids, solidify and then reference pattern of solidify feature. This is because there are problems when entities are patterned next to each other on curved surface, they tend create errors with geometry.
Diamond shape is basicly extrude with taper.
Sorry for late response.
9 REPLIES 9
Jan 25, 2012
03:27 PM
- Mark as New
- Bookmark
- Subscribe
- Mute
- Subscribe to RSS Feed
- Permalink
- Notify Moderator
Jan 25, 2012
03:27 PM
So, you're lucky enough to work for a firearms company? Nice! I talked to a recruiter about a position with one once, the HR lady asked if I had any "ethical" reason not to work there. I told her "hell no", that I'd be proud to.
Are you looking for a snandard "diamond"-type knurl? Usually, you don't put that geometry into the model, it's simply photo-etched into the mold. The easiest way would be to create a bump map, and make it a visual and not geometry thing.
But.......making it real geometry would be that much more fun, right?  I'll have to look at it when I get some time.
Jan 25, 2012
03:39 PM
- Mark as New
- Bookmark
- Subscribe
- Mute
- Subscribe to RSS Feed
- Permalink
- Notify Moderator
Jan 25, 2012
03:39 PM
Yeah, a knurl seems right. I don't have the gun in hand.
Yeah, I work for one, but they don't deal much in pistols and I'm not doing any design work here  .
.
I didn't know about the photo-etching--thanks for that. I figured modeling the thing must be possible since it exists, but it makes much more sense for it to be a machining process.
I was using Creo 1.0 and different licensces a few months ago and I seem to remember there being a option within the pattern tool to pattern across a non-flat surface. But, I don't have those tools and want to find out if it can be done with my current software because like you said, It'll be fun!
Jan 25, 2012
06:30 PM
- Mark as New
- Bookmark
- Subscribe
- Mute
- Subscribe to RSS Feed
- Permalink
- Notify Moderator
Jan 25, 2012
06:30 PM
Kevin, i found your request quite challenging.
"1. The patterned entitites should have no space between them."
Unless there is a V or U groove between entities you will get nice big surface from merged little ones.
And there lies the problem i have, overlaping entities that create havoc. I used fill pattern projected on surface.
Your surface that you wana fill with entities is actualy made of 2 parts, one flat and one curved.
I tried patterning diamond shaped surface not solid and then solidifying it and pattering that but that gave me slightly better result.
Maybe solution lies in patterning groove section instead of diamonds.
Jan 25, 2012
09:54 PM
- Mark as New
- Bookmark
- Subscribe
- Mute
- Subscribe to RSS Feed
- Permalink
- Notify Moderator
Jan 25, 2012
09:54 PM
I like your image. Its better than I could make. I'm bit confused about your explanation, though. Could you restate it and add more detail, possibly some screen shots of the menus? Specifically, what did you mean by "fill pattern projected on surface"?
Thank you,
Kevin
Jan 26, 2012
12:44 PM
- Mark as New
- Bookmark
- Subscribe
- Mute
- Subscribe to RSS Feed
- Permalink
- Notify Moderator
Jan 26, 2012
12:44 PM
hi,
I think Davor has used this technique: http://learningexchange.ptc.com/tutorial/778/using-the-fill-pattern-tool
(at the end of the vid)
Not sure how he got the triangular shape or diamond shape.
Jan 26, 2012
01:08 PM
- Mark as New
- Bookmark
- Subscribe
- Mute
- Subscribe to RSS Feed
- Permalink
- Notify Moderator
Jan 26, 2012
01:08 PM
I see now.
I just ran a quick trial and I think that is going to be the answer. I'll be back as soon as I've gone the whole nine yards.
Thank you Jakub and thank you very much Mark Taddonio, the author of the video.
P.S. Mark is doing the tutorial with Creo 1.0, but the options that he shows are also in WF5.
Jan 26, 2012
01:40 PM
- Mark as New
- Bookmark
- Subscribe
- Mute
- Subscribe to RSS Feed
- Permalink
- Notify Moderator
Jan 26, 2012
01:40 PM
Here is screenshot of dashboard. Here i made pattern with no gap between entities.
Its basicly 2 patterns. I had to pattern extrudes that are surfaces not solids, solidify and then reference pattern of solidify feature. This is because there are problems when entities are patterned next to each other on curved surface, they tend create errors with geometry.
Diamond shape is basicly extrude with taper.
Sorry for late response.
Jan 26, 2012
01:55 PM
- Mark as New
- Bookmark
- Subscribe
- Mute
- Subscribe to RSS Feed
- Permalink
- Notify Moderator
Jan 26, 2012
01:55 PM
Gratitude
Thank you very much Davor. I was getting close, but I learned that my machine cannot handle the pattern with the diamonds being that small. While I'm typing, Creo is locked up.
Questions
How did you get the diamond to terminate perfectly at the edge of the curve? 
How did you pattern the Solidfy feature? It did not work for me.
Tip
This will help so you don't have to do two patterns: Copy then paste the 2 surfaces. Then, trim the new quilt using the blue curve. This will provide a single surface for patterning the diamonds.
Jan 26, 2012
02:31 PM
- Mark as New
- Bookmark
- Subscribe
- Mute
- Subscribe to RSS Feed
- Permalink
- Notify Moderator
Jan 26, 2012
02:31 PM
First you offset surface that you want your pattern on. You make it same depth as height of extrude you gona make.
Then when doing fill pattern you enter offset distance of pattern items from boundary surface so that they fill zone completly. On my screenshot you can see its 0.02. Make sure you type "-" before number because you want offset to be the outside one not the inside one.
Regarding solidify. First you make extrude then solidify it then pattern extrude then reference pattern solidify.
Worked for me.
Thx for the tip. I found it interesting to pattern on 2 part surface, beacuse sometimes you will not be able to have single one. The only trick is to make entity for second pattern on the place where it would look like it was made by first pattern. So 2 patterns look like its one pattern.
