
Turn on suggestions
Auto-suggest helps you quickly narrow down your search results by suggesting possible matches as you type.
Showing results for
Turn on suggestions
Auto-suggest helps you quickly narrow down your search results by suggesting possible matches as you type.
Showing results for
Community Tip - You can change your system assigned username to something more personal in your community settings. X
- Community
- Creo+ and Creo Parametric
- Analysis
- "Hole tool"
Options
- Subscribe to RSS Feed
- Mark Topic as New
- Mark Topic as Read
- Float this Topic for Current User
- Bookmark
- Subscribe
- Mute
- Printer Friendly Page
"Hole tool"
Aug 27, 2010
07:03 AM
- Mark as New
- Bookmark
- Subscribe
- Mute
- Subscribe to RSS Feed
- Permalink
- Notify Moderator
Aug 27, 2010
07:03 AM
"Hole tool"
Working in WF4, the "plain" hole tool doesn't provide for a counterbore function. However, if I choose a tapped hole, the counterbore function available. Frankly, I can't even see a use for a tapped hole that is counterbored. I've been around for a while, and have NEVER counterbored a tapped hole. Is there any way that I can "fix" this problem? Currently, I have to use 2 "plain" holes to get the desired results.
This thread is inactive and closed by the PTC Community Management Team. If you would like to provide a reply and re-open this thread, please notify the moderator and reference the thread. You may also use "Start a topic" button to ask a new question. Please be sure to include what version of the PTC product you are using so another community member knowledgeable about your version may be able to assist.
Labels:
- Labels:
-
General
10 REPLIES 10
Aug 27, 2010
04:49 PM
- Mark as New
- Bookmark
- Subscribe
- Mute
- Subscribe to RSS Feed
- Permalink
- Notify Moderator
Aug 27, 2010
04:49 PM
My guess would be because you typically use counterbored holes with fasteners. Change the option for the depth of the hole to through and you can select the show thread icon to turn off threads which makes the hole a clearance hole. There is also a config.pro option that allows you to overide the hole diameter for holes defined by the hole tables (I believe it's called hole_diameter_overide).
Aug 30, 2010
01:13 PM
- Mark as New
- Bookmark
- Subscribe
- Mute
- Subscribe to RSS Feed
- Permalink
- Notify Moderator
Aug 30, 2010
01:13 PM
Kevin,
Thanks for your answer, but I can't seem to get the "hole tool" (counterbore of simple holes)
to work satisfactory. I've used this same command in Wildfire2 and Wildfire3, but it seems to
have gotten a little lost in translation to Wildfire4. We're moving to Wildfire5 soon,
(in a month or so) so I hope it's all cleared up in that version.
Jon.
Aug 30, 2010
02:27 PM
- Mark as New
- Bookmark
- Subscribe
- Mute
- Subscribe to RSS Feed
- Permalink
- Notify Moderator
Aug 30, 2010
02:27 PM
In WF4 I was able to create a counterbored hole, and vary all diameter and depth dimensions by selecting the following settings. Using the simple hole icon ( ) and then selecting the use standard hole profile as drill hole profile (
 ), the counterbore and countersink buttons became available and then I could create a counterbored hole with whatever dimensions I wanted. I didn't create it as a standard hole (
 ). Hopefully this is what you are looking for.
Below is the shape tab for the hole dashboard just before accepting to create the hole:
Hope this helps you out!
-Greg
Aug 31, 2010
06:49 AM
- Mark as New
- Bookmark
- Subscribe
- Mute
- Subscribe to RSS Feed
- Permalink
- Notify Moderator
Aug 31, 2010
06:49 AM
Greg,
Wow, I've got to say THANKS... Now, It looks like I want it to look.
But, I don't know why the WF4 version didn't follow the same format as 2 and 3.
It works great.
Jon
Aug 31, 2010
09:09 AM
- Mark as New
- Bookmark
- Subscribe
- Mute
- Subscribe to RSS Feed
- Permalink
- Notify Moderator
Aug 31, 2010
09:09 AM
Hi there
You know he is right, so mark his answer as correct.
You can even use the countersink and counterbore at the same time.
Hope this will help you further.
Regards
Chris
Sep 19, 2010
09:10 AM
- Mark as New
- Bookmark
- Subscribe
- Mute
- Subscribe to RSS Feed
- Permalink
- Notify Moderator
Sep 19, 2010
09:10 AM
The countersink and counterbore of simple holes was added till WF4. In WF2 and 3 the only way to create a countersink or counterbore using the simple hole option was to sketch the hole profile. The hole tool works the same in WF5 as in WF4 but has some additional features.
Sep 17, 2010
09:04 AM
- Mark as New
- Bookmark
- Subscribe
- Mute
- Subscribe to RSS Feed
- Permalink
- Notify Moderator
Sep 17, 2010
09:04 AM
Hi guys,
There's another way to do this that uses the 'standard hole' feature, which means basically that you get to choose a counterbore for a specific fastener size
and then tweak the various dimensions if desired. The only drawback is the actual clearance hole diameter is confined to either 'CLOSE FIT' or 'FREE FIT',
and these dimensions are locked to someone's vague idea of these terms.
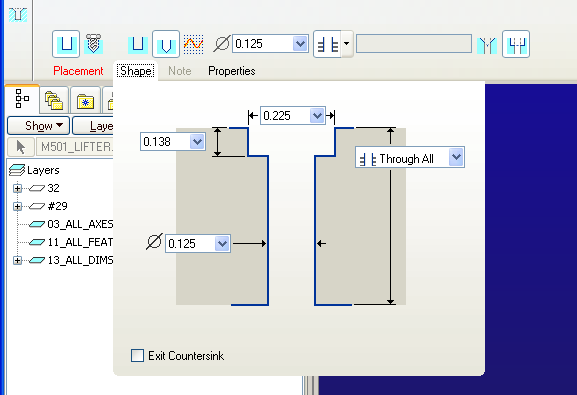
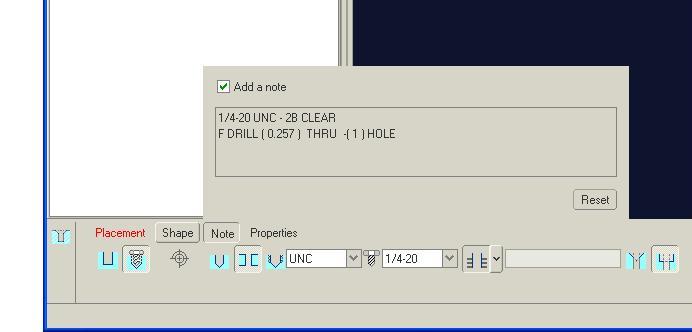
My example uses a 1/4-20 SHCS. The trick lies in the unobvious (is that a word? PTC has made it necessary so now it's a word even if it wasn't)
'DESELECTING' of the TAP icon. This is the little target looking fella below the word SHAPE in the image below. The next step is to SELECT the
clearance hole icon you see depressed (below the P in Properties) and the c'bore icon at the end of the row. Then you can hit SHAPE as in Greg's
illustration and adjust the counterbore within the above limitations.
The only real benefit, if it can be considered such, is that there's an automatic NOTE attached to the feature which can easily be shown in the drawing.
This note has its own frailties and shortcomings, as you might expect, so this is not necessarily a whole-hearted endorsement of this method.
For my money, though, this seems to be PTC's intent for creating a standard counterbore feature and it's the method I use most.
Just another option to consider.
Sep 19, 2010
09:40 AM
- Mark as New
- Bookmark
- Subscribe
- Mute
- Subscribe to RSS Feed
- Permalink
- Notify Moderator
Sep 19, 2010
09:40 AM
As I mentioned before the config.pro option hole_diameter_override will allow you to override the diameter value given in the *.hol table. You can also change the note format and values given in the *.hol table file.
Jun 04, 2012
03:56 PM
- Mark as New
- Bookmark
- Subscribe
- Mute
- Subscribe to RSS Feed
- Permalink
- Notify Moderator
Jun 04, 2012
03:56 PM
How do you get to utilize this note in a drawing?
What toggle do you need to turn on or enable?
Thanks,
Dale Rosema
Jun 07, 2012
10:18 PM
- Mark as New
- Bookmark
- Subscribe
- Mute
- Subscribe to RSS Feed
- Permalink
- Notify Moderator
Jun 07, 2012
10:18 PM
On a drawing you select Show Model Annotations and select the Notes tab in WF5.
Announcements
Top Tags
