
Turn on suggestions
Auto-suggest helps you quickly narrow down your search results by suggesting possible matches as you type.
Showing results for
Please log in to access translation
Turn on suggestions
Auto-suggest helps you quickly narrow down your search results by suggesting possible matches as you type.
Showing results for
- Community
- IoT & Connectivity
- IoT & Connectivity Tips
- Managing and using Localization in ThingWorx
Please log in to access translation
Options
- Subscribe to RSS Feed
- Mark as New
- Mark as Read
- Bookmark
- Subscribe
- Printer Friendly Page
- Notify Moderator
Managing and using Localization in ThingWorx
No ratings
Please log in to access translation
Internationalization and Localization
Internationalization (often abbreviated I18N – from "I" + 18 more letters + "n") is the process of developing software that supports many languages, including those with non-Latin character sets. Localization (L10N) refers to developing applications that can be delivered in many languages, relying on the underlying architecture of I18N. This how-to article focuses mostly on localization, since the infrastructure is in place and stable.
Create a Localization Table
You create a Localization Table entity when you need to add support for another language to the application you're developing. Someone from Sales has said "There's an opportunity if we can deliver the Spiffy application in Estonian." This suggests that an Estonian-speaking end user should be able to run Spiffy and see all of its labels, messages, prompts, dialogs, and so on in Estonian. Most of the cost of adding Estonian language support is in a (usually contracted) service that does the English-to-Estonian (or whatever target language) translations. Such services employ native speakers who can get the nuances of translation correct. See Tips for translators below for suggestions on improving the accuracy of the translation.
In Composer, view the Localization Tables list. Begin by duplicating an existing table (e.g. check Default or another language and click Duplicate) or by clicking New.
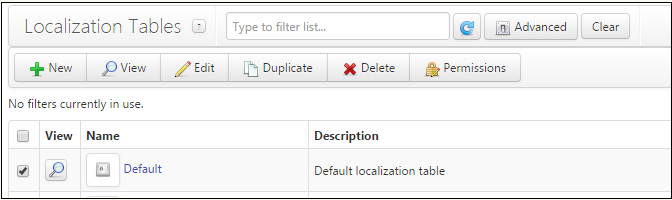
A new tab will open with a New Localization Table in edit mode.
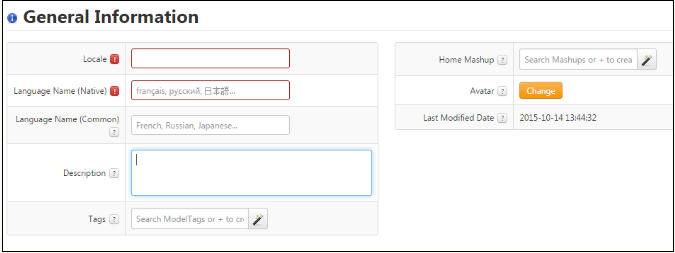
The fields shown are:
- Locale (required). This is the official language tag of the new language. Language tags are defined by an Internet standard, IETF BCP 47. Briefly, they consist of a standard abbreviation for a language (e.g. en for English, de for German), followed optionally by a script subtag (e.g. Cyrl for Cyrilic), followed optionally by a region code (a country code, such as CH for Switzerland or HK for Hong Kong, or a U.N. region number), followed optionally by other qualifiers such as dialect. A simple example is es, Spanish. A complex one is sl-Latn-IT-nedis, Slovenian rendered in Latin characters as spoken in Italy in the Natisone dialect. Software rarely needs such highly specific language tags; the most specific practical examples are the various scripts and regions for Chinese (e.g. zh-Hans-CN, zh-Hant-TW).
- Language Name (Native) (required). This is the name of the language as written in that language, such that it would be readable by a native speaker. For example, 日本語 for Japanese, ਪੰਜਾਬੀ ਦੇ for Punjabi, or Deutsche for German.
- Language Name (Common). This is the name of the language as written in a common administrative language. For an application delivered internationally, English is probably a safe choice. Administrators at a customer site might change these to be in the language of the headquarters country.
- Description. Free form text describing the language. This will appear to end-users as a tooltip as they hover over language choices.
- Tags. Standard ThingWorx entity tags.
- Home Mashup. Does not apply.
- Avatar. An icon for this language. The default is
 . No other icons are delivered as standard, but language selection interfaces in many products use national flags to help distinguish choices, and those could be supplied here. Avatars are 48x48px images. There may be political implications in choosing a flag or other symbol for a language; use caution.
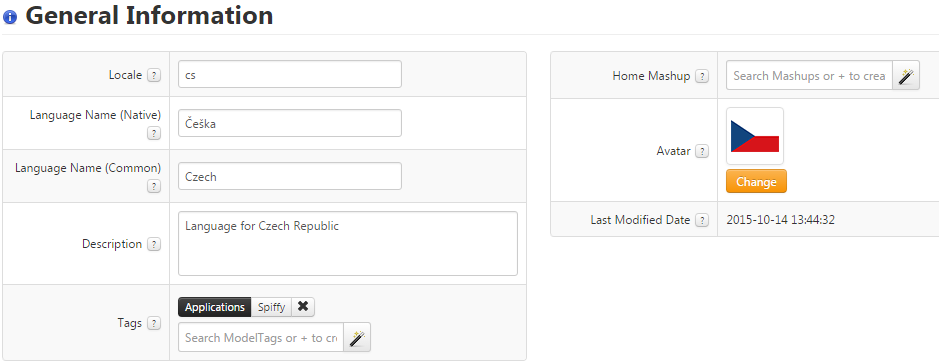
Note that subtags of a language tag are separated by a hyphen, as in zh-Hans-SG. Using underscore is a Java convention that does not conform to BCP 47.A complete properties definition for Czech might look like this:
Once the table has been created and saved, you can edit the translated text in Composer. Under Entity Information, select Localization Tokens. A grid similar to this will appear:
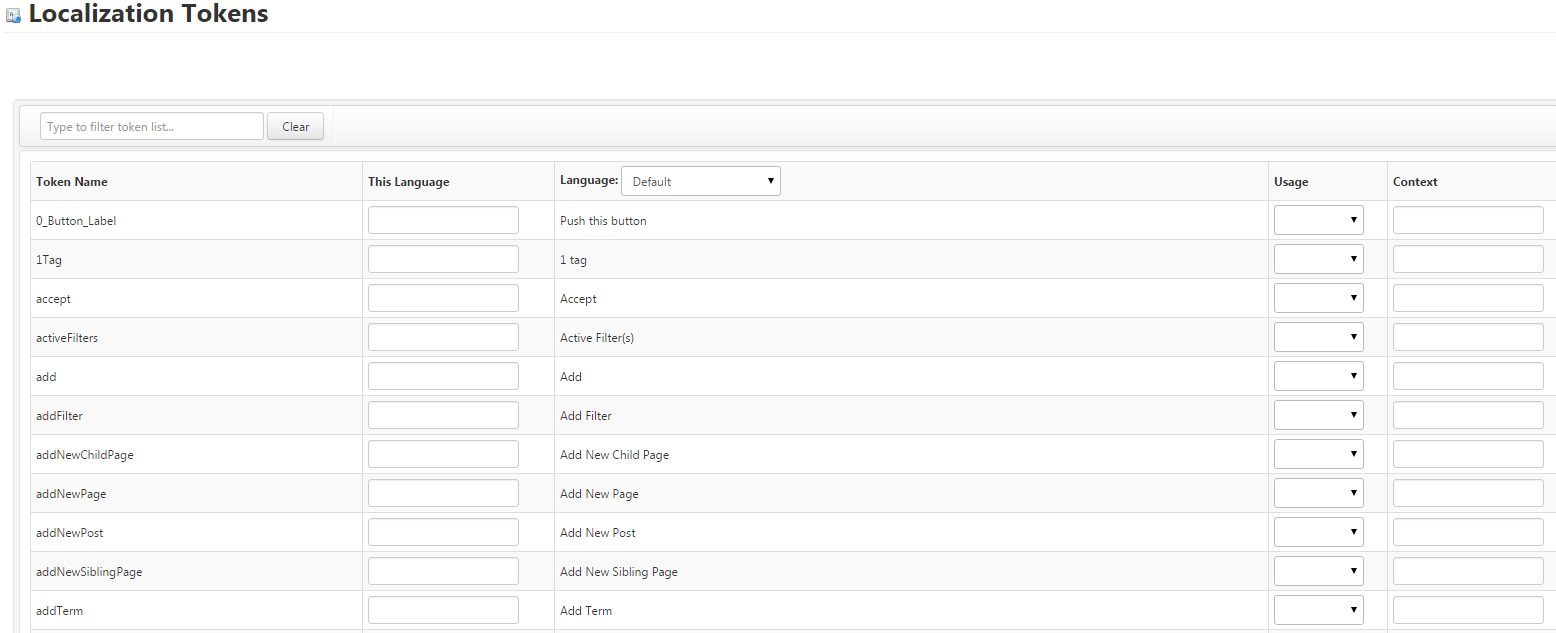
The columns shown are:
- Token Name. This is the symbol used by mashup developers to insert a localized string into a certain place in a widget. For example, no matter how the phrase "Add New Page" is rendered (Neue Seite hinzufügen, Adicionar nova página, 새 페이지 추가...) the application developer is only concerned that the token addNewPage appears on the proper widget. See How tokens are resolved below for more information.
- This Language. How the text is to be represented in this language, that is, the language of the Localization Table currently being viewed or edited.
- Language. How the text has already been represented in any other language currently defined on the system. This is simply for reference purposes, to compare one translation with another.
- Usage. Can be set to Label, Message, or left unspecified. This is a guide to translators, who have to be concerned about the size of translated text. Usage Label suggests that the text needs to fit in a confined space, such as in a column header or on the face of a button. Usage Message suggests that the text is meant for a popup, error message, help, or somewhere that full sentences can be accommodated.
- Context. This is a free-form text field to provide instructions, advice, context, or other explanatory material to the translator. For the token book, for example, the context field can distinguish between the senses of book (something to read), book a table, book a sale, or book a prisoner, which may all have different translations.
Translations can be entered in Composer. However, it's also likely that a third-party translator will do the work without using this editor. See Tips for translators below.
Define language preferences for a user
The reason for localization is to present user interfaces in the best language for a given user. To support this, each ThingWorx user is associated with one or more languages – those that that user can read comfortably. Some applications might offer just one language or a few, some many, and the supported languages may or may not overlap. So each user defines an ordered preference list, saying in effect: my best language is Catalan, but I'm decent in Spanish, and if those aren't available I did spend a few years in Hungary, and as a last resort there was some French in school. This would be represented in ThingWorx as: ca,es,hu,fr. A user from Scotland might have language preference en-UK,en, meaning that English with United Kingdom spellings and vocabulary is best (tyre, windscreen), but if not available then any English will do (tire, windshield). (It is not necessary to spell out related preferences of this type – see How tokens are resolved.) Any application then interacts with a given user in the best language that the application and user have in common.To define the language preference(s) for a user, open the Users list in Composer:
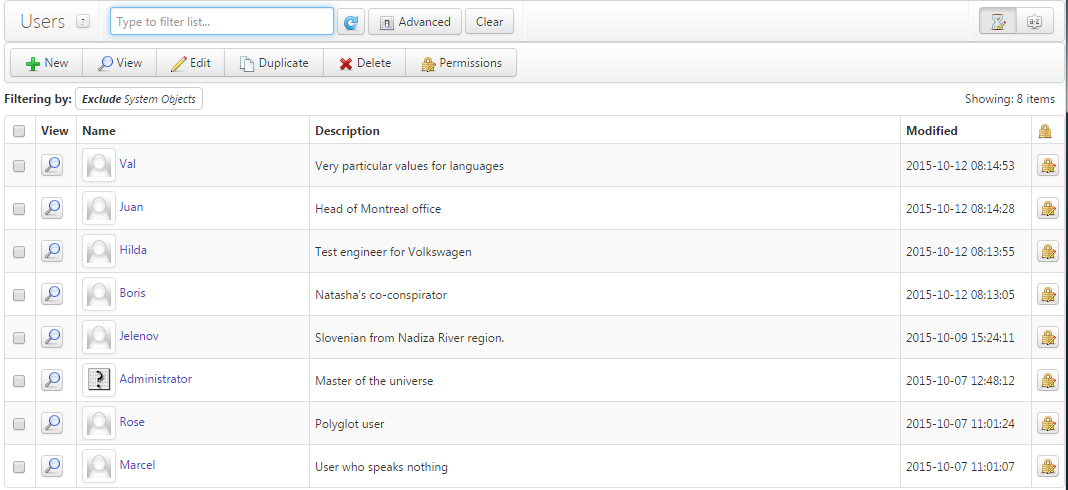
Then choose an existing user to edit, or click New to create a new account.
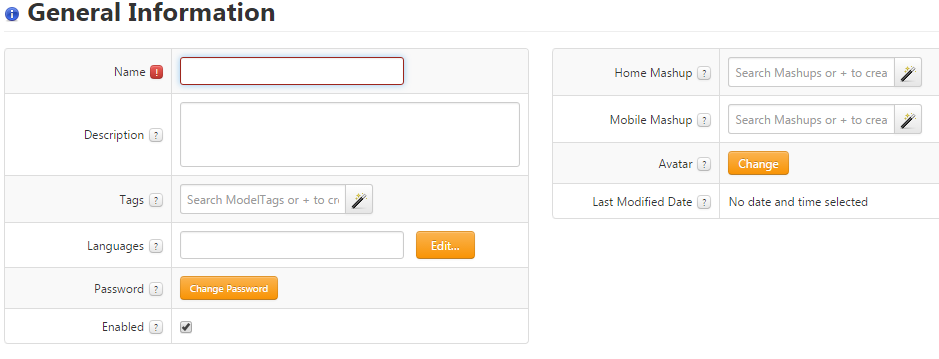
The only localization related information here is the Languages field. An administrator who knows the names of available languages may edit or paste an ordered, comma-separated list into the Languages field (e.g. ca,es,hu,fr-CA). Clicking the Edit... button brings up a drag-and-drop preferences editor:
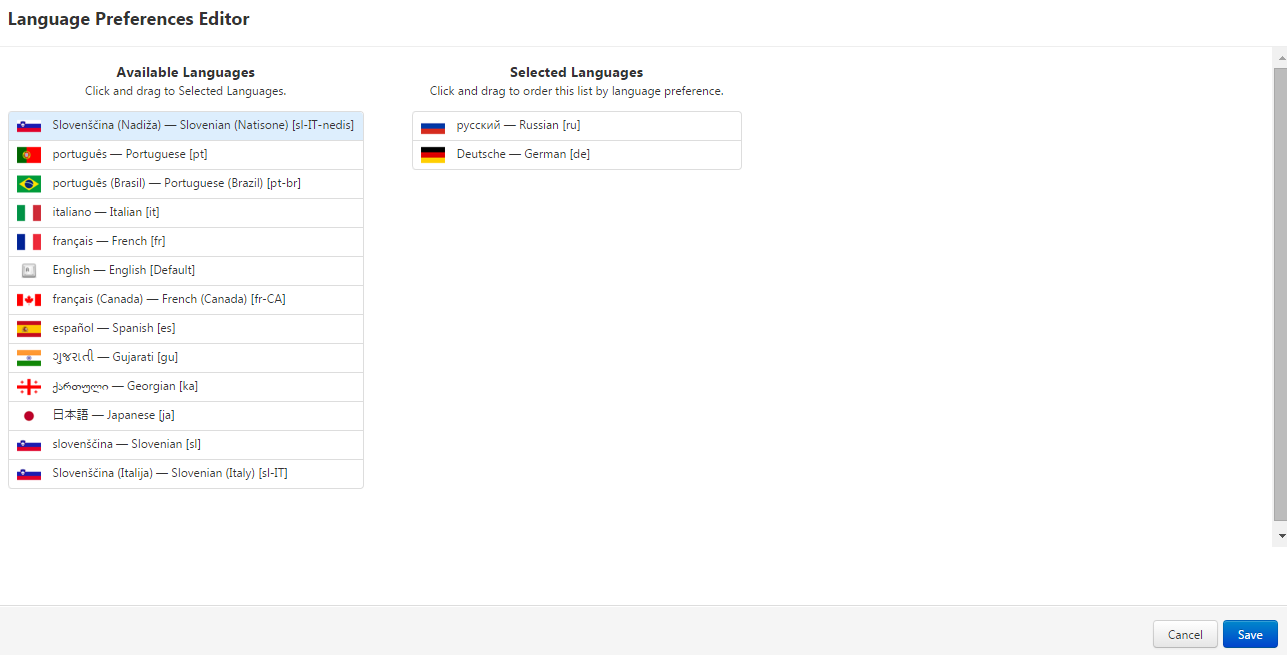
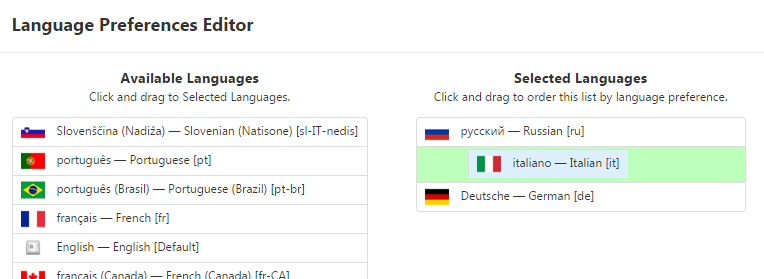
The column on the left shows available (unselected) languages. The column on the right shows this user's languages, with the top entry being the most preferred language. Dragging a language from left to right adds it to the user's list; from right to left removes it; dragging rows up and down on the right changes the preference order. As language entries are dragged, a highlight appears to show where they might be dropped:
A user with no language preference set will have all tokens resolved from the Default and System tables. Language Preferences can be set programmatically, as detailed in KCS Article CS243270.
Localize Mashups
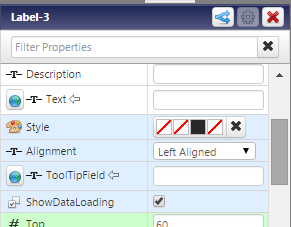
The job of the application developer is to keep hard-coded natural language strings out of applications. To support this, widgets define an attribute isLocalizable: true for widget properties that can contain text. This shows up in the Mashup editor as a globe icon next to each localizable property. In this example, both the Text and ToolTipField properties are localizable:
Clicking the globe icon changes the property from static to localized. The appearance in the Mashup editor changes accordingly:

Clicking the magic wand icon opens the localization token picker:

The list of tokens on the right corresponds to the Token Name column in the Localization Table editor. This is the key that is common to the meaning of a word or phrase, independent of its translation into natural languages. Select one from the list, or click  to create a new one. Enter the token name and its Default (usually English) value:
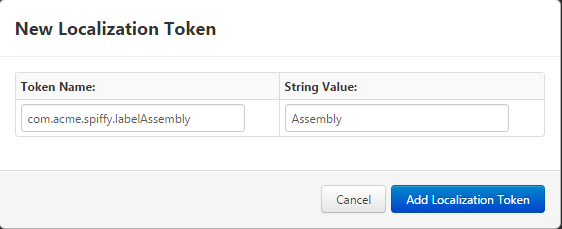
Note that, complying with best practices for extension developers, the token name has been namespaced: this token belongs to Acme Inc.'s Spiffy application. The rest of the name is descriptive and may reflect other development standards.When a new token is created, it becomes available to edit in every configured Localization Table. If these are not updated, then the default (English) value will be shown wherever the token occurs.

How tokens are resolved
What happens at run time when the UI needs to display the value of a localization token? The answer is determined by
- the current user's language preferences
- the set of Localization Tables configured on the system
- the presence or absence of a translation for a given token in a given table
To visualize this, picture the user's language preferences as a stack, with the most preferred language on top and the least one sitting on the floor – where the floor consists of the Default and System Localization Tables:

The user's language preference is fr,pt,ru,hi (French, Portuguese, Russian, Hindi, with French most preferred). The system is configured with Localization Tables, which have no order, for it (Italian), fr-CA (Canadian French), ru (Russian), pt-BR(Brazilian Portuguese), es (Spanish), and the default (likely Engish). Now the UI needs to present this user with the best value for the token com.acme.spiffy.labelAssembly.
To resolve this, we start at the top of the stack. Is there a fr Localization Table? There is. Does it contain a translation for com.acme.spiffy.labelAssembly? For the sake of illustration, assume that it does not – perhaps other applications have French support, but the Spiffy application doesn't, so there aren't any com.acme.spiffy.* tokens in the French Localization Table. So we still need a value. Continuing down through the user's preferences, the next acceptable language is pt. Is there a pt localization table? No. There is a Brazilian Portuguese translation, but that won't help a user from Portugal. Still looking, we move to the next language, ru. Is there a ru Localization Table? There is. Does it contain a translation forcom.acme.spiffy.labelAssembly? It does: Ассамблея – so the token has a value, and that is what gets displayed in the UI.
Suppose that the user's preferences were more specific, something like this:

The users's language preference is fr-CA,pt-BR,ru-Cyrl-RU,sl-Latn-IT-nedis (Canadian French, Brazilian Portuguese, Russian in Cyrillic characters as used in Russia, Slovenian in Latin characters as used in Italy where the Natisone River dialect prevails). ThingWorx treats this by internally expanding the stack to include acceptable fall-back languages. In effect, it looks like:
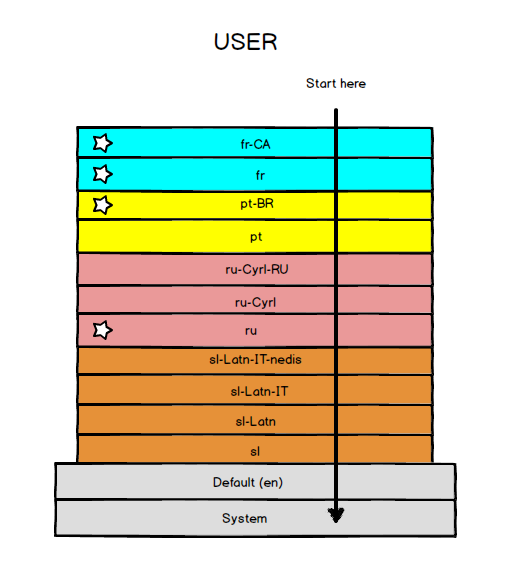
Of the four languages that the user can accept and that the system defines (fr-CA, fr, pt-BR, ru) the first one containing the desired token determines its value in the UI.
Token and translation management for applications
While it's possible to edit localized values using the Localization Table editor in Composer, translations are usually done in bulk by subject-matter experts. While workflow will vary among organizations and projects, the following example illustrates the basic process.
ACME, Inc. is developing a ThingWorx application called Cambot for controlling security cameras. ACME's developer begins by constructing a mashup:
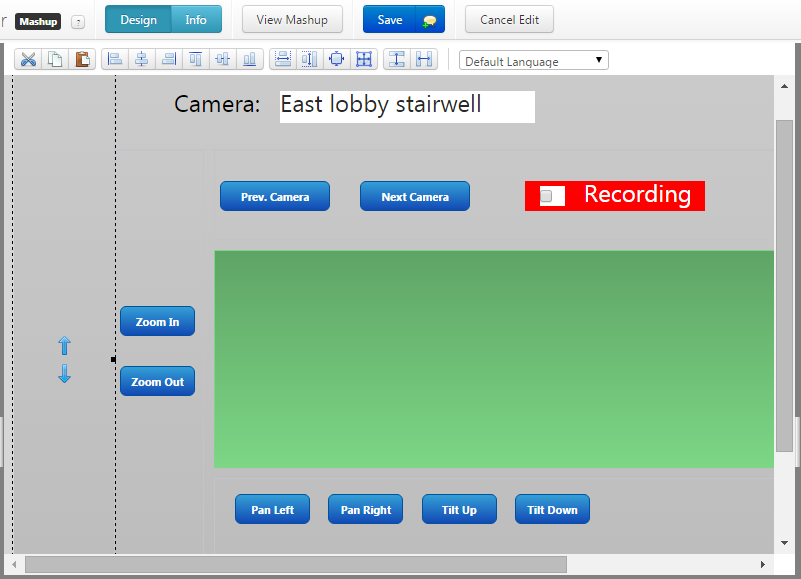
This is the first draft. There is an area for the video widget, to be added later, and some button and label widgets for choosing and controlling a camera. The widgets have been given static labels:
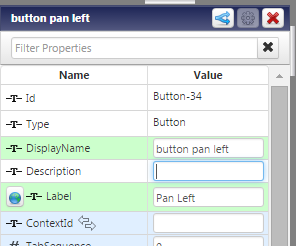
As shown here, the text for the pan left button has been entered simply as "Pan Left."
But the Cambot app needs to be localized, and delivered in English, French, and Spanish. The next step for the developer is to replace all of the static text with localization tokens. Clicking the globe icon to the left of the label property changes the text from static to tokenized:  and adds a magic picker for localization tokens. This is a new application, and will need its own set of localization tokens. To create the one for "Pan Left," click the magic wand to open the tokens picker:
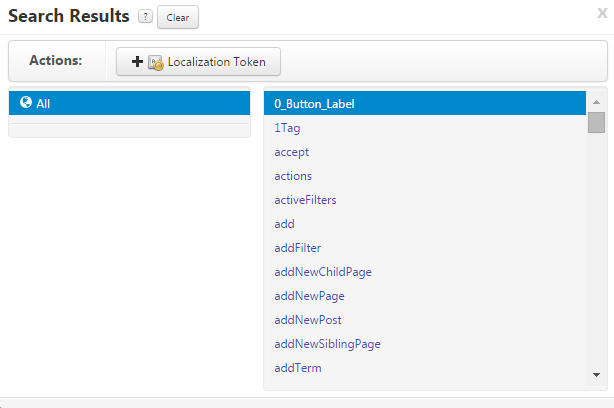
and then click "+ Localization Token" to add a new one. A dialog opens prompting for the token name and its default (English) value:
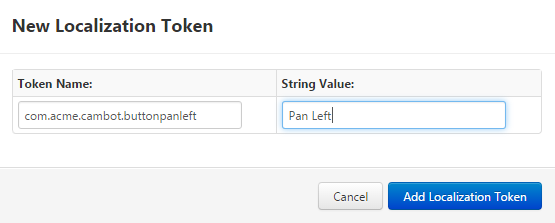
Note that the token name has been namespaced for two reasons: to prevent conflicts with tokens from other sources, and to allow the developer and translators to work only with application-specific tokens. On clicking "Add Localization Token," the token is created and the default value saved. The mashup builder now shows:  .
.
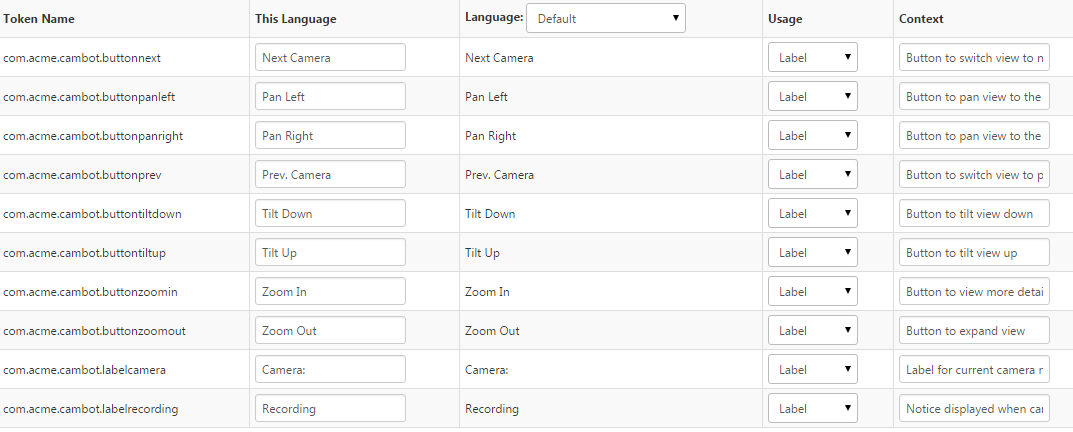
After all of the tokens needed by the application have been defined, they and their values may be seen on the Localization Tokens editor for the Default Localization Table. By entering the namespace prefix in the filter textbox, the display can be restricted to the tokens for this application:
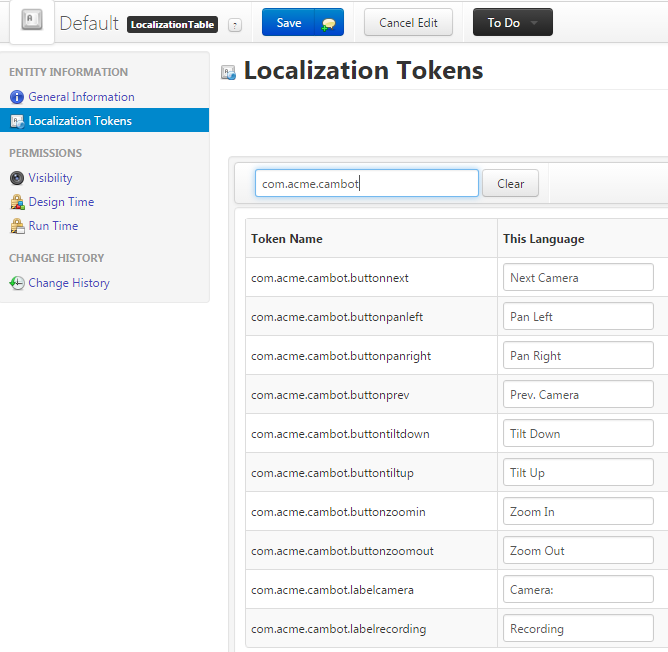
As application development continues, and more tokens are required, this process is repeated. When tokens are defined, the developer should edit the Default Localization Table to supply Usage and Context information for each one:
Finally, it's time to do the translations for French and Spanish. First, create the localization tables for those languages, as described above in "Create a Localization Table."
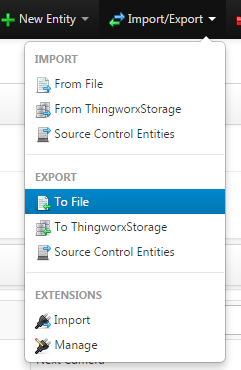
From the Import/Export menu, select EXPORT / To File:
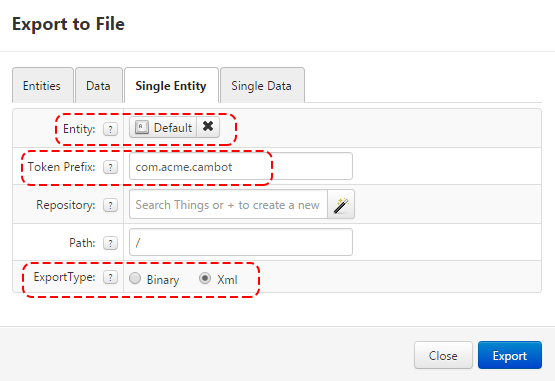
Then, depending on the file format desired, choose either the Entities or Single Entity tab. For Entities, set the Collections value to Localization Tables, enter the namespace in the Token Prefix field, and choose XML as the Export Type:

This will produce a single output file, containing a Localization Table element for every language defined on the system – in this example, English, French, and Spanish -- but including only the com.acme.cambot tokens.
For Single Entity, choose the language to export, specify the prefix, and choose XML:
This must be repeated, once for each language, and creates a separate XML file for each. In either case, the translator should be supplied with the Default XML and the file for the language to be added. (Or, the tokens and values may be converted to and from other formats, depending on the requirements of the translation service. In any case, the translated values must be in the same XML format before they can be imported.)
The Default export file will contain a <Rows> element like this:
<Rows>
<Row>
<usage><![CDATA[label]]></usage>
<name><![CDATA[com.acme.cambot.buttonnext]]></name>
<context><![CDATA[Button to switch view to next camera]]></context>
<value><![CDATA[Next Camera]]></value>
</Row>
<Row>
<usage><![CDATA[label]]></usage>
<name><![CDATA[com.acme.cambot.buttonpanleft]]></name>
<context><![CDATA[Button to pan view to the left]]></context>
<value><![CDATA[Pan Left]]></value>
</Row>
<Row>
<usage><![CDATA[label]]></usage>
<name><![CDATA[com.acme.cambot.buttonpanright]]></name>
<context><![CDATA[Button to pan view to the right]]></context>
<value><![CDATA[Pan Right]]></value>
</Row>
<Row>
<usage><![CDATA[label]]></usage>
<name><![CDATA[com.acme.cambot.buttonprev]]></name>
<context><![CDATA[Button to switch view to previous camera]]></context>
<value><![CDATA[Prev. Camera]]></value>
</Row>
<Row>
<usage><![CDATA[label]]></usage>
<name><![CDATA[com.acme.cambot.buttontiltdown]]></name>
<context><![CDATA[Button to tilt view down]]></context>
<value><![CDATA[Tilt Down]]></value>
</Row>
<Row>
<usage><![CDATA[label]]></usage>
<name><![CDATA[com.acme.cambot.buttontiltup]]></name>
<context><![CDATA[Button to tilt view up]]></context>
<value><![CDATA[Tilt Up]]></value>
</Row>
<Row>
<usage><![CDATA[label]]></usage>
<name><![CDATA[com.acme.cambot.buttonzoomin]]></name>
<context><![CDATA[Button to view more detail]]></context>
<value><![CDATA[Zoom In]]></value>
</Row>
<Row>
<usage><![CDATA[label]]></usage>
<name><![CDATA[com.acme.cambot.buttonzoomout]]></name>
<context><![CDATA[Button to expand view]]></context>
<value><![CDATA[Zoom Out]]></value>
</Row>
<Row>
<usage><![CDATA[label]]></usage>
<name><![CDATA[com.acme.cambot.labelcamera]]></name>
<context><![CDATA[Label for current camera name]]></context>
<value><![CDATA[Camera:]]></value>
</Row>
<Row>
<usage><![CDATA[label]]></usage>
<name><![CDATA[com.acme.cambot.labelrecording]]></name>
<context><![CDATA[Notice displayed when camera is recording]]></context>
<value><![CDATA[Recording]]></value>
</Row>
</Rows>
Whereas the French and Spanish export files will contain an empty <Rows/> element. This is where the new translations should be added.
When the translations are ready, check that the <LocalizationTable> attributes (name, description, languageCommon, languageNative) are correct. Then import the new languages and inspect the results using the Localization Table editor. Localization tables for an application may be bundled into an extension .zip file as other entities are handled; on import, the tokens for the application will be merged with existing localization tables for the same language.
In the case that a brand new language is being introduced, note that many widgets use tokens from the System localization table. These will need to be translated as well – however, there is no easy way to restrict the set of tokens to those actually used. At present this is a manual filtering step. For existing languages, check to see if the System tokens have already been translated.
Important note on character encoding
In handling the export, transmission and editing of XML files, it's important to ensure that UTF-8 encoding is maintained throughout. Encoding problems can show up either as errors when the file is re-imported, or as localized strings with question marks or other unexpected characters in place of accented letters. ThingWorx must run with UTF-8 as the default file encoding. Specify the Java option -Dfile.encoding=UTF-8 on launch.
Windows
In %CATALINA_HOME%\bin\setenv.bat, include this command:
set CATALINA_OPTS=-Dfile.encoding=UTF-8
Tips for translators
Each token in an exported Localization Table XML file is defined by four fields: name, value, usage, and context.
While name might be suggestive, it is actually arbitrary and should not be relied on.
Value contains the natural language value for the token in another language (as agreed upon). Translating from this language into the target language is the object.
Usage hints at constraints on the size of the translated text. ThingWorx widgets do not in general resize to fit contents; so a button label, column heading, field label, etc. may be more difficult to translate. Because the default language is likely to be English, and English is a particularly compact language, the application may have been designed with narrow constraints. Such tokens should be marked as tricky by having a usage value of Label. Tokens with a usage of Message are for strings in more adaptable spaces, such as a texarea, warning message, etc.
Context allows the application developer to provide translation hints. This may disambiguate synonyms, explain usage, discuss space constraints, specify tone of voice, or anything else applicable.
The interesting section of a language's XML representation is contained in the <Rows> element. For example:
<Rows> example
1 2 3 4 5 6 7 8 9 10 11 12 13 14 15 16 17 18 19 20 | <Rows>
|
In this example, the token defined in lines 2 through 7 is missing the translation cues usage and context. The translator's only option is to intuit the sense of "Part" – is it a noun or a verb? – and attempt a reasonable guess. Access to a running example of the application would clearly be helpful. Lines 8 through 13 identify a label and describe how it is used; lines 14 through 19 do the same for a message. The translator would know that space for the translation of "Assembly" might be limited but that the warning message can be expressed naturally.
A translator working on French might then edit this file as follows (again, only the <Rows> element is illustrated):
After translating
1 2 3 4 5 6 7 8 9 10 11 12 13 14 15 16 17 18 19 20 | <Rows>
|
Note that only the <value> elements need to be translated – the context and usage are hints for the translator.
System tokens for international data formats
There are several tokens used for formatting that are also subject to localization.
| Token | Default value | Notes |
|---|---|---|
| datepickerDayNamesMin | Su,Mo,Tu,We,Th,Fr,Sa | Day-of-week abbreviations used in calendar heading. |
| datepickerFirstDay | 0 | First day of the week, 0 for Sunday, 1 for Monday... |
| datepickerMonthNames | January,February,March,April,May,June,July,August,September,October,November,December | Month names used in calendar heading. |
| dateTimeFormat_Default | yyyy-MM-dd HH:mm:ss | Date and time format codes are defined by the moment.js library. |
| dateTimeFormat_FullDateTime | LLLL | |
| dateTimeFormat_LongDate | LL | |
| dateTimeFormat_LongDateTime | LLL | |
| dateTimeFormat_MediumDate | ll | |
| dateTimeFormat_ShortDate | l | |
| dateTimeFormat_TimeOnly | LT | |
| shortDateFormat | mm/DD/yyyy |
See also KCS Article CS241828 for details about numeric localization.
Allowing users to set their own language preferences
It may not be practical for the Administrator to set the language preferences for each user. An application may elect to expose the preferences editor to the end user, so that each user may select from the available languages those that are useful.
To support this, ThingWorx Composer offers a Preferences widget in the Mashup builder. The widget may be inserted into any application wherever the designer chooses. It may be tied to a button or menu item, or simply appear in a layout with other widgets – perhaps along with application-specific preferences and other settings.
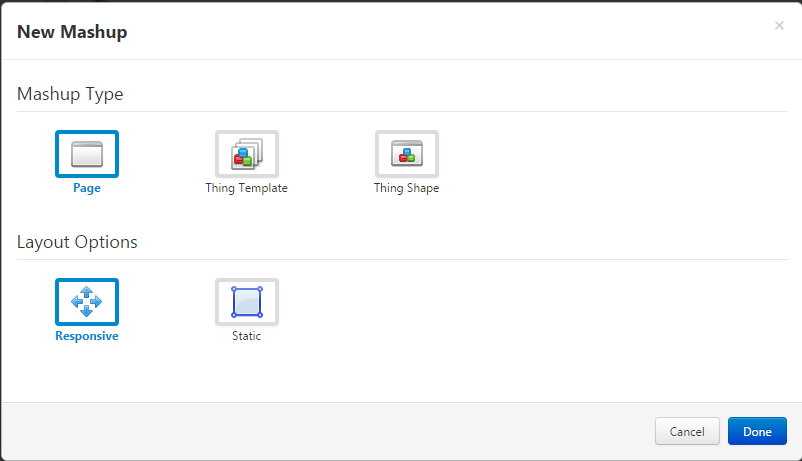
To use the Preferences widget, design a mashup for it to appear in. The minimal case would be a responsive page mashup containing nothing but the preferences widget.
Add the Preferences widget by dragging it into place:

A placeholder for the widget appears in the mashup:
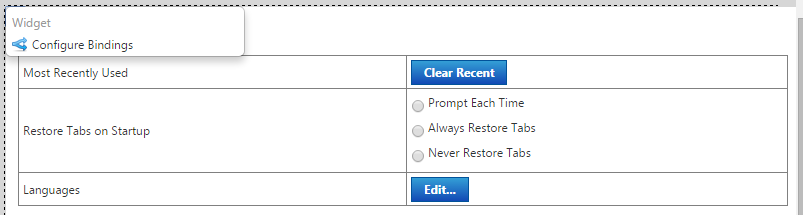
The widget may be customized by setting various properties:
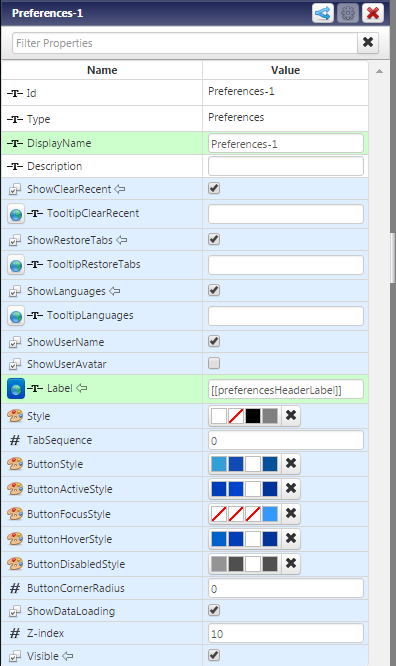
These properties are specific to the Preferences widget:
- ShowClearRecent: Check this to include the option for the user to clear the Most Recently Used history. You may specify a localized tooltip.
- ShowRestoreTabs: Check this to include the option for the user to set tab restoration to ask, always, or never. You may specify a localized tooltip.
- ShowLanguages: Check this to include the option for the user to edit language preferences. You may specify a localized tooltip.
- ShowUserName: Check this to label the preferences widget with the user's name.
- ShowUserAvatar: Check this to label the preferences widget with the user's avatar, if one is defined.
- Style: Style the preferences widget itself.
- ButtonStyle: Style the Clear Recent and Edit buttons. These should probably be set to the application's primary button style.
After adding the Preferences widget to a mashup, provide some way for the user to navigate to it, consistent with the application's UI design. The mashup may be tied to a menu entry, or assigned to a Navigation widget, or included in a page within the application's workflow – whatever suits the application design. Here is an example of providing access to preferences through a button in the application's title area:
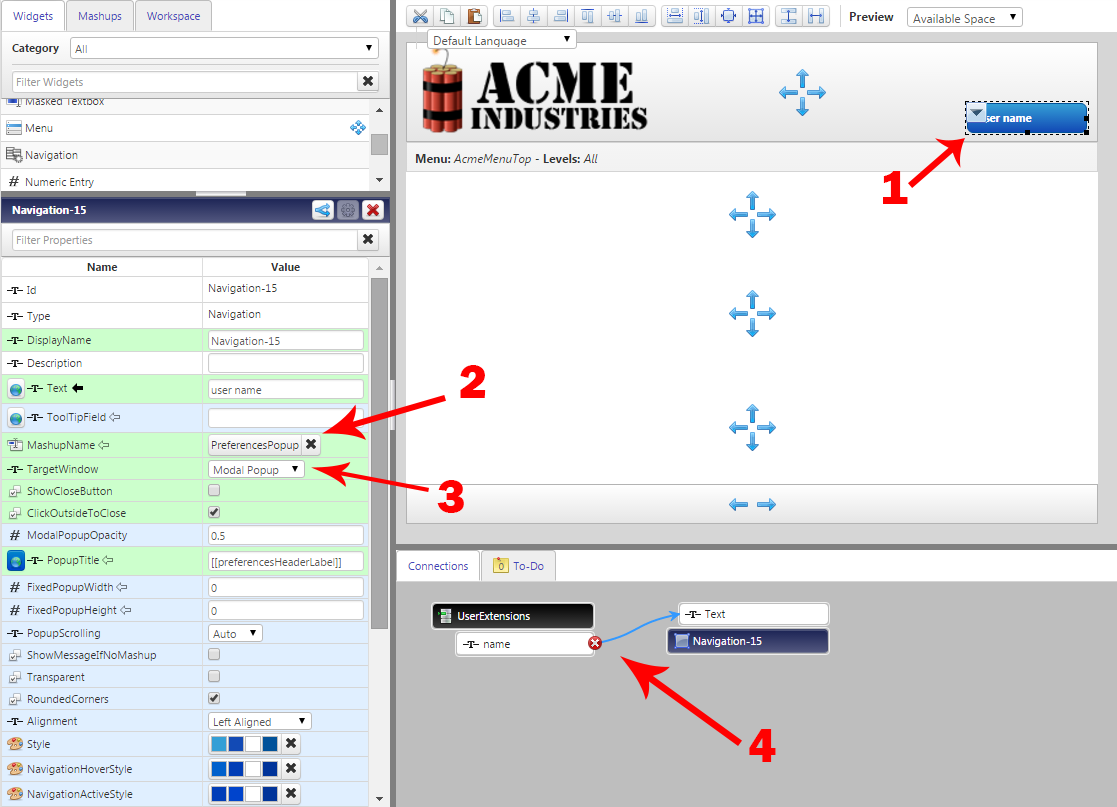
1) The Navigation widget is placed in the page header.
2) The MashupName property is set to the mashup containing a Preferences widget.
3) The TargetWindow property is set to Modal Popup.
4) For a more interesting UI, the button label is bound from the user's name.
At runtime, the example looks like this:
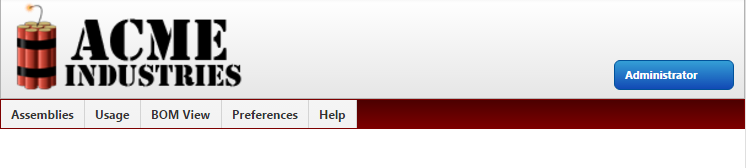
Note that there is also a menu item leading to the mashup with the Preferences widget.
Comments
Aug 16, 2016
07:57 AM
- Mark as Read
- Mark as New
- Bookmark
- Permalink
- Notify Moderator
Please log in to access translation
Aug 16, 2016
07:57 AM
All your images are referencing to thingworx jira. I assume most, if not all of the users here do not have access to this. Please can you change this and duplicate the images. You can reach me on Skype Business, if you want to have a look how it is presented here.
Aug 16, 2016
11:25 AM
- Mark as Read
- Mark as New
- Bookmark
- Permalink
- Notify Moderator
Please log in to access translation
Aug 16, 2016
11:25 AM
The images are now stored on the Community site itself and so should be publicly viewable. Please let me know if you spot any further issues.
Aug 17, 2016
02:25 AM
- Mark as Read
- Mark as New
- Bookmark
- Permalink
- Notify Moderator
Please log in to access translation
Aug 17, 2016
02:25 AM
Solved! Working now
Dec 13, 2018
03:59 AM
- Mark as Read
- Mark as New
- Bookmark
- Permalink
- Notify Moderator
Please log in to access translation
Dec 13, 2018
03:59 AM
Hi,
When we export the localization tables from one TWX instance to another, does it just add the not repeated "delta" tokens or does it replace the whole table?
Thanks
