Community Tip - Stay updated on what is happening on the PTC Community by subscribing to PTC Community Announcements. X
- Community
- PLM
- Windchill Discussions
- Did You Know? Integrating Multiple Models into a S...
- Subscribe to RSS Feed
- Mark Topic as New
- Mark Topic as Read
- Float this Topic for Current User
- Bookmark
- Subscribe
- Mute
- Printer Friendly Page
Did You Know? Integrating Multiple Models into a Single Design
- Mark as New
- Bookmark
- Subscribe
- Mute
- Subscribe to RSS Feed
- Permalink
- Notify Moderator
Did You Know? Integrating Multiple Models into a Single Design
The ‘Did You Know?’ series focuses on providing PTC Windchill users with informative, “how-to” tips to help them get the most out of their software. Today, PTC application expert John Peng shows us how to integrate features from multiple models using PTC Windchill PDMLink.
Before you begin, follow these five steps to ensure you are properly set-up.
- Have at least one saved version of the model in PTC Windchill 9.0 M030+ or higher.
- Create two workspaces that have the same version (in this example it is A.1) of the model added to them.
- Start PTC Creo Parametric 2.0 linked to one of the workspaces and save a newly modified or different iteration. Repeat for the second workspace.
- Check-in one of those iterations into PTC Windchill (in this example it is A.2) to make the iteration in the other workspace that is out-of-date.
- Have PTC Creo Parametric 2.0 tied to the workspace with the out-of-date model.
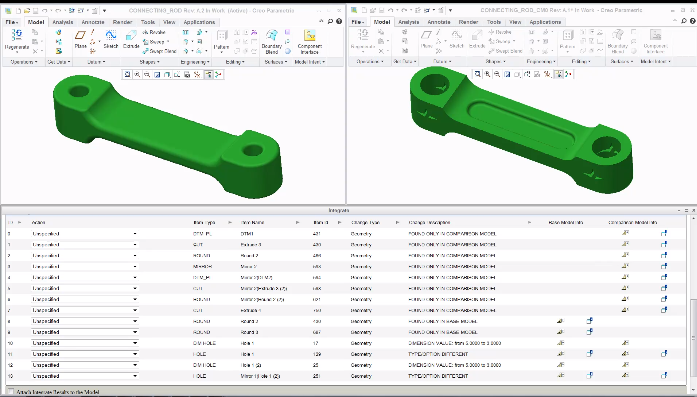
To help you follow along, shrink the “base model” (version A.2) dialogue box and move it to the upper left hand corner of your screen. Then take the “integrate differences box” and stretch it across the entire bottom half of your screen. Finally, take your current version (the one you are making the changes to), which we’ll call the “comparison model”, and drag it to the upper left hand corner of your screen. It should look something like this.

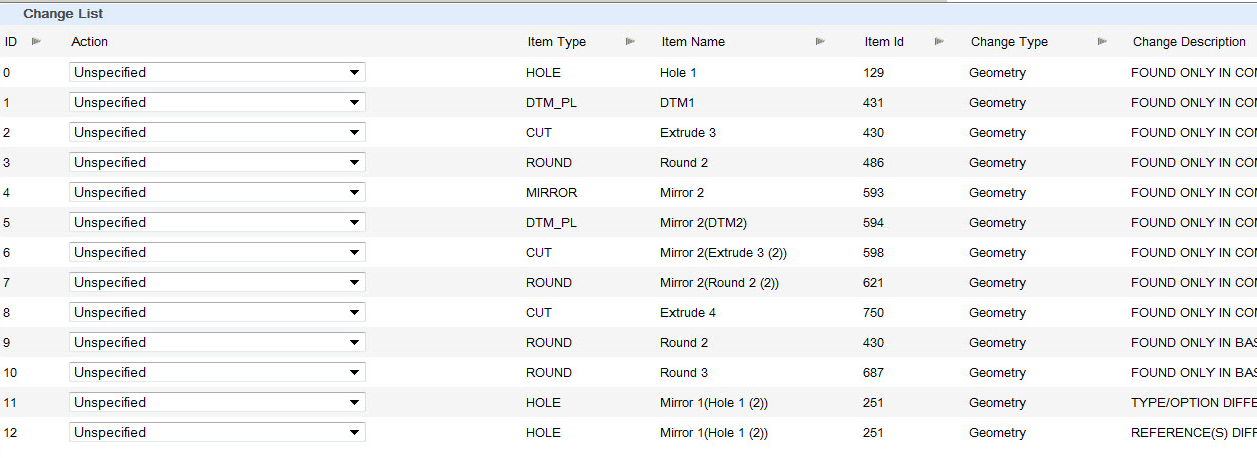
Now, let's begin the model integration process. First, you'll want to filter for geometry differences by checking “geometry” in the integrate differences box; scroll down to identify the main geometry differences between the base model and the comparison model.

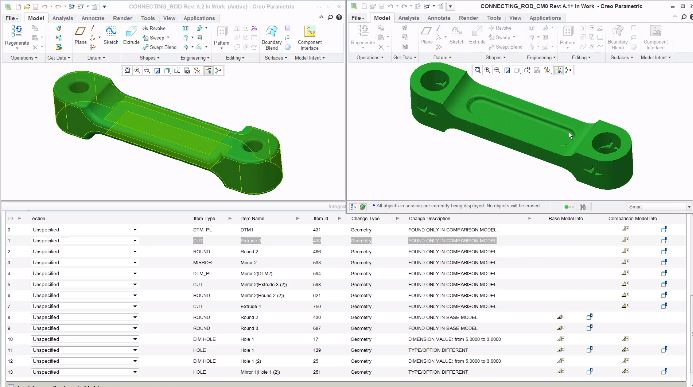
To bring a feature that's unique to the comparison model over to the base model, simply highlight the row of information for that feature.
Note: When you highlight a feature row in the integrate differences box, that feature will also highlight in the actual model.
To keep this change click the “Action” dropdown menu and select “take from comparison model”. Then click “Execute” found at the bottom right hand side of the differences box. You've now brought a feature over from the comparison model to the base model.

Continue by going down the list - line item by line item - to look at all the differences between the two models. Remember to refresh your screen so that when you click to highlight features, any differences will be graphically pointed out for you in the model as well. As you do this you can decide which features you want to keep and which ones you want to move to the comparison model.
To recap:
- Highlight the unique feature in the comparison model that you want to keep
- Click the “Action” list dropdown
- Select option for “take from the comparison model”
- Click “Execute” at bottom right side of screen
- Refresh your screen before highlighting your next feature
To walk through these steps following John Peng’s video tutorial in action (“Quick Start to Creating Multiple Models into Single Design), sign-in or create an account on the PTC University Learning Exchange.
- Mark as New
- Bookmark
- Subscribe
- Mute
- Subscribe to RSS Feed
- Permalink
- Notify Moderator
Better title - "How to integrate minor changes to the same base model made by different users?"
- Mark as New
- Bookmark
- Subscribe
- Mute
- Subscribe to RSS Feed
- Permalink
- Notify Moderator
Sure would be nice if this could be done between different models that don't have the same name.


