Community Tip - Learn all about the Community Ranking System, a fun gamification element of the PTC Community. X
- Community
- Creo+ and Creo Parametric
- 3D Part & Assembly Design
- Fill pattern tips or tricks
- Subscribe to RSS Feed
- Mark Topic as New
- Mark Topic as Read
- Float this Topic for Current User
- Bookmark
- Subscribe
- Mute
- Printer Friendly Page
Fill pattern tips or tricks
- Mark as New
- Bookmark
- Subscribe
- Mute
- Subscribe to RSS Feed
- Permalink
- Notify Moderator
Fill pattern tips or tricks
i hardly use fill pattern at work so i dont know how reations can controle patterns... if u know anything even basic it will be helpful thanx
This thread is inactive and closed by the PTC Community Management Team. If you would like to provide a reply and re-open this thread, please notify the moderator and reference the thread. You may also use "Start a topic" button to ask a new question. Please be sure to include what version of the PTC product you are using so another community member knowledgeable about your version may be able to assist.
- Mark as New
- Bookmark
- Subscribe
- Mute
- Subscribe to RSS Feed
- Permalink
- Notify Moderator
Hello!
I hope these links would be useful for you:
http://learningexchange.ptc.com/tutorial/778/using-the-fill-pattern-tool
- Mark as New
- Bookmark
- Subscribe
- Mute
- Subscribe to RSS Feed
- Permalink
- Notify Moderator
- Mark as New
- Bookmark
- Subscribe
- Mute
- Subscribe to RSS Feed
- Permalink
- Notify Moderator
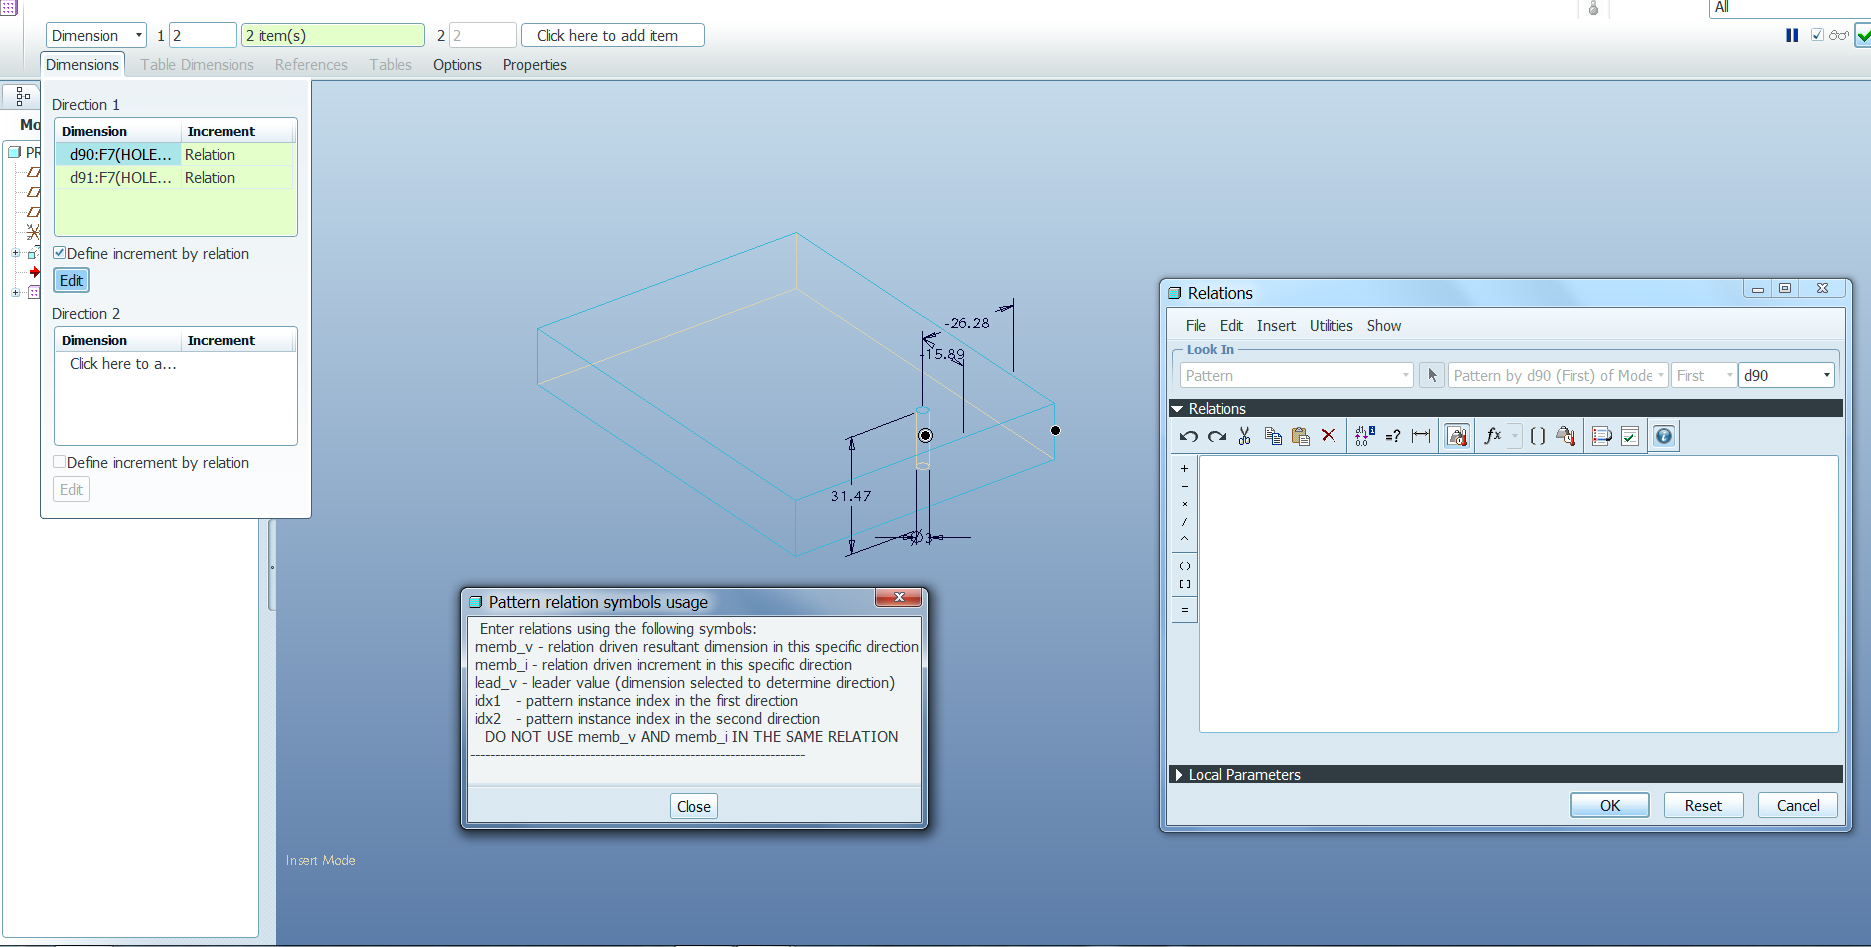
Please take a look here (chapter "Using Pattern Relations" in "Pro/ENGINEER Wildfire 5.0 Advanced Tutorial"):
- Mark as New
- Bookmark
- Subscribe
- Mute
- Subscribe to RSS Feed
- Permalink
- Notify Moderator
thanx agian VladimirN. do you hv pdf of this the link u gv is not showinging all pages
- Mark as New
- Bookmark
- Subscribe
- Mute
- Subscribe to RSS Feed
- Permalink
- Notify Moderator
No, I do not have this book in PDF. The book can be ordered at "SDC Publications" site, and there you can find complete first chapter in PDF:
http://www.sdcpublications.com/Textbooks/ProENGINEER-Wildfire-5-0-Advanced/ISBN/978-1-58503-540-3/
http://www.sdcpublications.com/pdfsample/978-1-58503-540-3-1.pdf
- Mark as New
- Bookmark
- Subscribe
- Mute
- Subscribe to RSS Feed
- Permalink
- Notify Moderator
hmmmm i'll keep it in my last option... do u know how to use relations if yes i'll be glad if u upload any prt file here...
- Mark as New
- Bookmark
- Subscribe
- Mute
- Subscribe to RSS Feed
- Permalink
- Notify Moderator
if anybody knows plz share...

- Mark as New
- Bookmark
- Subscribe
- Mute
- Subscribe to RSS Feed
- Permalink
- Notify Moderator
Hi Dalbeer...
I can help you with this. Some of the newer fill tools are much nicer but I can still dig up information on the pattern relations. Before the fill tools were released, pattern relations were the only way to go if you wanted to create a complex pattern without manually locating all the features.
With all due respect to Vladimir...don't waste your money on books. I'm stirring up trouble saying this but these books are nothing but a cash grab. They're glorified help files. Anyone with a bit of time to spare can go down the list of features in Pro/E, write a two-sentence blurb about each of them, and call it a "book". Most of these books don't do much beyond repackaging the same lame information the free PTC help files already give you.
The books don't teach you when to use the different features or why. They don't spell out the trade-offs and help you really understand when to choose one feature over another. Often it comes down to design intent and what you're trying to achieve. No book really captures this. If anyone DID try to capture this knowledge in a book, the book would be thousands of pages... and no one would read it.
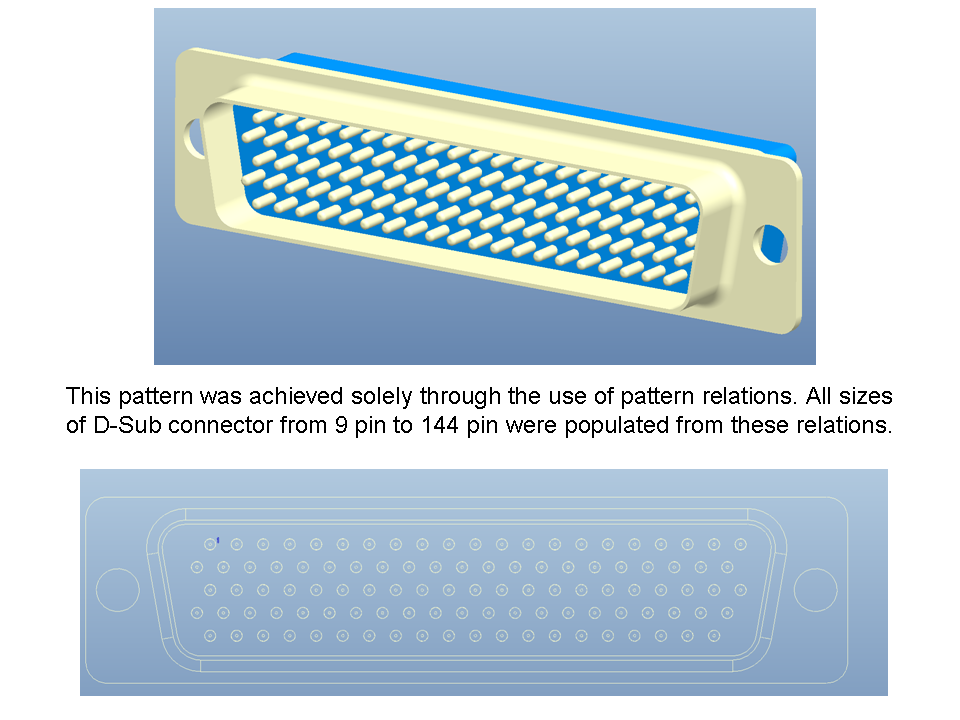
The best way to learn these tools is to read the help files, ask questions here and other free sites, and investigate on your own. If you really want to learn all about pattern relations, I'll be happy to teach you what I know. The image below shows a d-subminiature connector with a pattern or pins created from pattern relations.
Do you have an idea for a specific pattern you're trying to create... or do you just need basic general information? Let me know and I'll try to help.
Thanks!
-Brian

- Mark as New
- Bookmark
- Subscribe
- Mute
- Subscribe to RSS Feed
- Permalink
- Notify Moderator
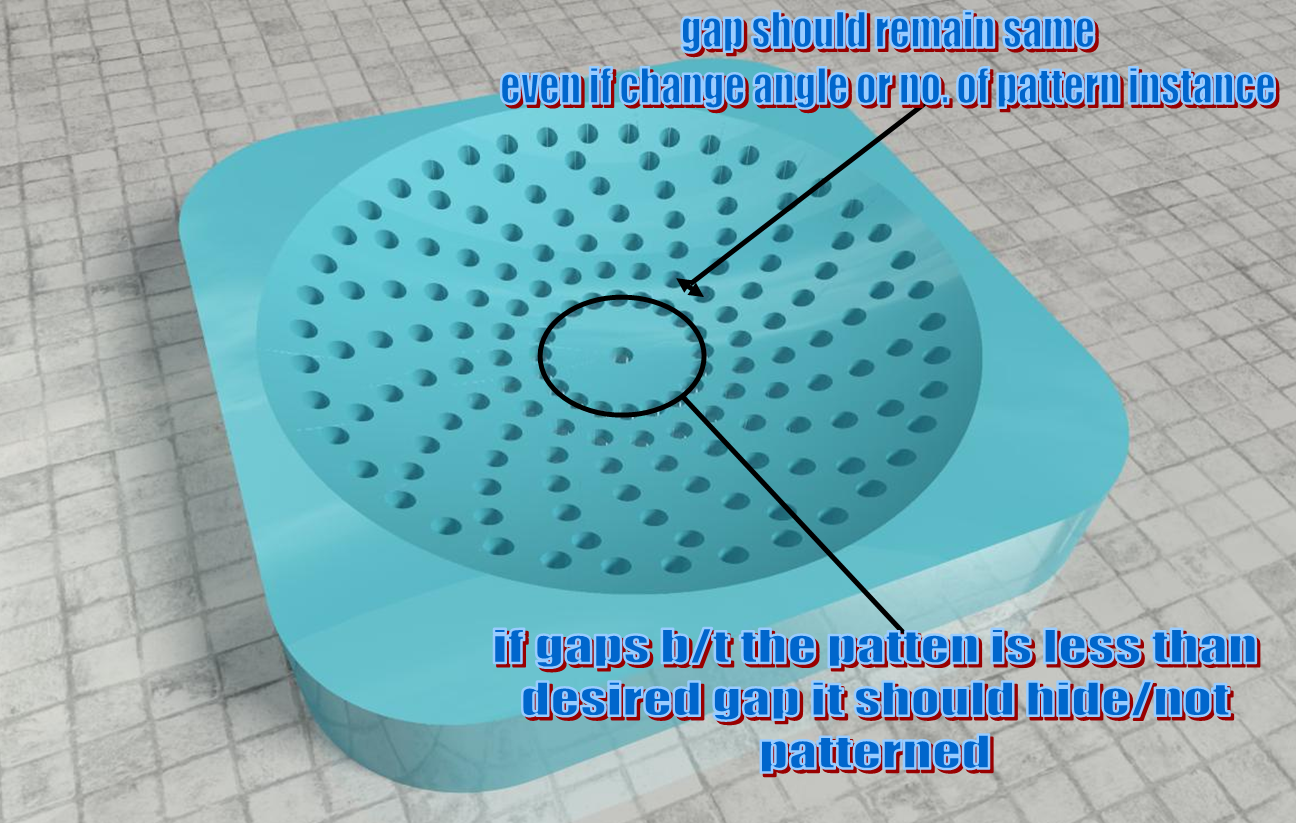
i do need help in this and if u plz look at the pic given below

this is a soap tray, I made an curve pattern and then select that pattern to make an axis pattern.. Now wat i want to do is to keep the equal desired distance between bottom holes even if i change its angle, pattern instances or curve patten instances...
and plz do give me a basic tour of relation pattern too.
- Mark as New
- Bookmark
- Subscribe
- Mute
- Subscribe to RSS Feed
- Permalink
- Notify Moderator
Hi Dalbeer...
Hmm... interesting pattern you have here. I will certainly give you an introduction to the pattern relations I still have a few questions about what you're trying to do:
- When you say the gap should remain the same... do you mean you always want the same distance apart. For instance... always keep them .060 apart no matter what. OR do you mean always keep the spacing equal. for instance if there were only 4 curves being patterned you'd want them at 90 degree increments... but if there were 12, you'd want them at 30 degree increments instead (to always keep them equal).
If you want the second option, there's already a way tro do that within an Axis Pattern. You can hit the "equal spacing" button and achieve this. I'll take a screenshot if you don't already know where it is.
- You said if the pattern is LESS than the desired gap, hide/not pattern the holes. Do you mean you'd like for this thing to figure out how many curves can be patterned while maintaining the minimum hole-to-hole distance? We can do this with a pattern relation. We can also do it with a regular measurement/analysis feature and a straight model relation (not a pattern relation).
Help me out with the answers to those questions so I can approach your problem in a way that's the most efficient and helpful for you. I don't want to waste your time by covering information not relevant to solving your problem.
I'll start working up a pattern relation based on your reply (if that's how you want to proceed). I'll also start working on a brief primer for you to learn the pattern relations.
Thanks!
-Brian
- Mark as New
- Bookmark
- Subscribe
- Mute
- Subscribe to RSS Feed
- Permalink
- Notify Moderator
thanx for ur quick replies Brian...
it the first option that u mentioned i need equal diatance between holes plus this thing to figure out how many pattern on curve can be patterned while maintaining the minimum hole-to-hole distance. i hope it makes clear...
let me tell u one thing more my english is not that good.. but hope i made it clear to u. ![]()
- Mark as New
- Bookmark
- Subscribe
- Mute
- Subscribe to RSS Feed
- Permalink
- Notify Moderator
Thanks Dalbeer...
I'm working on it. I have a co-worker who's crushing my will to live today... I apologize for the delay. I'll take a look at your part.
-Brian
- Mark as New
- Bookmark
- Subscribe
- Mute
- Subscribe to RSS Feed
- Permalink
- Notify Moderator
Wow Dalbeer...
If this is even possible, it's going to take a good bit of pattern relations to accomplish. I believe I'll need to use your curve to perform some analysis that lets me derive the appropriate spacing. then I can apply those values to the pattern... I think.
I'm still not completely sure how automatic you want to make this pattern. I can make a nice, even pattern to fill in the area with holes... but varying the curve, angle, spacing, and hole size gets tough. Maybe you can convince your employer to settle for a nice spiral? ![]() It's much easier!
It's much easier!
You will not be able to use pattern relations with an AXIS pattern. So we'll have to make a dimensional pattern which relies on the dimensions of the hole for it's variance. So far, I've managed to duplicate your pattern using this technique. It's quite a bit more complex to start tweaking the variables while having Pro/E automatically figure out the proper pattern.
I'll keep working on it.
Thanks!
-Brian
- Mark as New
- Bookmark
- Subscribe
- Mute
- Subscribe to RSS Feed
- Permalink
- Notify Moderator
i made it by curve pattern and axis pattern cause i didnt know how to make this in fill pattern. i need same result doesnt matter wat other technice we will use. this comlex pattern is used by a company almost every product it made.. so uses it often and i hv to make modifications contiusly..
they were using SW and person on seat do it with ease.
- Mark as New
- Bookmark
- Subscribe
- Mute
- Subscribe to RSS Feed
- Permalink
- Notify Moderator
just came up with a new solution ![]() but
but ![]() hv to go to skt mode to increase or descrease no of holes.
hv to go to skt mode to increase or descrease no of holes.
use parameters for patterns but it's not in fill pattern agian i use axis pattern with some relation if its possible in fill pattern will be great cause i can edit dynamicaly in one single feature..
- Mark as New
- Bookmark
- Subscribe
- Mute
- Subscribe to RSS Feed
- Permalink
- Notify Moderator
I was going to suggest setting basic dimensions via a sketch and then using a pattern to complete the rest of the holes. I've managed to create this pattern several different ways. I am still playing with it trying to determine the easiest way for you to proceed.
Now that you've mentioned SolidWorks, I want to find a solution even more. I'm rather sick of SolidWorks people acting like they can model a scale version of the EARTH with one button in their package. SolidWorks has a few strong areas... but to hear SW people talk the package allows them to walk on water.
I'll go a bit further than stop and document what I have. Maybe you'll see something in what I've already accomplished which will give you what you're looking for.
Thanks!
-Brian
- Mark as New
- Bookmark
- Subscribe
- Mute
- Subscribe to RSS Feed
- Permalink
- Notify Moderator
I love solidworks,but I prefer powerpoint. ![]()
- Mark as New
- Bookmark
- Subscribe
- Mute
- Subscribe to RSS Feed
- Permalink
- Notify Moderator
I've looked at this new model. There's no curvature to the radial holes. Is this intentional?
The benefit of the pattern along the curve is that you can set the SPACING or you can set the NUMBER of features you want to pattern. You can say... pattern items 3mm apart OR you can say pattern 6 items equally along the length.
So far here's my approach...
(1) Add a model parameter called "MIN_SPACING" making it a real number. This will be your minimum center-to-center hole spacing for every hole in your pattern.
(2) Sketch the CURVE first representing the shape of the radial "arms" of holes.
(3) Measure the curve's length.
(4) Place the first hole of a given diameter (say 3mm). I'll place this hole by DIAMETER so I can incorporate an angle and a diameter dimension from the center of the part.
(5) Pattern the hole along the curve by SPACING. The spacing will be determined by the MIN_SPACING parameter in step 1, the length of the curve from step 2, and the diameter of the hole (3mm) from step 4.
(6) Using the diameter dimension and hole diameter from step 5, calculate how many holes can fit next to each other near the center of the part without violating the MIN_SPACING from step 1.
(7) Pattern the "Curve Pattern" from step 5 varying the number of items in the pattern using the value from step 6.
This should allow for continuous variations to the curve, hole diameter, center spacing, and MIN_SPACING dimension while assuring your patterns always work.
I need to show this to you... I realize it's hard to understand what I'm saying in words alone.
- Mark as New
- Bookmark
- Subscribe
- Mute
- Subscribe to RSS Feed
- Permalink
- Notify Moderator
Hi Dalbeer...
Let's jump right in. I hope this gets you where you want to go... click the slides for larger versions so you can read the text. I'll try to upload the modified model in a separate mesage.
- Mark as New
- Bookmark
- Subscribe
- Mute
- Subscribe to RSS Feed
- Permalink
- Notify Moderator
Here's the model Sorry I should have put it in the last message. I wasn't seeing the upload button!
I really hope this nails it for you.
Thanks again...
-Brian
- Mark as New
- Bookmark
- Subscribe
- Mute
- Subscribe to RSS Feed
- Permalink
- Notify Moderator
made a little change in slide one... it will keep patten in controlled limit and geomatry. added an outer limit cicle and divied the curve into two.
- Mark as New
- Bookmark
- Subscribe
- Mute
- Subscribe to RSS Feed
- Permalink
- Notify Moderator
awsome presentation!!! good solution..![]() thanx
thanx
but can we do it in single feature.. so that we can see changes dynamicaly??? i'm still working on that...
i'm not aware of relation pattern if u could share how that pin work is done ![]() u mentioned here earler it might help me
u mentioned here earler it might help me
- Mark as New
- Bookmark
- Subscribe
- Mute
- Subscribe to RSS Feed
- Permalink
- Notify Moderator
Hi Dalbeer...
Performing this type of pattern in a single feature (meaning a single pattern) would be tough. I'm not sure it's impossible but it would be significantly difficult. I'll go through the pattern relations as promised in the next reply. If it seems like I'm avoiding it... you're right! It's like giving someone a tour of a swamp... you'd rather not give the tour because it's not very exciting, the swamp is smelly, and in the end there are very few good reasons to go there in the first place! I can tell you're still interested though so I'll try to explain it.
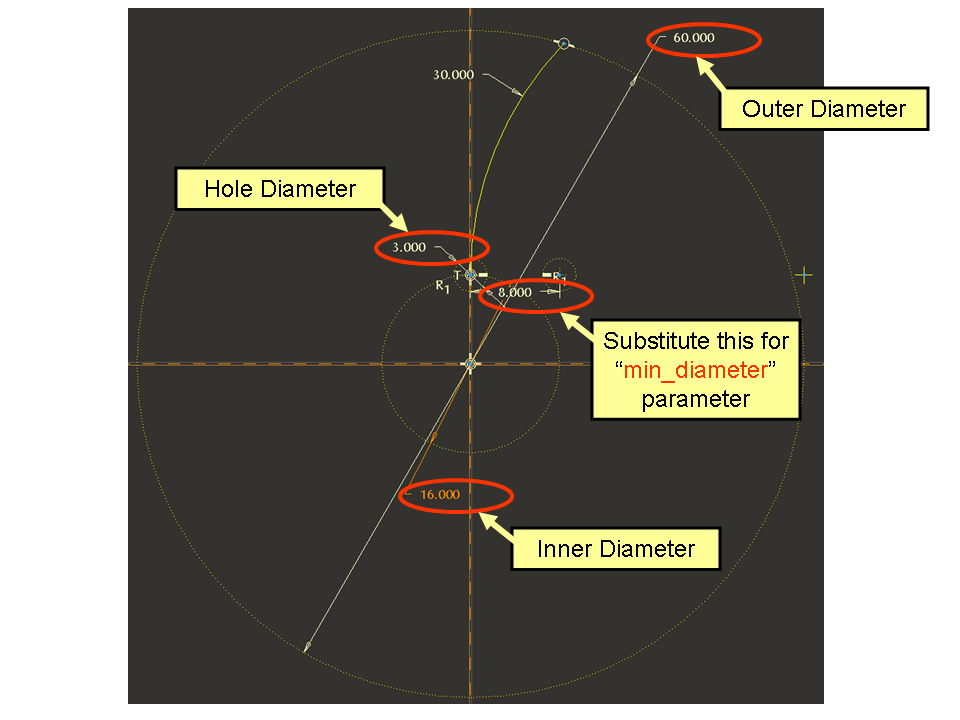
As for the problem at hand... your best bet to see "real time" results is to figure out a clever way to use a sketch to drive EVERYTHING. Then you can vary the sketch in real-time using the Dynamic Edit feature. I've modified the original curve sketch in the image below. I've replaced the need for the min_distance parameter by adding it as a dimension in the sketch. I added the different sketch components as CONSTRUCTION items so they wouldn't damage the curve trajectory. Again click the slide for a larger image...

You'll have to substitute the dimension from the sketch for the min_diameter parameter in all the relations but this is easy. Once you've done this and regenerated successfully, you can use the Dynamic Edit tool. Select the sketch and right-click to select Dynamic Edit. Drag the handles (or modify the dimensions) and view the resultant geometry as it updates in real time.
I produced a very brief video on Dynamic Edit which might be helpful. It's up on YouTube here:
http://www.youtube.com/watch?v=Z0i73X01ygU&feature=youtu.be&a
I'll go to work on the pattern relations primer next...
Take care!
-Brian
- Mark as New
- Bookmark
- Subscribe
- Mute
- Subscribe to RSS Feed
- Permalink
- Notify Moderator
i'm shrek's fan i love swamp.....lol for once i want to smell it...
about min_distance thats a unique techinc thanks.. it's awsome!!!
-thanks
Dalbeer
- Mark as New
- Bookmark
- Subscribe
- Mute
- Subscribe to RSS Feed
- Permalink
- Notify Moderator
unable to make UDF of this ![]() pattern failed all the time....
pattern failed all the time....
- Mark as New
- Bookmark
- Subscribe
- Mute
- Subscribe to RSS Feed
- Permalink
- Notify Moderator
I'm still working on the pattern relations thing! Don't hop over into UDF's yet. I can help you with those, too... I just may need a bit of a breather before we move into another deep topic.
It looks like we're going to have about 15 slides for the Pattern Relations primer. Maybe I should make the answers to some of these questions a "document" instead of a thread post? Any thoughts? Maybe I'll post it in both formats.
I'm coming to the end though... I'll be able to post it today I hope.
Thanks!
-Brian
- Mark as New
- Bookmark
- Subscribe
- Mute
- Subscribe to RSS Feed
- Permalink
- Notify Moderator
document would be great.. ![]()
eagerly waiting for master piece.. ![]()
Thanx!
-Dalbeer
- Mark as New
- Bookmark
- Subscribe
- Mute
- Subscribe to RSS Feed
- Permalink
- Notify Moderator
Hi Dalbeer...
I'm trying to figure out a coherent way to show examples of the pattern relations and how to control them. It's a bit more challenging than I thought. Here are the first seven slides of the mini-tutorial. This is basically just setup work showing how I created a simple model. It also starts to explain the various special parameters at work in pattern relations. The next set of slides will show examples of how I used those special parameters to create a bunch of different patterns.
Stay tuned... sorry this has taken so long. I don't like doing a half-baked job when I am trying to put together a tutorial. I feel most tutorials... even the better ones... gloss over numerous details in the interest of keeping the tutorial brief. But in doing this, some of the usefulness is lost... some of the meat of the feature being demonstrated is lost. Pattern relations have been a black hole for a long time. They're rarely discussed and few books and tutorials bother to explain them.
Maybe this will help change that. I'll put everything together in one document when I'm done. You're a sharp guy... you'll be able to figure this stuff out in no time.
Here's the first few slides...
... more to follow with examples of controlling patterns using these special parameters...
- Mark as New
- Bookmark
- Subscribe
- Mute
- Subscribe to RSS Feed
- Permalink
- Notify Moderator
Hi Dalbeer...
Here are the next set of slides. I'm trying to explain HOW the slides are attempting to explain pattern relations. If anything is unclear, please let me know. Once you understand how the first example is constructed, the next several examples will be constructed the same way. I'll show the relation, the original feature, the values generated by the relation in table form... and the final result.
If this layout isn't clear or you don't get what I'm trying to say, please let me know so I don't move forward until you understand.
Thanks...
Here are the next fews slides...
... more to come... please comment so I can insure we're on the same page!
Thanks!
-Brian


