cancel
Showing results for 
Search instead for 
Did you mean: 
cancel
Showing results for 
Search instead for 
Did you mean: 

Community Tip - Stay updated on what is happening on the PTC Community by subscribing to PTC Community Announcements. X

importing image into Creo

JamesBurcham
4-Participant

importing image into Creo

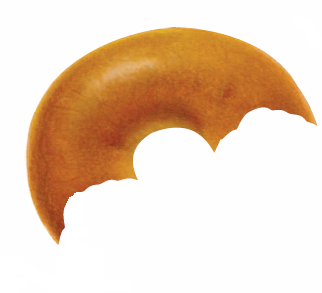
Does anyone know if you can import an image into Creo then use that image to create a piece of sheet metal with that shape. Below is the image I want to import and turn into a piece of sheetmetal. I have also attached the .png file.

bagel.png


This thread is inactive and closed by the PTC Community Management Team. If you would like to provide a reply and re-open this thread, please notify the moderator and reference the thread. You may also use "Start a topic" button to ask a new question. Please be sure to include what version of the PTC product you are using so another community member knowledgeable about your version may be able to assist.
1 ACCEPTED SOLUTION

Accepted Solutions

To close this community thread on How to import an image into a Creo model


Summary of the exchanges and list of solutions:

  • In Pro/ENGINEER, Creo Elements/Pro or early Creo Parametric releases
    • You could use the Insert > Style command to create a Trace Sketch with the image
    • This required the Interactive_Surface_Design license
    • As an alternate solution you could use the Render > Images > Add command to place the picture on a Datum Plane
  • In later Creo Parametric releases
    • This function has been merged and made available without additional license
    • You can Add / Import pictures with the Images command under the Model Display section drop down in View tab of the ribbon
    • See article CS31120 for the details and animation
  • Note:
    • The images won’t be imported as geometry, however they can serve as an underlay to create sketches, curves or surfaces.
    • Otherwise you may evaluate 3rd party tools (eg Photoshop) to convert those raster images to vector data and export them to a different file format (eg DXF/DWG).

View solution in original post

5 REPLIES 5

you can go to Insert >> Style. Then Select Trace Sketch tool under styling menu. Select the plane you want to put the image and click + Icon. Now select the image and below are the image adjusting parameter options.

I am not sure about Sheetmetal though.

Greetings.

Make your image a .bmp file (default OLE image object that normally works every time).

Have a location datum plane available.

Use: Render>Images>Add - select the placement plane and navigate to your image file.

Note the options on the ribbon before you begin dragging the image. Also note the transparency level. Be careful about using the "set transparent color". I haven't found a way to undo that.

The image quality will not be the greatest but normally sufficient to use as an underlay.

Thank you both for the quick response.

First Sudhir, when I select "Style" I get this

Option Interactive_Surface_Design not ordered, please contact your sales representative.

Please check "File->Options->Licensing" or Visit http://www.ptc.com/support/apps/sw_trial to try out options.

Any other time I've seen that its because I dont have the correct lisence to use that option. I'm guess this method isnt going to be an option for me.

Antonius, this was helpful to import the image, but I really can't do anything with it. I was hoping I could use the image to create a sheetmetal piece.

James, I'm sorry but a bitmap image is not enough information for Creo to create edges or a useful sketch.

There are programs that can convert the image to "vector" such as Photoshop. It is still an interpolation algorithm but likely sufficient, and more accurate than using the image as an underlay. If you have Photoshop or similar software that can convert the image to vector based (read: line based) data and export it as a DXF or DWG (sometimes HPGL; which can be converted through other means), then you can use the data in Creo more directly.

I have used images as underlays. They work reasonably well. In this case, It imports well enough to get a good sense of the edge profile. But you have to create the sketch manually. Sorry about that.

If you have a higher resolution image available, you could work on it in sections and merge geometry at different stages to maximize the edge quality in Creo. I don't know what you need but these are the only other suggestions I might have for you.

To close this community thread on How to import an image into a Creo model


Summary of the exchanges and list of solutions:

  • In Pro/ENGINEER, Creo Elements/Pro or early Creo Parametric releases
    • You could use the Insert > Style command to create a Trace Sketch with the image
    • This required the Interactive_Surface_Design license
    • As an alternate solution you could use the Render > Images > Add command to place the picture on a Datum Plane
  • In later Creo Parametric releases
    • This function has been merged and made available without additional license
    • You can Add / Import pictures with the Images command under the Model Display section drop down in View tab of the ribbon
    • See article CS31120 for the details and animation
  • Note:
    • The images won’t be imported as geometry, however they can serve as an underlay to create sketches, curves or surfaces.
    • Otherwise you may evaluate 3rd party tools (eg Photoshop) to convert those raster images to vector data and export them to a different file format (eg DXF/DWG).
Top Tags