
Turn on suggestions
Auto-suggest helps you quickly narrow down your search results by suggesting possible matches as you type.
Showing results for
Turn on suggestions
Auto-suggest helps you quickly narrow down your search results by suggesting possible matches as you type.
Showing results for
Community Tip - When posting, your subject should be specific and summarize your question. Here are some additional tips on asking a great question. X
- Community
- Creo+ and Creo Parametric
- 3D Part & Assembly Design
- Forming (non-projected) curves onto surface using ...
Options
- Subscribe to RSS Feed
- Mark Topic as New
- Mark Topic as Read
- Float this Topic for Current User
- Bookmark
- Subscribe
- Mute
- Printer Friendly Page
Forming (non-projected) curves onto surface using solid bend functionality
Aug 19, 2012
10:55 PM
- Mark as New
- Bookmark
- Subscribe
- Mute
- Subscribe to RSS Feed
- Permalink
- Notify Moderator
Aug 19, 2012
10:55 PM
Forming (non-projected) curves onto surface using solid bend functionality
I am looking for some WF5 functionality which will allow me to form a set of curves onto a complex 3D surface in a similar fashion as to how the combination of flatten quilt and solid bend allow me to flatten a complex surface into a planar surface, create extruded solid features onto this surface, and then "solid bend" them back up to acquire the curvature of the original complex 3D surface.
What I really want is something similar to the aforementioned flatten quilt/solid bend functionality, though allowing me to flatten the quilt, create curves onto this now planar quilt, and then form the quilt (solid bend) back into its original shape with the curves following suit.
If anyone has ideas as to how to accomplish such a task please let me know. Thanks up front for your help.
-
(919)259-0610
Labels:
- Labels:
-
Surfacing
6 REPLIES 6
Aug 20, 2012
12:13 AM
- Mark as New
- Bookmark
- Subscribe
- Mute
- Subscribe to RSS Feed
- Permalink
- Notify Moderator
Aug 20, 2012
12:13 AM
So I suspect you are already quite familiar with powerful surfacing commands. I am also going to guess you do not have the advanced surface module (which I know nothing about). And finally, I guess you cannot make the features on the surface before you bend or otherwise contrort it.
So I'm going to give you an out-of-the-box concept that may do what you need, yet very different than you are currently thinking.
Map a texture onto the surface... seriously, hear me out. A parametric texture might give you a nice grid, or even outlines for what you are trying to achieve. Now you can create planar sketches based on the textured grid or graphics. Of course, you will need to have some idea of what the surface will look like flattened, and you might need an image editor that can distort if that will be required.
I once did a "waving American flag" Now that was a challenge. And yes, I had to map out every point to get there. If I had parametric texturing, life would have been much simpler.
I am often accused of doing things the hard way, but I get the job done 🙂
Aug 20, 2012
01:55 AM
- Mark as New
- Bookmark
- Subscribe
- Mute
- Subscribe to RSS Feed
- Permalink
- Notify Moderator
Aug 20, 2012
03:33 AM
- Mark as New
- Bookmark
- Subscribe
- Mute
- Subscribe to RSS Feed
- Permalink
- Notify Moderator
Aug 20, 2012
03:33 AM
Looks like the hard work is already done. You have several options from here.
If you insist on curves:
Project the pattern edgesto a flat plane, fill the 3D pattern and project the curves back to the new surface.
Better yet, export the projected curves to a DXF and re-import them so they have no dependency.
...or, export a top view of the pattern from a top (or collection of) drawing view to DXFand import the DXF into the model. Now project the DXF curves onto the smooth surface where the pattern is suppressed.
Personally, I would go with a decal made from the "top" view (planer rather than parametric). The image could be a screen-print right from the top view on the screen.
This is easier to do than explain 🙂
Aug 20, 2012
07:24 AM
- Mark as New
- Bookmark
- Subscribe
- Mute
- Subscribe to RSS Feed
- Permalink
- Notify Moderator
Aug 20, 2012
07:24 AM
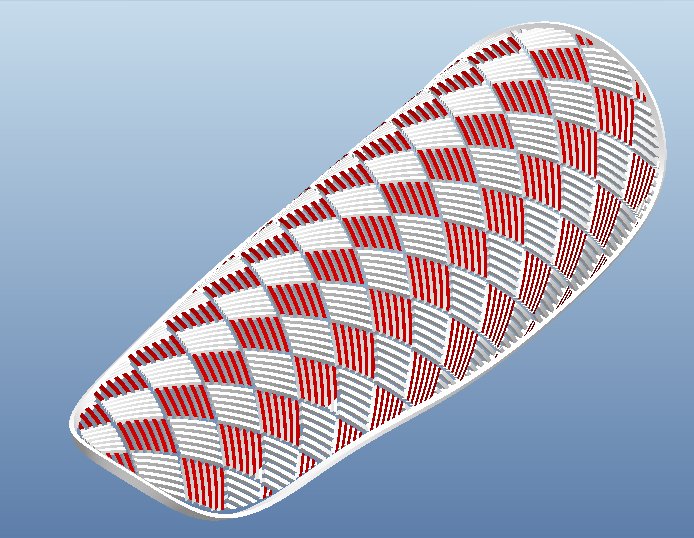
I've should probably have explained more details up front, but the previously providedimage is basically part of a texture being molded into the handle of a product. In this particular type of product the handle textures are critical to acceptance of the product. There are numerous iterations that occur back and forth with the customer for each handle design, tweaking patterns, completely changing out patterns, swapping in and out perimeter shapes, etc. This is what becomes extremely tedious and time consuming when right now all of the geometry is being provided back and forth to the customer as a fully modeled solid part and regeneration times for these texture features is off the charts.
Being able to put all of this geometry for patterns and shapes onto a single plane as curves which arethen "wrapped" onto the complex surface would provide enough detail for customer buy-in without the need for the final manufacturable solid cuts and protrusions that make up the patterned textures and shapes.
If there was a way to actually pattern these curves directly onto the 3D surface this would be fantastic, but there isn't a dimensioning scheme that would work in laying out the pattern in a equidistant manner in the same way that a wrapping (flatten quilt/solid bend) function can do with solids on a complex surface. As originally stated standard projected curves do not provide the correct geometry, the "wrap" function for curves does not work on non-developable surfaces (and these surfaces cannot be changed), and spinal bends are not an option for bending curves.
Any additional suggestions are greatly appreciated.
Scott
Aug 20, 2012
12:56 PM
- Mark as New
- Bookmark
- Subscribe
- Mute
- Subscribe to RSS Feed
- Permalink
- Notify Moderator
Aug 20, 2012
12:56 PM
Okay, now I understand better. The "iteration" part was a bit more confusing. I fully understand the level of effort required to satisfy customer needs in this instance.
But do know that the projection I was leading to is not a direct projection. I did this same thing with wrapped text where the text was properly wrapped on a cylinder and then projected the curves back to flat planes. The projections onto the flat planesare distorted text but accurate to the original when extruded linearly.
What happens when you apply an image to the surface as a decal and make it map parametrically?Depending on the way the surface was made, it should do exactly what you want. Doesn't WF5 have parametric mapping of the image? Once you have the image mapping worked out, you can swap patterns at will with ease without creatingany master geometry.
I don't know of any other method WF will let you make the iterative process other than what you did. What I am a firm believer in is exporting and importing data to make it more efficient. That way you can suppress the feature and import the "standin".
Nov 01, 2012
05:22 PM
- Mark as New
- Bookmark
- Subscribe
- Mute
- Subscribe to RSS Feed
- Permalink
- Notify Moderator
Nov 01, 2012
05:22 PM
As a follow-up to my original message back in August, I found out that Creo (1.0 and beyond) has enhanced the combination of Flatten Quilt/Solid Bendfunctionality to include not only solids, but surfaces, cuves, and datum points as well. They have also renamed the "Solid Bend" command to "Flatten-Quilt Deformation". So now once you have used the "Flatten Quilt" option, the command to bend specific geometry back is called "Flatten-Quilt Deformation".
With this functionality, I now have the ability to first flatten a complex 3D surface, generate a pattern of curves on the flattened quilt, and then use "Flatten-Quilt Deformation" to bend the patterned curves back up onto the original 3D surface. What I am surprised about is that when I first posted this message in August, Creo had already been on the market for quite some time. It's hard to believe that no one was already utilizing this functionality. So my main goal in this follow up is to let others know that the software is now capable of doing what I originally required.
