
Turn on suggestions
Auto-suggest helps you quickly narrow down your search results by suggesting possible matches as you type.
Showing results for
Turn on suggestions
Auto-suggest helps you quickly narrow down your search results by suggesting possible matches as you type.
Showing results for
Community Tip - You can Bookmark boards, posts or articles that you'd like to access again easily! X
Options
- Subscribe to RSS Feed
- Mark as New
- Mark as Read
- Bookmark
- Subscribe
- Printer Friendly Page
- Notify Moderator
Forced Root Cause Monitoring - Create the Main Mashup
No ratings
This post is part of the series Forced Root Cause Monitoring via Mashups and Modal Popups
To not feel lost or out of context, it's recommended to read the main post first.
Create the Main Mashup
- Create a new Mashup called "rcp_MashupMain" as Page and Responsive
- Save and switch to the Design tab
Design
- Add a Layout with two Columns
- In the right Column add another Layout (vertical) with a Header and one Row
- Add a Grid to the Row
- Add a Panel to the Header
- Add a Panel into the Panel
(we will use a Panel-In-Panel technique for a better design experience) - Set "Width" to 200
- Set "Height" to 50
- Set "Horizontal Anchor" to "Center"
- Set "Vertical Anchor" to "Middle"
- Delete its current "Style" and add a new custom style - all values to default (this will create a transparent border around the panel)
- Add a Label to the inner Panel
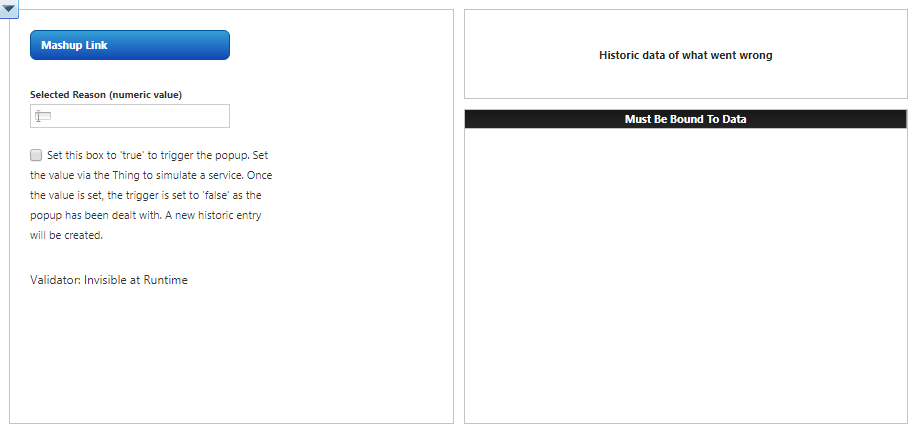
- Set "Text" to "Historic data of what went wrong"
- Set "Alignment" to "Center Aligned"
- Set "Width" to 200
- Set "Top" to 14
- Add a Panel to the left Column
- Add a Navigation Widget to the Panel
This will call the Popup Window when its Navigate service is invoked (by a Validator) - Set "MashupName" to "rcp_MashupPopup"
- Set "TargetWindow" to "Modal Popup"
- Set "ShowCloseButton" to false
- Set "ModalPopupOpacity" to 0.8 (to make the background darker and give more visual focus to the popup)
- Set "FixedPopupWidth" to 500
- Set "FixedPopupHeight" to 300
- Set "PopupScrolling" to "Off"
- Set "Visible" to false, so it will not be shown to the user during runtime
- Add a Textbox to the Panel
This will show the numeric value corresponding to the State selected in the modal popup
This will just be used for displaying with no other functionality - so that we can verify the actual values chosen - Set "Read Only" to true
- Set "Label" to "Selected Reason (numeric value)"
- Add a Checkbox to the Panel
This will be used an input for the Validator to determine if an error state is present or not - Set "Prompt" to "Set this box to 'true' to trigger the popup. Set the value via the Thing to simulate a service. Once the value is set, the trigger is set to 'false' as the popup has been dealt with. A new historic entry will be created."
- Set "Disabled" to true
- Set "Width" to 250
- Add a Validator to the Panel
This will determine if the checkbox (based on the trigger / error state) is true or false. If the checkbox switches to true then the validator will call the Navigate service on the Navigation Widget. Otherwise it will do nothing. - Click on Configure Validator
- Add Parameter
- Name: "Input"
- Base Type: BOOLEAN
- Click Done
- Set "Expression" to "Input" (the Parameter we just created)
- Set "AutoEvaluate" to true
- Save the Mashup
Data
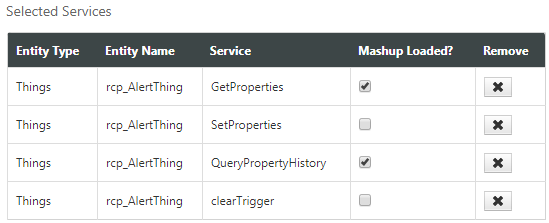
- In the Data panel on the right hand side, click on Add entity
- Choose the "rcp_AlertThing" and select the following services
- GetProperties (execute when Mashup is loaded)
- SetProperties
- QueryPropertyHistory (execute when Mashup is loaded)
- clearTrigger
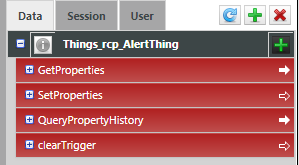
- Click Done and the services will appear in the Data panel
Connections
- After configuring the UI elements and the Data Sources we now have to connect them to implement the logic we decided on earlier
- GetProperties service
- Drag and drop the trigger property to the Checkbox and bind it to State
- Set the Automatically update values when able to true
- SetProperties service
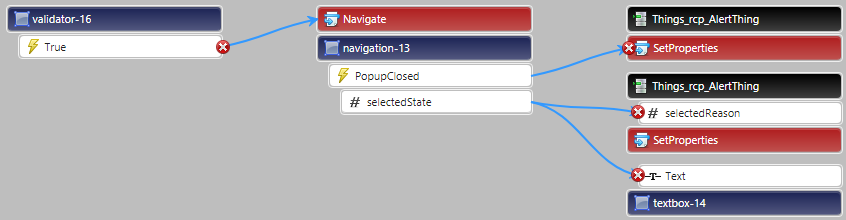
- From the Navigation Widget drag and drop the selectedState property and bind it to the SetProperties service selectedReason property
- From the Navigation Widget drag and drop the PopupClosed event and bind it to the SetProperties service
- From the SetProperties service drag and drop the ServiceInvokeCompleted event and bind it to the clearTrigger service
- From the SetProperties service drag and drop the ServiceInvokeCompleted event and bind it to the QueryPropertyHistory service

- QueryPropertyHistory service
- Drag and drop the Returned Data's All Data to the Grid and bind it to Data
- On the Grid click on Configure Grid Columns
- Switch the position of the timestamp and selectedReason fields with their drag and drop handles
- For the selectedReason
- Set the "Column Title" to "Reason for Outage"
- Switch to the Column Renderer & State Formatting tab
- Change the format from "0.00" to "0" (as we're only using Integer values anyway)
- Choose the State-based Formatting
- Set "Dependent Field" to "selectedReason"
- Set "State Definition" to "rcp_AlertStateDefinition"
- Click Done

- clearTrigger service
- There's nothing more to configure for this service
- As the properties will automatically be pushed via the GetProperties service, there's no special action required after the service invoke for the clearTrigger service has been completed
- Validator Widget
- Drag and drop the Validator's TRUE event to the Navigation Widget and bind it to the Navigate service
- Drag and drop the Checkbox State to the Validator and bind it to the Input parameter

- Navigation Widget
- Drag and drop the Navigation Widget's selectedState to the Textbox and bind it to the Text property
- Save the Mashup
