
Turn on suggestions
Auto-suggest helps you quickly narrow down your search results by suggesting possible matches as you type.
Showing results for
Please log in to access translation
Turn on suggestions
Auto-suggest helps you quickly narrow down your search results by suggesting possible matches as you type.
Showing results for
Community Tip - You can Bookmark boards, posts or articles that you'd like to access again easily! X
- Community
- Creo+ and Creo Parametric
- 3D Part & Assembly Design
- Re: Assembly pattern to points problem
Translate the entire conversation x
Please log in to access translation
Options
- Subscribe to RSS Feed
- Mark Topic as New
- Mark Topic as Read
- Float this Topic for Current User
- Bookmark
- Subscribe
- Mute
- Printer Friendly Page
Assembly pattern to points problem
Apr 05, 2012
12:47 PM
- Mark as New
- Bookmark
- Subscribe
- Mute
- Subscribe to RSS Feed
- Permalink
- Notify Moderator
Please log in to access translation
Apr 05, 2012
12:47 PM
Assembly pattern to points problem
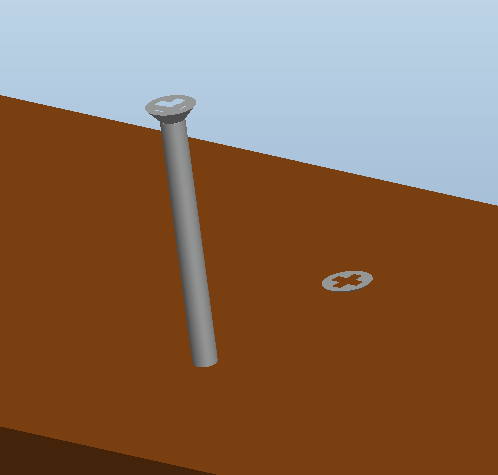
I need help quickly. Why did the pattern of the screw component go halfway in? The screw is 3" long and went 1.5" into the member.
The screw that is sunk in completely was fully assembled and then I selected it for a Pattern to an array of datum points that I previously set up. Note: there are other screws not seen here that are sticking halfway out.
Thanks,
Kevin
This thread is inactive and closed by the PTC Community Management Team. If you would like to provide a reply and re-open this thread, please notify the moderator and reference the thread. You may also use "Start a topic" button to ask a new question. Please be sure to include what version of the PTC product you are using so another community member knowledgeable about your version may be able to assist.
Solved! Go to Solution.
Labels:
- Labels:
-
Assembly Design
ACCEPTED SOLUTION
Accepted Solutions
Apr 09, 2012
02:54 PM
- Mark as New
- Bookmark
- Subscribe
- Mute
- Subscribe to RSS Feed
- Permalink
- Notify Moderator
Please log in to access translation
Apr 09, 2012
02:54 PM
Try specifying an alternate origin point under the Options tab, in your case the pattern leader. Depending on how you have definded your points you may need to deselect the one at the pattern start otherwise you end up with a duplicate part at the start location.
4 REPLIES 4
Apr 06, 2012
12:12 AM
- Mark as New
- Bookmark
- Subscribe
- Mute
- Subscribe to RSS Feed
- Permalink
- Notify Moderator
Please log in to access translation
Apr 06, 2012
12:12 AM
What kind of constraints have you given for the screw?
Apr 09, 2012
09:03 AM
- Mark as New
- Bookmark
- Subscribe
- Mute
- Subscribe to RSS Feed
- Permalink
- Notify Moderator
Please log in to access translation
Apr 09, 2012
09:03 AM
I used the following constraints.
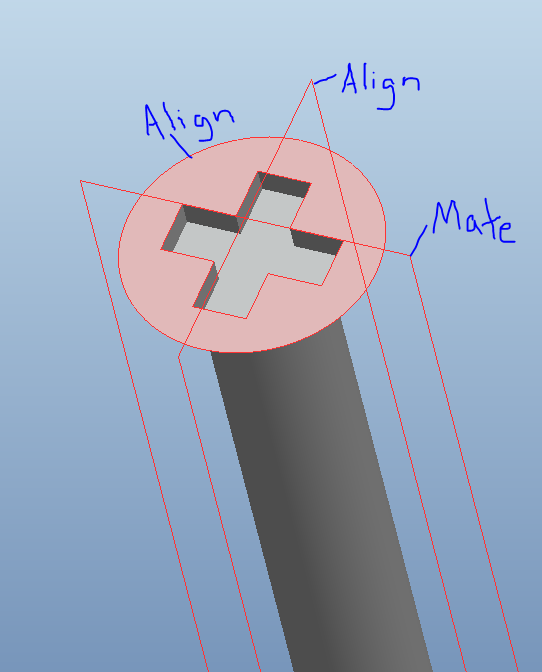
When you assemble a component you will notice a square at the center of the component as seen below.
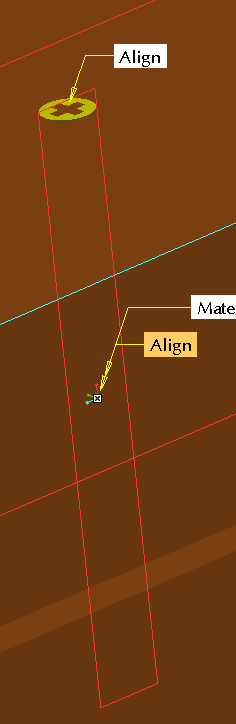
When I did the pattern to an array of points, all the points were on the surface of the wood (brown), and the square at the center of the screws matched up with the points thereby leaving the screws sticking out of the wood.
Without moving my points down inside the wood, I hope there is a way to do this pattern the way I want.
Apr 09, 2012
02:54 PM
- Mark as New
- Bookmark
- Subscribe
- Mute
- Subscribe to RSS Feed
- Permalink
- Notify Moderator
Please log in to access translation
Apr 09, 2012
02:54 PM
Try specifying an alternate origin point under the Options tab, in your case the pattern leader. Depending on how you have definded your points you may need to deselect the one at the pattern start otherwise you end up with a duplicate part at the start location.
Apr 09, 2012
03:08 PM
- Mark as New
- Bookmark
- Subscribe
- Mute
- Subscribe to RSS Feed
- Permalink
- Notify Moderator
Please log in to access translation
Apr 09, 2012
03:08 PM
Thanks, Kevin.
I did not want the original components to be copied during the patterning so that the first point would have two components overlapping one another, and, and you say, you can select the black circle to turn off any of the pattern memebers, including the first one.
I thought I would be clever and not have a datum point where the original component was assembled so that there would be no overlapping, but then I had no point to select as an alternate origin point. So, after your suggestion I created a datum point on the fly to define the alternate origin point.


