Community Tip - Learn all about the Community Ranking System, a fun gamification element of the PTC Community. X
- Community
- Creo+ and Creo Parametric
- 3D Part & Assembly Design
- Re: BOM Customization (search for either or parame...
- Subscribe to RSS Feed
- Mark Topic as New
- Mark Topic as Read
- Float this Topic for Current User
- Bookmark
- Subscribe
- Mute
- Printer Friendly Page
BOM Customization (search for either or parameter)
- Mark as New
- Bookmark
- Subscribe
- Mute
- Subscribe to RSS Feed
- Permalink
- Notify Moderator
BOM Customization (search for either or parameter)
HI all,
I'm creating a customized BOM report, in which I need to able to include the string content of the part 'Description' parameter. This currently works fine as I've edited the 'bom_format.bft' file as required. However, it is now a little more complex as some of the assemblies are using legacy parts generated overseas which do not contain a 'Description' parameter but an 'equivalent alternative'. My question is how to get the BOM report to search for the 'equivalent alternative' parameter in the absence of the 'Description' parameter?
I have successfully managed to do this with BOM tables in drawings, but in this instance I am generating the report from the assembly via the 'Bill of Materials' route.
Many thanks in advance.
Bob
This thread is inactive and closed by the PTC Community Management Team. If you would like to provide a reply and re-open this thread, please notify the moderator and reference the thread. You may also use "Start a topic" button to ask a new question. Please be sure to include what version of the PTC product you are using so another community member knowledgeable about your version may be able to assist.
Solved! Go to Solution.
- Labels:
-
Assembly Design
Accepted Solutions
- Mark as New
- Bookmark
- Subscribe
- Mute
- Subscribe to RSS Feed
- Permalink
- Notify Moderator
The steps are as follows:
1. Create a blank drawing (no associate models) and add a repeat region with whatever columns / parameters you want.
2. Save the drawing somewhere all of your users has access (network drive).
3. Record mapkey that opens the drawing and adds an assembly. My mapkey changes the filter to assemblies to make it easier on the user.
4. Add a manual pause so the user can choose the assembly and master rep. My manual pause says:
Select an assembly and then click the "open" button.
Then choose a simplified rep before clicking "Resume"
5. Then continue the mapkey and use the find tool to seach for the Table ID (should be table 0 if you started from a blank drawing)
6. After you have selected the table, export it on the table tab to a text or csv file. I export mine to a text file and I use the @ symbol as a delimiter in my repeat region to prevent mix ups in excel for things like descriptions that might have commas in them.
7. Close and erase the drawing.
If you want to get really fancy you can then add an @system at the end of your mapkey that calls a script to open excel and import the text file.
- Mark as New
- Bookmark
- Subscribe
- Mute
- Subscribe to RSS Feed
- Permalink
- Notify Moderator
Hi,
functionality you are looking for is not available in Assembly mode when using Bill of Materials command.
MH
Martin Hanák
- Mark as New
- Bookmark
- Subscribe
- Mute
- Subscribe to RSS Feed
- Permalink
- Notify Moderator
Martin,
Thanks for your reply. Is there not a way of defining a relation i.e. an 'ELSE' script which searches for the 'Description' parameter, but if not found searches for the 'alternative' contained within the Part model parameters?
I live in hope.
Bob
- Mark as New
- Bookmark
- Subscribe
- Mute
- Subscribe to RSS Feed
- Permalink
- Notify Moderator
Hi,
you can define relations in repeat region in Drawing mode. Bill of Materials command in Assembly mode does not have such functionality implemented.
MH
Martin Hanák
- Mark as New
- Bookmark
- Subscribe
- Mute
- Subscribe to RSS Feed
- Permalink
- Notify Moderator
If it helps, we have solved this by having a blank drawing that has a single empty repeat region on it. We have a mapkey that opens that drawing and prompts the user to pick an assembly. The mapkey then adds that assembly to the drawing, exports the table as a csv and then closes and erases the drawing.
You could do the same thing and achieve what you are after.
- Mark as New
- Bookmark
- Subscribe
- Mute
- Subscribe to RSS Feed
- Permalink
- Notify Moderator
Chris,
Thanks for your input. I'd be interested to learn a bit more about your proposal. I've initially steered clear of the drawing / BOM table route as it meant having to create a drawing etc. etc. However, if this is done via a Mapkey it's automated and less Mouse clicks. I'll investigate.
- Mark as New
- Bookmark
- Subscribe
- Mute
- Subscribe to RSS Feed
- Permalink
- Notify Moderator
The steps are as follows:
1. Create a blank drawing (no associate models) and add a repeat region with whatever columns / parameters you want.
2. Save the drawing somewhere all of your users has access (network drive).
3. Record mapkey that opens the drawing and adds an assembly. My mapkey changes the filter to assemblies to make it easier on the user.
4. Add a manual pause so the user can choose the assembly and master rep. My manual pause says:
Select an assembly and then click the "open" button.
Then choose a simplified rep before clicking "Resume"
5. Then continue the mapkey and use the find tool to seach for the Table ID (should be table 0 if you started from a blank drawing)
6. After you have selected the table, export it on the table tab to a text or csv file. I export mine to a text file and I use the @ symbol as a delimiter in my repeat region to prevent mix ups in excel for things like descriptions that might have commas in them.
7. Close and erase the drawing.
If you want to get really fancy you can then add an @system at the end of your mapkey that calls a script to open excel and import the text file.
- Mark as New
- Bookmark
- Subscribe
- Mute
- Subscribe to RSS Feed
- Permalink
- Notify Moderator
Interesting approach! A few potential refinements/variations: 1) You could employ File>New>Drawing>From Template to make the drawing with assembly. 2) Selecting the table from the drawing tree in the Table tab should also be stable.
Comes out the same, I think, so which way you care to go with it is up to you.
- Mark as New
- Bookmark
- Subscribe
- Mute
- Subscribe to RSS Feed
- Permalink
- Notify Moderator
All,
I've followed Chris' Mapkey proposal and it works well. However, a few minor glitches:
1) The exported CSV does not capture BOM (table) indents when imported into Excel. Any suggestions?
2) On opening the Excel document I have to manually select the 1st column and reset its justification. The cell contents in this column then magically appear. Any suggestions?
Thanks all.
Bob
- Mark as New
- Bookmark
- Subscribe
- Mute
- Subscribe to RSS Feed
- Permalink
- Notify Moderator
Hi,
please add following information.
1.) picture of Creo BOM table showing indents
2.) picture of Excel showing magic appearance
3.) upload example csv file using How to Attach a File to a Discussion Reply procedure
MH
Martin Hanák
- Mark as New
- Bookmark
- Subscribe
- Mute
- Subscribe to RSS Feed
- Permalink
- Notify Moderator
Files attached. 1st image of Pro-E created Indent table ready for saving. The 2nd illustrates the imported CSV file into Excel (no Part Number content). The 3rd shows the Part number column justified and the content appears.
- Mark as New
- Bookmark
- Subscribe
- Mute
- Subscribe to RSS Feed
- Permalink
- Notify Moderator
Hi,
in Creo I created following repeat region table

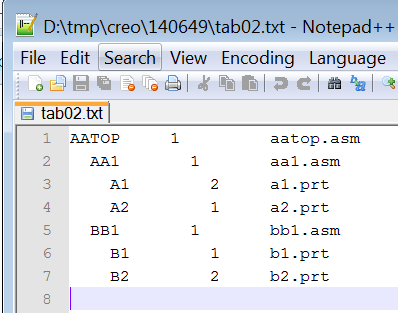
I saved the table into *.txt file ... and get this result

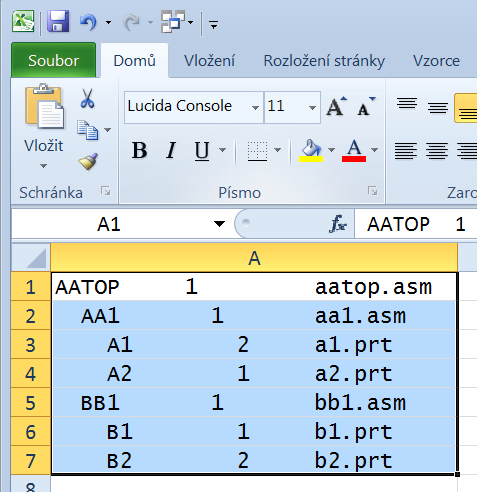
I launched Excel and using Copy&Paste put data from text file into Excel sheet ... and get this result

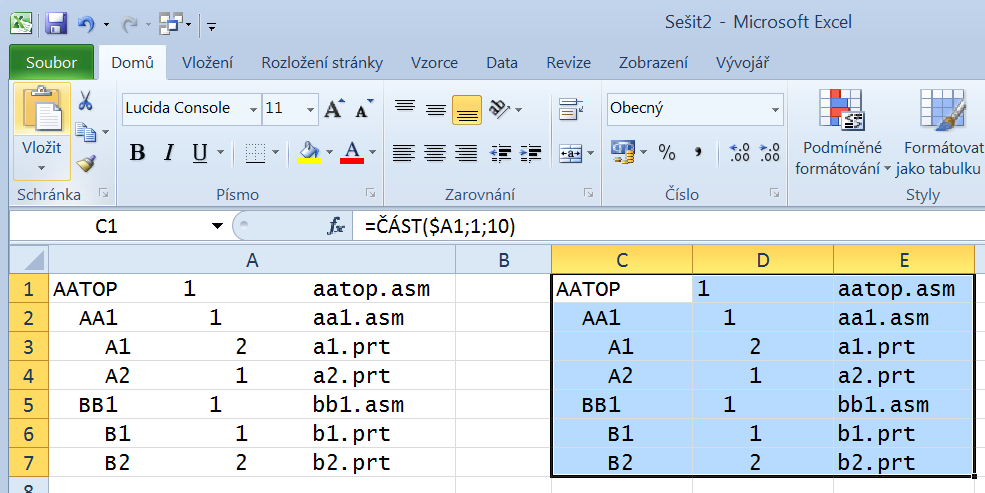
I placed
=MID($A1;1;10) formula into C1
=MID($A1;11;10) formula into D1
=MID($A1;21;10) formula into E1
and copied C1+D1+E1 into following 7 lines ... and get this result

Note: I did not deal with trailing spaces.
MH
Martin Hanák
- Mark as New
- Bookmark
- Subscribe
- Mute
- Subscribe to RSS Feed
- Permalink
- Notify Moderator
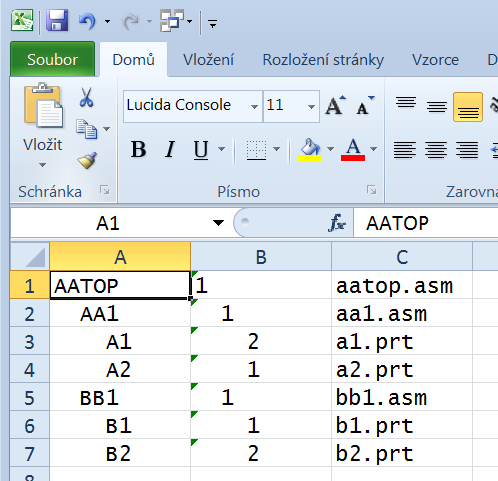
Maybe it is faster to add special separating character into text file (for example >)

... and specify this character during file import to get

MH
Martin Hanák
- Mark as New
- Bookmark
- Subscribe
- Mute
- Subscribe to RSS Feed
- Permalink
- Notify Moderator
By "indents" I am going to assume you mean multiple spaces. I think those might get removed with a csv. If that is the case, then you could replace those (with a relation in the repeat region) with another character (like #) or something that is not likely to be used in your table and then convert them back with VBA in excel. As I mentioned in the previous post you can add a @SYSTEM at the end of your mapkey (make sure to include a \ at the end of the previous line!) followed by the path of a script:
Mapkey:
mapkey(continued) ~ blah blah blah ;\
mapkey(continued) @SYSTEMC:\\folder\\myscript.VBS;
myscript.vbs:
Dim objExcel
Dim objWorkBook
Set objExcel = CreateObject("EXCEL.APPLICATION")


'---------- Create the File System Object ---------------------
Set objFSO = CreateObject("Scripting.FileSystemObject")


'--------- Check if File Exists----------------------------
If objFSO.FileExists("C:\Folder_Name_Goes_Here\FileName_Goes_Here.xls") Then


  '------------------Open template-------------------------
  Set objWorkBook = objExcel.Workbooks.Open("C:\Folder_Name_Goes_Here\FileName_Goes_Here.xls")


  '------------------ Run macros --------------------------
  objExcel.Run("MyMacro") 'run macro in excel


Else
WScript.Echo "File " & strFile & " does not exist in " & strTempDirectory & " Program will end."
End If


'---------End Error Checking script------------
set objFolder = nothing
set objFile = nothing
Using the above you can open a Excel Workbook and then run a macro in that workbook. The macro could covert the characters back to spaces or simply add spaces as needed. It could also autofit any of your columns for you.
- Mark as New
- Bookmark
- Subscribe
- Mute
- Subscribe to RSS Feed
- Permalink
- Notify Moderator
In my setup I have level included in the repeat region and then I set the indents based on that with the Excel Macro


