
Turn on suggestions
Auto-suggest helps you quickly narrow down your search results by suggesting possible matches as you type.
Showing results for
Please log in to access translation
Turn on suggestions
Auto-suggest helps you quickly narrow down your search results by suggesting possible matches as you type.
Showing results for
Community Tip - New to the community? Learn how to post a question and get help from PTC and industry experts! X
- Community
- Creo+ and Creo Parametric
- 3D Part & Assembly Design
- Did You Know? Concept Design with Design Explorati...
Translate the entire conversation x
Please log in to access translation
Options
- Subscribe to RSS Feed
- Mark Topic as New
- Mark Topic as Read
- Float this Topic for Current User
- Bookmark
- Subscribe
- Mute
- Printer Friendly Page
Did You Know? Concept Design with Design Exploration Extension
Sep 17, 2015
11:19 AM
- Mark as New
- Bookmark
- Subscribe
- Mute
- Subscribe to RSS Feed
- Permalink
- Notify Moderator
Please log in to access translation
Sep 17, 2015
11:19 AM
Did You Know? Concept Design with Design Exploration Extension
The key to designing better products is operating in an environment where innovation is seamlessly integrated into the design process. The PTC Creo Design Exploration Extension, brand new in PTC Creo 3.0, provides innovative users like you with a dedicated environment to easily and efficiently evaluate new ideas and the impact of design changes. It eliminates the need to manually manage multiple versions of data and allows you to move seamlessly back and forth between these design alternatives during development and review. In today’s post we will discuss how to explore new design concepts, build check point trees, and use the notification center in PTC Creo Design Exploration Extension (DEX). Moshe Baum, CAD Product Manager, explains more here:
To begin a DEX session, use the file menu to open the Manage Session menu. Hover over Design Exploration Session and click Start. Name your Design Exploration session and click OK to begin exploring the model and investigating new design ideas. Be sure to create a name that is easily understood at first glance.
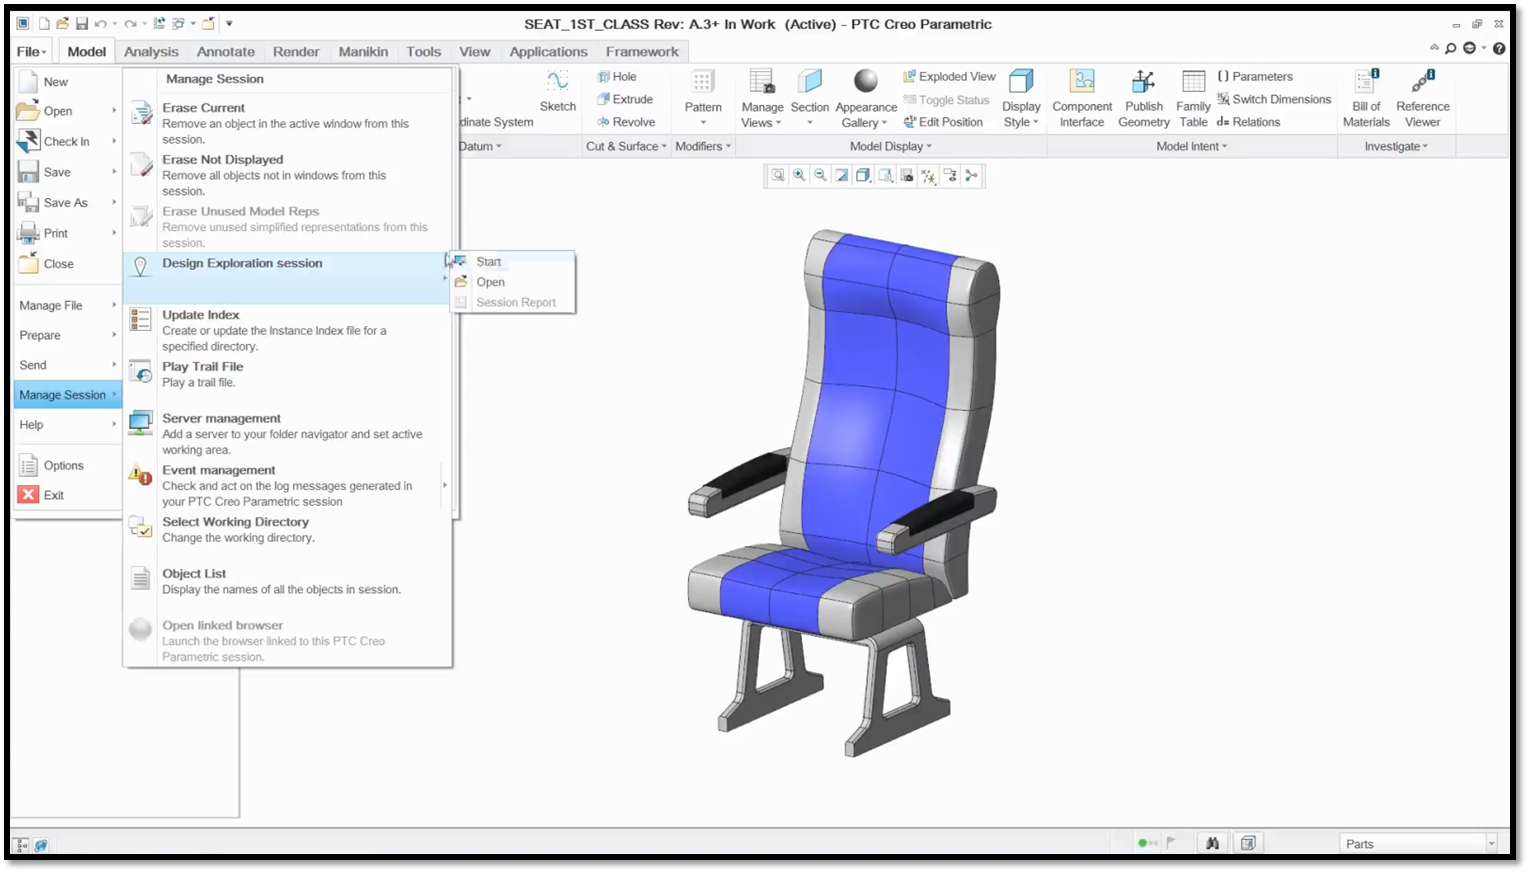
For this example, the DEX session is named train_seats_concept_design.
In our model, the arms of a chair are mounted to the back, but they need to be mounted to the base. Within the DEX session, you can freely explore how to change this and save the new design concept as a checkpoint. Simply select the part or assembly that you want to change and click Activate. Use the features in the toolbar to update the model as needed. Click Add Checkpoint and update the Checkpoint Properties to save your changes. As you continue to explore more design concepts within the DEX environment, you can build a checkpoint tree, including branches off of individual concepts. This allows you to effortlessly move between check points, eliminating the manual effort typically required.

Create a name for your Checkpoint that is easily understood at first glance, like Original_with_Recline.
Within the DEX environment, you also have access to the full capabilities of PTC Creo Parametric. In this case, using Freestyle to quickly develop freeform surfaces, we can easily change the head supports on the seat and create a new checkpoint. To further develop this concept, we can modify the legs to meet the requirements of the design and save this as a new checkpoint branching off the existing one. Once the final concept is chosen, the checkpoint can be brought forward as the new version of the model. To do so, click the assembly in the Model Tree, hover over Check In, and click Auto to confirm the new version of the model.
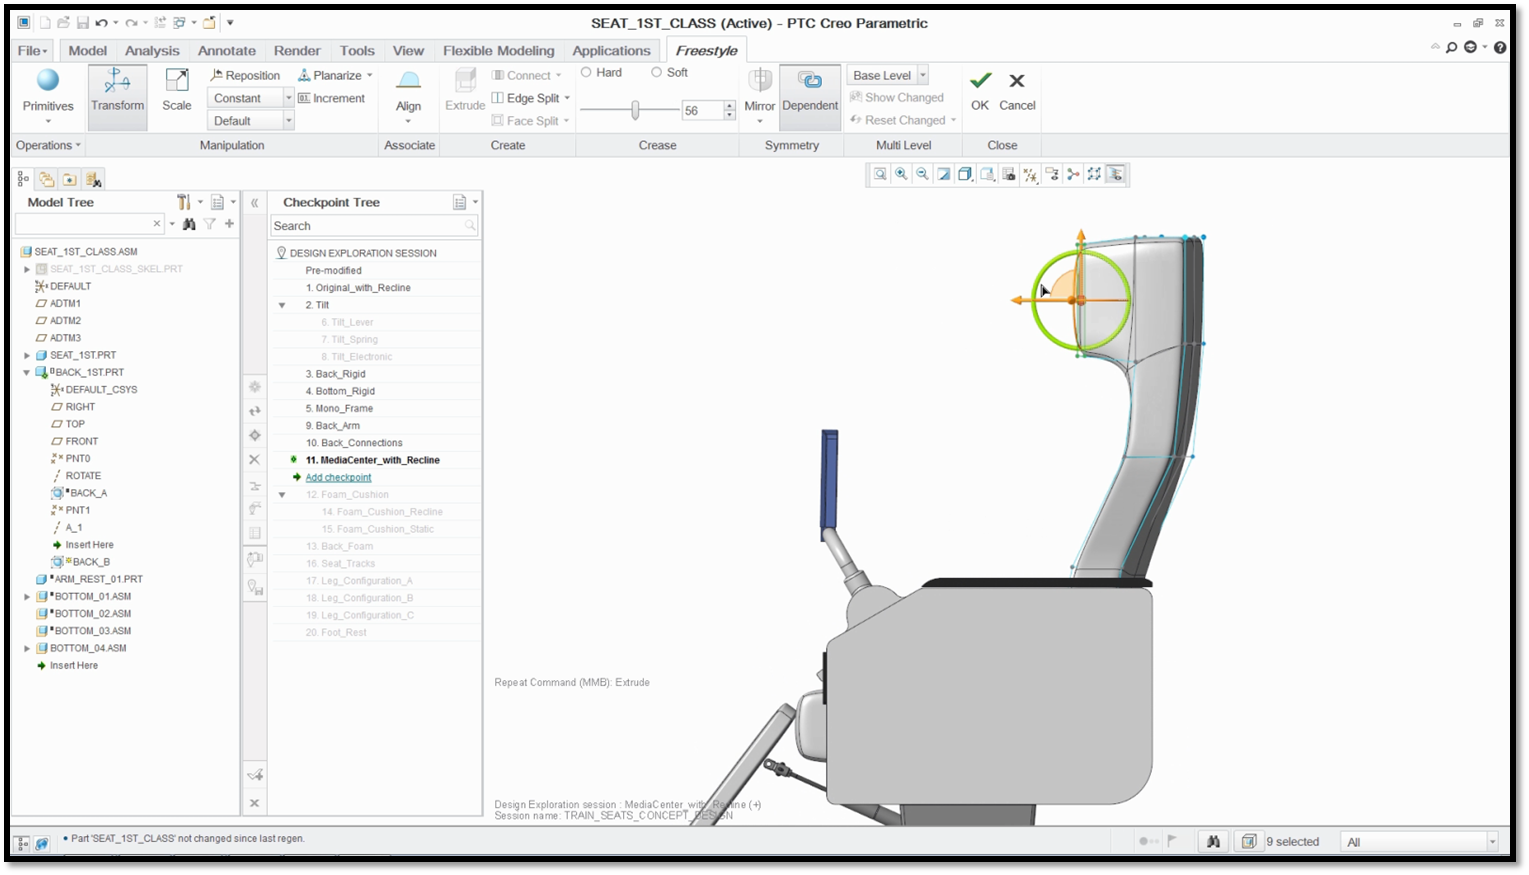
Here, we used Freestyle to quickly reshape the headrest on the seat.
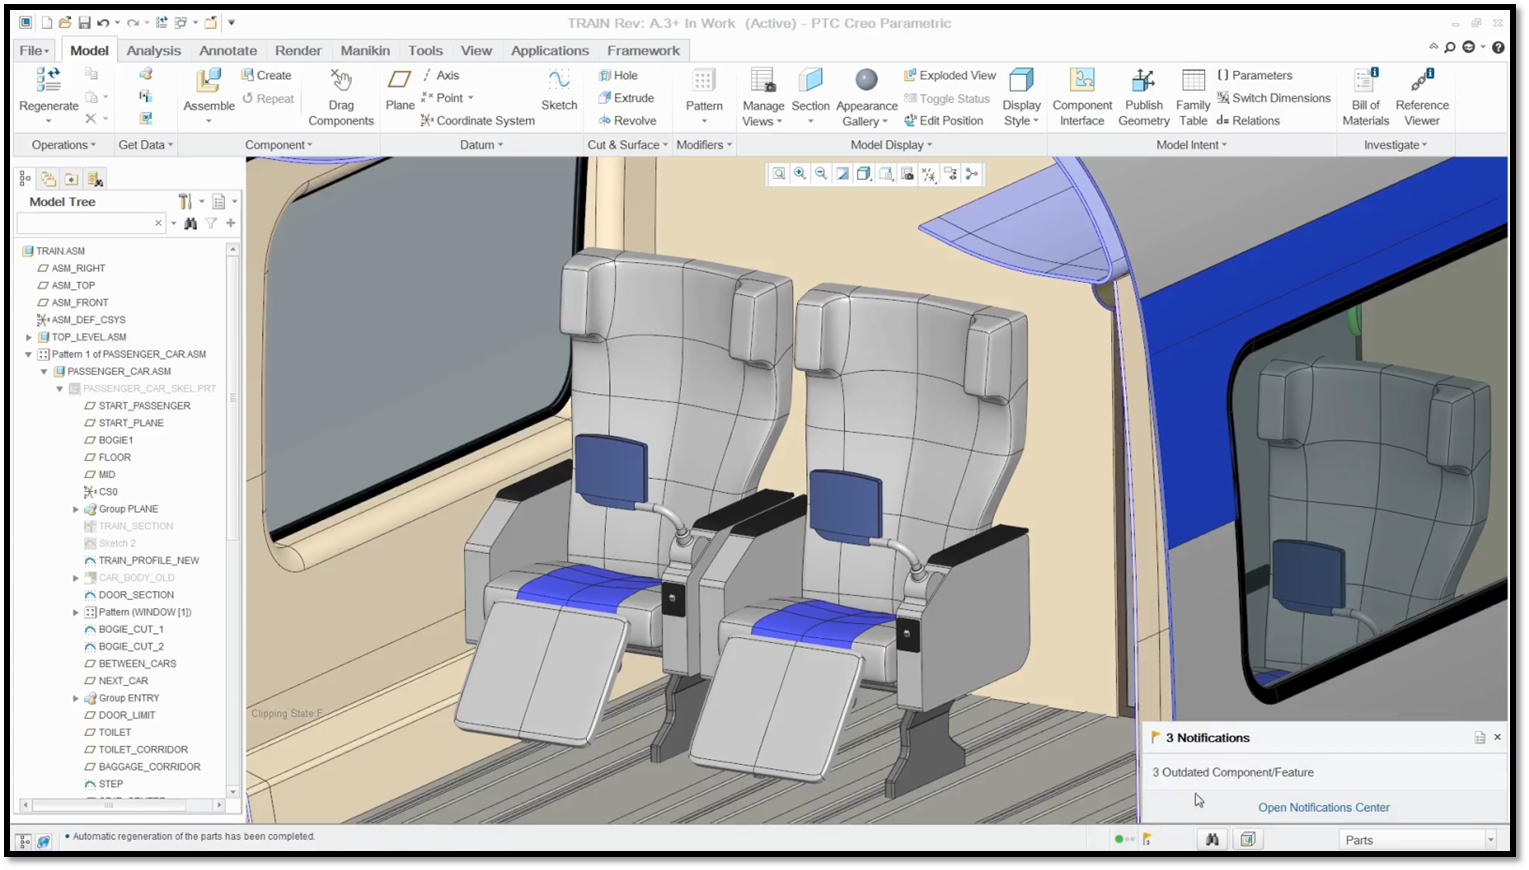
Another area where DEX provides significant advantage is in understanding and viewing proposed design changes in a top down design environment. In this case, we are updating a passenger train assembly with a new chair design, then accommodating a customer driven change. You can navigate a sub-assembly in your model for a closer look. When combined with PTC Windchill, PTC Creo Parametric will notify you when newer versions of parts and assemblies are available. To open the Notification Center, click the yellow flag at the bottom right hand of your screen and click the notification. The Notification Center provides you with easy to use tools to identify and update changing parts and assemblies in the assembly. Select the models that you want to update to the latest PDM version and click the Update icon as shown in the image. Click Yes in the next dialogue box to update the objects in your work space and session.

In this example, the First Class Seat Assembly and Back require updates.
Our passenger car design also requires an update to accommodate a more streamlined shape. After locating the part in the Model Tree and making the update, we can see that this top level change has a significant effect on the existing assemblies and parts. Typically, to review these changes, you need to accept them and regenerate the entire model without any visibility into the impact. DEX provides a more efficient visual alternative to this workflow. By returning to the notification center at the bottom right of the screen, we can see how our changes impact the model.
Here, you can see that there are now three Outdated Components/Features.
In this case, the top down design change has an unplanned impact on the chair design that must be resolved – specifically the leg geometry. In addition to the Notification Center, you are provided with warning icons in the Model Tree next to affected features. Using the new update control, only available with DEX, you can visualize the impact of the changes on your design. Select the parts and assemblies with yellow warning triangles, hover over Update Control, and click Show Differences. Outdated and changed geometry can now be viewed simultaneously. To make viewing the changes easier, you can click Isolate in the tool bar and select the Outdated or Changed to make things more apparent.
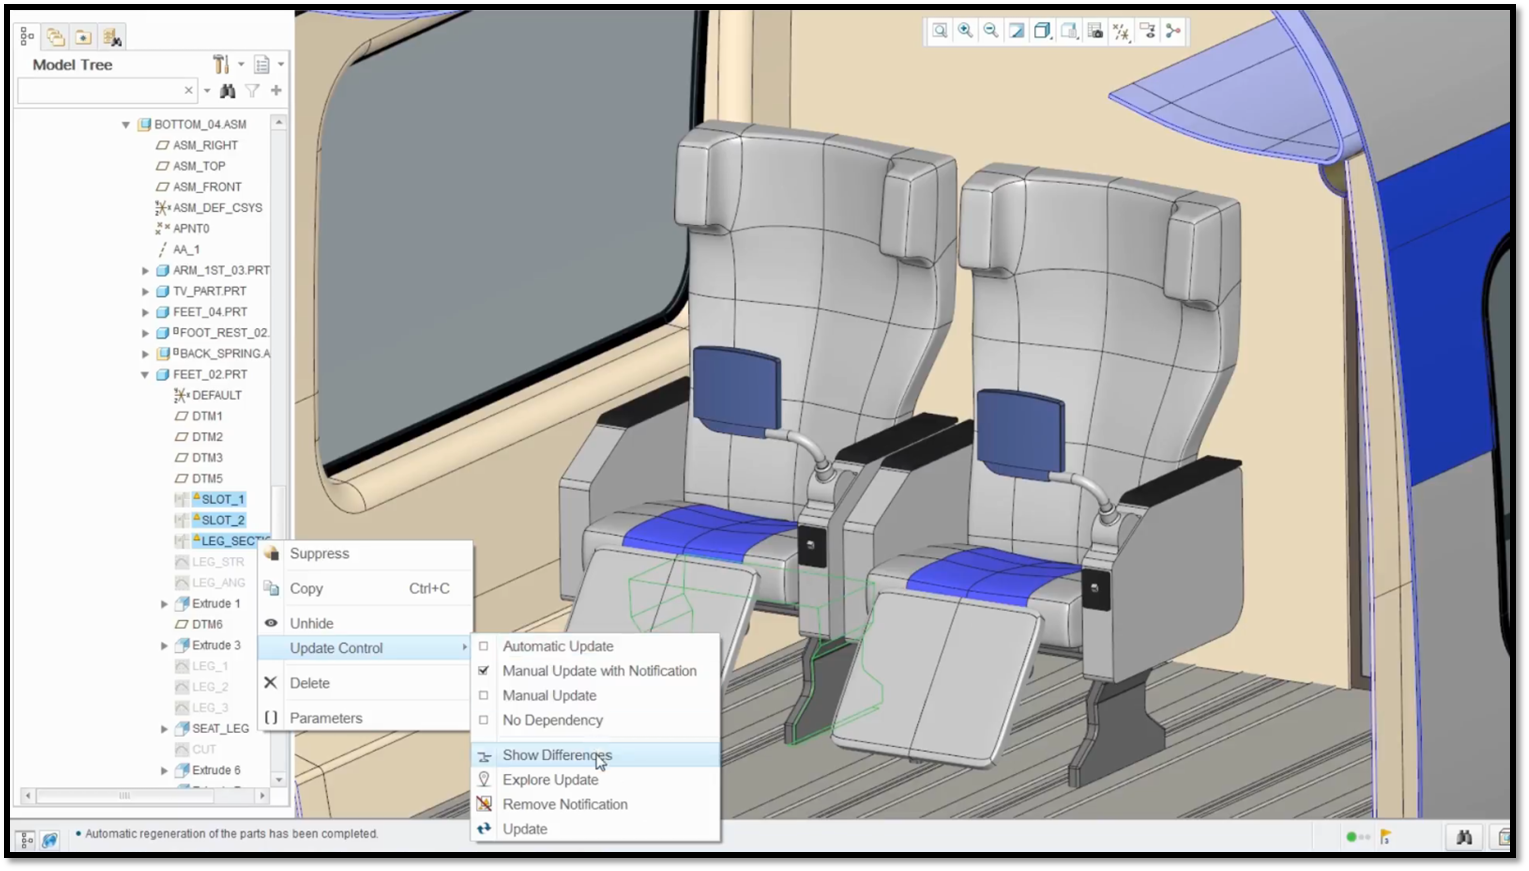
Now you can easily visualize the impact of your design changes.
Using a DEX session, you can further explore the impact of a top down design change on the model without accepting the modifications as final. By doing this, you not only ensure an uninterrupted workflow, you also eliminate the need to create manual backup copies of the data. To start a DEX session, click Explore Update in the toolbar and use the Start a Design Exploration Session dialogue box to name your session. Once in the session, you are able to resolve the changes and move the design forward or determine that the new changes will not work with your design. To move the design forward, click the check mark icon with a plus sign next to the Checkpoint Tree and OK.
Quickly and easily evaluate modifications without creating back-up copies or accepting the changes as final.
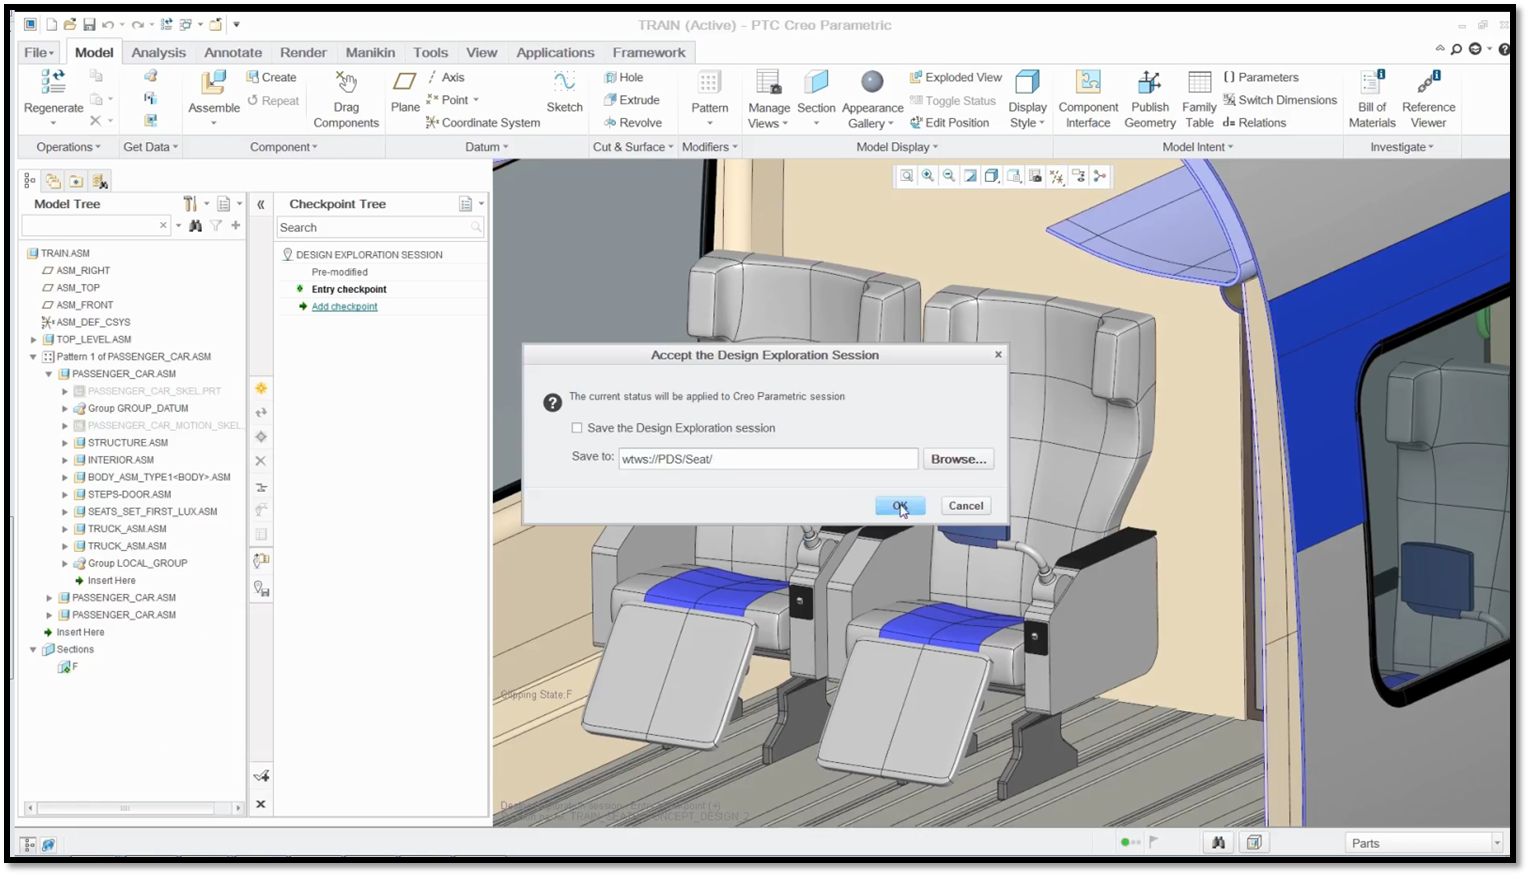
To complete the process, you can store your entire DEX session in a lightweight file format. This saves significant time, eliminating the need to load each design version and manage multiple PTC Creo Parametric instances just to review alternative designs. Entire DEX session data can be captured in a single file that can be accessed by other users to review different design alternatives. To access a DEX session that was created by other user – first download its file to the work space, then open it from the File menu. Select Manage Session, Design Exploration Session, click Open, and select the file. To browse different concepts – select desired checkpoint and click Activate.

You can easily locate and activate new design concepts from any of your Model Trees.
To learn more about design exploration in PTC Creo Design Exploration Extension, check out our video tutorial (“PTC Creo Design Exploration Extension Synopsis Demo Video”).
Stay tuned to our “Did You Know” blog series as we cover all of the exciting, new enhancements in PTC Creo 3.0.
For more in-depth product feature explanations, visit our Tech Tips area.
Have some ideas about what PTC Creo product features you’d like to learn more about? Send me a message or leave a comment below and we’ll write up the best ideas from the community. Thanks for reading, looking forward to all of your feedback!
In case you missed it, see what’s new and check out our recent Did You Know posts covering PTC Creo 3.0 enhancements:
- Fast Facts! Quick Tips for Using PTC Creo - Mechanism Part 1
- Did You Know? PTC Creo 3.0 Enhancements: Tangency Propagation in PTC Creo Flexible Modeling Extension
- Did You Know? PTC Creo Advanced Assembly Extension: Concurrent Engineering
This thread is inactive and closed by the PTC Community Management Team. If you would like to provide a reply and re-open this thread, please notify the moderator and reference the thread. You may also use "Start a topic" button to ask a new question. Please be sure to include what version of the PTC product you are using so another community member knowledgeable about your version may be able to assist.
Labels:
- Labels:
-
General
0 REPLIES 0


