Community Tip - Did you know you can set a signature that will be added to all your posts? Set it here! X
- Community
- Creo+ and Creo Parametric
- 3D Part & Assembly Design
- Dimension round up and tolerances in drawing mode
- Subscribe to RSS Feed
- Mark Topic as New
- Mark Topic as Read
- Float this Topic for Current User
- Bookmark
- Subscribe
- Mute
- Printer Friendly Page
Dimension round up and tolerances in drawing mode
- Mark as New
- Bookmark
- Subscribe
- Mute
- Subscribe to RSS Feed
- Permalink
- Notify Moderator
Dimension round up and tolerances in drawing mode
I have been trying for nearly a day to wrap my head around the myriad configuration options that I need to set in order to get the results I want. I won't mention the config.pro options and the .dtl options I have set alreadybecause that will just confuse the heck out of everyone. I'd like to start with a blank slate.
Here's what I want:
- A 3D part model in inches with dimensions to 4 decimal places. Most of the time we want 3, but occasionally we want 4. We have some very precise stuff sometimes.
- In the drawing however, I want the dimensions to be rounded up to 3 decimal places. By checking the "Rounded Dimension Value" in dimension Properties I know I can prevent this round up from affecting the actual geometry. But I want this to display by default.
- When I "Show Model Annotations", or create a driven dimension in a drawing I want this 3 decimal place round up to show up by default rather than have to modify it later.
- I also want to show mm as secondary dimensions, with one less dimension place, so that "primary/secondary" "inches/inches" trick won't work with my drawing.
Secondarily:
- I want symmetrical linear tolerances to be able to be displayed.
- I don't want them displayed by default when I show or create every dimension. Quality Control would not like me.
- I want to be able to go into dimension Properties of the 2 or 3 dimensions that need it and show the tolerance, not grayed out.
- I want default tolerances of a certain value set for my part (I believe I have this set in my start part).
- I do not want the tolerances to affect my actual geometry
This should not be too difficult, but wading through all the command prompt options and (PTC's attempts at explaining them) available in config.pro and my .dtl file, not to mention the View>Display Settings>Model Display>"Dimension Tolerances" check box, which to make no difference to anything...
I am working in Creo/Elements.... 5.0.
This thread is inactive and closed by the PTC Community Management Team. If you would like to provide a reply and re-open this thread, please notify the moderator and reference the thread. You may also use "Start a topic" button to ask a new question. Please be sure to include what version of the PTC product you are using so another community member knowledgeable about your version may be able to assist.
- Labels:
-
2D Drawing
- Mark as New
- Bookmark
- Subscribe
- Mute
- Subscribe to RSS Feed
- Permalink
- Notify Moderator
What you want is pretty much what I have already set up.
Which are you having trouble with?
- Mark as New
- Bookmark
- Subscribe
- Mute
- Subscribe to RSS Feed
- Permalink
- Notify Moderator
All of it ![]()
Seriously, right now two things:
- the dimensions on the drawing don't display rounded up to 3 decimal places by default, I have to edit them;
- when I edit dimension properties to show the tolerance the available value is not the default.
- Mark as New
- Bookmark
- Subscribe
- Mute
- Subscribe to RSS Feed
- Permalink
- Notify Moderator
config.pro - default_dec_places 3 (I use 4 and correct them on the drawing as needed).
I don't mess with default tolerances. I leave them at the default 0.1, 0.01, 0.001, and 0.5 degrees.
However, be aware that by default (at least in Creo 2.0), limit dimensions try to adjust geometry to the middle of the values. This really bothers me!
config.pro - maintain_limit_tol_nominal yes *no This sounds counter intuitive, but yes means it leaves the nominal value alone.
In general, I am very conscious about how many decimal places to show. If the model uses 4 place values for the sake of the drawing. If you really want to worry a machinist, show a dimension of .38" on a 3/8" hole! They will never trust your models again. This really plays havok with dual dimensions ![]()
detail.dtl - tol_display yes *no
- Mark as New
- Bookmark
- Subscribe
- Mute
- Subscribe to RSS Feed
- Permalink
- Notify Moderator
config.pro - default_dec_places 3 (I use 4 and correct them on the drawing as needed).
If you set default decimal places to 3, can you still type in a value that goes to 4 decimal places without it rounding up the actual geometry back to 3? I would be okay with this, I don't have to see 4 decimal places all the time. I only need to see the exact value when I double click on a dimension (when in sketcher or right-click>Edit) to change it.
I don't mess with default tolerances. I leave them at the default 0.1, 0.01, 0.001, and 0.5 degrees.
Nevertheless our company standard is 0.1, 0.01, 0.005 and 1 degree. It displays on the format of our drawings and I would like this to be in our parts. I think that in existing part files I simply need to edit the values down in the bottom right corner, and I have edited it in our start part so future parts will have it. What confuses me though is if I go to edit>properties of a dimension the default tolerance (although I have it set to nominal by default) is +0.0001 and -0.0001
However, be aware that by default (at least in Creo 2.0), limit dimensions try to adjust geometry to the middle of the values. This really bothers me!
config.pro - maintain_limit_tol_nominal yes *no This sounds counter intuitive, but yes means it leaves the nominal value alone.
Yep, I had this set.
In general, I am very conscious about how many decimal places to show. If the model uses 4 place values for the sake of the drawing. If you really want to worry a machinist, show a dimension of .38" on a 3/8" hole! They will never trust your models again. This really plays havok with dual dimensions ![]()
detail.dtl - tol_display yes *no
Yep, I had that set to "Yes".
Clearly you need to never make anything to 3/8". That's probably the only value for which the decimal and fractional could get mixed up...![]()
I think Point 3 of Document - CS74352 shown below is what I need, however I would be more confident if someone could translate it into english:
" linear_tol to # <tolerance x> x
Where # is an integer representing the number of decimal digits for the dimension, <tolerance> represents the tolerance value, and x represents the number of decimal digits for the tolerance (x must be greater than #)
For example, linear_tol 2 .035 3 would set .035 as the default tolerance for a 2 place dimension "
Huh?
- Mark as New
- Bookmark
- Subscribe
- Mute
- Subscribe to RSS Feed
- Permalink
- Notify Moderator
You are tryin to apply logic to the ways of PTC, aren't you? ![]()
Yes, internally the values remember your math... where an entry of 5/64 really is .078125 although at 3 places it shows as .078.
I don't know if this is different in your version. This basically says that new dimesnions will take on these values once they are set in config.pro or in your template files.
config.pro:
I haven't tested this yet, but it seems logical <cough>.
- Mark as New
- Bookmark
- Subscribe
- Mute
- Subscribe to RSS Feed
- Permalink
- Notify Moderator
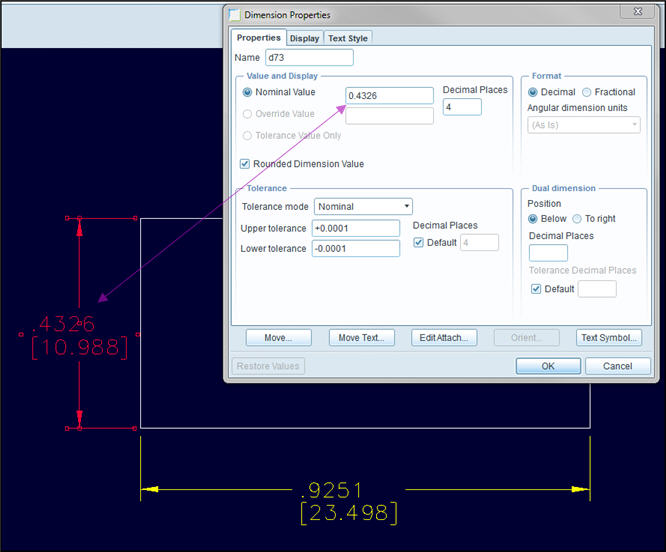
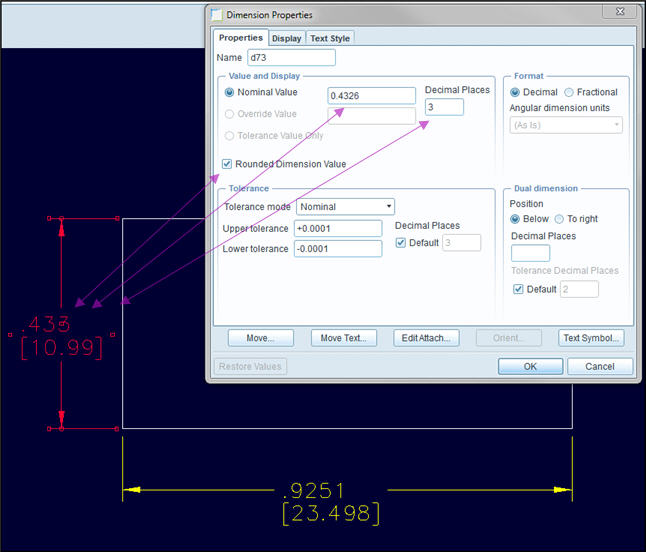
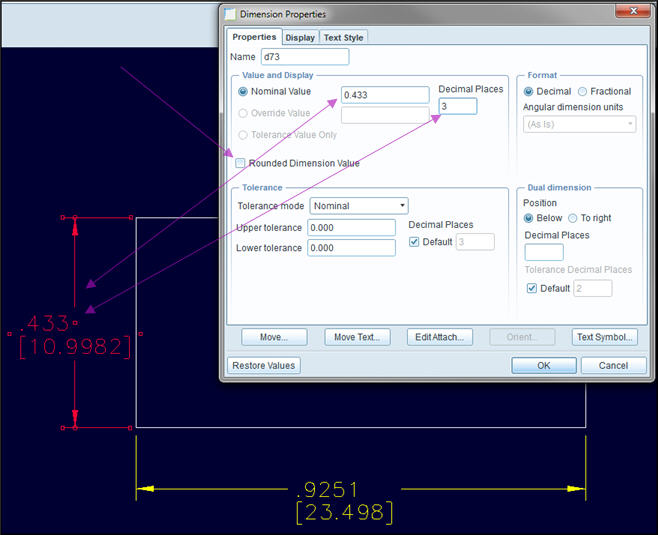
Okay. I think I know what has been going on with regard to some misbehaving dimensions from a couple of weeks ago. I had some dimensions to 4 decimal places, but had to show them to 3 decimal places on the drawing. Yet every time I went back to the 3D model, it had regenerated it with dimensions rounded up to 3 decimal places.
I had the drawing set to 3 decimal places, but with the "Rounded Dimension Value" box unchecked. So it rounded it to 3 places, but in actuality, not in the dimension display only. See the 3 attached pics. In the last one you can see with the box unchecked the real value of the dimension .4326 has changed to .433.
My solution to this was to change the config.pro option default_dec_places to 4. But this was wrong.


- Mark as New
- Bookmark
- Subscribe
- Mute
- Subscribe to RSS Feed
- Permalink
- Notify Moderator
However... I am still not able to get default tolerances to what I want them to be... I guess it doesn't matter: if I have to display the tolerance it's only because it's not standard.
Still, dammit, at approx 2 and a half grand a year in maintenence I don't see why i can';t have this set up the way I want! ![]()
- Mark as New
- Bookmark
- Subscribe
- Mute
- Subscribe to RSS Feed
- Permalink
- Notify Moderator
I found some strange behavior in Creo 1.0 but not in Creo 2.0. It could well be some bad "assumptions" by the programmers on what was to be "expected behavior".
If you still have maintenance, you could certainly have PTC support explain this to you.


