Community Tip - You can subscribe to a forum, label or individual post and receive email notifications when someone posts a new topic or reply. Learn more! X
- Community
- Creo+ and Creo Parametric
- 3D Part & Assembly Design
- Re: Drawing error
- Subscribe to RSS Feed
- Mark Topic as New
- Mark Topic as Read
- Float this Topic for Current User
- Bookmark
- Subscribe
- Mute
- Printer Friendly Page
Drawing error
- Mark as New
- Bookmark
- Subscribe
- Mute
- Subscribe to RSS Feed
- Permalink
- Notify Moderator
Drawing error
Hi,
When trying to create a drawing of my assembly model, I get these errors:
Error: The saved view name FRONT does not exist in the model PIPE_WRENCH.ASM. The drawing view on page 1 could not be created.
Error: The view on page 1 could not be created because the parent projection view was not created.
Error: The view on page 1 could not be created because the parent projection view was not created.
Could anyone please help me with these.
Thanks ![]()
This thread is inactive and closed by the PTC Community Management Team. If you would like to provide a reply and re-open this thread, please notify the moderator and reference the thread. You may also use "Start a topic" button to ask a new question. Please be sure to include what version of the PTC product you are using so another community member knowledgeable about your version may be able to assist.
Solved! Go to Solution.
- Labels:
-
Assembly Design
- Tags:
- creo_parametric_1.0
Accepted Solutions
- Mark as New
- Bookmark
- Subscribe
- Mute
- Subscribe to RSS Feed
- Permalink
- Notify Moderator
Hi...
What's happening here is that the drawing is looking to place a view called "FRONT". This view would normally be pre-defined and stored inside your 3D model. Because your model does not have such a view called "FRONT", the drawing cannot place it. The other two errors are "projection" view errors. Because the first view couldn't be placed, the additional 2 projections views also cannot be placed.
What Srikanth was trying to say was... you need to open your 3D model and create a view called "FRONT". Many times companies will have a basic blank 3D model template preconfigured to have common views, parameters, and other settings. This blank model template is usually called a "start part". Most of the time you don't have to create your own "FRONT" view, because one will already exist in your start part. In this case, either you didn't create your model using the template, your template didn't include default views, or your model was created from imported geometry. You'll have to create the "FRONT" view manually.
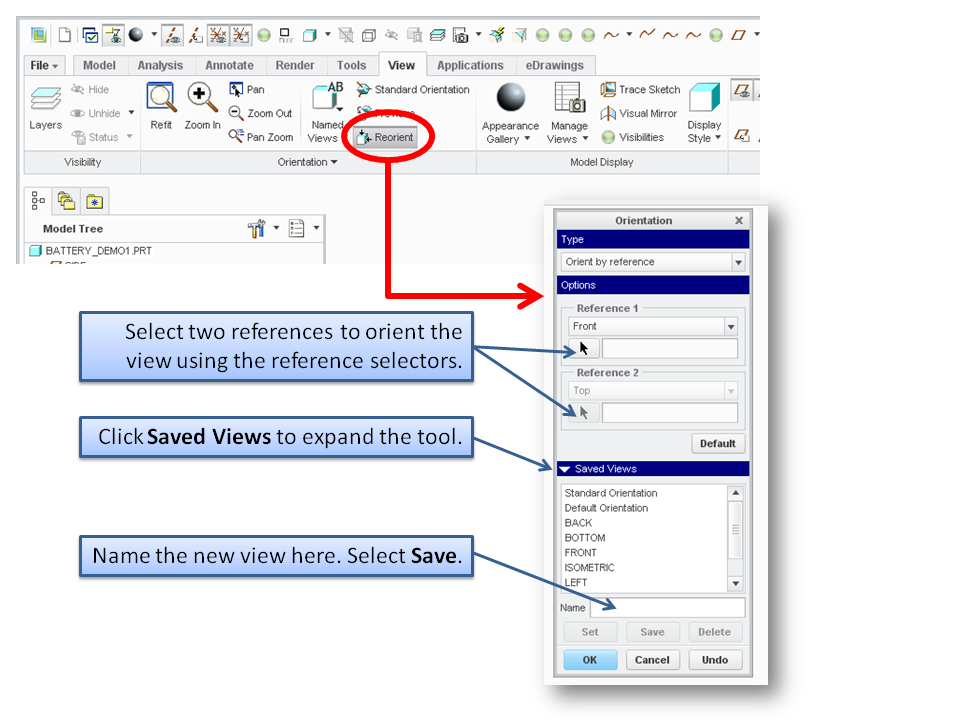
To do this in Creo Parametric 1.0, go to the View tab, select Reorient. The Orientation tool will open. You'll need to select two references to orient your model. The goal is to create the "FRONT" view. Your first reference will set your viewing direction. Select a surface or plane parallel to the front of your model. Your second reference will determine the orientation of your model as you look at the first reference. Select a second reference that's perpendicular ("normal") to the first reference. You may need to experiment or flip the viewing directions of your references to dial in the desired orientation.
Once you're satisfied with the orientation, select Saved Views from the Orientation tool. The tool will expand to reveal a sub-menu where you can name and save the view. The image below should help a bit... click it for a larger, more easily readable graphic...

Once you've created the "FRONT" view and saved it, save your model. The next time you start a drawing using a drawing template, your views will automatically appear.
Thanks and good luck!
-Brian
- Mark as New
- Bookmark
- Subscribe
- Mute
- Subscribe to RSS Feed
- Permalink
- Notify Moderator
create views in the assembly mode manually,and try to apply from property tab in drawing.
- Mark as New
- Bookmark
- Subscribe
- Mute
- Subscribe to RSS Feed
- Permalink
- Notify Moderator
Thanks for the reply, but how do i create the views manually?
- Mark as New
- Bookmark
- Subscribe
- Mute
- Subscribe to RSS Feed
- Permalink
- Notify Moderator
Hi...
What's happening here is that the drawing is looking to place a view called "FRONT". This view would normally be pre-defined and stored inside your 3D model. Because your model does not have such a view called "FRONT", the drawing cannot place it. The other two errors are "projection" view errors. Because the first view couldn't be placed, the additional 2 projections views also cannot be placed.
What Srikanth was trying to say was... you need to open your 3D model and create a view called "FRONT". Many times companies will have a basic blank 3D model template preconfigured to have common views, parameters, and other settings. This blank model template is usually called a "start part". Most of the time you don't have to create your own "FRONT" view, because one will already exist in your start part. In this case, either you didn't create your model using the template, your template didn't include default views, or your model was created from imported geometry. You'll have to create the "FRONT" view manually.
To do this in Creo Parametric 1.0, go to the View tab, select Reorient. The Orientation tool will open. You'll need to select two references to orient your model. The goal is to create the "FRONT" view. Your first reference will set your viewing direction. Select a surface or plane parallel to the front of your model. Your second reference will determine the orientation of your model as you look at the first reference. Select a second reference that's perpendicular ("normal") to the first reference. You may need to experiment or flip the viewing directions of your references to dial in the desired orientation.
Once you're satisfied with the orientation, select Saved Views from the Orientation tool. The tool will expand to reveal a sub-menu where you can name and save the view. The image below should help a bit... click it for a larger, more easily readable graphic...

Once you've created the "FRONT" view and saved it, save your model. The next time you start a drawing using a drawing template, your views will automatically appear.
Thanks and good luck!
-Brian
- Mark as New
- Bookmark
- Subscribe
- Mute
- Subscribe to RSS Feed
- Permalink
- Notify Moderator
Thanks for helping ![]()
It worked perfectly!
- Mark as New
- Bookmark
- Subscribe
- Mute
- Subscribe to RSS Feed
- Permalink
- Notify Moderator
Excellent! Write back if you get stuck...
Take care..
-Brian


