
Turn on suggestions
Auto-suggest helps you quickly narrow down your search results by suggesting possible matches as you type.
Showing results for
Please log in to access translation
Turn on suggestions
Auto-suggest helps you quickly narrow down your search results by suggesting possible matches as you type.
Showing results for
Community Tip - Need to share some code when posting a question or reply? Make sure to use the "Insert code sample" menu option. Learn more! X
- Community
- Creo+ and Creo Parametric
- 3D Part & Assembly Design
- Geometry overlap issue
Translate the entire conversation x
Please log in to access translation
Options
- Subscribe to RSS Feed
- Mark Topic as New
- Mark Topic as Read
- Float this Topic for Current User
- Bookmark
- Subscribe
- Mute
- Printer Friendly Page
Geometry overlap issue
Oct 22, 2013
01:54 PM
- Mark as New
- Bookmark
- Subscribe
- Mute
- Subscribe to RSS Feed
- Permalink
- Notify Moderator
Please log in to access translation
Oct 22, 2013
01:54 PM
Geometry overlap issue
I am in the process of importing Reference Models into a Mold model.
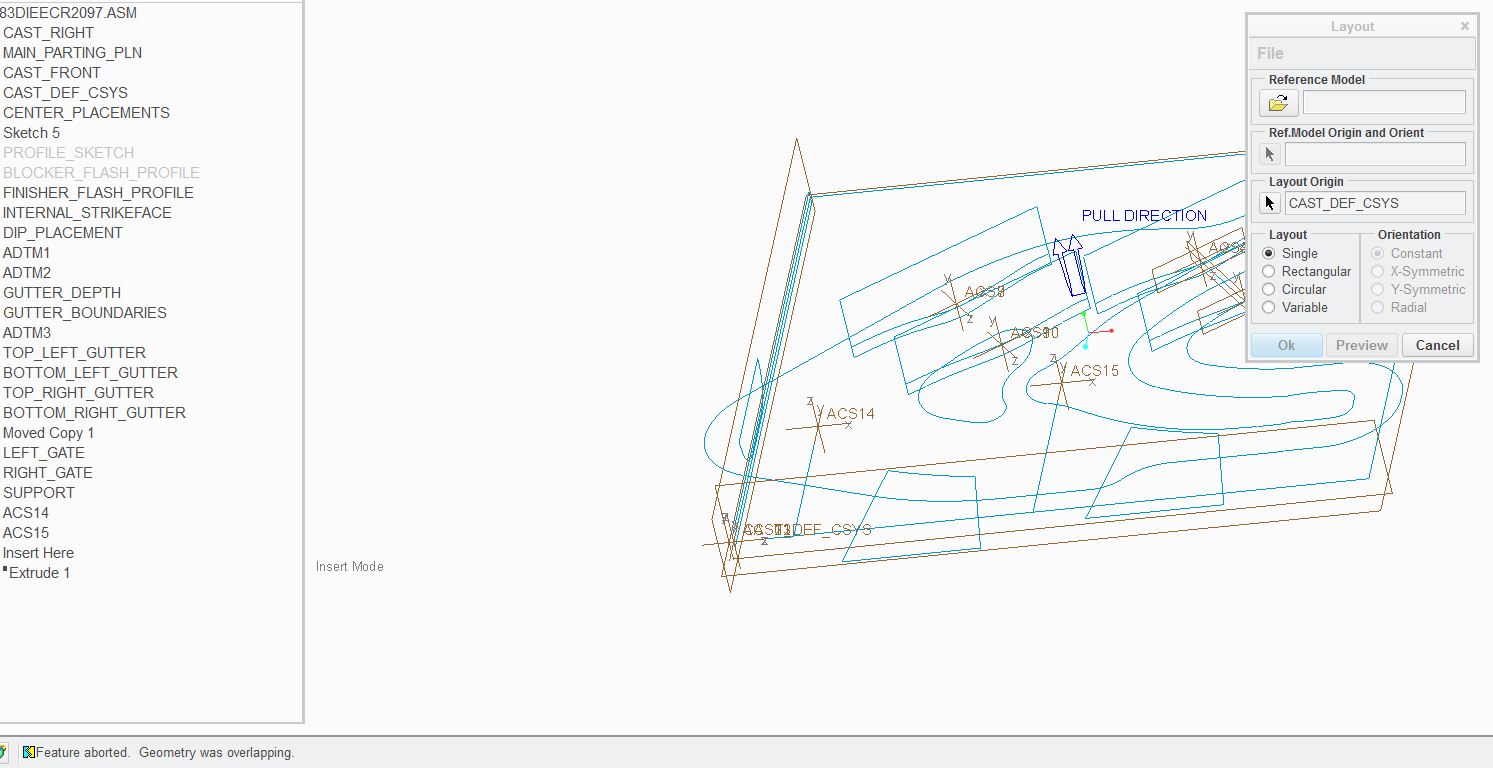
One of the models that I am trying to import comes up with the error "Feature aborted. Geometry was overlapping."
The model that I am trying to import includes a couple External merges which are merged together in that file.
Initially this model had some tiny edge Geometry Check issues which I resolved. I see no other issue showing up with this model.
There is another reference model which was created the same way that I have no trouble bringing into the Mold model.
Is there anything in specific I should look for that might be causing the geometry overlap issue?
This thread is inactive and closed by the PTC Community Management Team. If you would like to provide a reply and re-open this thread, please notify the moderator and reference the thread. You may also use "Start a topic" button to ask a new question. Please be sure to include what version of the PTC product you are using so another community member knowledgeable about your version may be able to assist.
Solved! Go to Solution.
ACCEPTED SOLUTION
Accepted Solutions
Oct 23, 2013
10:04 AM
- Mark as New
- Bookmark
- Subscribe
- Mute
- Subscribe to RSS Feed
- Permalink
- Notify Moderator
Please log in to access translation
Oct 23, 2013
10:04 AM
@Paul: First, you must enable absolute accuracy in your config.pro file. Then you must go into all the models in question and change the accuracy from Relative, to absolute with the same settings for each/all model(s). The config setting just ALLOWS you to later change that type of accuracy, it does NOT actually change the models.
Now, if you want, you can change your start part to have an absolute accuracy of a certain value, and that will do what it sounds like you want and have every model compatible. The caveat is that setting a low value for absolute accuracy increases file size. So, we use it ONLY where it's needed. For really complicated surfacing shapes or if I'm going to be doing merges etc., I'll set it to an absolute .00001 right off the bat. For simple stuff, I'll leave it at the default relative accuracy.
40 REPLIES 40
Oct 22, 2013
03:07 PM
- Mark as New
- Bookmark
- Subscribe
- Mute
- Subscribe to RSS Feed
- Permalink
- Notify Moderator
Please log in to access translation
Oct 22, 2013
03:07 PM
You might be dealing with accuracy settings. It could also be that exported models should be checked before importing them. Or are you talking merging native models?
Of course, you could be dealing with a tangency issue.
Can you share the model(s)?
Oct 22, 2013
04:14 PM
- Mark as New
- Bookmark
- Subscribe
- Mute
- Subscribe to RSS Feed
- Permalink
- Notify Moderator
Please log in to access translation
Oct 22, 2013
04:14 PM
To further explain what Antonius means, all the models that will be merged etc. should have the same absolute (not relative) accuracy, probably .0001 or smaller (.00001 etc.).
Oct 23, 2013
06:12 AM
- Mark as New
- Bookmark
- Subscribe
- Mute
- Subscribe to RSS Feed
- Permalink
- Notify Moderator
Please log in to access translation
Oct 23, 2013
06:12 AM
Hi!
Try this:
Export a flat surface and import it to a new part with 0.001
On the new part Edit definition of the imported feature, Options, Add from file, choose your file and do ok.
See if that works
Oct 23, 2013
07:04 AM
- Mark as New
- Bookmark
- Subscribe
- Mute
- Subscribe to RSS Feed
- Permalink
- Notify Moderator
Please log in to access translation
Oct 23, 2013
07:04 AM
Hi Hugo,
I have a few questions before I try this.
When you say "Export" a flat surface, do you mean Export as an IGES or STEP? The models I am trying to import into the Mold model are the standard .prt files.
When this model gets imported into a new part do you change the accuracy in the "Prepare" option area? Should this be defined as Relative or Absolute? Would the new part happen to be the Mold model that I've been trying to import into?
So, correct me if I'm wrong. You would import the flat surface 1st; then you would import the model that I've been unable to through the Edit Definition option?
Oct 23, 2013
07:14 AM
- Mark as New
- Bookmark
- Subscribe
- Mute
- Subscribe to RSS Feed
- Permalink
- Notify Moderator
Please log in to access translation
Oct 23, 2013
07:14 AM
Export iges or step, same thing
After importing the falt surface change the accuracy to absolut 0.001 and yes this part is your new part.
Yes import the file inside imported feature ( edit definition ).
Oct 23, 2013
07:47 AM
- Mark as New
- Bookmark
- Subscribe
- Mute
- Subscribe to RSS Feed
- Permalink
- Notify Moderator
Please log in to access translation
Oct 23, 2013
07:47 AM
Hugo,
There is only one thing that I don't see as being possible; the model file that I would import into is a Mold file. To my understanding it just isn't possible to import IGES or STEP into a Mold model. There is no option to bring in an IGES Reference model.
The models that I import (or try to import) into the Mold model are .prt files.
Oct 23, 2013
06:39 AM
- Mark as New
- Bookmark
- Subscribe
- Mute
- Subscribe to RSS Feed
- Permalink
- Notify Moderator
Please log in to access translation
Oct 23, 2013
06:39 AM
The accuracy settings are quite confusing to me.
I've had my configuration settings with Absolute Accuracy Enabled for a long time.
When I look at the model files in question I see that the 2 files that I need to import into the die have relative accuracy specified in the properties instead of absolute accuracy. The tolerance shown is .0012.
In looking at the die model file I see that Relative Accuracy is used, and the tolerance shown is .0026.
I have not specified accuracy when I have created any of the model files yet there is a difference.
The strange thing is that one of the model files with the .0012 relative accuracy imports into the .0026 absolute accuracy model, while the other model file with the .0012 relative accuracy does not import.
I'm not sure that this is what is causing the failure but I would like to understand why Creo sometimes would build a model with relative accuracy and the other model would build it as absolute accuracy. I have Absolute Accuracy enabled so I would have thought all models would be created this way.
Oct 23, 2013
06:42 AM
- Mark as New
- Bookmark
- Subscribe
- Mute
- Subscribe to RSS Feed
- Permalink
- Notify Moderator
Please log in to access translation
Oct 23, 2013
06:42 AM
I had that problem too, please try my option and give me feedback
Oct 23, 2013
10:04 AM
- Mark as New
- Bookmark
- Subscribe
- Mute
- Subscribe to RSS Feed
- Permalink
- Notify Moderator
Please log in to access translation
Oct 23, 2013
10:04 AM
@Paul: First, you must enable absolute accuracy in your config.pro file. Then you must go into all the models in question and change the accuracy from Relative, to absolute with the same settings for each/all model(s). The config setting just ALLOWS you to later change that type of accuracy, it does NOT actually change the models.
Now, if you want, you can change your start part to have an absolute accuracy of a certain value, and that will do what it sounds like you want and have every model compatible. The caveat is that setting a low value for absolute accuracy increases file size. So, we use it ONLY where it's needed. For really complicated surfacing shapes or if I'm going to be doing merges etc., I'll set it to an absolute .00001 right off the bat. For simple stuff, I'll leave it at the default relative accuracy.
Oct 23, 2013
12:27 PM
- Mark as New
- Bookmark
- Subscribe
- Mute
- Subscribe to RSS Feed
- Permalink
- Notify Moderator
Please log in to access translation
Oct 23, 2013
12:27 PM
Thank you, that finally did the trick.
Several of you pointed out correctly that this was a tolerance issue.
I just didn't realize that I needed to sync the tolerances within each model file.
I do have absolute accuracy enabled. I don't understand why the model files would set themselves up to be relative accuracy.
Do you have to establish the absolute accuracy of every single model file you build?
Oct 23, 2013
12:36 PM
- Mark as New
- Bookmark
- Subscribe
- Mute
- Subscribe to RSS Feed
- Permalink
- Notify Moderator
Please log in to access translation
Oct 23, 2013
12:36 PM
This really should be a background automatic function but its not. I only learned about it when I tried to extrude a silkscreen on a rack panel. It really is an archaic implementation of managing internal calculations. I'm really hoping it gets upgraded in Creo 3.0.
In the meantime, thanks Frank for clarifying for Paul. And Paul, I am glad you got it to work... Community 1 - Support 0 
If you use template parts, you can enable the Absolute Accuracy in all your config.pro files, and you can set your accuracy in your template or start_part files. I have many of my start parts set to .00005" absolute accuracy.
Oct 23, 2013
04:02 PM
- Mark as New
- Bookmark
- Subscribe
- Mute
- Subscribe to RSS Feed
- Permalink
- Notify Moderator
Please log in to access translation
Oct 23, 2013
04:02 PM
Anything to help brotha!
Hey PTC, maybe instead of "points" for correct answers, we can get some.....cash?  Or maybe points are put towards a free copy of Pro/E? I'd like to start a little business, and would hate to have to stoop to using SW because it's more affordable......
Oct 23, 2013
01:11 PM
- Mark as New
- Bookmark
- Subscribe
- Mute
- Subscribe to RSS Feed
- Permalink
- Notify Moderator
Please log in to access translation
Oct 23, 2013
01:11 PM
I think in Creo 2, maybe earlier, absolute accuracy is the default, I believe set to 0.0001". However, that only applies for parts made from scratch with no template. If you are using older start parts / templates, the accuracy will be defined in the template. You need to open your templates, change their accuracy and save them.
Oct 23, 2013
01:20 PM
- Mark as New
- Bookmark
- Subscribe
- Mute
- Subscribe to RSS Feed
- Permalink
- Notify Moderator
Please log in to access translation
Oct 23, 2013
01:20 PM
Since Creo 1.0, absolute accuracy is disabled and the default is relative at .0012". Without the specific enable_absolute_accuracy yes addition to the config.pro file, you get relative only regardless of what is set in the templates.
Oct 23, 2013
01:45 PM
- Mark as New
- Bookmark
- Subscribe
- Mute
- Subscribe to RSS Feed
- Permalink
- Notify Moderator
Please log in to access translation
Oct 23, 2013
01:45 PM
Wow, I jsut created a blank part in Creo 2 and you're right. I could have sworn that PTC had announced that they were making absolute the default.
It's been that way as long as I can remember, default is relative 0.0012. I started on Pro/E rev 16 doing mold design, we always used absolute accuracy because you had to with molds. I never saw a need or benefit to relative, in fact it causes me trouble most of the time.
My apologies for the misinformation.
Oct 23, 2013
02:07 PM
- Mark as New
- Bookmark
- Subscribe
- Mute
- Subscribe to RSS Feed
- Permalink
- Notify Moderator
Please log in to access translation
Oct 23, 2013
02:07 PM
I did check my start part templates and indeed they are set to relative .0012
I planned on changing this to absolute .0012. For some reason this number was too small for Creo. I had to enter a .00722 tolerance or I couldn't save it off.
I had no trouble changing the model files with geometry over to .0012.
I don't like the fact that my new models will be so loose with their tolerance. This may lead into it's own problems.
I'd like to just have the correct value set and forget about it.
Oct 23, 2013
02:23 PM
- Mark as New
- Bookmark
- Subscribe
- Mute
- Subscribe to RSS Feed
- Permalink
- Notify Moderator
Please log in to access translation
Oct 23, 2013
02:23 PM
What units are you using? Absolute accuracy is units sensitive (relative is not). Absolute acuracy defines the smallest edge that Creo will create, relative sets the smallest as a ratio of the largest.
If you're in inches, you want to go smaller than 0.0012". The default is 0.0001", which works well for us. The minimums are odd, too. Frequently, when working in a mm part Creo won't let me enter 0.00254mm, saying it's too small. But if I accept the default of 0.0001mm, it'll take it. Dumb.
For metric models, I'll change my units to inches, change my accuracy to the default 0.0001" (it always accepts that, regardless of what it thinks the minimum is), then change back to metric.
Oct 23, 2013
02:57 PM
- Mark as New
- Bookmark
- Subscribe
- Mute
- Subscribe to RSS Feed
- Permalink
- Notify Moderator
Please log in to access translation
Oct 23, 2013
02:57 PM
In your start part create a small extrude 3"x 3"x 1". Then change the absolute accuracy to .0001 or .0002. Assemble this into your start assembly and change the accuracy there if you want. Then delete the small extrude save the part and you are good to go.
Oct 24, 2013
10:23 AM
- Mark as New
- Bookmark
- Subscribe
- Mute
- Subscribe to RSS Feed
- Permalink
- Notify Moderator
Please log in to access translation
Oct 24, 2013
10:23 AM
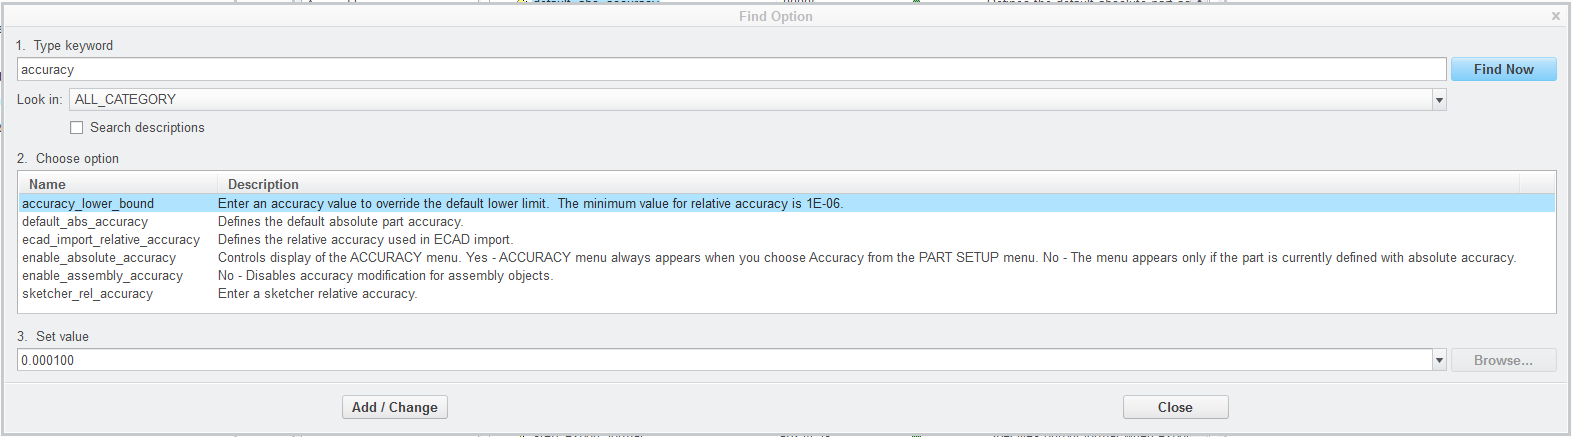
As an addendum the config option 'accuracy_lower_bound' (and a very small number) might set you straight on the entering of the value you want
Oct 24, 2013
11:24 AM
- Mark as New
- Bookmark
- Subscribe
- Mute
- Subscribe to RSS Feed
- Permalink
- Notify Moderator
Please log in to access translation
Oct 24, 2013
11:24 AM
Good point Charlotte.
For completeness... all the accuracy options:
Oct 24, 2013
12:03 PM
- Mark as New
- Bookmark
- Subscribe
- Mute
- Subscribe to RSS Feed
- Permalink
- Notify Moderator
Please log in to access translation
Oct 24, 2013
12:03 PM
Good point!
Oct 23, 2013
08:25 AM
- Mark as New
- Bookmark
- Subscribe
- Mute
- Subscribe to RSS Feed
- Permalink
- Notify Moderator
Please log in to access translation
Oct 23, 2013
08:25 AM
It might be helpful if I attach a screenshot with the error message in the context of the import.
Oct 23, 2013
08:44 AM
- Mark as New
- Bookmark
- Subscribe
- Mute
- Subscribe to RSS Feed
- Permalink
- Notify Moderator
Please log in to access translation
Oct 23, 2013
08:44 AM
First create a part file then assemble to the manufacturing assembly
Oct 23, 2013
09:48 AM
- Mark as New
- Bookmark
- Subscribe
- Mute
- Subscribe to RSS Feed
- Permalink
- Notify Moderator
Please log in to access translation
Oct 23, 2013
09:48 AM
Hugo,
I appreciate your help, but I just can't follow the steps that you've suggested. Even if I import a .prt file as a reference instead of an IGES I can not change the model that get's imported.
All options to re-channel the imported part file are greyed out. I've tried this through the import feature directly as well as the dropdown External Merge. It appears you are just stuck with the reference model that gets imported.
Oct 23, 2013
09:57 AM
- Mark as New
- Bookmark
- Subscribe
- Mute
- Subscribe to RSS Feed
- Permalink
- Notify Moderator
Please log in to access translation
Oct 23, 2013
09:57 AM
Paul, do you have active maintenance? Since you know what you are doing is correct and the function fails, it would be good to have PTC look at it in parallel.
I don't have the mold extension, but it is based on the merge feature of core Creo. You can try doing this outside the mold package by making a block and assembling the block and part into an assembly. Activate the block and merge the part to the block. See if this fails as well (probably will). Then start changing accuracy settings by 1st enabling absolute accuracy and then changing the model attributes. They may need to be adjusted up or down. It is hard to say what makes this little time bomb tick.
Oct 23, 2013
10:01 AM
- Mark as New
- Bookmark
- Subscribe
- Mute
- Subscribe to RSS Feed
- Permalink
- Notify Moderator
Please log in to access translation
Oct 23, 2013
10:01 AM
Paul i agree with Antonius , i work with manufacter files everyday and i don't understand your error. I make cavity/core splits everyday working with mold compnents and volumes and don't know how can i solve that.
Oct 23, 2013
11:06 AM
- Mark as New
- Bookmark
- Subscribe
- Mute
- Subscribe to RSS Feed
- Permalink
- Notify Moderator
Please log in to access translation
Oct 23, 2013
11:06 AM
Antonius,
I tried what you suggested with attempting to bring the problem part into a fresh model. I ended up with an invalid contraints error message.
When I tried to bring in the model that does work I got a fully constrained message and it did come in.
It would seem strange that this might be a constraint issue.
I will mess around a little with tolerances. I'm new to this so I'm not sure how to placate the software.
Thanks for your suggestions!
I may end up calling support but this is always a very trying process.
Oct 23, 2013
11:27 AM
- Mark as New
- Bookmark
- Subscribe
- Mute
- Subscribe to RSS Feed
- Permalink
- Notify Moderator
Please log in to access translation
Oct 23, 2013
11:27 AM
Don't let support get in your way. They are there to help you. Just give them the models you are having trouble with and tell them what you need it to do. It sounds like you are in a business critical situation and should get prompt support.
I find that recording a session in a screen cap video is very helpful. If you don't have video capture software, CamStudio is free and easy to use. Enough quality to get the point across. I upload to YouTube just to keep things simple in the support case.
As for the constraint issue, if this is an assembly constraint, make both parts "fixed" and unrelated to each other, where the block is created to engulf the part file. When you merge the part file with the Active block model, it should just hollow the block out.
Oct 23, 2013
11:33 AM
- Mark as New
- Bookmark
- Subscribe
- Mute
- Subscribe to RSS Feed
- Permalink
- Notify Moderator
Please log in to access translation
Oct 23, 2013
11:33 AM
BTW: You want to start a support case by logging a case on the PTC support website. If you are not already set up, you will need a bit of information from your CAD administrator. You need a customer number and a current maintenance code. They may need to add you as a site user; not sure about that. Having this set up makes support cases very easy to log and track after that. I highly recommend everyone use this service when they get stuck. ...of course, come into the community as well. Its always good to see who can solve an issue faster or more completely "us or them"


