Community Tip - Stay updated on what is happening on the PTC Community by subscribing to PTC Community Announcements. X
- Community
- Creo+ and Creo Parametric
- 3D Part & Assembly Design
- Re: How to create Twisted wires
- Subscribe to RSS Feed
- Mark Topic as New
- Mark Topic as Read
- Float this Topic for Current User
- Bookmark
- Subscribe
- Mute
- Printer Friendly Page
How to create Twisted wires
- Mark as New
- Bookmark
- Subscribe
- Mute
- Subscribe to RSS Feed
- Permalink
- Notify Moderator
How to create Twisted wires
Can anyone tell me how to show twisted wires in Pro-E? I took the PTC training course on Cabling a few years ago and the instructor couldnt show me then. Does anyone know how to do this now. I'm using 4.0 now.
I look forward to hearing form you.
- Labels:
-
Routed Syst. Design
- Mark as New
- Bookmark
- Subscribe
- Mute
- Subscribe to RSS Feed
- Permalink
- Notify Moderator
Geoff,
Are you trying to do this within Cabling automatically, or do you want a general modeling method? I don't remember this being an automatic feature when I last looked at the Cabling module a few years back, I may be wrong. Anyway, it can be done quite easily with a Datum Curve at the centerline of your cable and two (or more) Variable Section Sweeps twisting around the Curve for the individual wires.
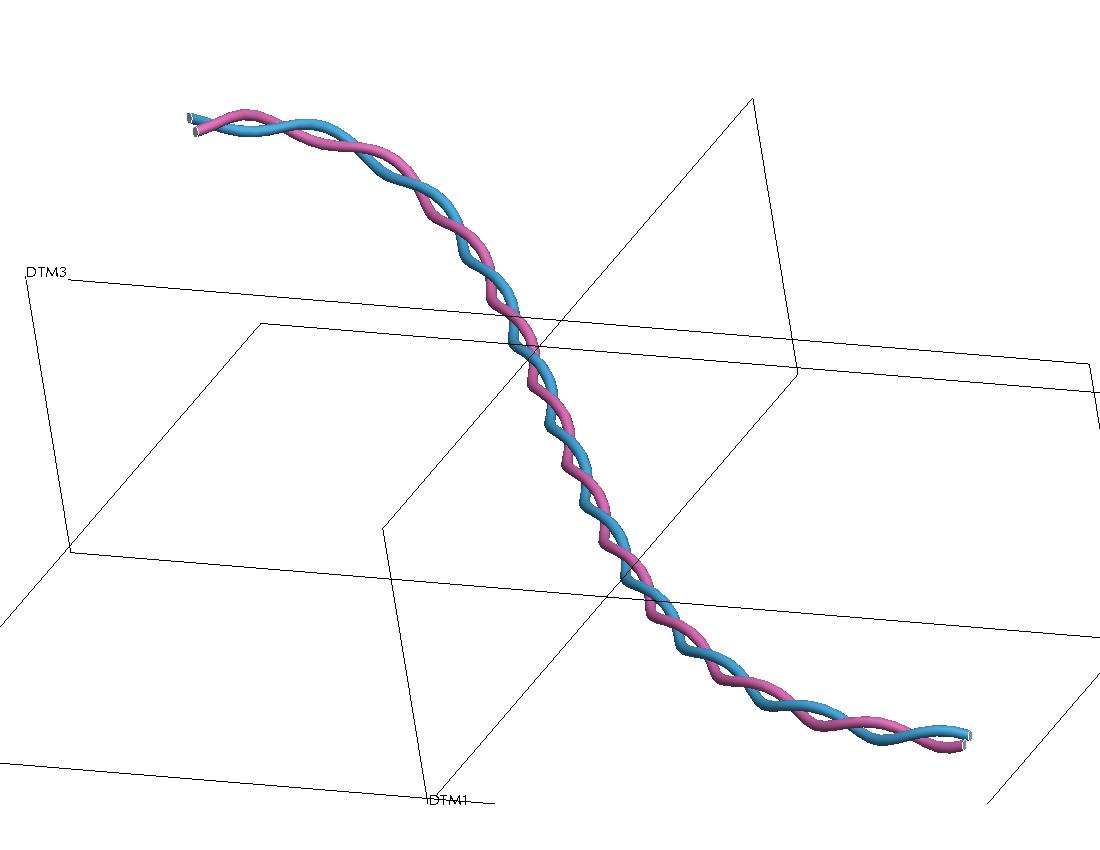
When you create the VSS, you sketch a circle on an angled centerline going through the start point, then you vary the angle dimension using a Relation in Sketcher. For example, if you wanted 10 twists as in the above illustration, your relation would be something like sd4=trajpar*360*10.
If this method interests you, but you are unfamiliar with "trajpar" and relations like the one above, I can give you more details.
David
- Mark as New
- Bookmark
- Subscribe
- Mute
- Subscribe to RSS Feed
- Permalink
- Notify Moderator
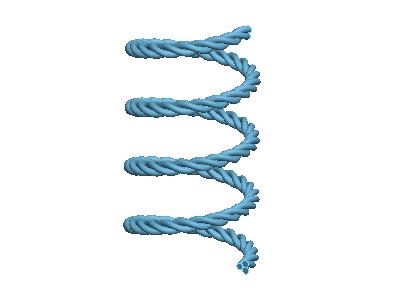
P.S. This general method can be used for a variety of different things, such as twisted cable, or even a twisted-three-wire spring:
- Mark as New
- Bookmark
- Subscribe
- Mute
- Subscribe to RSS Feed
- Permalink
- Notify Moderator
OMG
- Mark as New
- Bookmark
- Subscribe
- Mute
- Subscribe to RSS Feed
- Permalink
- Notify Moderator
Hi David
Tried the approach for the twisted wire and the spring. Works well but the sketch plane is not normal to the wire trajectory.
If the number of twists (as a parameter) is kept low say 20 it looks OK as in the image below.
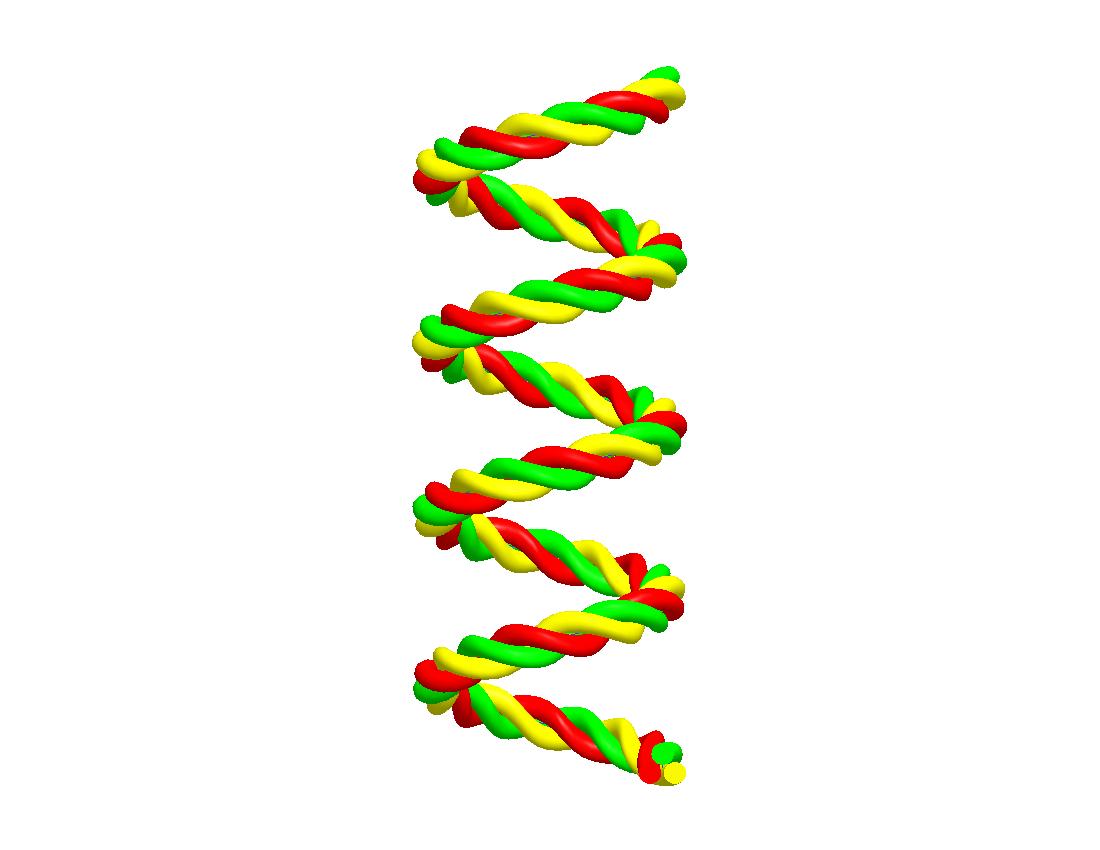
If the no of twists is increased to say 40 in the next image a change crosssection is seen.
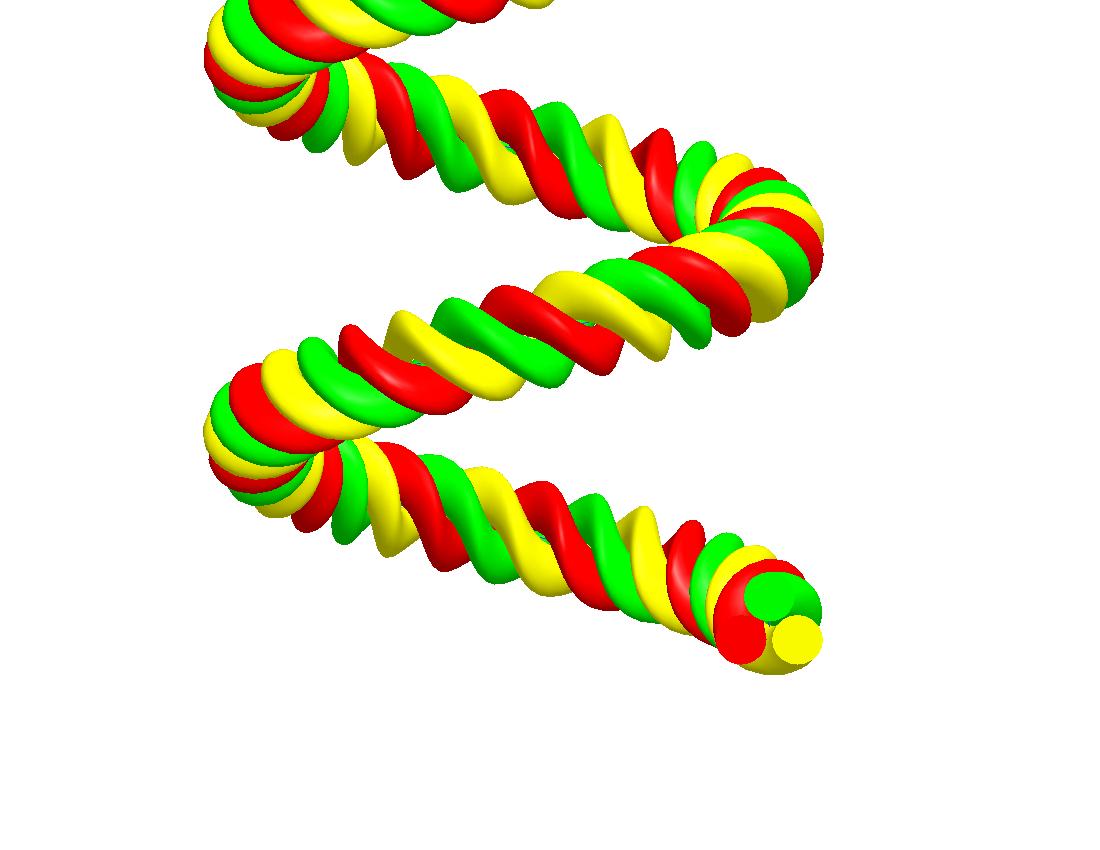
How do we solve this? I could not find the equivalent of Helical sweep option of Normal to trajectory in VSS.
- Mark as New
- Bookmark
- Subscribe
- Mute
- Subscribe to RSS Feed
- Permalink
- Notify Moderator
Ajayinder,
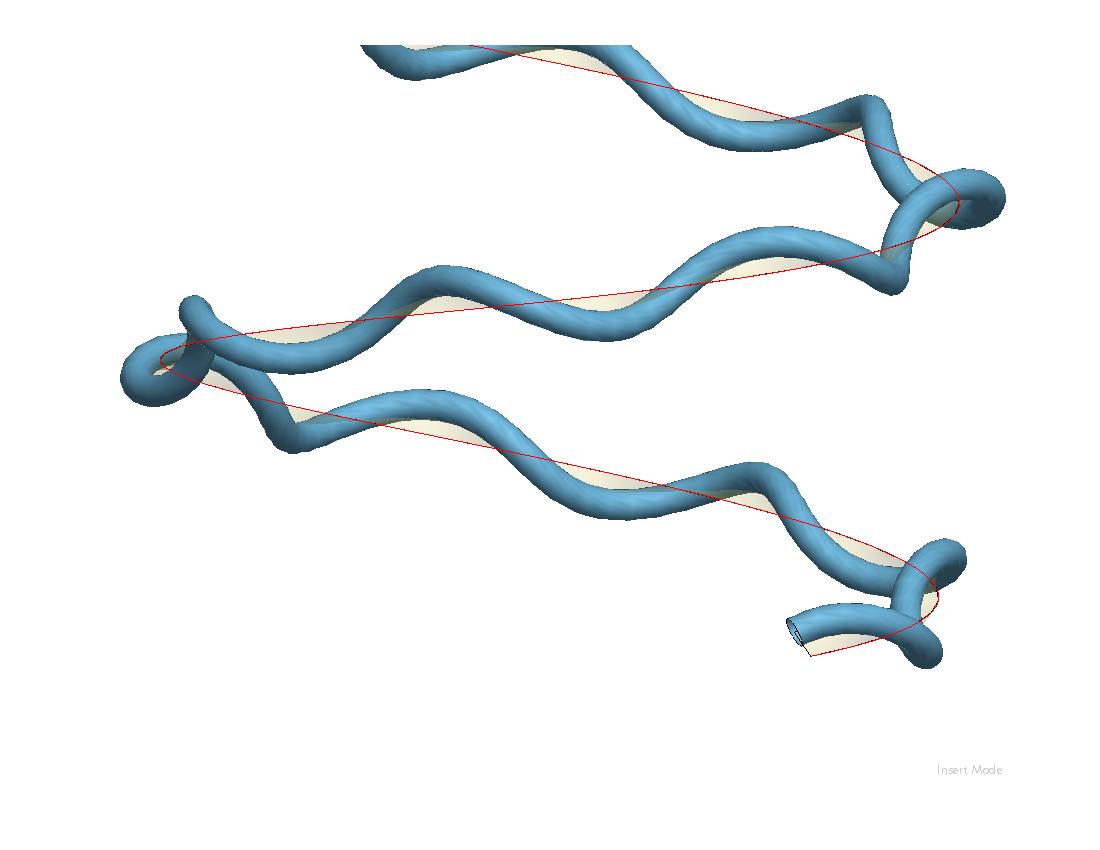
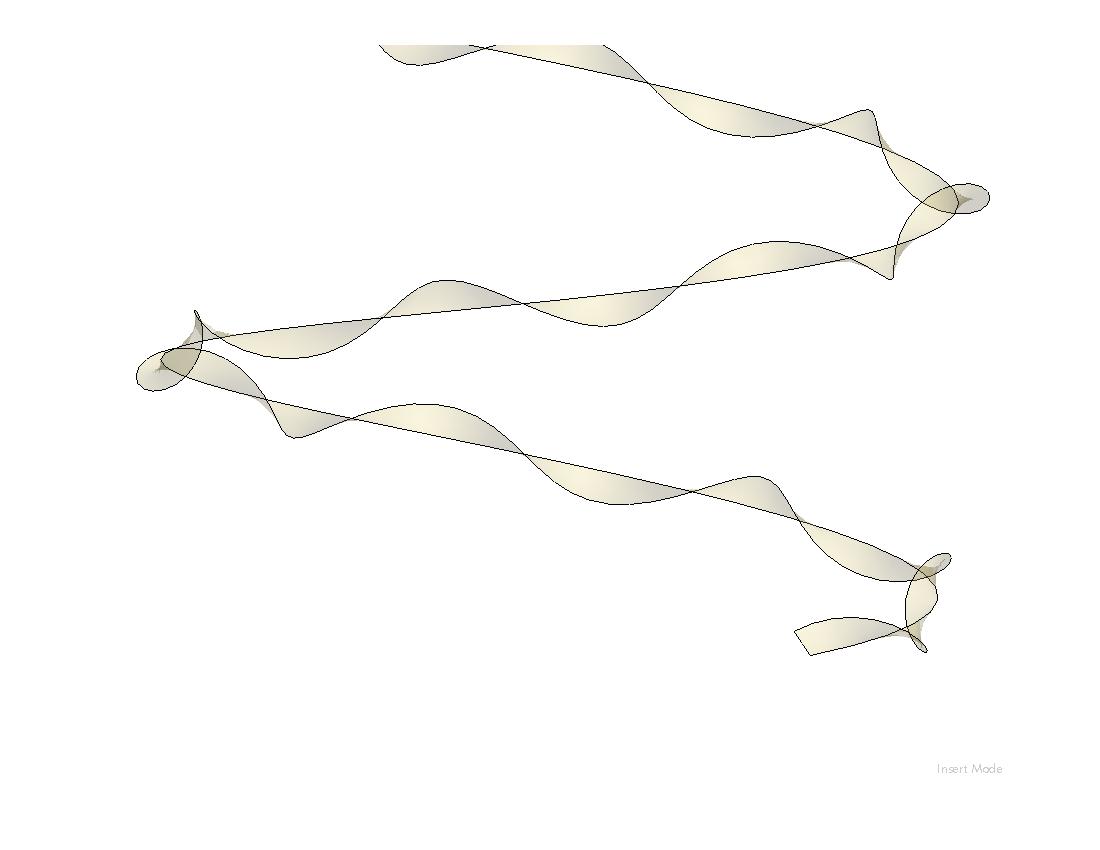
You are right; when there is too much twist, you can't use the simpler technique. What you need then is an intermediate VSS, namely a twisted ribbon whose edge you can use as the trajectory for your circular (or other) section. If you think about it, Nomal to Trajectory is not relevant with the simpler method because there is no pre-existing twisting trajectory since the twist is produced within the feature relation and doesn't exist before the sketch. Anyway, instead of sketching a circle to start, sketch a straightline and use a trajpar relation to make it twist around the primary curve trajectory. Then use the resulting twisted edge as your trajectory for the circular section (centered right on it).
David
- Mark as New
- Bookmark
- Subscribe
- Mute
- Subscribe to RSS Feed
- Permalink
- Notify Moderator
In other words, create this first:
- Mark as New
- Bookmark
- Subscribe
- Mute
- Subscribe to RSS Feed
- Permalink
- Notify Moderator
Thanks. This would work. Will try it out immediately.
Wondering how to extend it to multicore (multilevel of twisted wires) forming wire ropes......
- Mark as New
- Bookmark
- Subscribe
- Mute
- Subscribe to RSS Feed
- Permalink
- Notify Moderator
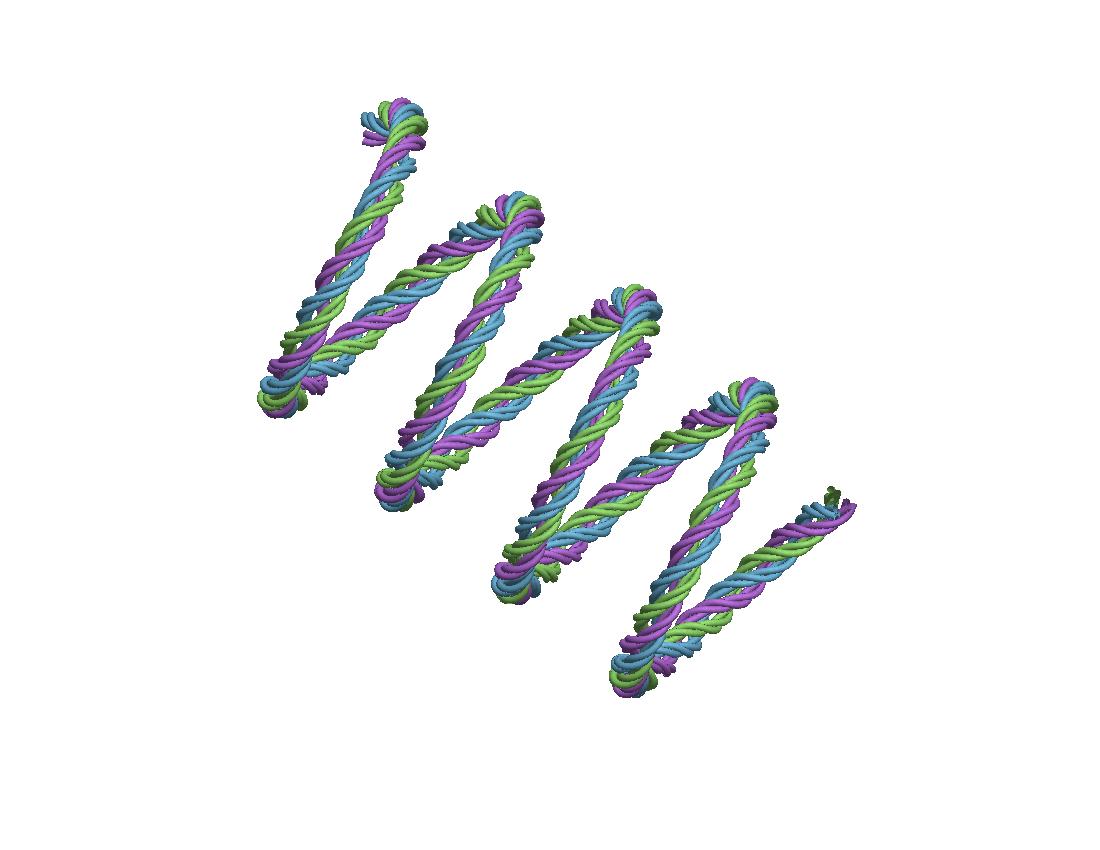
Haven't tried that yet, but I don't know why you can't "piggyback" the technique, i.e. create ribbons twisted around twisted ribbons. By the way, to save time, you can't directly pattern one ribbon or wire to get multiples, but you can do something close enough. Just copy-and-paste the original VSS (twice for 3-wire), then do Edit Definition on the copies (you may have to repick the original curve reference first). Then in the sketch just add an angle (120 & 240 deg. for 3-wire) to the end of the trajpar relation.
- Mark as New
- Bookmark
- Subscribe
- Mute
- Subscribe to RSS Feed
- Permalink
- Notify Moderator
Here you go. This time saved 3 parts and assembled; could use 9 parts and 3 subassemblies as well:
- Mark as New
- Bookmark
- Subscribe
- Mute
- Subscribe to RSS Feed
- Permalink
- Notify Moderator
David,
Thanks for the response. Can you send me some pics of your sketch? I have used trajpar in the past but cant figure this one out for some reason.
Also, one of our goals is to keep the wires round during the twist. I noticed on some of the examples posted the wires seem to be oval shape. We would like to avoid this if possible.
Thanks for the help!
- Mark as New
- Bookmark
- Subscribe
- Mute
- Subscribe to RSS Feed
- Permalink
- Notify Moderator
Geoff,
The first method described does mean that the wire cross section will end up elliptical, only slightly so if there aren't too many twists. For keeping the sections round, see the last few posts in this thread (my discussion with Ajayinder). Recapping, to keep the section round you need to create a VSS twisted flat ribbon first, then use its outbound edge as the trajectory for your circular section. I will try to attach shots of the Sketches for each method.
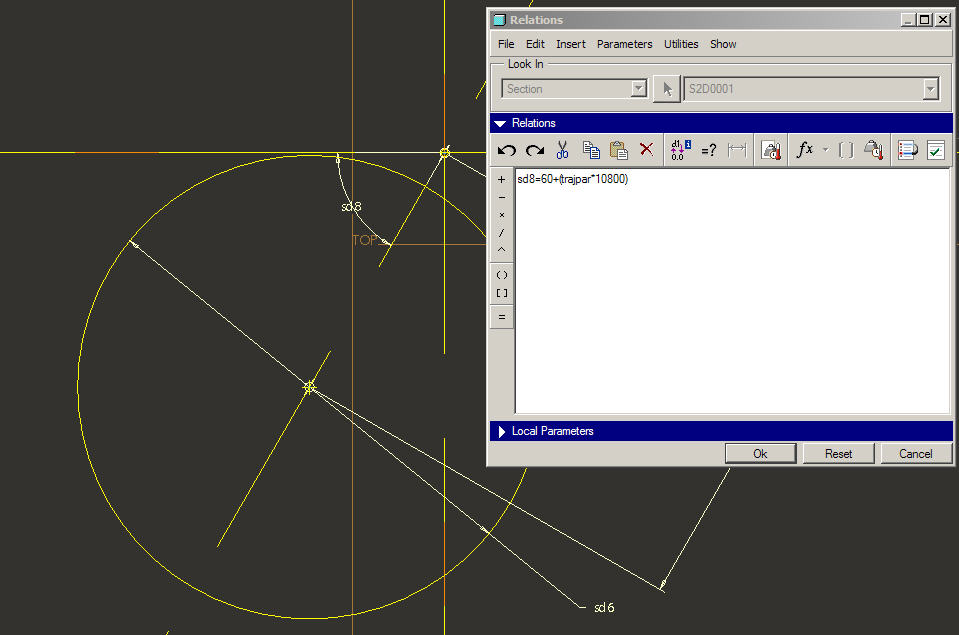
There are three dimensions in the sketch: wire diameter, center distance from trajectory curve, and angle, the latter controlled by trajpar, in this case by the relation: sd8=60+(trajpar*10800).
[For some reason I can't attach the second jpeg here, so I'll do it in a separate post.]
David
- Mark as New
- Bookmark
- Subscribe
- Mute
- Subscribe to RSS Feed
- Permalink
- Notify Moderator
Geoff,
This illustrates the superior and one-step-more-involved method. The Sketch is just a straight line that twists around the trajectory to create a ribbon. Then the circular section can be placed in a second VSS using the new outbound edge of the ribbon as its trajectory.
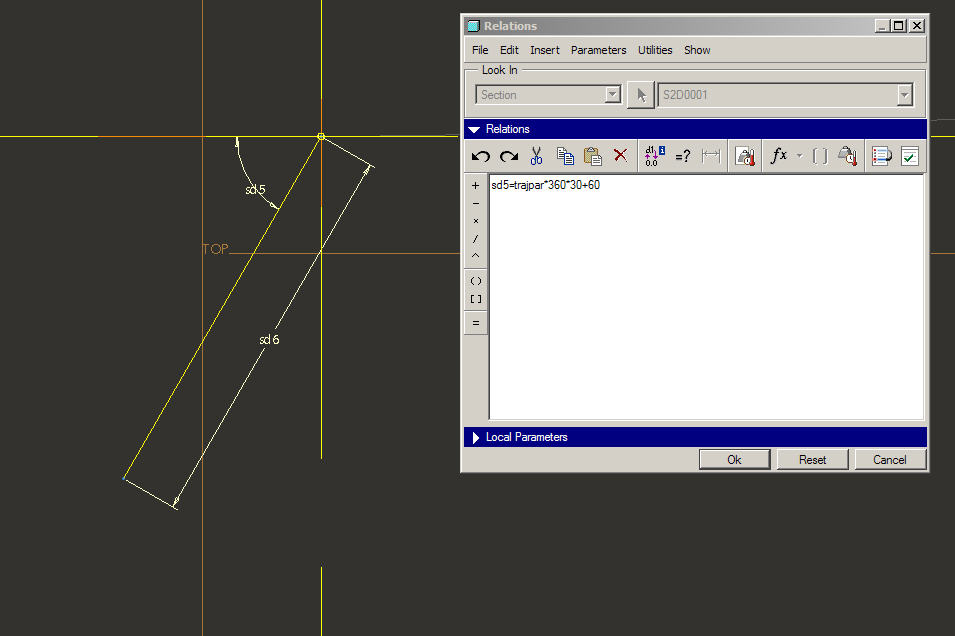
Only two dimensions this time: length of line, and again the angle, in this particular case controlled by the relation: sd5=trajpar*360*30+60.
The 60 is included so that you can copy this VSS and get the additional wires needed by changing that value (to 240 for 2 wires, to 300 for the 2nd of 3, etc.). You can also create a part parameter for the offset angle, and use it instead of 60 in the relation. Then if you copy the part to create a new part for the second wire, all you have to do is change the value of the parameter to get the right geometry.
David
- Mark as New
- Bookmark
- Subscribe
- Mute
- Subscribe to RSS Feed
- Permalink
- Notify Moderator
Geoff,
If you are successful with the truly-round wire method, your next question may be, "What about the ends?". The two circular ends will not be coplanar, besides which you might want a short untwisted section leading into a connector, etc. There are various ways of dealing with this, but you might be interested in the following possibility.
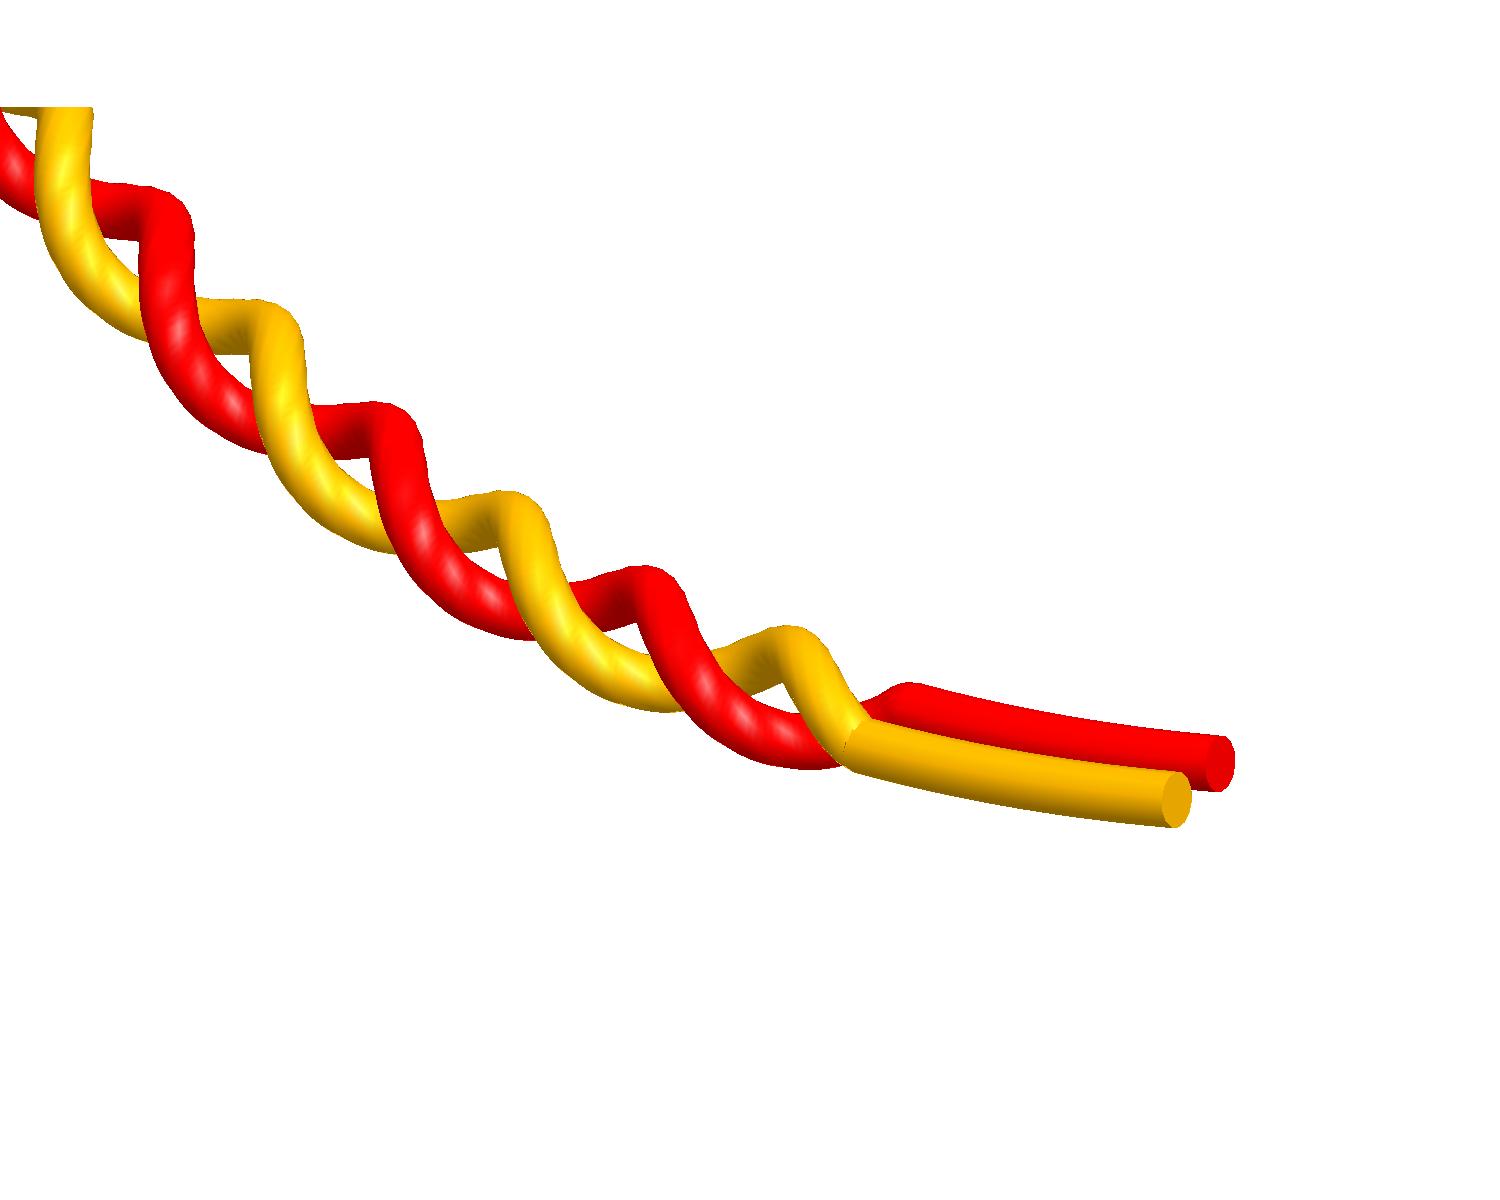
This was created using the following Sketcher relations:
IF trajpar<.05
sd5=45
ELSE
sd5=45+(trajpar-.05)*360*20
ENDIF
Copy the 1st wire, change 45 to 225 for the 2nd wire, assemble both using Default or CSYS.
(I so love the incredible logic/math engine available from the creators of Pro/E!!)
David
- Mark as New
- Bookmark
- Subscribe
- Mute
- Subscribe to RSS Feed
- Permalink
- Notify Moderator
Great! Thanks for all your help!
next question....Is there a way to get that straight section on both ends?
- Mark as New
- Bookmark
- Subscribe
- Mute
- Subscribe to RSS Feed
- Permalink
- Notify Moderator
Geoff,
Sure, just a little more complicated in the relations department.
IF trajpar<=.05
sd5=45
ENDIF
IF trajpar>.05 & trajpar<.95
sd5=45+(trajpar-.05)*360*20
ENDIF
IF trajpar>=.95
sd5=45+.9*360*20
ENDIF
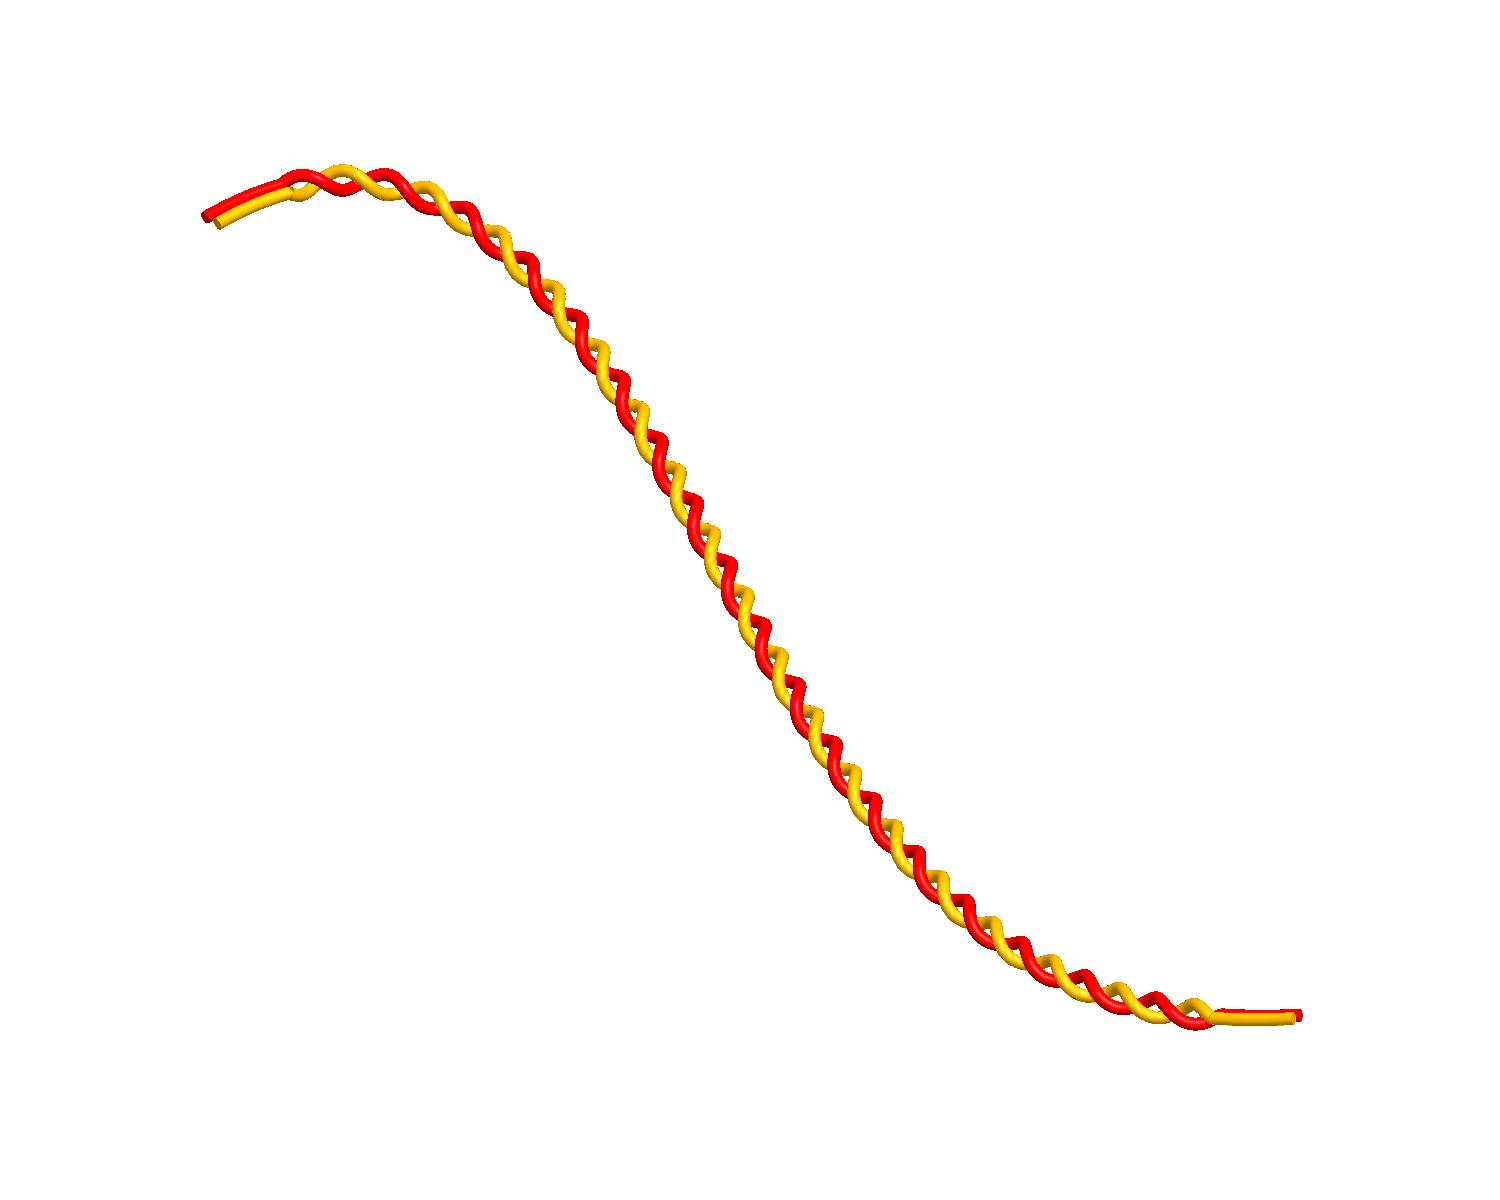
It's a little "kinky" at the second transition; would have to get more involved to take care of that. Could also use a Graph to govern the twist, straight, and transition sections.
David
- Mark as New
- Bookmark
- Subscribe
- Mute
- Subscribe to RSS Feed
- Permalink
- Notify Moderator
As noted, a VSS will distort the cross section the farther out from the origin trajectory you are. I had to do a 10-wire ribbon cable with a 180deg twist and at the distortion was really bad, especially at the end. The cross section will ony stay (in this case) circular if it's centered on the origin trajectory, so i had to do 10 VSS's to get my ribbon cable right (see "5417" and "LAST CABLE". It was quite a challenge but it worked out great (except the files were huge). As David (always a good source of info)noted, you can combine the VSS with other surface features, and use the intersection of them for you trajectory (see "ANDY'S_COIL"). That was for an air-core component, note that the ends are normal to a plane, as they are on "PHONE_CORD". Also, just for fun, I did the "COILED_SPIRAL". Question: How did I get the origin trajectory of that to circle over the top of itself 4 times in one feature? ![]()
!&%^&%&*%!!!! How the hell do I: "Note: To upload an image, you must insert it in the context of a discussion."
I hope you guys can see these.
Edit: This sucks. You can download the pics and look at them, but I can't show them in the post. ??????? Anyone have an idea on this?
- Mark as New
- Bookmark
- Subscribe
- Mute
- Subscribe to RSS Feed
- Permalink
- Notify Moderator
Hi Frank,
A few nice models there; I really like your "Coiled Spiral"! Pasting pictures in this forum is a little strange.
I've used the little "Insert Image" camera icon in the upper style bar to paste jpegs into my messages, but it seems to allow me to put only one picture in one message. I think I got more than one in a message when this new interface was introduced, but I haven't been able to recently. ???
David
- Mark as New
- Bookmark
- Subscribe
- Mute
- Subscribe to RSS Feed
- Permalink
- Notify Moderator
P.S. It seems that you have to type something first before it will let you paste a picture. That may be the meaning of "in the context of a discussion."
- Mark as New
- Bookmark
- Subscribe
- Mute
- Subscribe to RSS Feed
- Permalink
- Notify Moderator
Ok
It seems to work with JPEG only, and only one per post.
- Mark as New
- Bookmark
- Subscribe
- Mute
- Subscribe to RSS Feed
- Permalink
- Notify Moderator
- Mark as New
- Bookmark
- Subscribe
- Mute
- Subscribe to RSS Feed
- Permalink
- Notify Moderator
Note the tangent ends, in both different directions. One tangent to the end coil, the other tangent to the end coil but towards the spine of the coil.
- Mark as New
- Bookmark
- Subscribe
- Mute
- Subscribe to RSS Feed
- Permalink
- Notify Moderator
Note the ends normal to a plane on the bottom. These are the wires that get wrapped around an iron core and soldered to a PCB.
- Mark as New
- Bookmark
- Subscribe
- Mute
- Subscribe to RSS Feed
- Permalink
- Notify Moderator
Hi @DavidButz
May I ask you to record a video how to create the twisted wires?
thank you,
Arek


