
Turn on suggestions
Auto-suggest helps you quickly narrow down your search results by suggesting possible matches as you type.
Showing results for
Please log in to access translation
Turn on suggestions
Auto-suggest helps you quickly narrow down your search results by suggesting possible matches as you type.
Showing results for
Community Tip - Learn all about the Community Ranking System, a fun gamification element of the PTC Community. X
- Community
- Creo+ and Creo Parametric
- 3D Part & Assembly Design
- How to get the negative of a cavity?
Translate the entire conversation x
Please log in to access translation
Options
- Subscribe to RSS Feed
- Mark Topic as New
- Mark Topic as Read
- Float this Topic for Current User
- Bookmark
- Subscribe
- Mute
- Printer Friendly Page
How to get the negative of a cavity?
Oct 09, 2012
09:13 AM
- Mark as New
- Bookmark
- Subscribe
- Mute
- Subscribe to RSS Feed
- Permalink
- Notify Moderator
Please log in to access translation
Oct 09, 2012
09:13 AM
How to get the negative of a cavity?
Hello everybody,
i'm a begginer in the use of CREO, so i would be grateful if you could help me step by step. I have a 3D model with a cavity; this cavity has a curved base surface very variable. In the cavity there are also some internal features at different heights. I have to get the negative of this cavity in order to calculate the volume.
Thanks
This thread is inactive and closed by the PTC Community Management Team. If you would like to provide a reply and re-open this thread, please notify the moderator and reference the thread. You may also use "Start a topic" button to ask a new question. Please be sure to include what version of the PTC product you are using so another community member knowledgeable about your version may be able to assist.
Solved! Go to Solution.
Labels:
- Labels:
-
Data Exchange
ACCEPTED SOLUTION
Accepted Solutions
Oct 09, 2012
11:49 AM
- Mark as New
- Bookmark
- Subscribe
- Mute
- Subscribe to RSS Feed
- Permalink
- Notify Moderator
Please log in to access translation
Oct 09, 2012
11:49 AM
Hi Alberto...
I was able to generate the cavity using a couple of different techniques. Neither is really easy to communicate in this format. One method is better if you intend to keep this "core" and update it as your cavity updates. Another is better just for a quick measurement after which you'd discard it.
Sample model used for this procedure (cavity model). The procedure is shown in WF5 but is adaptable to Creo, too:
I'll try to describe the process and let you ask questions rather than try to document the steps here. Starting with your original model (I'll call it the "cavity" model):
- Create a new part. We'll call this the "core" model.
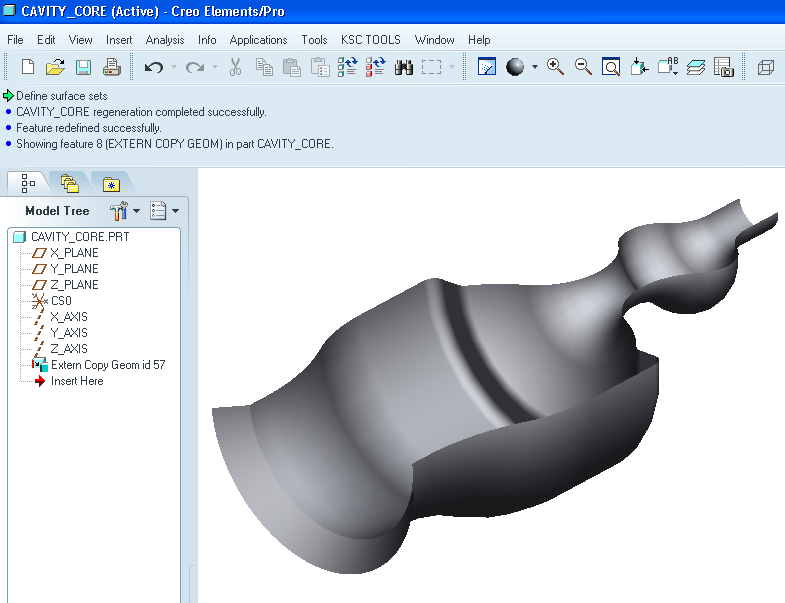
- After the default datums, the first feature of your new model should be a Copy Geometry (External). Load in the cavity model at the default location. Copy all of the surfaces of your cavity bounding the area you wish to calculate. In my sample model below, I copied all the surfaces in red/pink. When this step is complete, you'll have a brand new model that only includes a copy of the pink surfaces- no other geometry.The image below shows the new core model with the external copy geometry feature... you can see the "core" surface, too.
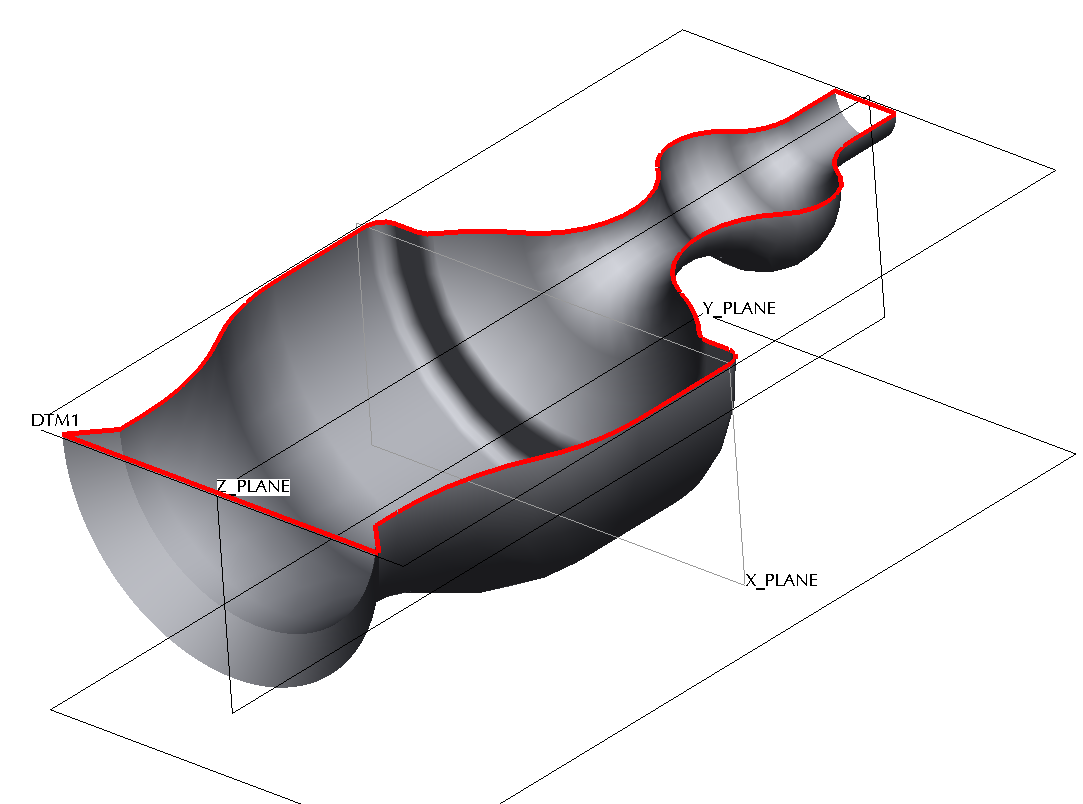
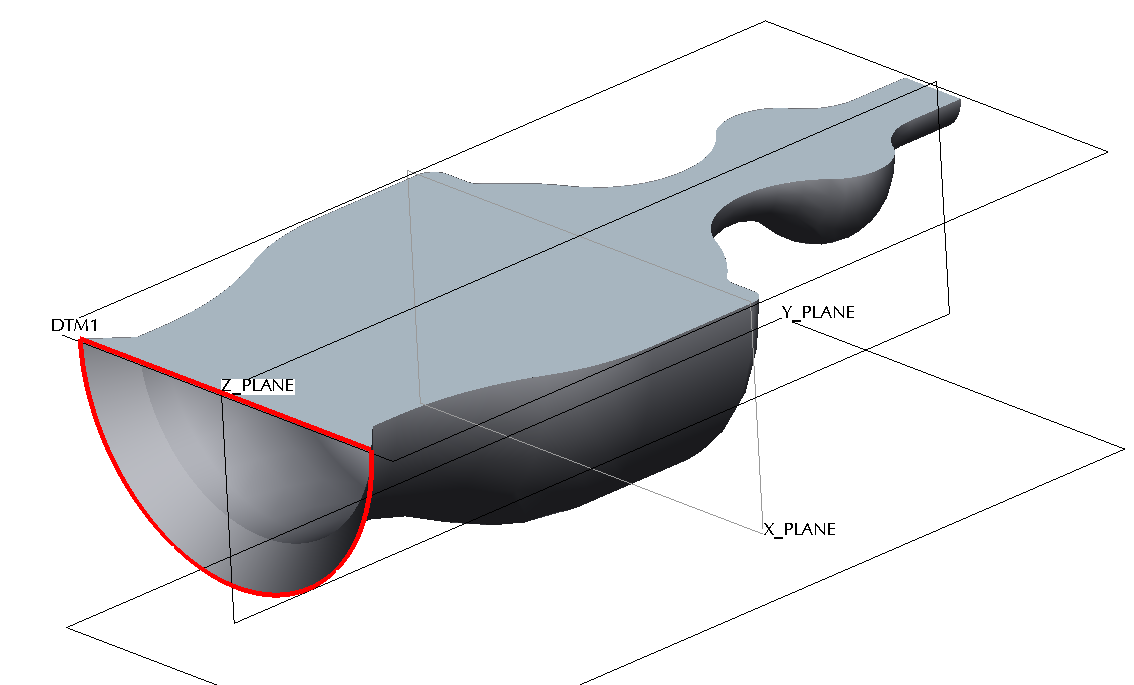
- In the core model, close off the top of the open core using a Fill surface. Start by creating a sketch that follows the curves along the top open edge of your core. Make sure the sketch makes a completely closed loop. Complete the sketch. In the image below, I created the datum plane (DTM1) and sketched the boundary highlighted in red using the edges of the core as references.
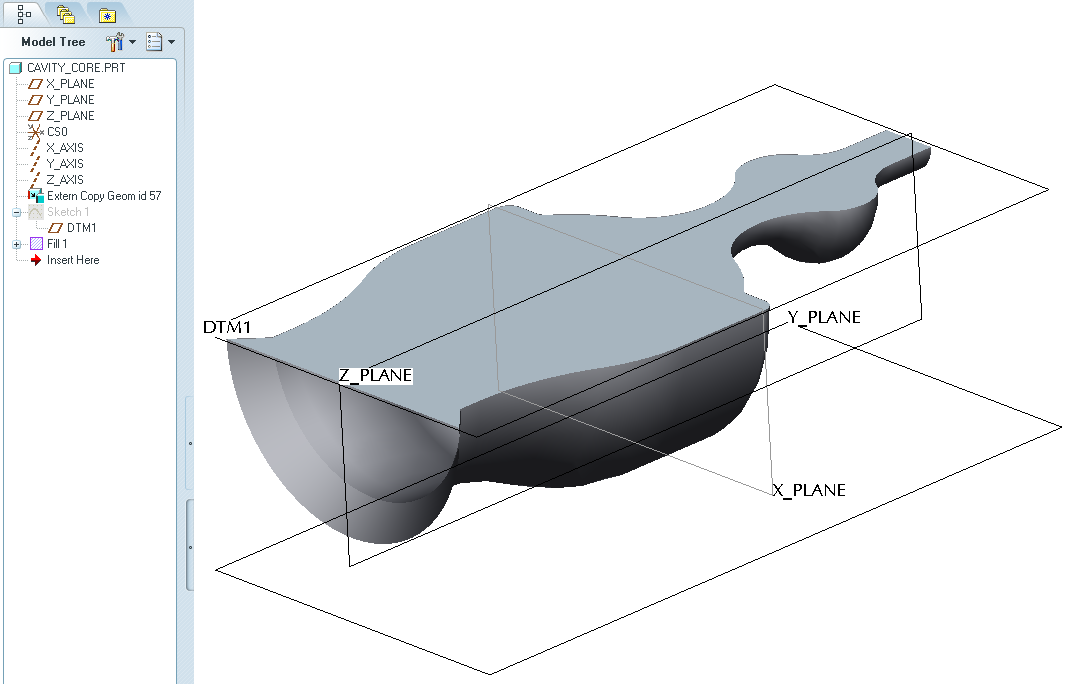
- Select the sketch and then select Edit->Fill to create a filled flat surface from the sketched loop.The top surface will become closed off as shown below. Note the fill feature in the model tree.
- In the core model, generate two boundary blends (Insert->Boundary Blend) to "close off" the open ends of your model. You will need one for each end. You're attempting to create surfaces to "close in" the volume you wish to measure. In the image below, I started by selecting the edges along the open edge of the core (shown in red). Then I simply selected Insert->Boundary Blend and selected the green checkmark to complete the feature. No other options are necessary. Do the same for the other open end.
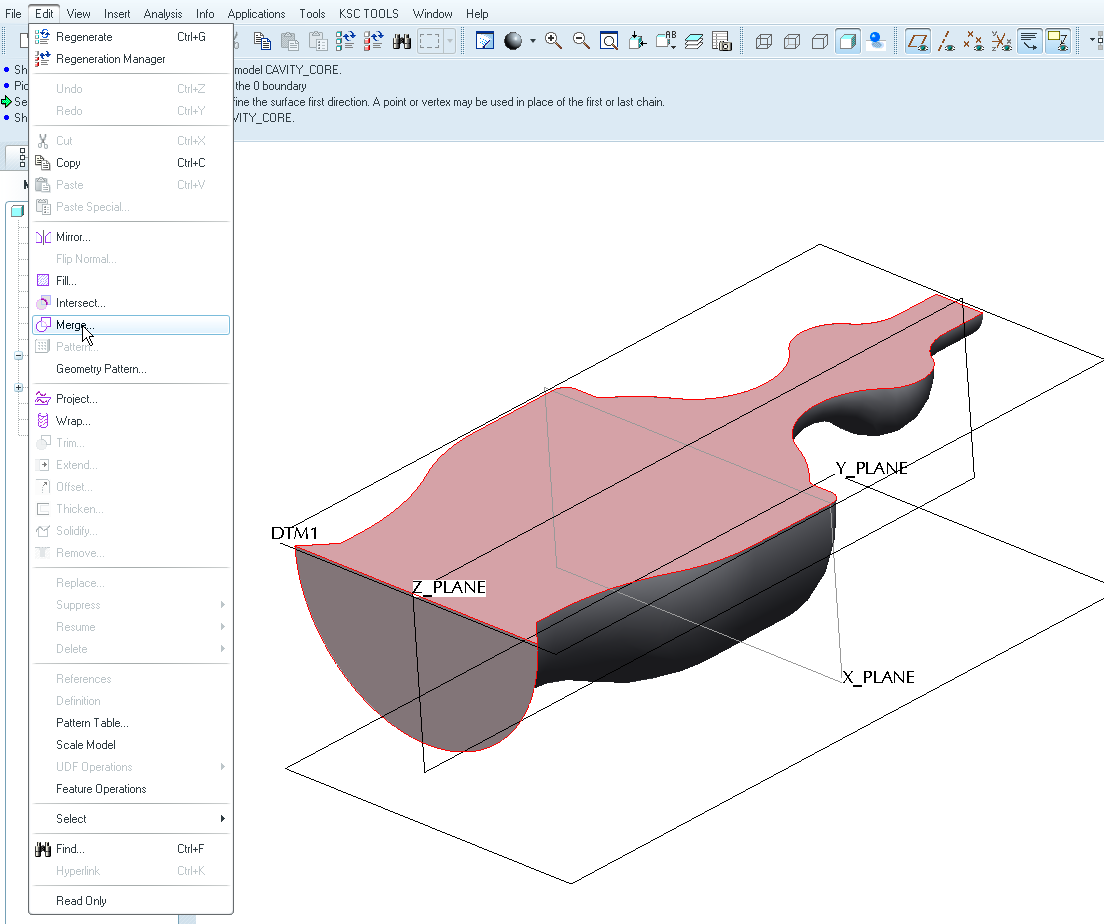
- Merge all of the surfaces together (Edit->Merge). You'll have to merge them in one at a time. As you merge, you'll start to see the surfaces combining (you'll see a mesh-like grid across the combined surfaces that goes away once the feature is completed). In the image below, I started by selecting the two surfaces shown in pink... then selected Edit->Merge.
Next, I selected the surface on the other end... and the merged surface from the previous step...
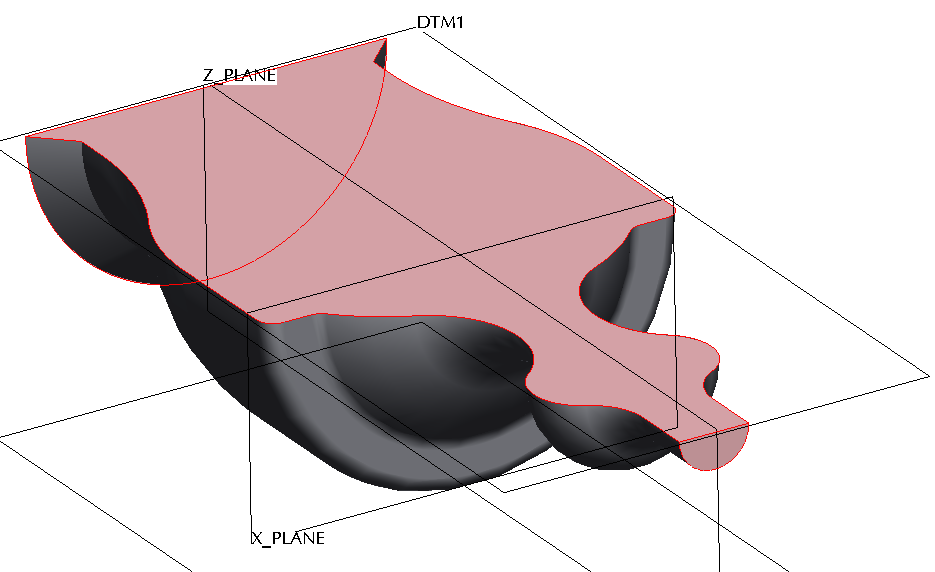
Finally, I merged in the last surface (the complex bottom piece).
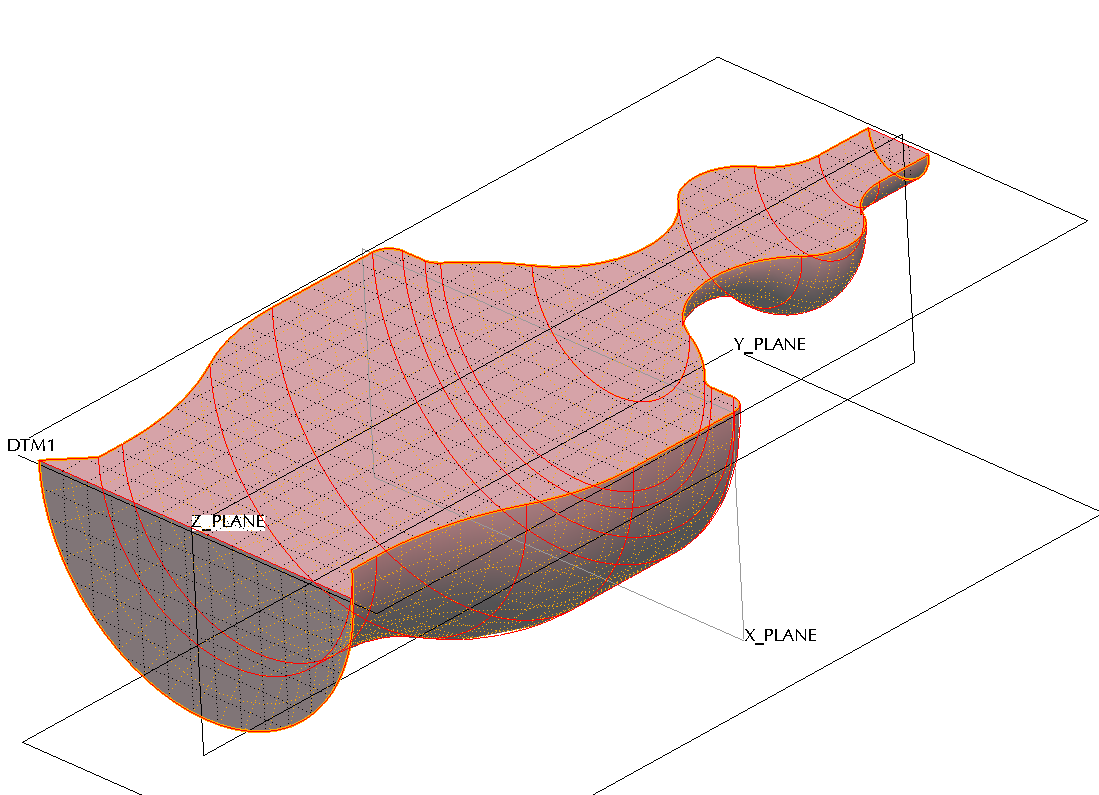
- Once all surfaces are merged, select Edit->Solidify to create a solid volume.
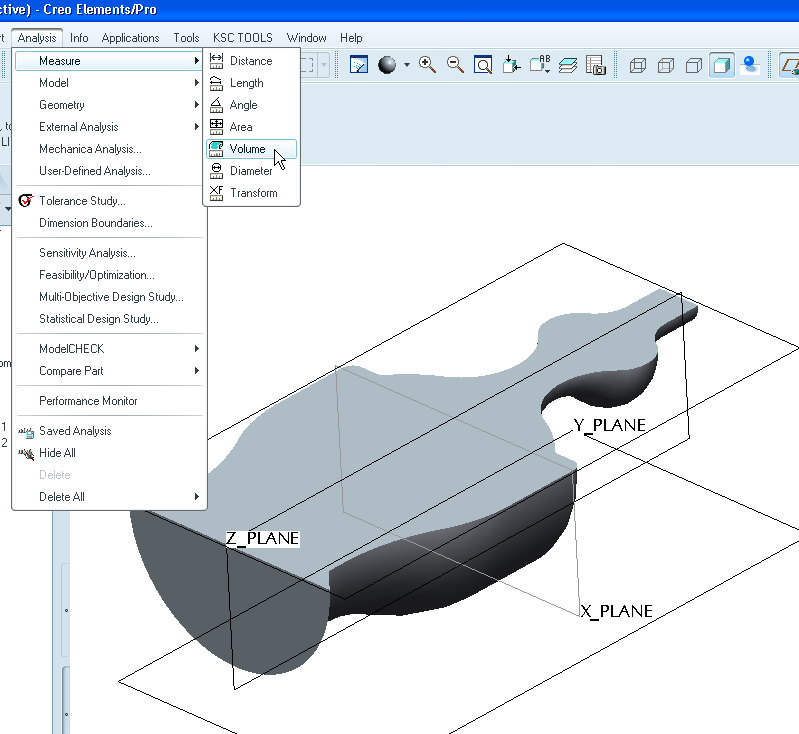
- Measure the solid volume using Analysis->Measure->Volume. As the original cavity changes, you can open and regenerate the core to see the volume update. If you add new curves or sections to your cavity, you may need to do some rework to the core model to insure those new curves are added to your model.
I hope that gives you enough to get you headed in the right direction. There are other ways to do this (assembly cutout) but I like this way better. I'm sure someone else might come up with an alternative but this is how I would approach the problem.
Thanks!
-Brian
8 REPLIES 8
Oct 09, 2012
09:27 AM
- Mark as New
- Bookmark
- Subscribe
- Mute
- Subscribe to RSS Feed
- Permalink
- Notify Moderator
Please log in to access translation
Oct 09, 2012
09:27 AM
Hi Alberto...
Are you saying you need the negative of the cavity or of the part. The technique required depends upon your answer.
But if you're just looking for the negative volume of the cavity, there are a few ways to go. You could do a cut out feature in assembly mode. You'd assemble your part with the cavity and then another part with just a solid block of material. The solid block would sit directly on your cavity and ideally "fill it" with a generous overlap into the surrounding material. Then you can use the assembly "cut out" feature to remove material from the solid block leaving only the shape of the cavity.
Another way would be to copy the surfaces of the cavity (using a copy geometry feature perhaps), and then "closing" the volume and solidifying it. You could then take a measurement of the resulting volume.
Do you have a part we can work with or a screen shot? This might be easier to explain with an example or a picture.
Thanks!
-Brian
Oct 09, 2012
09:55 AM
- Mark as New
- Bookmark
- Subscribe
- Mute
- Subscribe to RSS Feed
- Permalink
- Notify Moderator
Please log in to access translation
Oct 09, 2012
09:55 AM
Hi Brian,
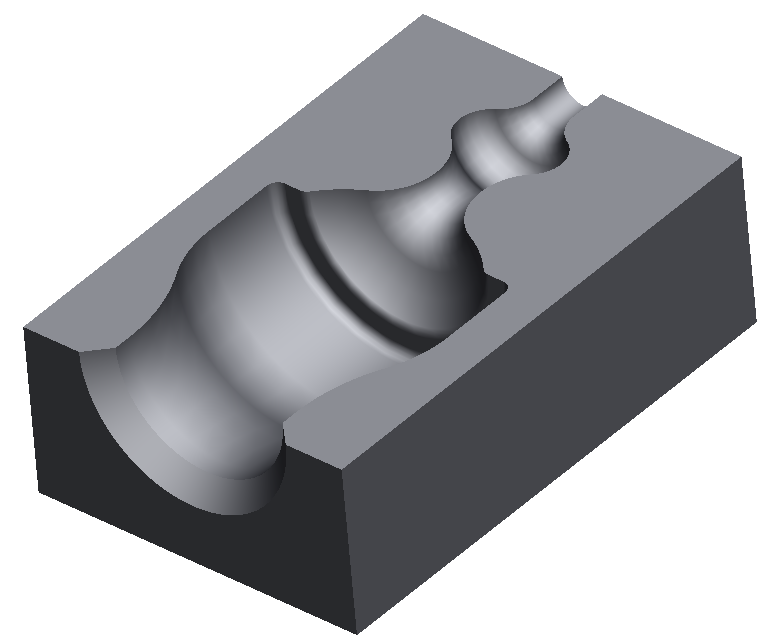
thanks for the answer. I need the negative of the cavity. Unfortunately the part is confidential so i can't post any pics. I found on the internet something similar.I have to get the negative of a cavity like this one.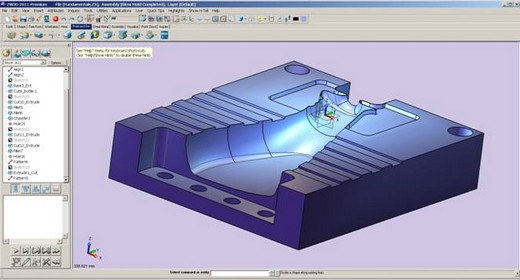
The part is imported from a PARASOLID file. It's recognised as a unique piece so i can't use the 2nd method. Regarding the 1st method you proposed, could you be just a bit more detailed on the various functions to use?
thank you very much!
Oct 09, 2012
11:49 AM
- Mark as New
- Bookmark
- Subscribe
- Mute
- Subscribe to RSS Feed
- Permalink
- Notify Moderator
Please log in to access translation
Oct 09, 2012
11:49 AM
Hi Alberto...
I was able to generate the cavity using a couple of different techniques. Neither is really easy to communicate in this format. One method is better if you intend to keep this "core" and update it as your cavity updates. Another is better just for a quick measurement after which you'd discard it.
Sample model used for this procedure (cavity model). The procedure is shown in WF5 but is adaptable to Creo, too:
I'll try to describe the process and let you ask questions rather than try to document the steps here. Starting with your original model (I'll call it the "cavity" model):
- Create a new part. We'll call this the "core" model.
- After the default datums, the first feature of your new model should be a Copy Geometry (External). Load in the cavity model at the default location. Copy all of the surfaces of your cavity bounding the area you wish to calculate. In my sample model below, I copied all the surfaces in red/pink. When this step is complete, you'll have a brand new model that only includes a copy of the pink surfaces- no other geometry.The image below shows the new core model with the external copy geometry feature... you can see the "core" surface, too.
- In the core model, close off the top of the open core using a Fill surface. Start by creating a sketch that follows the curves along the top open edge of your core. Make sure the sketch makes a completely closed loop. Complete the sketch. In the image below, I created the datum plane (DTM1) and sketched the boundary highlighted in red using the edges of the core as references.
- Select the sketch and then select Edit->Fill to create a filled flat surface from the sketched loop.The top surface will become closed off as shown below. Note the fill feature in the model tree.
- In the core model, generate two boundary blends (Insert->Boundary Blend) to "close off" the open ends of your model. You will need one for each end. You're attempting to create surfaces to "close in" the volume you wish to measure. In the image below, I started by selecting the edges along the open edge of the core (shown in red). Then I simply selected Insert->Boundary Blend and selected the green checkmark to complete the feature. No other options are necessary. Do the same for the other open end.
- Merge all of the surfaces together (Edit->Merge). You'll have to merge them in one at a time. As you merge, you'll start to see the surfaces combining (you'll see a mesh-like grid across the combined surfaces that goes away once the feature is completed). In the image below, I started by selecting the two surfaces shown in pink... then selected Edit->Merge.
Next, I selected the surface on the other end... and the merged surface from the previous step...
Finally, I merged in the last surface (the complex bottom piece).
- Once all surfaces are merged, select Edit->Solidify to create a solid volume.
- Measure the solid volume using Analysis->Measure->Volume. As the original cavity changes, you can open and regenerate the core to see the volume update. If you add new curves or sections to your cavity, you may need to do some rework to the core model to insure those new curves are added to your model.
I hope that gives you enough to get you headed in the right direction. There are other ways to do this (assembly cutout) but I like this way better. I'm sure someone else might come up with an alternative but this is how I would approach the problem.
Thanks!
-Brian
Oct 09, 2012
11:50 AM
- Mark as New
- Bookmark
- Subscribe
- Mute
- Subscribe to RSS Feed
- Permalink
- Notify Moderator
Please log in to access translation
Oct 09, 2012
11:50 AM
So much for "not documenting the steps", eh?
Oct 10, 2012
05:24 AM
- Mark as New
- Bookmark
- Subscribe
- Mute
- Subscribe to RSS Feed
- Permalink
- Notify Moderator
Please log in to access translation
Oct 10, 2012
05:24 AM
Hi Brian,
thanks, you are really kind. The "cavity" model is a unique piece so i'm not able to select only the cavity surface. Furthermore if i try to copy the geometry i can't select any surface of the "cavity" model when i have to "define publish geometri feature". I hope to be clear.
Thanks very much,
Alberto
Oct 09, 2012
04:56 PM
- Mark as New
- Bookmark
- Subscribe
- Mute
- Subscribe to RSS Feed
- Permalink
- Notify Moderator
Please log in to access translation
Oct 09, 2012
04:56 PM
Hmmm, the negative of a cavity.........a filling? 
Oct 09, 2012
04:58 PM
- Mark as New
- Bookmark
- Subscribe
- Mute
- Subscribe to RSS Feed
- Permalink
- Notify Moderator
Please log in to access translation
Oct 09, 2012
04:58 PM
I guess it is kinda!
Oct 10, 2012
09:13 AM
- Mark as New
- Bookmark
- Subscribe
- Mute
- Subscribe to RSS Feed
- Permalink
- Notify Moderator
Please log in to access translation
Oct 10, 2012
09:13 AM
Yes it's a filling.


