
Turn on suggestions
Auto-suggest helps you quickly narrow down your search results by suggesting possible matches as you type.
Showing results for
Please log in to access translation
Turn on suggestions
Auto-suggest helps you quickly narrow down your search results by suggesting possible matches as you type.
Showing results for
Community Tip - Have a PTC product question you need answered fast? Chances are someone has asked it before. Learn about the community search. X
- Community
- Creo+ and Creo Parametric
- 3D Part & Assembly Design
- Modify Parameters in na Hole Table
Translate the entire conversation x
Please log in to access translation
Options
- Subscribe to RSS Feed
- Mark Topic as New
- Mark Topic as Read
- Float this Topic for Current User
- Bookmark
- Subscribe
- Mute
- Printer Friendly Page
Modify Parameters in na Hole Table
Jul 23, 2024
02:33 PM
- Mark as New
- Bookmark
- Subscribe
- Mute
- Subscribe to RSS Feed
- Permalink
- Notify Moderator
Please log in to access translation
Jul 23, 2024
02:33 PM
Modify Parameters in na Hole Table
Hi,
I am using Creo Parametric 10.0.4
I've created a hole table in my creo drawing and I want to modify the parameters in the hole table. For example, in the picture, the fourth column is the description of the hole and it currently reads 'M5x.8 ISO' instead of this I want it to read 'M5 x.8 Tap THRU'
Any ideas on how I can make this change.
6 REPLIES 6
Jul 23, 2024
05:51 PM
- Mark as New
- Bookmark
- Subscribe
- Mute
- Subscribe to RSS Feed
- Permalink
- Notify Moderator
Please log in to access translation
Jul 23, 2024
05:51 PM
Not exactly easy (to do or to explain), but you can use "standard holes" driven by custom .HOL tables.
Add a column "MY_DESCRIPTION" to the custom .HOL table and then display this "MY_DESCRIPTION" parameter in the drawing hole table.
Please read through the documentation "Using Hole Charts" and "About Hole Tables" before asking follow up questions.
Jul 24, 2024
02:26 AM
- Mark as New
- Bookmark
- Subscribe
- Mute
- Subscribe to RSS Feed
- Permalink
- Notify Moderator
Please log in to access translation
Jul 24, 2024
02:26 AM
ou can modify the hole table parameters in Creo Parametric 10.0.4 by following these steps:
Double-click the hole table in your drawing to open the Hole Table Editor.
Select the column containing the description you want to change. In this case, it's the fourth column.
Right-click on the column header and select "Edit Column Properties".
In the "Column Properties" dialog box:
- Select the "Format" tab.
- Find the "Description" field.
- Click on the "..." button next to it.
- This will open the "Hole Table Description Format" dialog box.
In the "Hole Table Description Format" dialog box:
- Go to the "Text" tab.
- Under "Default Text", you can see the current format of the description.
- You can either edit the text directly in the "Default Text" field or use the available placeholders and operators.
- For example, to change the description to "M5 x.8 Tap THRU", you could use the following format:
- M%M %D** x %TH %TP THRU
- This format will use the predefined placeholders for the hole size, diameter, and thread type, as well as include the additional text " x Tap THRU".
Click "OK" in all the dialog boxes to close them.
The hole table will now update with the new description format.
Important notes:
- Ensure that the "Use Text Format" option is checked in the "Column Properties" dialog box.
- You can use various placeholders and operators to customize the description format. See the Creo Parametric documentation for a complete list of placeholders and operators.
- If you need to apply the same changes to multiple hole tables in your drawing, you can copy and paste the column properties.
By following these steps, you can easily modify the parameters in your hole table and customize the description format according to your needs.
Jul 24, 2024
03:11 AM
- Mark as New
- Bookmark
- Subscribe
- Mute
- Subscribe to RSS Feed
- Permalink
- Notify Moderator
Please log in to access translation
Jul 24, 2024
03:11 AM
I think the best way is to use custom hole table.
Any text that you see with the hole feature is defined in a .hol file.
The contents of a .hol file looks like this, and you can open .hol file in any txt editor.

So, if you find the .hol file you are using and change ISO to Tap THRU, then restart Creo, you will see Tap THRU appear in your hole table instead of ISO.
If you do not always want Tap THRU, but other text depend on your design, you can create multiple .hol files, and choose to create holes from those file.
Multiple holes in the same .prt file can be defined from different .hol files. For examples, I have multiple .hol files and can choose from this dropdown menu each time I create a hole:

To find the folder of your .hol files, find this configuration option.
hole_parameter_file_path
If you do not see that option, then the files are in default folder.
Jul 24, 2024
11:09 AM
- Mark as New
- Bookmark
- Subscribe
- Mute
- Subscribe to RSS Feed
- Permalink
- Notify Moderator
Please log in to access translation
Jul 24, 2024
11:09 AM
Thank you for the response.
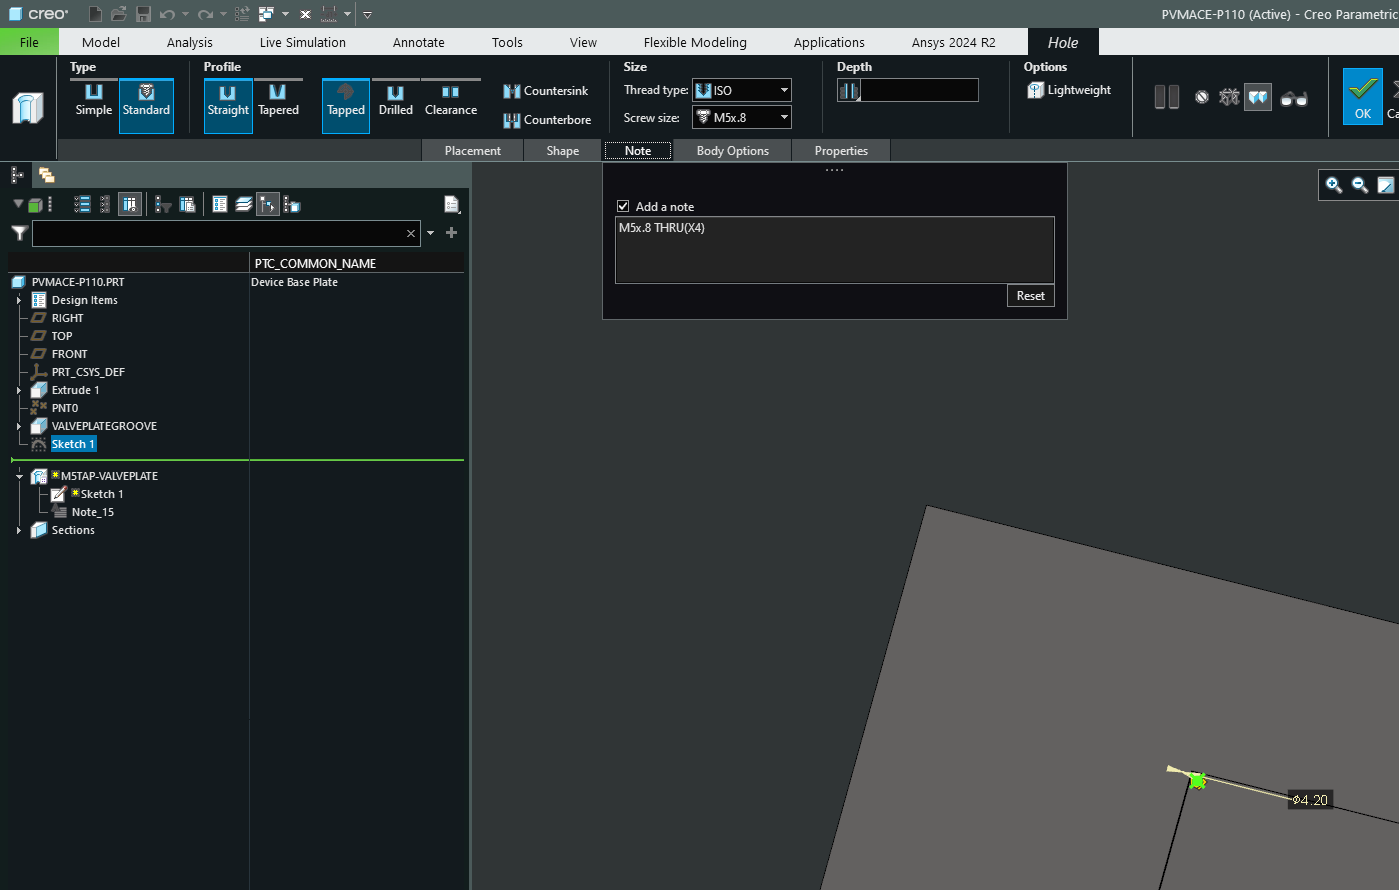
I've updated the ISO.hol file. The hole description has successfully changed (see snap-1 & snap-2). but the description in the hole table hasn't changed (see snap-3). I've of course deleted and recreated the table a few times to ensure it's updated with the changes made in the .hol file.
Jul 26, 2024
03:58 AM
- Mark as New
- Bookmark
- Subscribe
- Mute
- Subscribe to RSS Feed
- Permalink
- Notify Moderator
Please log in to access translation
Jul 26, 2024
03:58 AM
Sorry for replying late.
The default ϕ column is from .hol table, but it is not the hole note.

In the image above, the text M4 ISO_ is from ID and Series in .hol file

Although in the hole table, your note will not show, you can add parameters to show hole depth, boring diameter, thread depth, boring depth, etc.

You can control how the parameters appear in the table by editing "Name" column in the Hole Table window shown above.
The list of parameters can be found here.
https://support.ptc.com/help/creo/creo_pma/r11.0/usascii/index.html#page/part_modeling/part_modeling/Standard_Hole_Parameters.html
So instead of showing "M5 Thru" it is possible to show M5 <thread series> in a column and "Thru" in another column (indicating depth).
I haven't done it yet but maybe you can add your own parameter, as described in this answer
Re: Modify Parameters in na Hole Table - PTC Community
Aug 07, 2024
02:48 PM
- Mark as New
- Bookmark
- Subscribe
- Mute
- Subscribe to RSS Feed
- Permalink
- Notify Moderator
Please log in to access translation
Aug 07, 2024
02:48 PM
Hi @Anantj18,
I wanted to follow up with you on your post to see if your question has been answered.
If so, please mark the appropriate reply as the Accepted Solution.
Of course, if you have more to share on your issue, please let the Community know so that we can continue to help you.
Thanks,
Anurag


