Community Tip - Need to share some code when posting a question or reply? Make sure to use the "Insert code sample" menu option. Learn more! X
- Community
- Creo+ and Creo Parametric
- 3D Part & Assembly Design
- PTC Creo 3.0: Intelligent Fastener Extension Part ...
- Subscribe to RSS Feed
- Mark Topic as New
- Mark Topic as Read
- Float this Topic for Current User
- Bookmark
- Subscribe
- Mute
- Printer Friendly Page
PTC Creo 3.0: Intelligent Fastener Extension Part 2
- Mark as New
- Bookmark
- Subscribe
- Mute
- Subscribe to RSS Feed
- Permalink
- Notify Moderator
PTC Creo 3.0: Intelligent Fastener Extension Part 2
There are additional advanced tutorials for PTC Creo 3.0 that were not mentioned in our last blog post. They focus on the integration and customization of parts in PTC Creo 3.0 Intelligent Fastener extension. Today’s post, brought to you by PTC Product Management Director, Jim Barrett-Smith, will cover the first exercise in this category: Integrating Legacy Screw Fasteners into the IFX Library. Before you get started, be sure to read the note below:
Integrating and Customizing Parts
When you purchase the licensed version of PTC Creo Intelligent Fastener you can customize the out of the box library, add new hardware, and append your company’s legacy hardware library. There are three advanced tutorial exercises in the PTC Creo Parametric Help Center that cover integrating legacy screw fasteners into the IFX library, integrating a single screw fastener into the IFX library, and migrating nuts. Today, we’ll focus on integrating legacy screw fasteners into the IFX library.
Integrating Legacy Screw Fasteners into the IFX Library
To begin, you must first confirm that you have Write permissions for the configuration folder using Windows Explorer. To do so, navigate to the <creo_loadpoint>, click Common Files, and select afx. When the afx folder opens, right-click the configuration folder and select Properties. On the Security tab, confirm that you have Write permission for the configuration folder. If you do not have Write permission, add it or speak to your administrator.
The next major step is to create the folder, IFX_custom_lib using Windows Explorer. You can create the folder anywhere as long as you have Write permission to the folder. IFX_custom_lib is the new custom library. To open the folder, navigate to the <creo_loadpoint> and click Common Files. Select afx, then parts. The parts folder will open. From parts, copy the screws_and_pins folder and all its subfolders to IFX_custom_lib.
Next, start PTC Creo Parametric. Click File, select Options, and click Configuration Editor. Set the configuration option, show_selected_item_id, to yes. Click OK. Set the working directory to <downloaded files location>\IFXTraining\Migration_Asm and open ifx_migration.asm. You must have an assembly open before you can access the PTC Creo Intelligent Fastener functionality. In PTC Creo Parametric, click Tools, then Intelligent Fastener, followed by Options. The Intelligent Fastener — Options dialog box will open. Select PATH_ABS_LIBRARY, click Select path, and then browse to IFX_custom_lib and click, Open. The path will appear in the Value box. Click OK.
In Windows Explorer, browse to IFX_cust_lib, click screws_and_pins and screws and then in the screws folder, create the folder, myfasteners. In PTC Creo Parametric, click File, select Options, and click Configuration Editor. Set the configuration option, search_path, to point to your myfasteners folder by typing the full path name or by using Browse. Click OK.
In Windows Explorer, browse to <downloaded files location>\IFXTraining\Legacy_Part and copy m6x60-din931.prt, m6x70-din931.prt, and m6x75-din931.prt to the new custom folder myfasteners. Next, in Windows Explorer browse to IFX_cust_lib and then click screws_and_pins, screws, and mm. The mm folder will open. From the mm folder, copy mm.mnu and iso4017–8_8.dat to the myfasteners folder. In the myfasteners folder, rename iso4017-8_8.dat to legacy_fasteners.dat, and rename mm.mnu to myfasteners.mnu.
Note: The name of the MNU file and the name of the folder containing the MNU file should be the same.
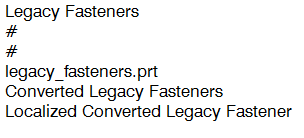
Edit myfasteners.mnu to match the file below:

- legacy_fasteners is the name of the DAT file with .prt appended.
- Converted Legacy Fasteners is the English tooltip.
- Localized Converted Legacy Fasteners is the localized tooltip.
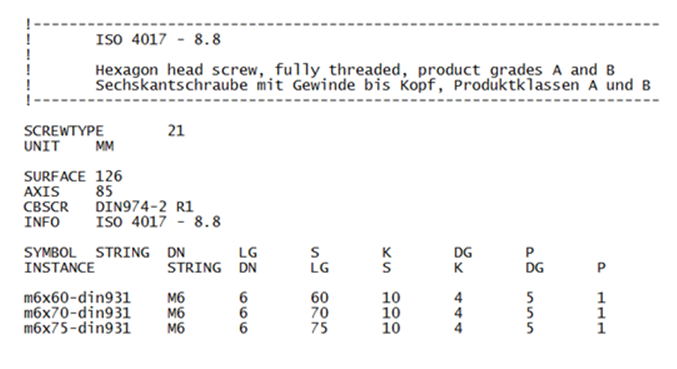
Save and close myfasteners.mnu. Edit legacy_fasteners.dat to match the file below:

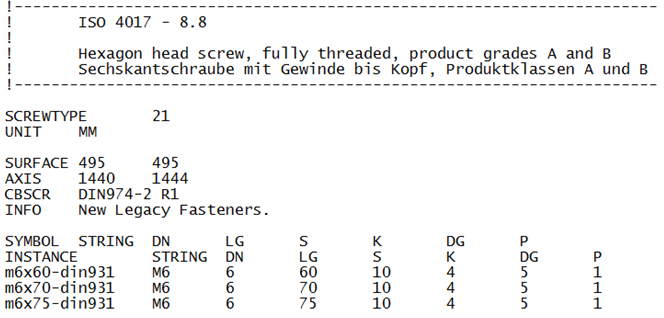
Save legacy_fasteners.dat but do not close it. The legacy_fasteners.dat file requires the surface ID and axis ID of the fasteners. Perform the following steps to identify the IDs: First, open m6x60-din931.prt. In the graphics window, move the pointer over the axis and note the ID 1440. Similarly, move the pointer over the fastener head and note the ID 495. Lastly, open and then obtain the surface and axis IDs for parts m6x70-din931.prt and m6x75-din931.prt. Type the unique surface IDs and axis IDs in legacy_fasteners.dat: SURFACE 495 495 and AXIS 1440 1444.
In Windows Explorer, from the <creo loadpoint> click Common Files, afx , configuration. Then, in the Configuration folder, open sl_data.cfg. Review the section COUNTERBOREDIAMETER FOR SCREW'S to validate if the CBSCR is suitable for m6 fasteners. After validation, you can close the file. In legacy_fastners.dat, change the tooltip INFO from ISO 4017 - 8.8 to New Legacy Fasteners. Your file should match the file below:

The next step is to save and close legacy_fasteners.dat. In Windows Explorer, from your IFX_custom_lib folder, click screws_and_pins, screws. The screws folder will open. Open screws.mnu and add the following lines to the end of the file:
- /myfasteners
- myfasteners Library
- ocalized myfasteners library
- /myfasteners points to the new customer library
- myfasteners Library is the English tooltip
- Localized myfasteners library is the localized tooltip
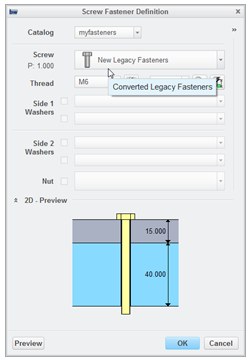
Save and close screws.mnu. Restart PTC Creo Parametric and open ifx_migration.asm. Using PTC Creo Intelligent Fastener, select the references to place a new fastener. When the Screw Fastener Definition dialog opens, note the following changes: myfasteners is available in the Catalog list and the tooltip is My Fasteners Library. New Legacy Fasteners is available in the Screw list and the tooltip is Converted Legacy Fasteners.

Complete the placement of the fastener, and close the assembly without saving. Click File, Manage Session, Erase Not Displayed. The Erase Not Displayed dialog box will open. Lastly, click OK to erase all files from memory.
To try more advanced tutorials for PTC Creo Intelligent Fastener Extension, check out tutorials in the PTC Creo Parametric Help Center (“PTC Creo Intelligent Fastener Tutorials: Advanced Tutorials”)
Stay tuned to our “Did You Know” blog series as we cover all of the exciting, new enhancements in PTC Creo 3.0.
Have some ideas about what PTC Creo product features you’d like to learn more about? Send me a message or leave a comment below and we’ll write up the best ideas from the community. Thanks for reading, looking forward to all of your feedback!
In case you missed it, see what’s new and check out our recent Did You Know posts covering PTC Creo 3.0 enhancements:
- Did You Know? PTC Creo 3.0: Intelligent Fastener Extension Part 1
- Did You Know? PTC Creo 3.0 Mold Analysis
- Did You Know? Unite Technology
This thread is inactive and closed by the PTC Community Management Team. If you would like to provide a reply and re-open this thread, please notify the moderator and reference the thread. You may also use "Start a topic" button to ask a new question. Please be sure to include what version of the PTC product you are using so another community member knowledgeable about your version may be able to assist.
- Labels:
-
(AFX)Struct_Framework


