Community Tip - Need to share some code when posting a question or reply? Make sure to use the "Insert code sample" menu option. Learn more! X
- Community
- Creo+ and Creo Parametric
- 3D Part & Assembly Design
- PTC Technical Specialists E-Newsletter Date: June ...
- Subscribe to RSS Feed
- Mark Topic as New
- Mark Topic as Read
- Float this Topic for Current User
- Bookmark
- Subscribe
- Mute
- Printer Friendly Page
PTC Technical Specialists E-Newsletter Date: June 2010
- Mark as New
- Bookmark
- Subscribe
- Mute
- Subscribe to RSS Feed
- Permalink
- Notify Moderator
PTC Technical Specialists E-Newsletter Date: June 2010
In this Issue:
PTC Product Focus:
- Pro/ENGINEER Behavioral Modeling Extension
- EPP – New Project Management Engine in ProjectLink
Tips of the Month:
- Using ProductView with Pro/ENGINEER for Large Assembly Management
- Using the Clipboard to View Multiple Objects in ProductView
Announcements: Most Recent Announcements
Upcoming Events & Training Schedule: Events & Training Schedule
| PTC Product Focus |
| Pro/ENGINEER Behavioral Modeling Extension |
|---|
Wouldn’t it be great if your computer-aided design software automatically determined the best design for you? Think of the time and effort you’d save. That’s exactly what Pro/ENGINEER Behavioral Modeling Extension (BMX) does for you, by delivering three key capabilities: design studies, smart models, and an open environment that uses calculated results from external programs.
When you have multiple design objectives to consider, such as how to maintain product strength while reducing material wall thickness, it can be very tedious and time-consuming to manually calculate the optimum values. Even then you can’t be sure that you have the optimum design, because it simply takes too much time to calculate all of the various possibilities that might work.
Pro/ENGINEER BMX automates this process for you, using design studies. To conduct a design study, you simply define your engineering goals, then define where your design is flexible, and Pro/ENGINEER BMX automatically analyzes countless iterations before arriving at the best solution.
Pro/ENGINEER BMX raises the level of design automation from simple geometry creation to a fully engineered solution. All you need to do is simply pick the best design and move on to your next task.
Pro/ENGINEER BMX can also optimize specific features within a design by creating “smart models.” Smart models capture design and process information, so that the model has the built-in intelligence to actually understand its function. Pro/ENGINEER captures this knowledge as a feature, which is automatically evaluated against the requirements–as the design evolves. This automation will increase your level of confidence that the design will function as intended–the first time. It also means that engineers can focus their energy on developing the design rather than continually checking engineering requirements.
Pro/ENGINEER BMX saves you time and effort in many ways. For instance, very often you need to use complex formulas to calculate design variables. And, usually, these calculations require third-party tools. Just imagine if your design software automatically read the output from those third-party programs and automatically updated your design? Not only would this save you time, but it would also eliminate the need to manually input values, thereby reducing the risk of errors.
With Pro/ENGINEER BMX, this is more than possible–it’s easy! Only Pro/ENGINEER BMX features an open, extensible environment that enables organizations to integrate diverse external tools into their design process.

Key Benefits
- Improve innovation by exploring numerous scenarios that meet your design criteria
- Clearly understand the impact of design changes, and prohibit inconsistent behavior
- Reduce product costs by optimizing your design to meet multiple objectives, such as maintaining a product’s strength while reducing its weight
- Save time by automatically iterating your design to meet your design requirements
- Reduce errors by using the results from external tools to drive your design directly, without manually transferring data

Features and Specifications
Objective-Driven Design Studies
- Solve real-world problems and meet a variety of design goals by applying multiple objectives to a design scenario
- Optimize designs to satisfy cost-reducing requirements such as decreasing a product’s weight to minimize costs
- Conduct feasibility studies to determine if there is a feasible solution that meets the design constraints of the model
- Perform sensitivity studies to evaluate “what-if” scenarios to understand the impact of changes
- Graphically review the response of the model to virtual testing, making results easier to interpret
- Apply statistical attributes to dimensions and parameters, enabling analysis of statistical effects on any measurable goal in the model
Smart Models
- Adapt to design changes instantly, while preserving the design intent
- Capture, group and store comprehensive design measurements as analysis features that can drive the design
- Leverage the power of analysis features to ensure that design changes do not alter the design intent
- Flexibly iterate the design, trusting the analysis feature’s embedded intelligence to ensure engineering criteria is maintained
Open Extensible Environment
- Increase design flexibility using calculations from external tools without programming or scripting
- Leverage results from other Pro/ENGINEER modules, such as Pro/ENGINEER Mechanica or Pro/ENGINEER Advanced Mechanica
Access Engineering Information More Easily
- Define engineering requirements, such as desired weights, angles of reflection, mass property requirements, assembly connection information and other measurements
- Capture custom measurements that are not easily dimensioned, such as cross sectional area or light reflectivity
- Apply custom measurements to relations
- Monitor critical design measurements and safety margins against design requirements
Track Model Performance with Analysis Features
- Track measurements, such as volume, mass or minimum clearance, during a structural analysis of solid geometries and quilts
- Measure force and torque while analyzing mechanisms
- Access Pro/ENGINEER Mechanica parameters, such as stress or displacement
- Use results from external applications to drive analysis features
- Create custom measurements for user-defined analyses
| EPP – New Project Management Engine in ProjectLink |
|---|
| Tips of the Month |
| Using ProductView with Pro/ENGINEER for Large Assembly Management |
|---|
When defining Simplified Representations of large assemblies in Pro/ENGINEER, a user needs to either be very familiar with the part names and structure of an assembly or needs to bring into session the Master Rep or a rep with more detail that the engineer might normally not want to take the time to regenerate. They also need to take into consideration the amount of data they want to have uploaded to the Workspace as well as the time it takes to clean out Workspaces to remove unnecessary data. How can the user easily browse a Pro/ENGINEER assembly to identify the components to include in a particular representation? Let’s take a look at ProductView MCAD Professional.
Advantages of using ProductView
- An assembly can be opened in ProductView quickly due to the reduced file size.
- An assembly can be opened in ProductView directly from the object’s Detail page in Windchill without being downloaded to the Workspace.
- ProductView visualization files can be created automatically, when an object is checked into Windchill.
Process Steps
1) Launch ProductView Professional either standalone or by selecting the thumbnail on the Details page in Windchill for the desired assembly. (If using standalone, open the assembly by selecting the desired *.pvs file)
2) In ProductView, select the Blank Square next to the top level assembly to Load All Parts
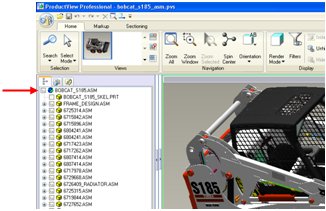
3) Browsing and Selecting components
Using the Product Structure for Selection
- Deselect parts/subassemblies by unchecking the box in front of the file name for any component or assembly
- Multi-select from structure or on model by holding down the control key and selecting with the left mouse button.
- In the Structure, the user can also select an item, hold down the Shift Key, and then select another item further down the list to select all items in between. (If necessary, open subassemblies in a new view to verify content)
Using Search for Selecting Parts/Subassemblies
- Name Search
- Select Search from the Home tab
- After the Search window opens, enter a Name if this is a search you may end up repeating
- The user is presented with the option of 3 types: Part, Attribute and Spatial.
- Select the Part option and browse down to Name block. Enter a name or a partial name using * as a wildcard and then select Apply.
- Go to the Product Structure, highlight the top level assembly, hold down the right mouse button, select Collapse and then choose Selected Parts to 1 Level.
- Select in the box next to the top level assembly to Unload All.
- In the Search Results, hold down the right mouse button and choose Select All. Hold down the right mouse button again and choose Select in Product Structure.

- Spatial Search
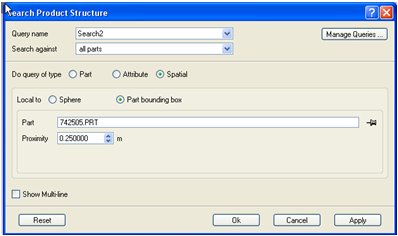
- On the Search window set the type as Spatial and then choose either Sphere or Part Bounding Box.
- If using sphere, use the Pin icon to locate the center of your search and enter a Radius value to define the extents of the search.
- If using Bounding Box, select the part of interest and set a Proximity value.
- Select Apply to run the search.
- Go to the Product Structure, highlight the top level assembly, hold down the right mouse button, select Collapse and then choose Selected Parts to 1 Level.
- Select in the box next to the top level assembly to Unload All.
- In the Search Results, hold down the right mouse button and choose Select All. Hold down the right mouse button again and choose Select in Product Structure.
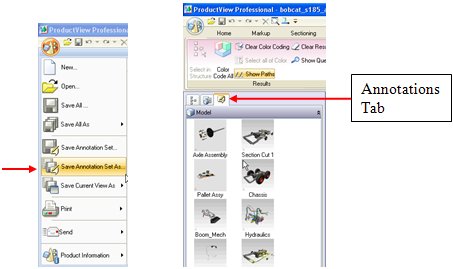
4) Using Annotation Sets to save
- Once the user has identified the parts of interest for the Simplified Rep, go to the circular icon in the top left corner of the window and choose Save Annotation Set As. Enter a Name for the annotation as well as the Author and Comments. OK to finish.
- Go to the Annotation Sets tab to the right of the Structure tab to see a list of annotations and double click to open the one of interest.
- Repeat for each Simplified Rep the user would like to create.
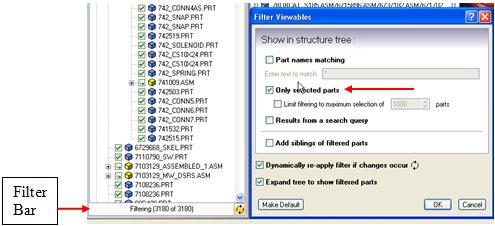
5) Minimize the data shown in the Structure tab
- Go to the Filter bar at the bottom of the Structure tree, click on the bar with the left mouse button and on the dialog box which appears, check the Only Selected Parts option.
6) Creating the Simplified Representation in Pro/ENGINEER
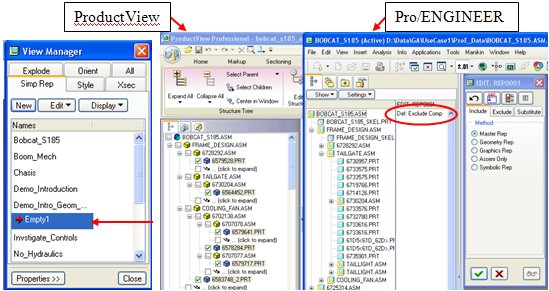
- Open a session of Pro/E and open your assembly using the By Rep option. Choose a Simp Rep which contains zero components or create an empty rep on-the-fly from Simp Rep dialog box.
- Open the View Manager, select the Simp Rep tab. Create a New Simp Rep, enter a name and set the Default Mode to Exclude. Select the Include tab and use the Model Tree to select components/subassemblies.
- Compare Model Tree in Pro/E with Structure in PV to manually select parts/assemblies to be included in new Simp Rep.
- Have your ProductView window set up so that the Product Structure is on left edge of the screen, have Pro/E on top and set the left edge of window so the ProductView Product Structure is visible.
- Have your ProductView window set up so that the Product Structure is on left edge of the screen, have Pro/E on top and set the left edge of window so the ProductView Product Structure is visible.
- When using Windchill PDMLink, expand assembly nodes only as this will download only the assembly files and not all parts/subassemblies
| Using the Clipboard to View Multiple Objects in ProductView |
|---|
| Announcements |
| The PTC/USER Portal is getting an updated, fresh user interface. |
|---|

The functionality is remaining the same but the site is being redesigned to allow for easier navigation by users.
You will also begin to see blog articles being posted by the PTC/USER Board of Directors highlighting different aspects of your community and other relevant info.
The four major areas in which our site design has been updated are:
- Redesigned Header Area
- Simplified Navigation
- New Site Wide Right Side Bar
- Other Design Elements
For more details on these changes you can read about them in the What's New guide.
Enjoy the redesigned site and we look forward to your feedback.
Evan Caille
PTC/USER Board of Directors
| PTC Tips & Techniques Newsletter Archives |
|---|
Did you miss an issue? Can’t find that awesome technique you read about? Fear not, you can click on the link below and go through our Customer PTC E-Newsletter archives.
| PTC Tips & Techniques Webcasts: Work Smarter. Not Harder. |
|---|
Click below to see regularly scheduled Tips & Techniques technical Webcasts that are designed to provide you with the most popular time-saving tricks that Pro/ENGINEER users of all skill levels will find useful. Get more out of your maintenance dollars!
Tips & Techniques: Work Smarter Not Harder!
| Special Hardware offers for PTC Customers |
|---|
| PTC Sponsored Events |
|---|
| Other News... |
|---|
- Explore what is new with the Pro/ENGINEER Wildfire family!
- Connect with PTC using the latest Social Networking resources:
| Upcoming Events & Training Class Schedules |
Upcoming, 2010 Your local Pro/Engineer User Groups
http://www.ptcuser.org/rugs/
June 6 – 9, 2010 Orlando, FL USA
PTC/USER World Event
http://www.ptcuser.org/
| Events |
|---|
Our seminars and conferences seek to provide you with relevant information regarding product development trends in your industry as well as innovative software learning experiences. Think of them as a constructive day off where you can share experiences and swap ideas with your peers.
If you can't manage to get away, we'll bring it to you. Check back often for regularly scheduled live webcast events.
| Please visit the PTC Education Services website for the latest training information including course descriptions, schedules, locations, and pricing. |
|---|
- Attend a course at any PTC Center and receive a free copy of Pro/ENGINEER Wildfire Student Edition!
http://www.ptc.com/services/edserv/index.htm
| Live Instructor-Lead Virtual PTC Training Courses |
|---|
Virtual Classrooms provide interactive learning with a trained PTC instructor in convenient and manageable sessions that last approximately 4 hours over a series of days. It's easy to join a class right from your desk using a phone or voice-over IP technology.
Sessions are performed just like a traditional ILT (including interactive exercises where you and the instructor can work on lab exercises together) and feature some of our most popular ILT courses. These sessions cover the exact same material as the traditional ILT in-center courses. Also look for some of our most frequently requested mini-topics delivered in the same format that are only an hour - two hours in duration.
If you have any questions about these sessions or would like to see getting other courses, not on this list, on the schedule please feel free to contact me for more details. They are a great way to bring training to you without you having to worry about location or being out from work for long stretches.
You can register for these sessions just as you would for any normal ILT class either by:
- calling order admin at http://www.ptc.com/services/edserv/training/registra.htm or
- you can go to PTC University directly at http://www.ptc.com/learning and submit a registration request directly. All you have to do is search the catalog by typing in “virtual” in the search field and you will see a listing.
PTC
Note: These newsletters are compiled in the local PTC office and are delivered via PlanetPTC Community. |
This thread is inactive and closed by the PTC Community Management Team. If you would like to provide a reply and re-open this thread, please notify the moderator and reference the thread. You may also use "Start a topic" button to ask a new question. Please be sure to include what version of the PTC product you are using so another community member knowledgeable about your version may be able to assist.


