Community Tip - Stay updated on what is happening on the PTC Community by subscribing to PTC Community Announcements. X
- Community
- Creo+ and Creo Parametric
- 3D Part & Assembly Design
- Re: Pattern starting at the center
- Subscribe to RSS Feed
- Mark Topic as New
- Mark Topic as Read
- Float this Topic for Current User
- Bookmark
- Subscribe
- Mute
- Printer Friendly Page
Pattern starting at the center
- Mark as New
- Bookmark
- Subscribe
- Mute
- Subscribe to RSS Feed
- Permalink
- Notify Moderator
Pattern starting at the center
Does the pattern feature always have to start from one end or the other, or can it start in the middle and go out in each (positive and negative) direction? I am looking at a series of holes that are alway going to be centered on the middle of a bar and as the bar length varies, so does the number of holes. Thanks, Dale
This thread is inactive and closed by the PTC Community Management Team. If you would like to provide a reply and re-open this thread, please notify the moderator and reference the thread. You may also use "Start a topic" button to ask a new question. Please be sure to include what version of the PTC product you are using so another community member knowledgeable about your version may be able to assist.
- Labels:
-
General
- Mark as New
- Bookmark
- Subscribe
- Mute
- Subscribe to RSS Feed
- Permalink
- Notify Moderator
Is this pattern symmetric about the center? If so, maybe you could mirror the pattern or set up some relations to add holes for whatever increment of length you need. Just an idea. I don't think you can pattern in 2 directions but I'm not totally sure.
- Mark as New
- Bookmark
- Subscribe
- Mute
- Subscribe to RSS Feed
- Permalink
- Notify Moderator
We may have done something similar to what you are looking to do.
We want to start in the center and the outward hole placements could vary outwards from the center.
I'm new at this but I'm wondering if you could 1st place the center hole and use the Pattern/Fill Pattern to take advantage of the stock size you have.
- Mark as New
- Bookmark
- Subscribe
- Mute
- Subscribe to RSS Feed
- Permalink
- Notify Moderator
I've had good luck with point pattern. I've attached a link to a PTC video addressing the feature. I've had better luck creating the feature, then creating a pattern. Then select the feature, right click and select pattern. From the pattern menu select point. Then select the"References" tab and define a sketch plane. From there create geometry points and close the sketch and the pattern.
http://www.youtube.com/watch?v=8nyP814k1_o
http://www.ptc.com/appserver/wcms/relnotes/note.jsp?&im_dbkey=84142&icg_dbkey=826
- Mark as New
- Bookmark
- Subscribe
- Mute
- Subscribe to RSS Feed
- Permalink
- Notify Moderator
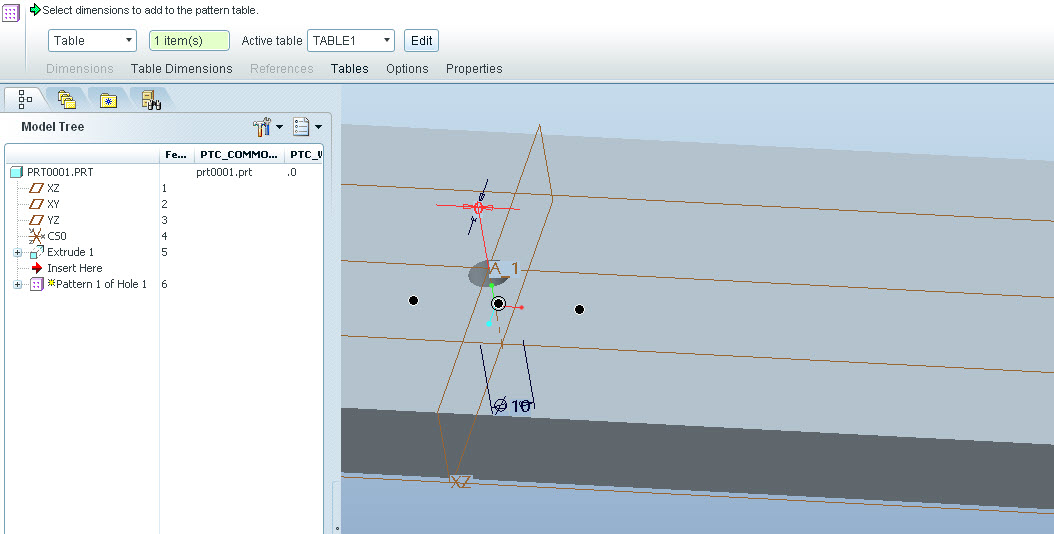
It can be done very easily with Pattern Table.
Create the first hole in the center of the part
Create a Pattern - Table
Select the dimensions that will drive the pattern
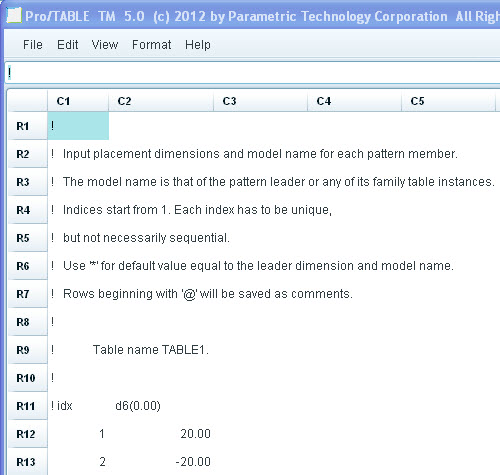
Edit the table
Add postive numbers for holes in one direction
Add negative numbers for holes in the other direction


- Mark as New
- Bookmark
- Subscribe
- Mute
- Subscribe to RSS Feed
- Permalink
- Notify Moderator
Can you use pattern table if the quantity varies?
If you want to maintain a spacing of 10, so if the part is 35, it has three holes; but if it is 55, it has five; if it is 65, it still has five since the first hole is centered.
- Mark as New
- Bookmark
- Subscribe
- Mute
- Subscribe to RSS Feed
- Permalink
- Notify Moderator
Nope, pattern table is probably not the way to go in that situation. Sorry I missed that requirement.
Maybe a relational pattern?
- Mark as New
- Bookmark
- Subscribe
- Mute
- Subscribe to RSS Feed
- Permalink
- Notify Moderator
You can use a fill patern.
You first have to create a sketch which will be "filled" by the holes. Actually it will contain all the holes' axis.
In your case this sketch must be a rectangle centered on your bar and its height must be less than the space between the holes. Note that it has to be created before the first hole.
Then create the first hole and pattern it. Select "Fill" as pattern type, select your rectangular sketch, set the needed dimensions and that's done.
As an example:
- Mark as New
- Bookmark
- Subscribe
- Mute
- Subscribe to RSS Feed
- Permalink
- Notify Moderator
You can also just use a line and pattern by point. Depending on the version you need to add an axis to place the hole and you could use a relation to set the length of the line used for the hole spacing.


