Community Tip - Stay updated on what is happening on the PTC Community by subscribing to PTC Community Announcements. X
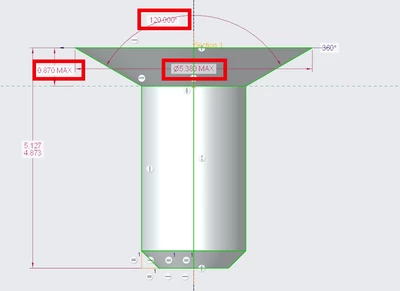
We don't model the threads of a screw for various reasons. When modeling a flat-head (non-countersunk) screw, the geometry of the head (height, dia, angle) automatically determine the 'body' of the screw. Therefore, if you want an accurate 'thread body' size, you would need to have an inaccurate head angle, height or diameter. We had chosen to keep all head dimensions accurate (angle, max dia, max height) and use the body as-is. Some users are getting confused. I checked a random screw from the 'Intelligent Fastener' system and it seems like they chose to not have an accurate head diameter. I would assume a head diameter is more critical to a thread body size, if the part name is saying it is an "M5". What is everyone's thoughts? How do you approach this conundrum.
Thanks!
Solved! Go to Solution.
OK. After looking at my assembly I posted earlier, I realized that I never tested a scenario with an incorrect head height. It turns out, an incorrect head height doesn't impact the height placement of the screw in the hole. The only factors are angle and the theoretical sharp max head diameter. Therefore, it seems like McMaster's approach was the best one after all.
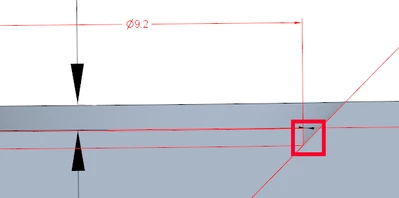
In your last post, since the model doesn't have a sharp edge, then the theoretical sharp is actually larger than 9.2, which is larger than the max in the spec and will raise the screw higher in the hole. This is screw 'E' in my earlier assembly.
Thank you for going back and forth with me on this. I believe based on the assembly testing I've done the best approach is to have an incorrect head height, which doesn't impact placement and allows for the thread body to be nominal.
Real fasteners are never sharp like that. We typically show a radius or a flat and then set the diameter equal to the actual size as measured on our actual fasteners, somewhere between the 'theoretical sharp' and 'absolute minimum'.
https://www.holo-krome.com/uploads/7/2/7/5/72754089/hk_consolidated_tech_manual_full_2015.pdf
Page 18:
One thing that recently stung me about this is for some of the short screws (i.e. 1/4-20 X 1/4 long) the head is actually undercut. Not having the undercut made the geometry goofy.
For me, the FHCS has to have the proper angle (to go with the countersink in the mating part) and I also define the head height and head diameter. The "flat" cylindrical portion of the head just "falls out" based on the height and diameter (the diameter is less than the theoretical sharp).
Flat heads are my least favorite type of screw - I've stripped out the hex on them more than any other. Button heads are almost as bad, but you can usually get vise grips around their heads to "convince" them to exit.
@TomU OK. So in short, you use the datasheet max height, datasheet angle, datasheet thread body and the measured head diameter (as long as it is within the tolerance)?
Yes, that's what we do. Not saying it's right..., but it is what we do. 😉
It's definitely another approach. I'm also thinking about using cosmetic threads, but that doesn't show in shaded mode. Nor does it get converted for Creo View visualizations.
This 'not sharp' approach gets tricky. Because if we are wrong with the diameter and the height of the non-sharp, the screw could end up sitting higher in the real-world than the cad. And we have a lot of products where the screw can not protrude out of the surface.
I'm not clear on the problem here. The head has a max height and the body has a specified diameter. Neither of these change regardless of whether the head is sharp or not, and therefore the engagement does not change either. What am I missing???
From that same pdf:
All three are the same height, same engagement, and have the same (thread) body diameter.
See attached for my test setup.
I was using DIN965, m5 as my test.
In the test assembly:
Screw A - Is our current approach (sharp head dimensions are max from the datasheet, but nominal thread body is incorrect)
Screw B - Is the McMaster equivalent with modeled threads. This is supposedly the most 'realistic'.
Screw C - Has accurate thread body as basic screw dia (5mm) and inaccurate sharp head diameter
Screw D - Has accurate body as basic screw dia and a non-sharp head with the min head diameter
Screw E - Has accurate body as basic screw dia and a non-sharp head with the max head diameter
If I understand your earlier comments correctly, you are using a screw somewhere in between 'D' and 'E'.
Based on the test models, Screws A and B assembly to the same height and Screws C, D, and E assemble to a different height. This is what I was afraid of. Depending on the design, this is critical. If we assume McMaster is 'correct', than approach A is the ideal modeling approach due to how it sits in the hole.
Am I missing something?
I'm assuming that the intersection between the angled sides and the nominal thread diameter is 'fixed' and everything else moves around these two points. If that is correct, then the 'sides' of the taper are not going to move when the head diameter or body diameter changes.
In this example, green is the minimum size and yellow is the maximum size. Anything inside the yellow area should be valid.
If I were modeling this, I would probably use the max sizes for everything since this is worst case, but if you want to be as close to perfectly flush as possible, you will probably need to base your model on the dimensions of the actual screws you are purchasing.
Too bad we don't have proper GD&T on this thing... 😉
I understand your assumption. It sounds like you are working from the bottom up (thread dia, then height, angle and last is head dia) assuming the square area below is correct.
I was working top-down (head dia, height, angle and whatever the thread dia turns out to be). It appears there is a meaningful difference here. The location of the junction for the area above defines where the screw will sit in the assembly.
I'm also looking at McMaster's a little more closer and they are playing games with their head height!
🤔
Based on a random picture of a screw I found online, it seems like the head height starts at the junction with the minor diameter (green lines below), where many people model with the major diameter (basic thread size - red lines below) and the junction is going to be higher. This seems to make sense with the sample models I provided in the previous post. Screws 'A' vs Screws 'C, D, E' from the previous post.
Am I making sense? Making this junction higher than reality impacts the location of the top and bottom of the screws.
From what I can tell looking at the standards, everything is driven by the theoretical sharp diameter, not the actual diameter (max or min) or the resulting height (max). This means the sides never move relative to the nominal screw diameter.
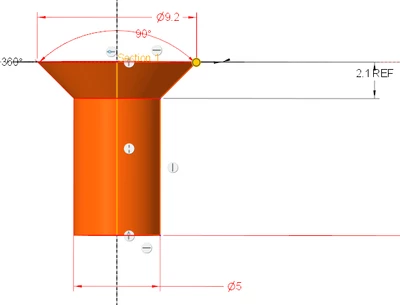
Regardless of how you choose to measure the head height (from the green line or from the red line), the sides (yellow lines) aren't going to change positions. The imaginary intersection point of the sides (orange dot) will never move.
Did you get a chance to look at Screw A and Screw C from my assembly I previously attached?
I'm looking at them again right now. I'm still of the opinion that the height is a reference dimension, not a controlling dimension. Everything is derived from the theoretical sharp diameter, not the actual, or resulting diameter. The height is just a max that can not be exceeded.
Here a screenshot from page 40 of the Unbrako catalog:
Keep in mind that these actual dimensions should meet the referenced standards, not that they necessarily are the referenced standards.
I hear you. But we want to create a model that represents the worse-case scenario, which would mean we would need the max height and max dia. Since the max dia represents the theoretical sharp angle, it could be modeled as such - just like McMaster and Intelligent Fastener. And based on our previous posts, it seems that the head height is the junction from the body and the angled surface. Forcing a body diameter will change the screw head so that it sits differently (Screw 'A' vs Screw 'C') due to a larger 'sharp' head diameter. Even if it is cut back to show the max of the datasheet, as you pointed out, the theoretical max value is the sharp edge, not a blunt or rounded shape.
Even ASME B18.6.3-2013 seems to indicate that the head does not start from the major.
I model all of my screws from the threaded portion and then add the head. I have no issues with flat head screws exceeding the spec dimensions.
More stuff to chew on...
@TomU For your three pictures above with the orange screws, which spec are you using?
@jwagh wrote:
@TomU For your three pictures above with the orange screws, which spec are you using?
I was basing these off your DIN 965 picture. I just created a model at the theoretical sharp diameter and then extended the head thickness upwards to the max thickness allowed. Not sure if this is technically correct or not... The only other way to make the head thicker would be to lower the intersection point with the body like you keep doing, which I guess is also possible, but I still don't think doing so should alter the nominal body diameter, instead it would create some kind of undercut. Interestingly enough, if I look at ISO 7721-1, that standard does not included the undercut area in the head thickness measurement.
I realize you want to model worst case, but you're probably not buying worst case screws. I'd suggest matching your model to what you're actually buying.
I'm referring to the dimensions in this picture:
I'm curious where you got it from, as it is in English.
Basically, the larger the theoretical sharp diameter is, the higher it will sit in the countersink. Therefore, in my opinion, that is a critical value.
Oh, sorry, all of those were from this:
The head height is only a reference, it's not a controlling dimension. The theoretical sharp diameter and nominal screw diameter never change. The actual head diameter can get smaller (down to the absolute min), but I'm not clear if this allowed reduction in head diameter is only due to the flat or radius that has been added to the edges, or if the head thickness can also get thinner while the head diameter is being reduced (and therefore keeping the edge sharp.)
Thank you. I got a good laugh when I looked at this spec. For some reason, the spec dimensions work perfectly with the max/nominal thread values (unlike Din965). Therefore, if I enter in any 2 of the 3 dimensions (head height, head diameter or body dia), the reference value matches as well with the datasheet! :). I guess this spec isn't a good example for this thread as the issue won't occur here.
For DIN965 (which seem to use the min thread dia for its head geometry) since both the head height and the head diameter contribute to where the screw sits in the hole, I would think that those would be important to model based on the company's policies (like 'max' for us) vs the thread body, which just 'is what it is'.
Not sure how much we can trust these pictures, but it sure seems like the intersection of the angle and the head height meets at the nominal thread diameter.
http://www.fasteners.eu/standards/DIN/965/
http://www.newfastener.com/wp-content/uploads/2013/03/DIN-965.pdf
https://www.dingfastener.com/din-965/
https://www.fastenal.com/content/product_specifications/M.MS.965.FPH.Z.00.pdf
This chart is interesting because it provides a comparison between the different standards:
https://www.fastenermart.com/files/DIN965-Specifications.pdf
From what I can tell, DIN 965 has been withdrawn and superseded by DIN ISO 7046, which allows for a slightly taller head (2.5 vs 2.7)
Regardless, I really think this is your worst case (maximum material) fastener if following DIN 965:
OK. After looking at my assembly I posted earlier, I realized that I never tested a scenario with an incorrect head height. It turns out, an incorrect head height doesn't impact the height placement of the screw in the hole. The only factors are angle and the theoretical sharp max head diameter. Therefore, it seems like McMaster's approach was the best one after all.
In your last post, since the model doesn't have a sharp edge, then the theoretical sharp is actually larger than 9.2, which is larger than the max in the spec and will raise the screw higher in the hole. This is screw 'E' in my earlier assembly.
Thank you for going back and forth with me on this. I believe based on the assembly testing I've done the best approach is to have an incorrect head height, which doesn't impact placement and allows for the thread body to be nominal.