
Turn on suggestions
Auto-suggest helps you quickly narrow down your search results by suggesting possible matches as you type.
Showing results for
Please log in to access translation
Turn on suggestions
Auto-suggest helps you quickly narrow down your search results by suggesting possible matches as you type.
Showing results for
- Community
- Creo (Previous to May 2018)
- Creo Modeling Questions
- Re: how to connect them?
Translate the entire conversation x
Please log in to access translation
Options
- Subscribe to RSS Feed
- Mark Topic as New
- Mark Topic as Read
- Float this Topic for Current User
- Bookmark
- Subscribe
- Mute
- Printer Friendly Page
how to connect them?
Aug 25, 2014
11:45 PM
- Mark as New
- Bookmark
- Subscribe
- Mute
- Subscribe to RSS Feed
- Permalink
- Notify Moderator
Please log in to access translation
36 REPLIES 36
Aug 25, 2014
11:53 PM
- Mark as New
- Bookmark
- Subscribe
- Mute
- Subscribe to RSS Feed
- Permalink
- Notify Moderator
Please log in to access translation
Aug 25, 2014
11:53 PM
No fair not adding a picture!
Creo 2 or 3?
Aug 25, 2014
11:56 PM
- Mark as New
- Bookmark
- Subscribe
- Mute
- Subscribe to RSS Feed
- Permalink
- Notify Moderator
Please log in to access translation
Aug 25, 2014
11:56 PM
i have given the part..creo elements pro/5.0
Aug 26, 2014
12:02 AM
- Mark as New
- Bookmark
- Subscribe
- Mute
- Subscribe to RSS Feed
- Permalink
- Notify Moderator
Please log in to access translation
Aug 26, 2014
12:02 AM

ok something like this
Aug 26, 2014
12:17 AM
- Mark as New
- Bookmark
- Subscribe
- Mute
- Subscribe to RSS Feed
- Permalink
- Notify Moderator
Please log in to access translation
Aug 26, 2014
12:17 AM
Oh, nice! We had a very nice discussion about this but I can never find these when you need them.
Getting them joined is not a problem; making them "nice" is more challenging.
Aug 26, 2014
12:33 AM
- Mark as New
- Bookmark
- Subscribe
- Mute
- Subscribe to RSS Feed
- Permalink
- Notify Moderator
Please log in to access translation
Aug 26, 2014
12:33 AM
yes exactly..making them "nice"...is challenging.
i thought "style" would be off help...but then i do not have experience with style tool bar.
Aug 26, 2014
12:35 AM
- Mark as New
- Bookmark
- Subscribe
- Mute
- Subscribe to RSS Feed
- Permalink
- Notify Moderator
Please log in to access translation
Aug 26, 2014
12:35 AM
There is a nice junction in this discussion including a sample part...
Aug 26, 2014
12:54 AM
- Mark as New
- Bookmark
- Subscribe
- Mute
- Subscribe to RSS Feed
- Permalink
- Notify Moderator
Please log in to access translation
Aug 26, 2014
12:54 AM
N-sided surface also can be used...
Aug 26, 2014
12:30 PM
- Mark as New
- Bookmark
- Subscribe
- Mute
- Subscribe to RSS Feed
- Permalink
- Notify Moderator
Please log in to access translation
Aug 26, 2014
03:50 PM
- Mark as New
- Bookmark
- Subscribe
- Mute
- Subscribe to RSS Feed
- Permalink
- Notify Moderator
Please log in to access translation
Aug 26, 2014
03:50 PM
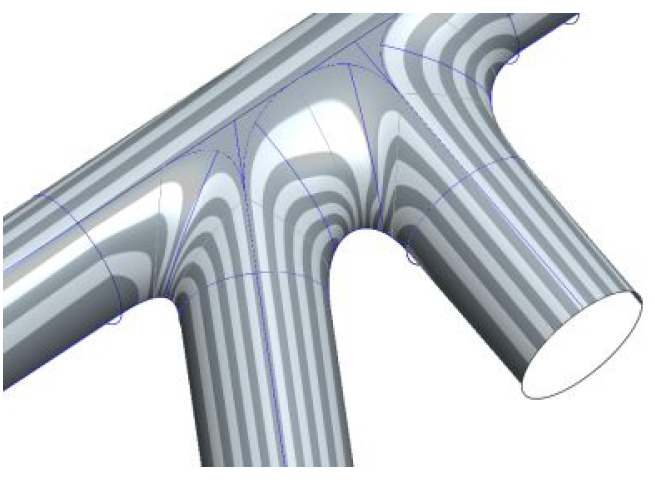
Getting that center transition with continuous curvature is a real pest when you don't have style.
Rohit, isn't Creo 3 offering you this capability in the core package?
Aug 26, 2014
09:09 PM
- Mark as New
- Bookmark
- Subscribe
- Mute
- Subscribe to RSS Feed
- Permalink
- Notify Moderator
Please log in to access translation
Aug 26, 2014
09:09 PM
the centre are always comes flat...
in n sided surface it is better...but then how to know it is exactly correct?
are you talking about about creo 3.0 boundary blend?
the surface option in "style" does not give the desired result.
offcourse i did not add extra curves.
the "fill" option in solidworks fails miserably too.
Aug 26, 2014
09:41 PM
- Mark as New
- Bookmark
- Subscribe
- Mute
- Subscribe to RSS Feed
- Permalink
- Notify Moderator
Please log in to access translation
Aug 26, 2014
09:41 PM
From an industrial design concept, core Creo falls way short in high order surface generation.
I thought I saw some videos in Creo 3.0 that is suppose to address this. Maybe it is simply the cubic n-sided surface with a new UI. Not sure having not explored this yet.
However, this can be done with grace and style (generic, not Creo). I find Creo 2.0 more frustrating then ever in getting surfaces like this to work. I know how to inspect them, but without the right tools you can loose days over this.
Aug 26, 2014
10:52 PM
- Mark as New
- Bookmark
- Subscribe
- Mute
- Subscribe to RSS Feed
- Permalink
- Notify Moderator
Please log in to access translation
Aug 26, 2014
10:52 PM
Antonius..if you have a good internet connection you can install Creo 3.0 trial in abt 45 mins...that is the time it took me with a 4 Mbps connection.
my trial is getting over....other than the align option in "freestyle" and the " optimize surface" in boundary blend..i do not remember anything new in Creo 3.0....
we have a "style" license at office..but rarely use it...so not much experience...
Aug 27, 2014
12:04 AM
- Mark as New
- Bookmark
- Subscribe
- Mute
- Subscribe to RSS Feed
- Permalink
- Notify Moderator
Please log in to access translation
Aug 27, 2014
12:04 AM
I can't risk messing up a production environment with a Creo 3 install.
Here you go:
http://learningexchange.ptc.com/tutorial/3438/aligning-freestyle-geometry
Aug 26, 2014
06:16 PM
- Mark as New
- Bookmark
- Subscribe
- Mute
- Subscribe to RSS Feed
- Permalink
- Notify Moderator
Please log in to access translation
Aug 26, 2014
06:16 PM
I don´t have Creo 3, but it seems that you can do it with freestyle:
And a member of our community has a good tutorial about surfaces of that kind: here.
Aug 26, 2014
06:29 PM
- Mark as New
- Bookmark
- Subscribe
- Mute
- Subscribe to RSS Feed
- Permalink
- Notify Moderator
Please log in to access translation
Aug 26, 2014
06:29 PM
Thanks, Jose. Another hidden command added to my ribbon 
conic surface and n-sided patch.
Aug 27, 2014
10:15 AM
- Mark as New
- Bookmark
- Subscribe
- Mute
- Subscribe to RSS Feed
- Permalink
- Notify Moderator
Please log in to access translation
Aug 27, 2014
10:15 AM
Hmmm, might have to try that with an N-sided patch!
Aug 26, 2014
06:20 PM
- Mark as New
- Bookmark
- Subscribe
- Mute
- Subscribe to RSS Feed
- Permalink
- Notify Moderator
Please log in to access translation
Aug 26, 2014
06:20 PM
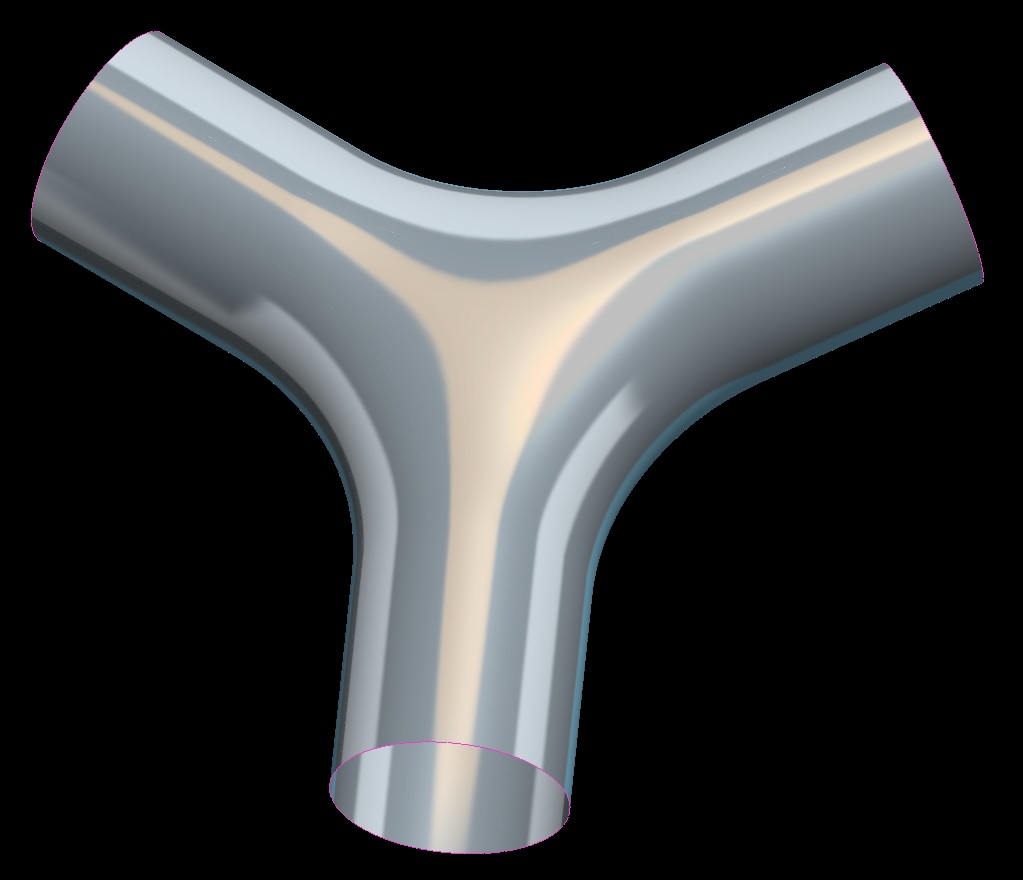
I did an N-Sided patch and think it turned out pretty well. Haven't done one of those in forever. Don't have the "Style" extension.
Aug 26, 2014
06:30 PM
- Mark as New
- Bookmark
- Subscribe
- Mute
- Subscribe to RSS Feed
- Permalink
- Notify Moderator
Please log in to access translation
Aug 26, 2014
06:30 PM
Very nice Frank!
Aug 27, 2014
08:30 AM
- Mark as New
- Bookmark
- Subscribe
- Mute
- Subscribe to RSS Feed
- Permalink
- Notify Moderator
Please log in to access translation
Aug 27, 2014
08:30 AM

Aug 27, 2014
08:39 AM
- Mark as New
- Bookmark
- Subscribe
- Mute
- Subscribe to RSS Feed
- Permalink
- Notify Moderator
Please log in to access translation
Aug 27, 2014
08:39 AM
yes i have made that one..instead of intersect curves i used datum points though.
thanks for your effort.
Aug 27, 2014
10:13 AM
- Mark as New
- Bookmark
- Subscribe
- Mute
- Subscribe to RSS Feed
- Permalink
- Notify Moderator
Please log in to access translation
Aug 27, 2014
10:13 AM
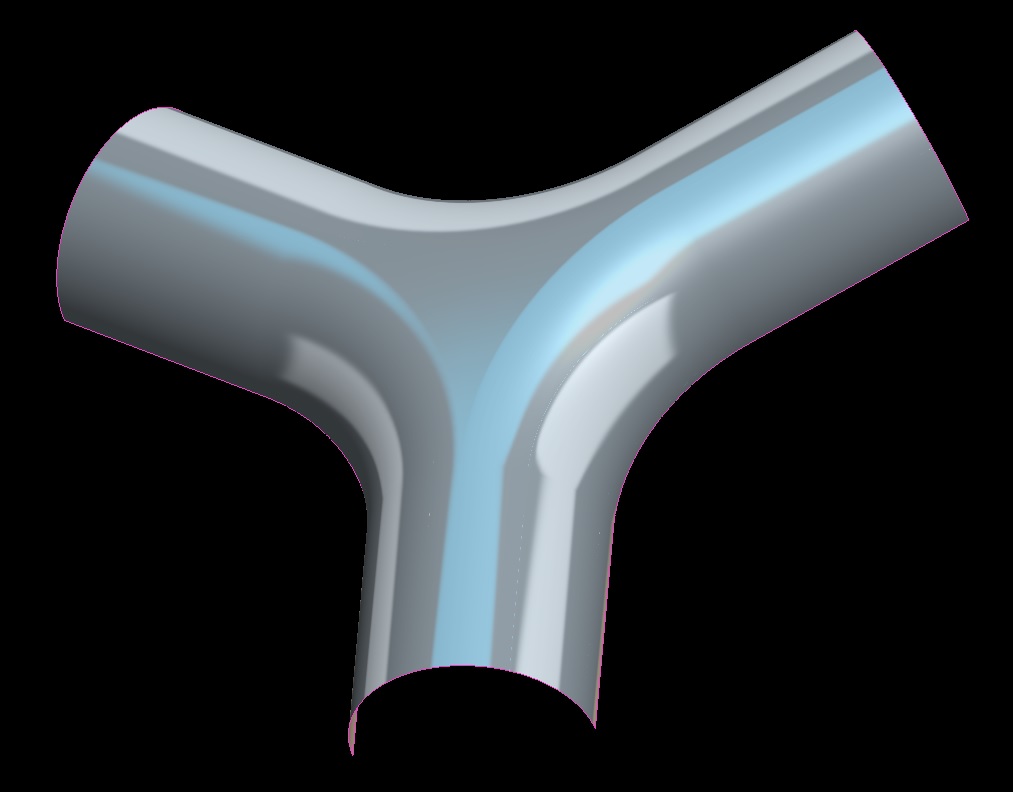
As always, it depends on EXACTLY the geometry you want. There are any number of ways to do this, and they all produce different geometry. Doing it with a "triangular" flat is easier and less CPU/data storage intensive....it also doesn't "blend" anything, it's just a flat and toroidial surfaces. I liked the N-sided patch better, personally. But, here's an easier/much less features way to do what you did. No reason to creat boundary blends if you don't need them, these are simple toroidial surfaces.
Aug 27, 2014
02:46 PM
- Mark as New
- Bookmark
- Subscribe
- Mute
- Subscribe to RSS Feed
- Permalink
- Notify Moderator
Please log in to access translation
Aug 27, 2014
02:46 PM
That n-sided patch dialog is driving me nuts. In my Creo, it doesn't even highlight the edges although it asks how to deal with it's blending surface on the highlighted edge.
But the challenge is ON...
The C2 curvature round fails miserably on this sample. But the feature is easy enough to create.
Aug 27, 2014
05:51 PM
- Mark as New
- Bookmark
- Subscribe
- Mute
- Subscribe to RSS Feed
- Permalink
- Notify Moderator
Please log in to access translation
Aug 27, 2014
05:51 PM
I noticed that too, it was a pain figuring out what edge was what, but I eventually got it by remembering which edge I picked first, and the fact that on certain ones it's default was the datum plane. The GUI could DEFINATELY be better!
Aug 27, 2014
08:50 PM
- Mark as New
- Bookmark
- Subscribe
- Mute
- Subscribe to RSS Feed
- Permalink
- Notify Moderator
Please log in to access translation
Aug 27, 2014
08:50 PM
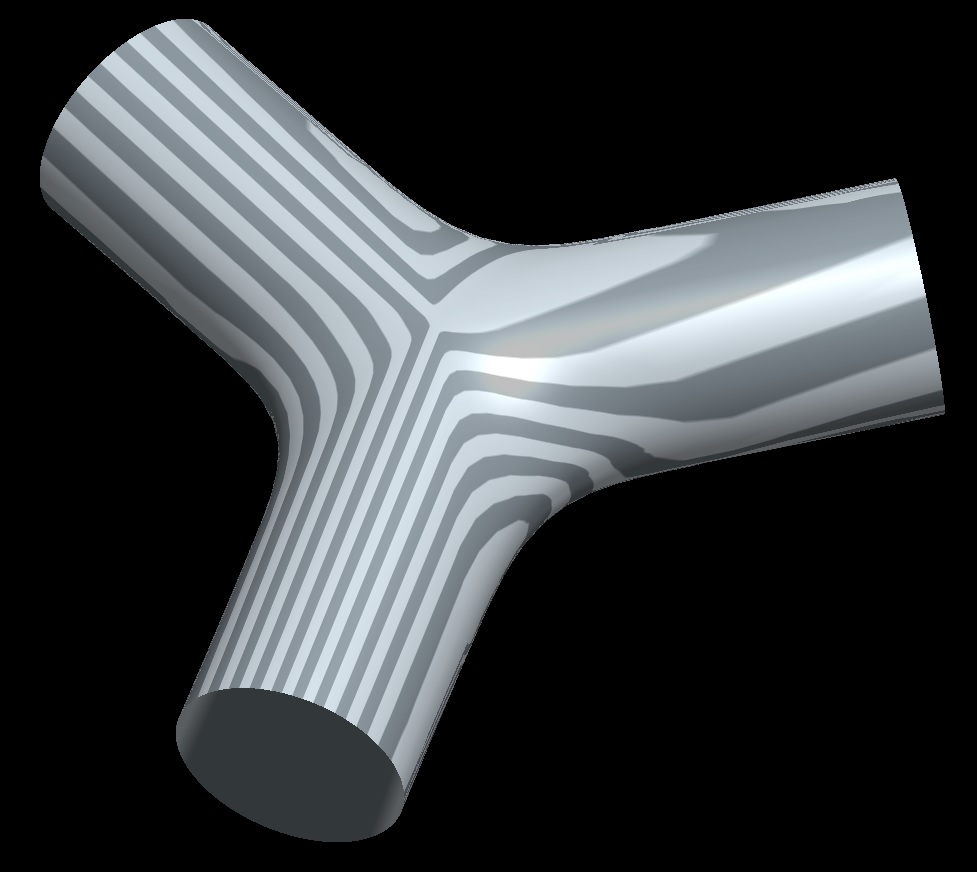
Okay; 3 days and many fails... I finally got one that might pass mustard. (don't ask me who came up with that one!)
All surface boundary blends were joined using curvature.
If I had to explain the process, I couldn't. ...So I attached the file.
But it also passed the final test. It solidifies!
Creo 2.0 attached and STEP.
Set shade quality to about 10 to see get a fairly smooth surface to evaluate.
Aug 28, 2014
09:47 AM
- Mark as New
- Bookmark
- Subscribe
- Mute
- Subscribe to RSS Feed
- Permalink
- Notify Moderator
Please log in to access translation
Aug 28, 2014
09:47 AM
Wow, nice work! I can't wait for Pro/E to simply just be able to DO that without having to build things so elaborately.
Glad I don't have to worry about that, I know the guy polishing the mold will make everything C2 as long as I get it as close as possible.
Aug 28, 2014
09:53 AM
- Mark as New
- Bookmark
- Subscribe
- Mute
- Subscribe to RSS Feed
- Permalink
- Notify Moderator
Please log in to access translation
Aug 28, 2014
09:53 AM
I worked on a couple of ID projects and they really wanted the model -perfect- since it makes the EDM forms. Any glitch in the model will reflect in the mold.
In general I agree; sandpaper is the best C2 tool ever made. Maybe we need a sandpaper feature!
Aug 28, 2014
10:00 AM
- Mark as New
- Bookmark
- Subscribe
- Mute
- Subscribe to RSS Feed
- Permalink
- Notify Moderator
Please log in to access translation
Aug 28, 2014
10:00 AM
Muster. You have to pass muster. Military term. First formation of the day. You don't pass muster, you in a heap o' trouble. The start of what will probably be a very bad day.
Passing mustard is a whole different thing.
Aug 28, 2014
10:03 AM
- Mark as New
- Bookmark
- Subscribe
- Mute
- Subscribe to RSS Feed
- Permalink
- Notify Moderator
Please log in to access translation
Aug 28, 2014
10:03 AM
Aug 28, 2014
11:33 AM
- Mark as New
- Bookmark
- Subscribe
- Mute
- Subscribe to RSS Feed
- Permalink
- Notify Moderator
Please log in to access translation
Aug 28, 2014
11:33 AM
...especially if it's SPICY mustard....
Ok, back on target. I just made 3 solid tubes that connected, and used a D1xD2 C2 round, tweaking the size and shape factor:
