Community Tip - Did you get an answer that solved your problem? Please mark it as an Accepted Solution so others with the same problem can find the answer easily. X
- Community
- Creo+ and Creo Parametric
- 3D Part & Assembly Design
- AutoIT Hole UI Scripts you may find useful.
- Subscribe to RSS Feed
- Mark Topic as New
- Mark Topic as Read
- Float this Topic for Current User
- Bookmark
- Subscribe
- Mute
- Printer Friendly Page
AutoIT Hole UI Scripts you may find useful.
- Mark as New
- Bookmark
- Subscribe
- Mute
- Subscribe to RSS Feed
- Permalink
- Notify Moderator
AutoIT Hole UI Scripts you may find useful.
Hi,
In my work I create a large amount of threaded holes in my designs and the hole placement UI can be a little tedious.
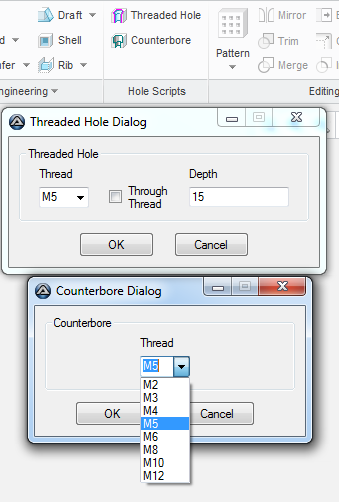
To solve this, yesterday I created two rough AutoIT scripts that simplify my hole workflow by selecting my most common parameters.
I need to modify the thread depth to a formula to allow for clearance, but at the moment they match the thread depth to the hole depth.
They can be called through mapkeys that I have placed on my ribbon.
They work on Creo 3.0, with tweaking I am sure they will work in other releases.
I would just like to share these with anyone who may find them interesting or even put them out there to be tidied or improved upon.
I am far from being any kind of coder but I am happy to explain how they work and welcome your feedback.

Enjoy
Miles
This thread is inactive and closed by the PTC Community Management Team. If you would like to provide a reply and re-open this thread, please notify the moderator and reference the thread. You may also use "Start a topic" button to ask a new question. Please be sure to include what version of the PTC product you are using so another community member knowledgeable about your version may be able to assist.
- Mark as New
- Bookmark
- Subscribe
- Mute
- Subscribe to RSS Feed
- Permalink
- Notify Moderator
Miles,
I was curious about your scripts, so I downloaded them and tested on PC with 22'' monitor with 1680x1050 resolution.
1.] AutoIt v3.3.10.2 is installed on my PC.
2.] Creo Parametric 3.0 M060
I had to slightly modify scripts, because my AutoIt installation does not contain AutoItConstants.au3.
I added:
#include <Constants.au3>
$MOUSE_CLICK_PRIMARY="primary"
3.] Creo Parametric 2.0 M180
Again I had to slightly modify scripts, because of different window title.
Creo 3.0 ... PTC Creo Parametric
Creo 2.0 ... Creo Parametric
MH
Martin Hanák
- Mark as New
- Bookmark
- Subscribe
- Mute
- Subscribe to RSS Feed
- Permalink
- Notify Moderator
Hi Martin,
I have AutoIT v 3.3.14.2 installed that will explain the #include being incorrect.
What are your thoughts on the execution of the script? A counterbore has gone from 9 or more clicks (depending on thread) to 4 (2 if you want the default of an M5 C'Bore)
It saves me so much time now and reduces errors from missed or forgotten clicks.
I hope they could be useful to others or even inspire others to streamline their own workflow. 🙂
I guess TOOLKIT could be utilised with greater affect but I do not know how it works.
Miles
- Mark as New
- Bookmark
- Subscribe
- Mute
- Subscribe to RSS Feed
- Permalink
- Notify Moderator
Miles,
1.] TOOLKIT programming is activity reserved for specialist - programmers. It cannot be used by amateurs - for example me ![]() .
.
2.] To save clicks, you can implement saving lastly used values into file. When launched next time, script can read this values.
MH
Martin Hanák
- Mark as New
- Bookmark
- Subscribe
- Mute
- Subscribe to RSS Feed
- Permalink
- Notify Moderator
Hi,
how did you connect the script with the icons, did you create two mapkeys using "os script"?
If so, how exaclty has the line to look like in order to work?
Andreas
- Mark as New
- Bookmark
- Subscribe
- Mute
- Subscribe to RSS Feed
- Permalink
- Notify Moderator
Hi Andreas,
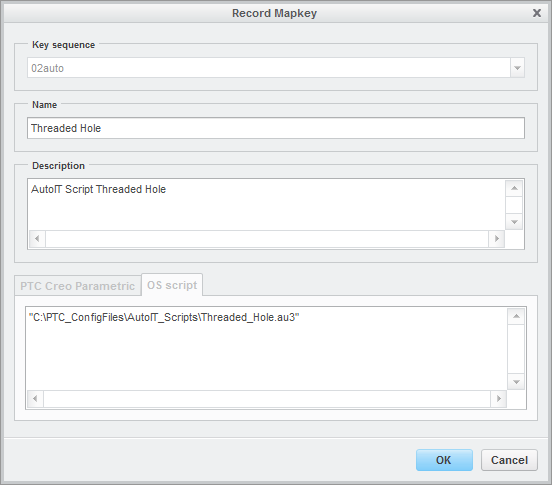
You are right, I did create 2 mapkeys using OS Script and placed them on the ribbon.
I copied the hole icon and modified it to give me a good visual icon.
The os script looks like this in the config.pro file:
mapkey 02auto @MAPKEY_NAMEAutoIT Script Threaded Hole;\
mapkey(continued) @MAPKEY_LABELThreaded Hole;\
mapkey(continued) @SYSTEM"C:\\PTC_ConfigFiles\\AutoIT_Scripts\\Thread\
mapkey(continued) ed_Hole.au3";
mapkey 03auto @MAPKEY_NAMEAutoIT Script Counterbore Hole;\
mapkey(continued) @MAPKEY_LABELCounterbore;\
mapkey(continued) @SYSTEM"C:\\PTC_ConfigFiles\\AutoIT_Scripts\\Counte\
mapkey(continued) rbore.au3";
Or like this in the mapkey UI

Regards,
Miles
- Mark as New
- Bookmark
- Subscribe
- Mute
- Subscribe to RSS Feed
- Permalink
- Notify Moderator
Hi Miles,
thanks for the answer, this is what I was expecting.
Andreas
- Mark as New
- Bookmark
- Subscribe
- Mute
- Subscribe to RSS Feed
- Permalink
- Notify Moderator
That's nice, usually people don't share that kind of stuff here.
But to achieve that you can also use a UDF with a mapkey.
The number of clicks will be the same but you'll have some advantages:
- Internal commands, not Keystrokes, so more more consistency.
- More easy to create and modify
- you can replace the already inserted hole with another one with another dimension (with a family table)
- Udf canl bring colors too, if that's important for you.
Just my 2 cents:)
Jose


