
Turn on suggestions
Auto-suggest helps you quickly narrow down your search results by suggesting possible matches as you type.
Showing results for
Please log in to access translation
Turn on suggestions
Auto-suggest helps you quickly narrow down your search results by suggesting possible matches as you type.
Showing results for
Community Tip - Need to share some code when posting a question or reply? Make sure to use the "Insert code sample" menu option. Learn more! X
- Community
- Creo+ and Creo Parametric
- 3D Part & Assembly Design
- Re: Advance surface modelling assistance - 6-sided...
Translate the entire conversation x
Please log in to access translation
Options
- Subscribe to RSS Feed
- Mark Topic as New
- Mark Topic as Read
- Float this Topic for Current User
- Bookmark
- Subscribe
- Mute
- Printer Friendly Page
Advance surface modelling assistance - 6-sided sketch blend
Dec 05, 2025
06:10 AM
- Mark as New
- Bookmark
- Subscribe
- Mute
- Subscribe to RSS Feed
- Permalink
- Notify Moderator
Please log in to access translation
Dec 05, 2025
06:10 AM
Advance surface modelling assistance - 6-sided sketch blend
Hi Community, 🙂
I am new in this forum.
I have medium experience in Creo Parametric (version 8 ) and have made a lot of 3D and 2D drawings.
I will soon get version 12.
The reason I am writing in here is that I have just begun my path into advanced surface modelling and that is a steep learning curve.
I have attached a render picture of what I am trying to create (made by a friend in Rhino), pictures of my sketches I have made, and pictures of my best result with and without surface analysis.
What I am trying to do is to make a surface between the different sketches but no matter what I do, it is either failing, or the surface quality is bad using analysis.
I have used several techniques, and I have also tried to use the Style feature.
What I Hope is that you can help to me learn how to do this geometry with a good quality surface. I know I am missing some features, steps or adjustments in order to do this right, but at the moment I have hit a wall with my experience.
Thank you in advance 🙂
Labels:
- Labels:
-
Surfacing
12 REPLIES 12
Dec 05, 2025
10:58 AM
- Mark as New
- Bookmark
- Subscribe
- Mute
- Subscribe to RSS Feed
- Permalink
- Notify Moderator
Please log in to access translation
Dec 05, 2025
10:58 AM
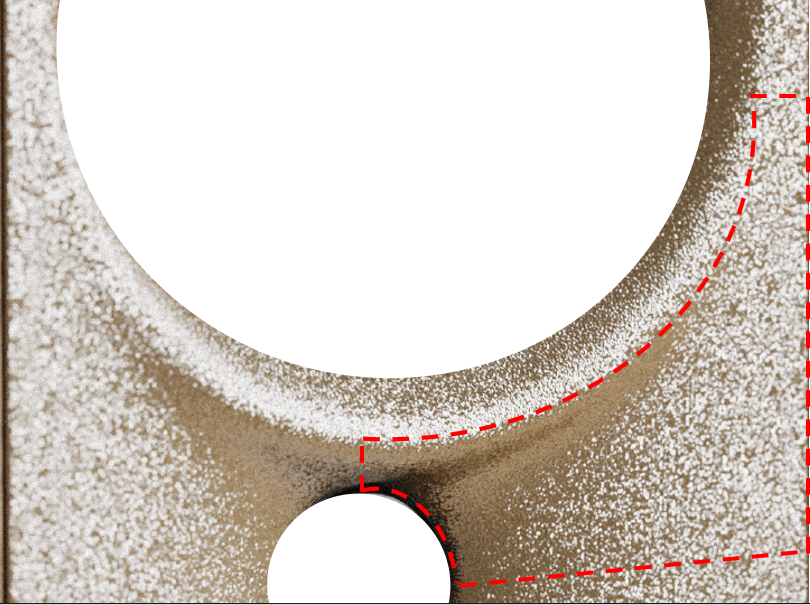
While there are tools for N-sided patches, generally it is better to create 4 sided surfaces. Overbuild a 4 sided surface and then trim it back. I would follow the green boundaries shown below. Pay attention to the construction curves used to define the bounds and their connections such that they support G2 (curvature) or higher order connections where needed. You may need to use composite curves to get a boundary suitable for the goal (#2 in pic below).
To access the n-sided patch you need to set a config option see this article (I am not suggesting this is the best approach to your issue):

As an alternative approach, based on the rendered image I see a possibility to use two surfaces of revolution about the holes and an extruded surface in the vertical direction that would intersect the revolved surfaces to generate the core geometry which you would then "patch" with an overbuilt 4 sided surface(s).
========================================
Involute Development, LLC
Consulting Engineers
Specialists in Creo Parametric
Involute Development, LLC
Consulting Engineers
Specialists in Creo Parametric
Dec 09, 2025
02:06 AM
- Mark as New
- Bookmark
- Subscribe
- Mute
- Subscribe to RSS Feed
- Permalink
- Notify Moderator
Please log in to access translation
Dec 09, 2025
02:06 AM
Dear tbraxton, 🙂
Thank you for your feedback.
I will try your suggestions and report back if it works (it may take a while for me 😉 )
I will not use N-side patches to begin with as you say it is not the best approach, but I appreciate the suggestions as well.
In the meantime, I am also open for other suggestions if there are other ways to do it 🙂
Dec 18, 2025
09:21 AM
- Mark as New
- Bookmark
- Subscribe
- Mute
- Subscribe to RSS Feed
- Permalink
- Notify Moderator
Please log in to access translation
Dec 18, 2025
09:21 AM
Hi @DH_14427784
I wanted to see if you got the help you needed.
If so, please mark the appropriate reply as the Accepted Solution or please feel free to detail in a reply what has helped you and mark it as the Accepted Solution. It will help other members who may have the same question.
Of course, if you have more to share on your issue, please pursue the conversation.
Thanks,
Catalina
PTC Community Moderator
Jan 05, 2026
02:48 AM
- Mark as New
- Bookmark
- Subscribe
- Mute
- Subscribe to RSS Feed
- Permalink
- Notify Moderator
Please log in to access translation
Jan 05, 2026
02:48 AM
Hi Catalina, 🙂
I have not solved the issue yet.
I am still trying to solve the advanced drawing.
Jan 17, 2026
11:44 PM
- Mark as New
- Bookmark
- Subscribe
- Mute
- Subscribe to RSS Feed
- Permalink
- Notify Moderator
Please log in to access translation
Jan 17, 2026
11:44 PM
Hi, attached is what I've got from the curves I approximated from your pictures. Is this close to what you wanted to achieve?

Jan 17, 2026
11:54 PM
- Mark as New
- Bookmark
- Subscribe
- Mute
- Subscribe to RSS Feed
- Permalink
- Notify Moderator
Please log in to access translation
Jan 17, 2026
11:54 PM
mirrored

Jan 18, 2026
12:11 AM
- Mark as New
- Bookmark
- Subscribe
- Mute
- Subscribe to RSS Feed
- Permalink
- Notify Moderator
Please log in to access translation
Jan 18, 2026
12:11 AM
Hi, attached is what I've got from the curves I approximated from your pictures. Is this close to what you wanted to achieve?
Jan 19, 2026
03:06 AM
- Mark as New
- Bookmark
- Subscribe
- Mute
- Subscribe to RSS Feed
- Permalink
- Notify Moderator
Please log in to access translation
Jan 19, 2026
03:06 AM
Hi BH0oi, 🙂
That looks exactly like want I am trying to achieve.
Do you have the recipe for that? 🙂
Jan 19, 2026
03:38 AM
- Mark as New
- Bookmark
- Subscribe
- Mute
- Subscribe to RSS Feed
- Permalink
- Notify Moderator
Please log in to access translation
Jan 19, 2026
03:38 AM
Hi, DH. These are the steps I used to create that final surface:

I attached the 3D in my last reply and you should see those curves I used to in my steps. Hope this helps
Jan 19, 2026
03:53 AM
- Mark as New
- Bookmark
- Subscribe
- Mute
- Subscribe to RSS Feed
- Permalink
- Notify Moderator
Please log in to access translation
Jan 19, 2026
03:53 AM
I will look at it and report back 🙂
If I have any questions, I will write back if that is, okay?
Thanks again for your help 🙂
Jan 19, 2026
04:11 AM
- Mark as New
- Bookmark
- Subscribe
- Mute
- Subscribe to RSS Feed
- Permalink
- Notify Moderator
Please log in to access translation
Jan 19, 2026
04:11 AM
Hi again, 🙂
Will you be able to export your file with the features in the feature tree?
The file you've sent was only for looking.
Also, the last surface (SF-78) is a 5-sided surface blend. How is that possible?
Kind regards 🙂
Jan 19, 2026
07:30 AM
- Mark as New
- Bookmark
- Subscribe
- Mute
- Subscribe to RSS Feed
- Permalink
- Notify Moderator
Please log in to access translation
Jan 19, 2026
07:30 AM
I am unable to send you non-creo format with model tree. I am not allowed to send out the native file from my computer. Do let me know if you need other formats. The picture in my last reply does show all the entities in the style features. yes, SF-78 is 5-side surface and it can be created quite easily. Feel free to reach out to me for any further questions.


