Community Tip - Learn all about the Community Ranking System, a fun gamification element of the PTC Community. X
- Community
- Creo+ and Creo Parametric
- 3D Part & Assembly Design
- Re: Can you override text height offsets in a note...
- Subscribe to RSS Feed
- Mark Topic as New
- Mark Topic as Read
- Float this Topic for Current User
- Bookmark
- Subscribe
- Mute
- Printer Friendly Page
Can you override text height offsets in a note/dimension property?
- Mark as New
- Bookmark
- Subscribe
- Mute
- Subscribe to RSS Feed
- Permalink
- Notify Moderator
Can you override text height offsets in a note/dimension property?
Hi,
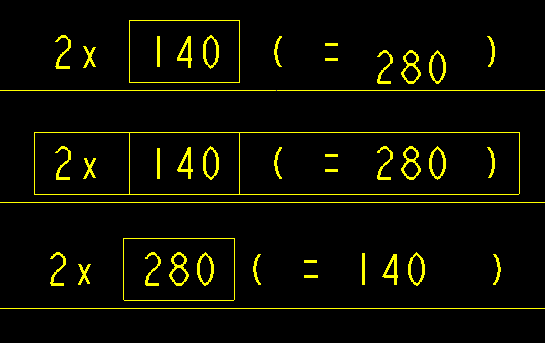
Just wondering if you can adjust the height of text in a note or dimension? If I have a pattern of holes for example and I reference them as below. I would clearly like the '280' to be inline with the rest of the text.
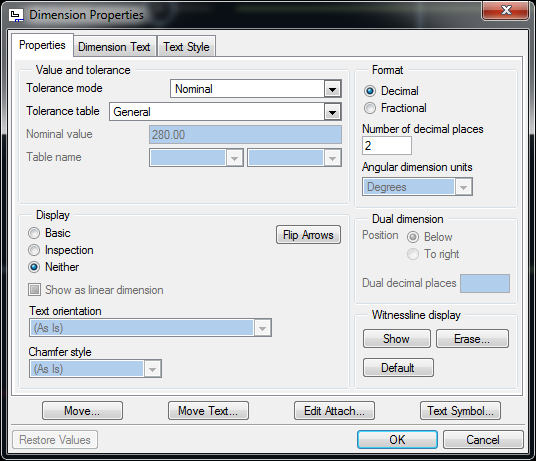
To create the dimension below I modified the dimension to:
2x @[&d1796@] ( = @D )
where the dimension I'm editing is the 280 and &d1796 is the 140 which I used to create the pattern.

Any suggestions?
We're on Wildfire 3.
Thanks,
Dave
This thread is inactive and closed by the PTC Community Management Team. If you would like to provide a reply and re-open this thread, please notify the moderator and reference the thread. You may also use "Start a topic" button to ask a new question. Please be sure to include what version of the PTC product you are using so another community member knowledgeable about your version may be able to assist.
Solved! Go to Solution.
- Labels:
-
2D Drawing
Accepted Solutions
- Mark as New
- Bookmark
- Subscribe
- Mute
- Subscribe to RSS Feed
- Permalink
- Notify Moderator
Well, we recently had some training for Creo 2 and hoping that the text height options would solve this issue I was disappointed to see the problem remined however the trainer was able to get to a workaround albeit rather a messy one!
You have to create an added dimension so you can ovewrite it with '@O' and then pull in the dimension with an '&d##' or '&ad##' (it works for either) and then it's all on the same level. You can't overwrite a driven dimension I don't think hense why it needs to be added.
since the screenshots of the dialog box didn't come out so well, the entry I used was:
4x @[50@] (= @O&ad149)
This can result in a few extra dimensions needing to be placed but you can just erase them in WF or delete as it's now called in Creo. Hope someone else gets some use from this.
Thanks,
Dave
- Mark as New
- Bookmark
- Subscribe
- Mute
- Subscribe to RSS Feed
- Permalink
- Notify Moderator
The problem is the box around 140. Does it have to be there? If you leave it out, it's all the same height.
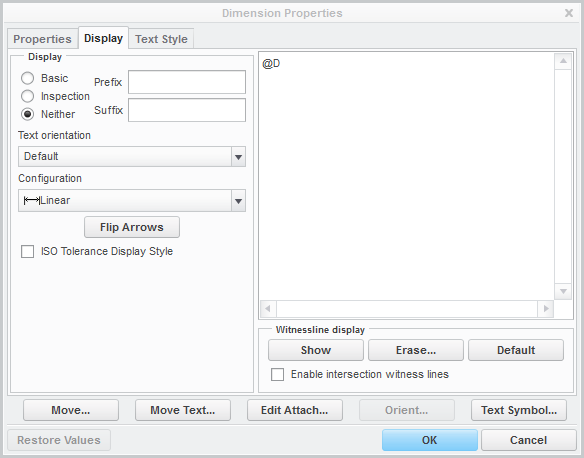
Also possible, under dimprop: Text orientation > Horizontal.
That get's you this:

Not really the same of course, but it's all aligned. (Never mind the mathmatical screw up)
- Mark as New
- Bookmark
- Subscribe
- Mute
- Subscribe to RSS Feed
- Permalink
- Notify Moderator
Unfortunately the basic dimension does need to be there becasue the holes have a geometric tolerance associated with them, but yes removing it does indeed align them correctly! I suppose as a last resort it could just sketch a box around the dim but I really don't want to be doing that! And it would be at the height of the 280 so the box would cut the dimension line.
My text orientation options are disabled, any idea why?

Thanks,
Dave
- Mark as New
- Bookmark
- Subscribe
- Mute
- Subscribe to RSS Feed
- Permalink
- Notify Moderator
What version are you using?
In my Creo 2.0 M080 Test orientation is under Display.

- Mark as New
- Bookmark
- Subscribe
- Mute
- Subscribe to RSS Feed
- Permalink
- Notify Moderator
Wildfire 3.0 M230... We were supposed to move to Creo 2.0 last month but that has been postponed till June... not sure what year though!
- Mark as New
- Bookmark
- Subscribe
- Mute
- Subscribe to RSS Feed
- Permalink
- Notify Moderator
Haha, know the feeling. We were supposed to go from WF2 to WF4. Then it became WF5, then Creo, and now, two months ago, we finally moved to Creo2...
Don't know why text orientation is greyed out. Did you place it with show/erase?
- Mark as New
- Bookmark
- Subscribe
- Mute
- Subscribe to RSS Feed
- Permalink
- Notify Moderator
No the dimension was added... I have an ongoing battle with some of our more seasoned pro/e users here who swear by show/erase but I prefer to model about lines of symmetry so these dimensions aren't so useful in drawings usually.
I don't think I can face another round of tech support with PTC so I'll just leave it until we upgrade, just looks a bit rubbish though!
- Mark as New
- Bookmark
- Subscribe
- Mute
- Subscribe to RSS Feed
- Permalink
- Notify Moderator
How annoying! Have you tried to put a superscript just before the "280" dim?
- Mark as New
- Bookmark
- Subscribe
- Mute
- Subscribe to RSS Feed
- Permalink
- Notify Moderator
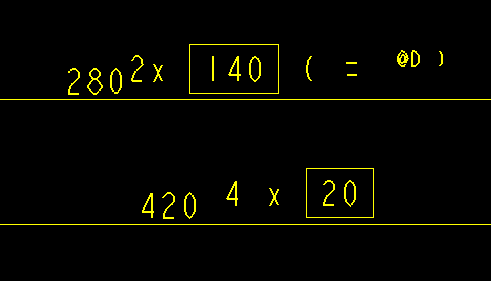
Sadly neither superscript (top dim) or even manually typing (bottom dim) has the desired effect. In the first case it added the @D back infront of the dimension and made the original @D a text string rather than parameter and in both cases it really wants to put the dimension value on the line.

I've even tried removing my config.pro but it still has this behaviour.
Thanks everyone for your suggestions so far!
- Mark as New
- Bookmark
- Subscribe
- Mute
- Subscribe to RSS Feed
- Permalink
- Notify Moderator
If I swap the @D with the &d1796 and then enable the basic dimension option (bottom dim) then it's all aligned but wrong. If I enable the basic option for my original dimension property then it's all aligned but the whole thing is boxed rather than just the 140 (middle dim).
Maybe it's just a bug/feature

- Mark as New
- Bookmark
- Subscribe
- Mute
- Subscribe to RSS Feed
- Permalink
- Notify Moderator
Yes, it seems to be a bug. I've seen it before but forget which version. Could be WF4 or Creo 1.0. The solution, of course, is to have the basic dimension be the driving dimension in the model.
This whole coding effort to get text to show up right on the drawing is so old school. PTC has promised to do something about it in Creo 3.0. Not holding my breath but at least I have my fingers crossed.
By the way, you can always get centerline dimensions to come out on many occasions depending on your modeling techniques. I do the same thing on my sheetmetal part. I am getting more comfortable with using geometry point sketches to drive hole patterns in sheet metal. This gives me great control of placing hole patterns and using appropriate driving dimensions. There are still too many limitation to using -only- driving dimensions on a drawing. Fortunately, I am not married to using driving dimensions on the drawing face.
- Mark as New
- Bookmark
- Subscribe
- Mute
- Subscribe to RSS Feed
- Permalink
- Notify Moderator
Well, we recently had some training for Creo 2 and hoping that the text height options would solve this issue I was disappointed to see the problem remined however the trainer was able to get to a workaround albeit rather a messy one!
You have to create an added dimension so you can ovewrite it with '@O' and then pull in the dimension with an '&d##' or '&ad##' (it works for either) and then it's all on the same level. You can't overwrite a driven dimension I don't think hense why it needs to be added.
since the screenshots of the dialog box didn't come out so well, the entry I used was:
4x @[50@] (= @O&ad149)
This can result in a few extra dimensions needing to be placed but you can just erase them in WF or delete as it's now called in Creo. Hope someone else gets some use from this.
Thanks,
Dave


