Community Tip - Learn all about the Community Ranking System, a fun gamification element of the PTC Community. X
- Community
- Creo+ and Creo Parametric
- 3D Part & Assembly Design
- Create family table with flat pattern
- Subscribe to RSS Feed
- Mark Topic as New
- Mark Topic as Read
- Float this Topic for Current User
- Bookmark
- Subscribe
- Mute
- Printer Friendly Page
Create family table with flat pattern
- Mark as New
- Bookmark
- Subscribe
- Mute
- Subscribe to RSS Feed
- Permalink
- Notify Moderator
Create family table with flat pattern
When you created a flat pattern in Wildfire 4 there was automatically created a family table and the flat pattern was suppressed.
In Creo 3 I don't see anything like this and we have to create the family table manually. Is there a way to do it so the family table is automatically created?
This thread is inactive and closed by the PTC Community Management Team. If you would like to provide a reply and re-open this thread, please notify the moderator and reference the thread. You may also use "Start a topic" button to ask a new question. Please be sure to include what version of the PTC product you are using so another community member knowledgeable about your version may be able to assist.
Solved! Go to Solution.
- Labels:
-
General
- Tags:
- family table
Accepted Solutions
- Mark as New
- Bookmark
- Subscribe
- Mute
- Subscribe to RSS Feed
- Permalink
- Notify Moderator
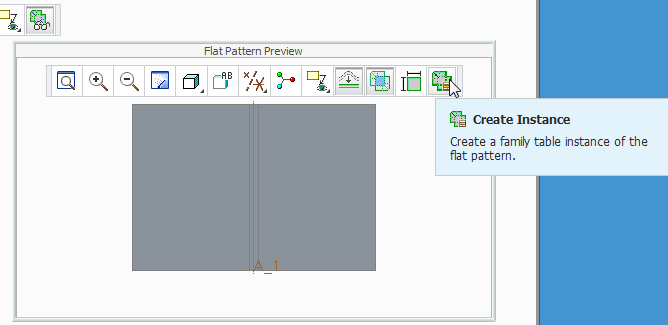
I'm working with Creo 2, but I'd bet this is the same in Creo 3. When in sheetmetal mode the graphics window toolbar has a "flat pattern preview" icon. If you click on that, you get a separate window showing the flat pattern. This window also has a graphics window toolbar with a "Create instance" icon.

- Mark as New
- Bookmark
- Subscribe
- Mute
- Subscribe to RSS Feed
- Permalink
- Notify Moderator
I remember from pre-Wildfire through Wildfire 4 days (yes old, long-time user) we used "Flat State" to automatically create a family table and flat instance - I searched the "Help" menu and that capability still exists... previous answer for Creo 2 is probably less cumbersome, but good to know "Legacy Flat State Instance" still exists.
To Create a Legacy Flat State Instance
You must set the enable_flat_state configuration option to yes to use this functionality.
1. Click File ▶ Prepare ▶ Model Properties. The Model Properties dialog box opens.
2. Click change in the Flat State Instances line. The FLAT STATE menu appears.
3. Click Create.
4. Type a name for the flat state instance and click .
If this is the first flat state instance for the generic part, the PART STATE menu appears.
Define the state the part is in:
• Fully Flat—The part is already unbent (or fully flat).
○ Click Fully Flat. The Select dialog box opens.
○ Select the unbend features that you used to unbend your part and click OK.
○ Define the state to put the generic part in and click Yes or No.
• Fully Formed—Your part is bent (or as designed).
○ Click Fully Formed. The (Regular Type) dialog box opens.
○ Select a plane or edge to remain fixed while the part is unbent/bent back.
○ Click OK in the ( Regular Type ) dialog box. The FLAT STAT menu appears.
5. Click Done/Return. The flat state is created.
About Legacy Flat State Instances


