Community Tip - Did you get called away in the middle of writing a post? Don't worry you can find your unfinished post later in the Drafts section of your profile page. X
- Community
- Creo+ and Creo Parametric
- 3D Part & Assembly Design
- Re: Creo 2.0 revolve - radius annotation
- Subscribe to RSS Feed
- Mark Topic as New
- Mark Topic as Read
- Float this Topic for Current User
- Bookmark
- Subscribe
- Mute
- Printer Friendly Page
Creo 2.0 revolve - radius annotation
- Mark as New
- Bookmark
- Subscribe
- Mute
- Subscribe to RSS Feed
- Permalink
- Notify Moderator
Creo 2.0 revolve - radius annotation
Hi All,
I'm facing following issue:
I have created sketch for revolve with internal axis of revolution and dimensions 95 and 104,03 converted to radiuses.
Now I want to show model annotations on the 2D drawing but my goal is to display them as R marked in green and unfortunately I'm able only to show these R like the blue on the top. Green radiuses are what I'm looking for but here they are added dimensions on the drawing, not show model annotations.
Thank you in advance for your advices.
- Labels:
-
General
- Mark as New
- Bookmark
- Subscribe
- Mute
- Subscribe to RSS Feed
- Permalink
- Notify Moderator
- Mark as New
- Bookmark
- Subscribe
- Mute
- Subscribe to RSS Feed
- Permalink
- Notify Moderator
This is one of Creo's core features and it applies to both drawings and sketches.
Later versions of Creo did a little to helps, but the Pro|Engineer solution is always available.
In all Pro|E; you select the line (in this case), select the revolve centerline, and you select again the same line feature you selected the 1st time. Then drop the dimension with the MMB (middle mouse button).
This is similar to adding a diameter dimension in a drawing... you click the circle or arc twice, and it converts to diameter. Of course, there are RMB picks that let you convert to diameter also once the radial dimension is selected.
Another tip to share is that there are two kind of centerlines in sketches... Geometry and construction. Geometry axes will become datum axes after you save and exit the sketch. Unfortunately they also hide when the sketch becomes hidden. Back to topic, however, if you use a geometry centerline before you create geometry curves (lines, arcs, and such) then the internal "solver" will assume diameters by default. It helps, and it also helps to determine which axes is actually meant to be the centerline when you have more than one in the sketch.
- Mark as New
- Bookmark
- Subscribe
- Mute
- Subscribe to RSS Feed
- Permalink
- Notify Moderator
I don't think what you are seeking is possible in Creo. The dimension you are trying to show belongs to the planar sketch (for sake of argument, this sketch lies on the "FRONT" plane). Creo isn't smart enough to show it as a radius dimension in the TOP view which is orthogonal to this sketch.
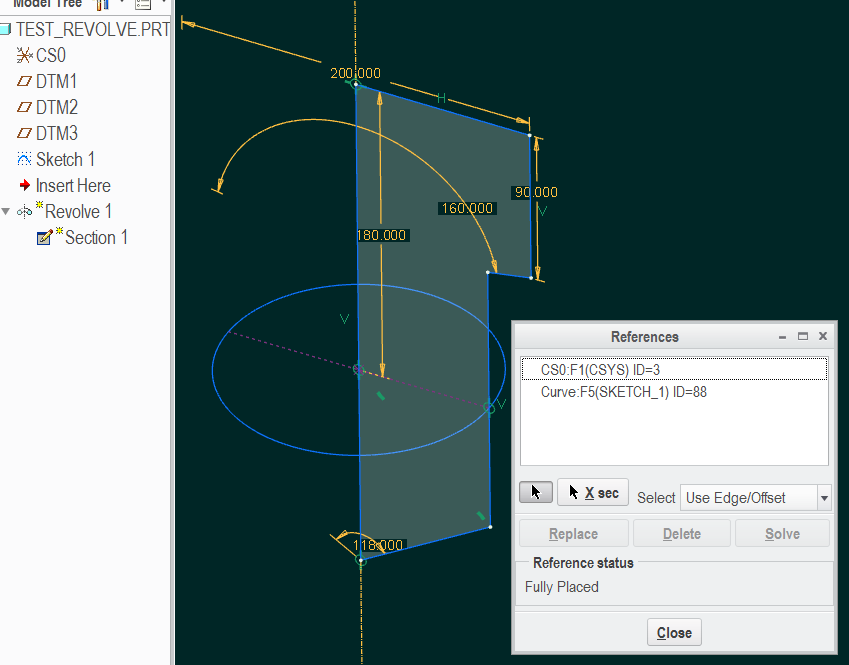
If your company insists on model dimensions only, then you can do something like this:
1) create Sketch 1 (on TOP plane) that contains the radius dimension.
2) use the Sketch 1 circle as a reference in the revolve's Section 1 (which lies on FRONT plane):
Another method would be to just create a reference dimension in the model using the annotation tools.
Either way, you get your radius dimension that can be "shown" in the drawing.
But isn't it so much easier just to make the extra radius dimension in the drawing?
I don't understand the policy of prohibiting drawing dimensions.
- Mark as New
- Bookmark
- Subscribe
- Mute
- Subscribe to RSS Feed
- Permalink
- Notify Moderator
Crumb... I completely missed the continuation image.
Is this something set in the dimensioning settings? Not familiar enough with config.pro settings outside ASME.
Be sure that the radial dimension that you place in the sketch is actually related to a revolve,
If it is a real radius dimension, then it should allow you to change it to diameter after creating it in the sketch.
If it is simply a linear dimension that took on baseline dimensioning, then that could be the issue.


