- Community
- Creo+ and Creo Parametric
- 3D Part & Assembly Design
- Re: I'm getting tired of this! - helical sweep fa...
- Subscribe to RSS Feed
- Mark Topic as New
- Mark Topic as Read
- Float this Topic for Current User
- Bookmark
- Subscribe
- Mute
- Printer Friendly Page
I'm getting tired of this! - helical sweep failures.
- Mark as New
- Bookmark
- Subscribe
- Mute
- Subscribe to RSS Feed
- Permalink
- Notify Moderator
I'm getting tired of this! - helical sweep failures.
I finally open a case on this after yesterdays threaded rod discussion.
I opened up a case on this because it doesn't make sense that we have to jump through hoops to get a thread complete on a shaft using helical sweep. This should be a simple one-button command and all too often it fails. All kinds of "solution" are provided here on the forum and the Pro|WorkAround feature, but a useful explanation still escapes us.
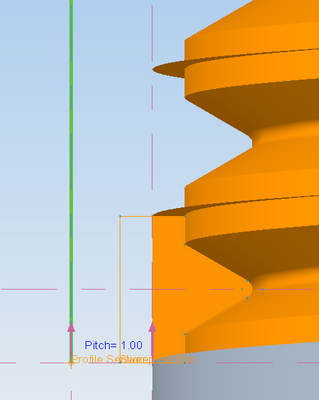
The problem is a helical sweep where the "theoretical" thread cut as a perfect triangle (60/60/60) where the legs are equal to the thread's pitch.
Seems simple enough, right? Reasonable request that you can run that cut feature right off the end of the part, right?
Excusses aside... there is no reason for this feature to fail. And it doesn't fail if you stop short of the end.
The rod is 1" and the pitch is .25. The sketch is tangent both to the surface and the edges are "sharp". Most of us think this simply cannot be done... but obviously it can, just not the way we need it to in 95% of use-cases.
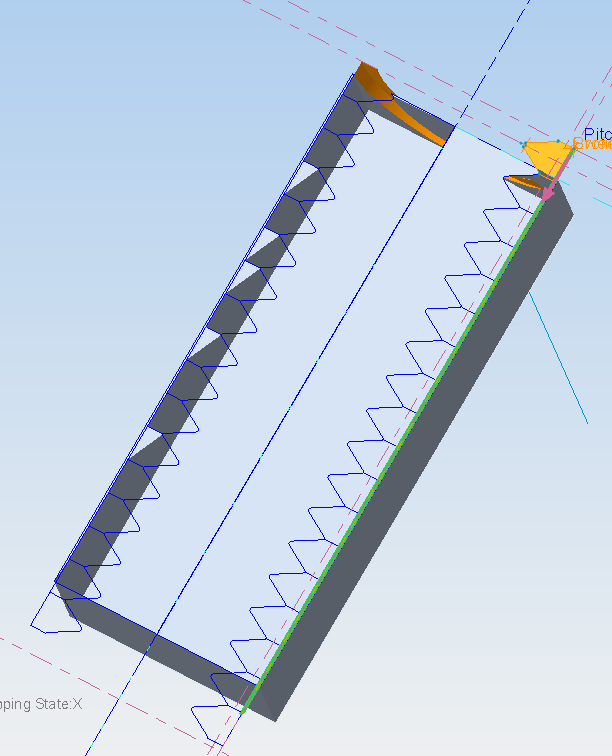
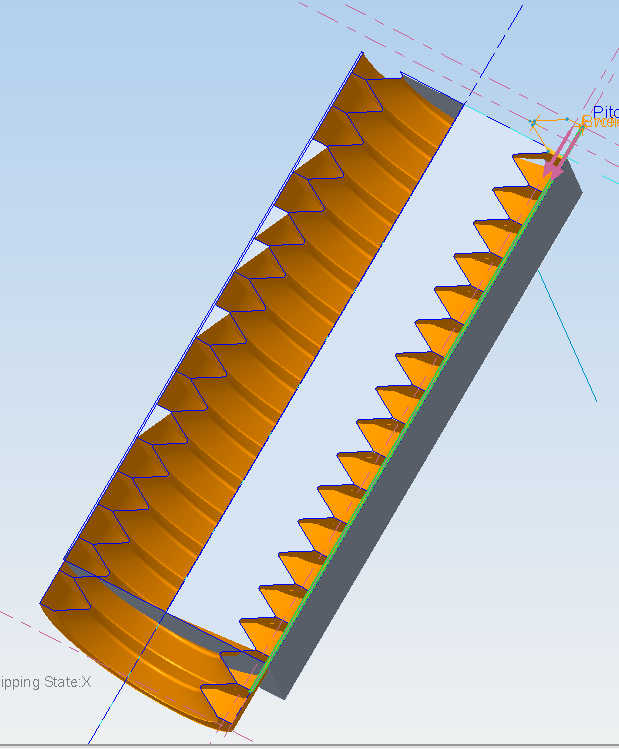
This is the only difference:
And if you don't use the remove material option:
Post your experience with this. We need this fixed if it hasn't been already. I'm still on Creo 2.0 M040.
I will update this post when I receive input from customer service.
{steps off soapbox}
- Mark as New
- Bookmark
- Subscribe
- Mute
- Subscribe to RSS Feed
- Permalink
- Notify Moderator
This is why real threads have a flat or round on the thread crest instead of a sharp edge. The sharp ones fail.
- Mark as New
- Bookmark
- Subscribe
- Mute
- Subscribe to RSS Feed
- Permalink
- Notify Moderator
I feel your pain. I'd found that the helical sweep definately has it's limitations. What I usually did, if I used it at all, was make sure the section was normal to the axis (actually how the thread angle is measured), and made it a surface that extended slightly beyone the solid. No matter if the surface self-intersected, but I found that was causing a lot (pretty much all) of the failures if it was a SOLID cut. The solid self-intersected and failed. Then I used the surface to remove material. I found that seemed the most robust way. Once I started doing that, I had very few failures.
Best of luck!
@David. Yup. there's even a controlled root-radius thread, UNJF class, if I remember, for highly-stressed environments. And, also, even if you could actually get a cutting tool with a true sharp point, a couple turns of removing material and it'll soon have a radius...... ![]()
- Mark as New
- Bookmark
- Subscribe
- Mute
- Subscribe to RSS Feed
- Permalink
- Notify Moderator
I actually do work with suppliers that create threads with a pointy bit (like a triangle flag) in the mill. They use it to cut very small, shallow, blind bottom threads in alloyed Ti. If you get the feed and speed just right in Ti, the tools actually wear quite well.
All fundamentals aside, you should be able to follow up this feature with a root diameter extrusion or sweep and an actual OD cut to trim off the points.
All too often I find myself trying to do a thread that I want properly mated in sections only to have to tweak the rotation of the part to get a good section. This should be easy to do with the basic numbers. When you have to "adjust" for the software's inadequacies, the sections become needlessly more complex. I don't do this for production stuff, but presentation invariably call for such detail.
- Mark as New
- Bookmark
- Subscribe
- Mute
- Subscribe to RSS Feed
- Permalink
- Notify Moderator
That's why I said thread crest, not thread root. Sharp crested threads interfere with the mating thread root.
- Mark as New
- Bookmark
- Subscribe
- Mute
- Subscribe to RSS Feed
- Permalink
- Notify Moderator
True, that is one reason a 1/2" bolt rarely measures 1/2" on the OD.
However, have you ever handled an 18" 3/4 UNC AllThread rod? You'd swear those are sharp. I bled all over those by simply handling them in the past.
And then you have plenty of application that have sharp (as possible) crests such as wood screws.
CS is looking into it. I expect to be woken up early tomorrow morning.
- Mark as New
- Bookmark
- Subscribe
- Mute
- Subscribe to RSS Feed
- Permalink
- Notify Moderator
Well, from the research I've done, with few exceptions most bolts have rolled threads, which are actually stronger because it works the grain of the metal. What they do is start out with a rod about the pitch diameter, and the material displaced from the triangular roller inboard of the pitch diameter becomes the thread crest. The bolt manufacturers do this to save themselves money, as no material is wasted as scrap.
When I created a library of bolts, I believe I simply used the nominal OD and used cosmetic threads for file size and expediency.
You probably got cut by the cheap allthread rods because on cheap bolts they do a pi$$-poor job of removing burrs.......
- Mark as New
- Bookmark
- Subscribe
- Mute
- Subscribe to RSS Feed
- Permalink
- Notify Moderator
Too true.
Yes, I think -all- CAD systems use the OD of a bolt or internal thread at the thread value on the large diameter.
My clients are split on using actual threads. Some want it and some don't. I don't bother keeping libraries because most hardware is easy enough to make on the fly. I often build threaded parts with both options just so I can use the one I need for that instance.
But when I do need to have a presentation show a properly mated threads, I want to be able to easily do this!
- Mark as New
- Bookmark
- Subscribe
- Mute
- Subscribe to RSS Feed
- Permalink
- Notify Moderator
Oh and it gets better! ![]()
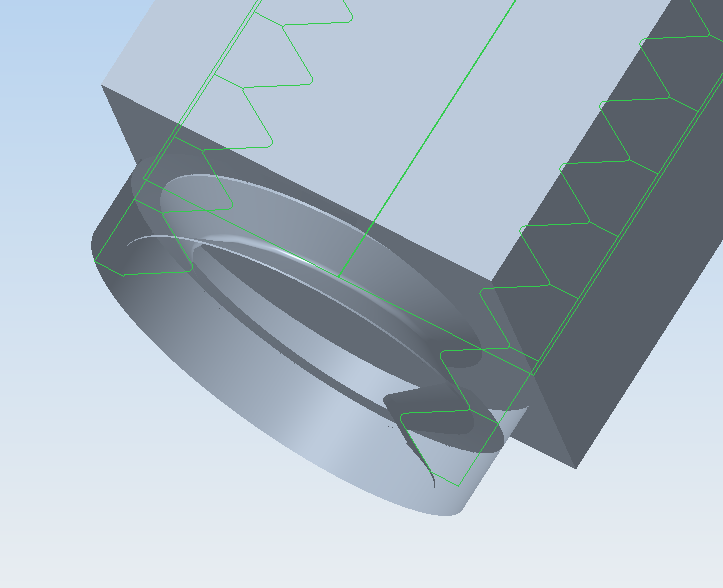
I tried to make a hexnut by the same token. YOU CAN'T! ... not with helical sweep.
I tried to make a standard hexnut 1/4-28 (UNF) and it wouldn't cut the triangle thread no matter what I tried.
Go ahead, I challenge you: Sharp ID and OD based on 1/28" pitch, 7/16" hex and 7/32 thick.
I ended up having to use the VSS to make the cut. LAME!
If you can accomlish this with the Helical Sweep, please post the file.
Remember; sharp edges using a 60/60/60 triangle shape and NO FUDGING!
- Mark as New
- Bookmark
- Subscribe
- Mute
- Subscribe to RSS Feed
- Permalink
- Notify Moderator
SPR 2213452 has been files with PTC R&D for further investigation.
- Mark as New
- Bookmark
- Subscribe
- Mute
- Subscribe to RSS Feed
- Permalink
- Notify Moderator
Check your personal e-mail. ![]()
- Mark as New
- Bookmark
- Subscribe
- Mute
- Subscribe to RSS Feed
- Permalink
- Notify Moderator
I forgot that I can make the guide surface (edge) using the helical sweep.
You got me pretty much seasoned on VSS ![]()
Wouldn't it be nice if we could just create curves directly with just a point feature in the sketch.
I quess that should be posted as an idea, huh ![]()
- Mark as New
- Bookmark
- Subscribe
- Mute
- Subscribe to RSS Feed
- Permalink
- Notify Moderator
Please vote for this...
Creating Curves with a Point in EXTRUDE, SWEEP, etc. Sections
- Mark as New
- Bookmark
- Subscribe
- Mute
- Subscribe to RSS Feed
- Permalink
- Notify Moderator
Update: Today I got the engineering response tied to other SPRs where this issue is obviously a long time "excuse". The response pretty much said I was lucky it worked at all.
The Pro|WorkAround solution is to make 2 helical sweeps with half the cut. LAME!
I am pushing support to dig deeper but with this much pushback to many, MANY! users in the past, it may just be beyond their capability to care.
For further reading: https://www.ptc.com/appserver/cs/view/solution.jsp?n=CS110958 (if you have access to these)
So why does this work if you use a sweep along a guide creating exactly the same geometry? I think it is high time for this to work. I know the few of us have little clout to ge tthis resolved. Is anyone here part of the larger customer base that is willing to -demand- better performance int he core product?
- Mark as New
- Bookmark
- Subscribe
- Mute
- Subscribe to RSS Feed
- Permalink
- Notify Moderator
"So why does this work if you use a sweep along a guide creating exactly the same geometry?"
Because it isn't creating exactly the same geometry. It is only very similar, but not the same.
It probably works better with a sweep the same way general patterns fail less often than identical ones for geometry reasons. A sweep is probably slower with better error handling.
If PTC can't handle Generic -> Family Table Entry -> Material -> Appearance, which is simple book-keeping, PTC won't be changing geometry generation and the underlying difficulty of solution accuracy any time soon.
- Mark as New
- Bookmark
- Subscribe
- Mute
- Subscribe to RSS Feed
- Permalink
- Notify Moderator
It is certainly the same within the relative tolerance range. Every measure is identical to the Nth degree.
- Mark as New
- Bookmark
- Subscribe
- Mute
- Subscribe to RSS Feed
- Permalink
- Notify Moderator
You are limited to the filtered measurement reporting of the software, which is not the same as knowing the underlying models are identical. You can try generating a STEP file for each to see if the contents of the files are identical. If the geometry is identical, the STEP files will be also, header info excepted.
Besides, how are you measuring the failed features?
- Mark as New
- Bookmark
- Subscribe
- Mute
- Subscribe to RSS Feed
- Permalink
- Notify Moderator
It only fails in the remove material mode, not the create solid or surface creation mode. And yes, they are identical in several export formats.
Again, I need PTC to own up to this for the general population of users that expect this to work the 1st time and every time. I think that would be 99.99% of us.
How the code is written is of no concern to me... it just has to do this basic function.
Seriously David, are you defending PTC on this one?
- Mark as New
- Bookmark
- Subscribe
- Mute
- Subscribe to RSS Feed
- Permalink
- Notify Moderator
Dear All (especially PTC)
I am running Creo 4.0 M020 and this 'Feature' still seems to be in place, is that correct?
Just had some students trying to generate a thread to make on a 3D printer and it is quite difficult to explain to them why adding a thread should be different from cutting a thread!
Regards
- Mark as New
- Bookmark
- Subscribe
- Mute
- Subscribe to RSS Feed
- Permalink
- Notify Moderator
Change the cut so it doesn't result in a sharp edge at the thread crest / that the cutter doesn't intersect itself as it makes the path.
- Mark as New
- Bookmark
- Subscribe
- Mute
- Subscribe to RSS Feed
- Permalink
- Notify Moderator
Will forward screengrab when on creo machine, but failure yesterday was an attempted Metric profile, flat top + rounded root, pitch = section width. Would work as a extrusion, as a cut only if section < pitch thus leaving a thin web. Unexpected, the add/remove material is normally seen as a toggle rather than a point of failure by users.
- Mark as New
- Bookmark
- Subscribe
- Mute
- Subscribe to RSS Feed
- Permalink
- Notify Moderator
I would make the section a little more than the material that's actually removed, but not as wide as the pitch. You can add centerlines and sketched points to dimension to the theoretical sharp crests. I would not make the section outer boundary vertices coincident with the outer surface, though it might still work.
Creo is a procedural modeler, as are most parametric modelers. This means that users are developing software; they are interactively creating a software procedure that results in a (usually) 3-D picture of a model. There is a lot of mathematics hiding out behind models and these are converted into a variety of algorithms. Some algorithms are faster, but can have failure modes. I think that helical sweep is one of them. I never had much use for it. Others are much more robust - such as variable section sweeps - because they need to account for a larger number of characteristics, but they are also a little more effort.
Many look at software and think that it works the way they think it works, if they give much thought to how it works at all; that just setting up a situation that seems easy means that creating the underlying geometry output is easy.
Removals are more failure prone as they more often involve tiny slivers of geometry compared to the bulk of the existing part and the accuracy of making those tiny slivers is proportionally lower. I've had a case where I needed a .005 inch depression in a large block; it failed. But when I created a 1.005 inch deep cut starting from 1.000 inches away, it worked.
When looking at how the software has to find intersections between the current geometry and temporary solid it makes to create the new feature it's apparent that rounding errors can make it look like geometry is coincident for a fast algorithm, which is where the model accuracy setting also comes in.
At the end, any algorithm or operation can fail - either because of numerical problems or because the user created a useless situation. It would be nice if software would have better error messages to describe what caused the failure, but it may be that the failure is so far down that the explanation doesn't relate well to the top level logical description. For example - it could be that some function in the feature creation path is expected to return an array of coordinates, but the feature is defined so that no coordinates are found. So it raises a flag - "Coordinate array failure" Maybe that's because a cut doesn't intersect the part (though there is a flag for that which generally works) or because the accuracy is not sufficient to detect that the feature should intersect the part, even though in a infinite resolution system it would. The low level error is too divorced from the 'make a hole' desire of the user. Instead, there's a quiet failure. It's annoying, but ask a Comp Sci professor about the problem of creating software that is guaranteed to work in all cases.
Here's a way to understand how complicated things can be under the hood. Create algorithm that takes an ordered set of coordinates to describe a polygon (the polygon may have concave sections,) and also takes two coordinates that describe a line segment. Determine what part of the line lies within the polygon and returns a list of all the endpoints where the line segment crosses the polygon. Use only 2 decimal places for all numbers and 3 decimal places for all calculations (or multiply by 100 and use integer descriptions and by 1000 for integer calculations.)
- Mark as New
- Bookmark
- Subscribe
- Mute
- Subscribe to RSS Feed
- Permalink
- Notify Moderator
@dschenken wrote:
I would make the section a little more than the material that's actually removed, but not as wide as the pitch. You can add centerlines and sketched points to dimension to the theoretical sharp crests. I would not make the section outer boundary vertices coincident with the outer surface, though it might still work.
Thank you for you fast reply. The points you made above I had already tried, in vain. However enthused that this is really a simple problem I have come in again today to try different approaches.
So I started again and drew the approximate geometry that was wanted yesterday. Some interesting observations
1) Starting with a smaller section than pitch outside the extremities of the original rod, NO thread.
2) Bring the start within the material NO thread
3) Being the end within the material Thread appears
4) geometry adding material works
Ok so at least I now have a thread set section = pitch, magic it works but see shape
So now there is a thin remaining material. Must be accuracy? Adjust (e.g. change relative accuracy) - no effect
Will it work if the thread starts outside the material, now NO Gives the user the opportunity for continue or cancel, but in both cases NO indication of the error .e.g. no indication of overlapping....
Move start to 1 pitch distance from the material and the add material option works but the remove fails, again NO error message
Move to less than 1 pitch distance away and both work (cut still with odd remaining material!)
Extend the profile beyond the end of the material, fails with both cut and add material (No error message!)
Set profile to finish at the end of the material, still fails - no error message
Set profile to finish within the material - still not working
Change the end position again, this time using modify, and it works!
While I understand Creo can be considered a Procedural language, matching typical manufacturing procedures, users should hope for it to be consistent OR give some useful feedback. A Helical sweep is a relatively common operation and to have the feature work or not work (sometimes with no error message) just because a dimension has changed by .01 mm is difficult to use and very frustrating to inexperienced users. (I haven't conclusive evidence but the above seems to have a feel of not clearing variables etc, despite regularity regenerating the model)
OK, as I think of modelling as you would work in manufacturing I thought I would try something odd, replace the original ('stock') material with a square, Still some issues, thread going through the material etc, but seemed more stable. Then extended the end of the helical cut outside the material, see interesting images
Inserting a section shows confusing effects depending on whether a cut or add material is chose. [

selected
- Mark as New
- Bookmark
- Subscribe
- Mute
- Subscribe to RSS Feed
- Permalink
- Notify Moderator
Before making the helical cut, make the rod section match the OD of the thread. Threads aren't cut by plunging the cutter into the material.that is far larger than the finished part. No wonder I didn't understand that you didn't make a section that matched the typical screw thread section.
Then create a triangle section that is smaller than the pitch - not with the extra flats that are going to leave radial faces or cut the thread crests. Do not use the section to also create the crest or have geometry interfere with itself. That isn't done with thread taps or dies. That's probably why PTC didn't adapt to what isn't an industrial process for this simplified algorithm.
The developers concentrate on real use, such as winding springs, where the temporary solid feature doesn't intersect itself.
I guess it wasn't clear that saying a program could fail and that it's very difficult to generate meaningful error messages meant that the developers would not generate meaningless messages. When you work out how to do the line-to-polygon intersection problem you'll better understand why this is not a problem that is easy.
- Mark as New
- Bookmark
- Subscribe
- Mute
- Subscribe to RSS Feed
- Permalink
- Notify Moderator
What I'd like to know is why I get a failure using Creo 4.0 when I modelled the same thread identically in Creo 2.0 just fine.
Are we going backwards?
I am sick of unexplained failures. The description was "size of features much smaller than the rest". How "useful" and untrue.
At least Solidworks gave decent error messages. It's time PTC caught up.
- Mark as New
- Bookmark
- Subscribe
- Mute
- Subscribe to RSS Feed
- Permalink
- Notify Moderator
It's probably an accuracy issue, which can be affected by the overall size of the model.
Set the part accuracy to Absolute (which I thought was the default in Creo 4, but maybe you are starting with a template part that was created at an earlier version) and make the value smaller than it currently is.


