
Turn on suggestions
Auto-suggest helps you quickly narrow down your search results by suggesting possible matches as you type.
Showing results for
Please log in to access translation
Turn on suggestions
Auto-suggest helps you quickly narrow down your search results by suggesting possible matches as you type.
Showing results for
Community Tip - Did you know you can set a signature that will be added to all your posts? Set it here! X
- Community
- Creo+ and Creo Parametric
- 3D Part & Assembly Design
- Painting Features in a Part File
Translate the entire conversation x
Please log in to access translation
Options
- Subscribe to RSS Feed
- Mark Topic as New
- Mark Topic as Read
- Float this Topic for Current User
- Bookmark
- Subscribe
- Mute
- Printer Friendly Page
Painting Features in a Part File
Mar 08, 2013
01:16 PM
- Mark as New
- Bookmark
- Subscribe
- Mute
- Subscribe to RSS Feed
- Permalink
- Notify Moderator
Please log in to access translation
Mar 08, 2013
01:16 PM
Painting Features in a Part File
Hello all,
Sorry to post what is probably an elementary question, I am new to Pro Engineer (I've only been using it for a little over a month now) and my problem is this:
I have a part file with multiple revolve features in it that are stacked on top of each other. So basically, if you imagine it similar to maybe a stack of washers... the top of the 2nd revolve is directly contacting the bottom of the 1st revolve, and the top of the 3rd revolve is directly contacting the bottom of the 2nd revolve, etc etc. I want to paint each individual revolve a different color so if you look at a cross section you clearly see the stack up (right now it just looks like a solid grey piece.) However, when I go to paint the surfaces, it acts as if all the different revolves stacked on top of each other are one solid piece and it paints one side of the entire stack up instead of just the one revolve I want. It doesn't seem to allow me to click the feature in the model tree in order to paint the whole feature at once, and if I change the selection method in the top right from "all" to "part" it again acts as if the whole thing is one part instead of many stacked features.
I also tried suppressing all the features but one in order to change the appearances one at a time, but when I paint the remaining feature and restore the suppressed features they are painted too.
Also, I know that it is possible in an assembly file... is it possible in a part file too?
This is driving me nuts!
I'm sure their must be a simple way to do this!
Thanks for your help!
Pete
This thread is inactive and closed by the PTC Community Management Team. If you would like to provide a reply and re-open this thread, please notify the moderator and reference the thread. You may also use "Start a topic" button to ask a new question. Please be sure to include what version of the PTC product you are using so another community member knowledgeable about your version may be able to assist.
Labels:
- Labels:
-
Assembly Design
4 REPLIES 4
Mar 08, 2013
01:39 PM
- Mark as New
- Bookmark
- Subscribe
- Mute
- Subscribe to RSS Feed
- Permalink
- Notify Moderator
Please log in to access translation
Mar 08, 2013
01:39 PM
Is the stack made up of different parts, or are they several instances of the same part?
Mar 08, 2013
01:40 PM
- Mark as New
- Bookmark
- Subscribe
- Mute
- Subscribe to RSS Feed
- Permalink
- Notify Moderator
Please log in to access translation
Mar 08, 2013
01:40 PM
Also, take a look at this thread (you may have to copy and paste):
http://communities.ptc.com/message/198627#198627
Thanks, Dale
Mar 08, 2013
01:41 PM
- Mark as New
- Bookmark
- Subscribe
- Mute
- Subscribe to RSS Feed
- Permalink
- Notify Moderator
Please log in to access translation
Mar 18, 2013
10:47 PM
- Mark as New
- Bookmark
- Subscribe
- Mute
- Subscribe to RSS Feed
- Permalink
- Notify Moderator
Please log in to access translation
Mar 18, 2013
10:47 PM
or Check your original post at
http://www.eng-tips.com/viewthread.cfm?qid=340552
Where I answered your question already here it is on this site
Pete,
I think I know what you're getting at.
You've broken down a long shaft part into smaller sections so you don't have a single Monster Sized revolve feature. I've done so in the past and a few inside the box people couldn't fathom that choice. Obviously they never had to deal with laborious large sketches in ProE.
Well getting to the method you can use to achieve what you are looking to do.
while in the Part Color tool - select the flyout to apply color and when promted to select something to color hit ^F or CTRL+F and you will get the search tool Finder the Binocular looking icon linked below because Google Photos images decided to no longer show or use extensions for images and the [img photolink fails.
Search Filter - AKA Finder Tool

Once you get the finder open make sure the [Options] Button has "Build Query" checked on
Doing so will give you 5 buttons to [Add New] [Remove] [Update] [Move Up] [Move Down] list
The finder tool allows you to paint the surfaces involved in each of your surfaces a different color. In Proe Creo PTCsNextCADdesignation. Color can be applied to the entire solid model [Part] color is the first thing set and all features will be painted that color when made. After that in the higherarchy comes Feature color which can be applied by coloring all the Faces of your feature.
For Second criteria use Feanture by Type and select revolution or just Feat.ID or Number
to make your life easier you can display Feat # and ID in your Model Tree to help out.
You can use a variety of search criteria or just one.
If you want a base color you can search for Solid Geometry using the All (radio-button)found on the history tab [History] tab or Right Click with Geometry in selection filter and select All Solid Surfaces.
Surfaces: can be classified as individual faces on a solid or one of the patches on a
Quilt(continuous surface body connected surface)
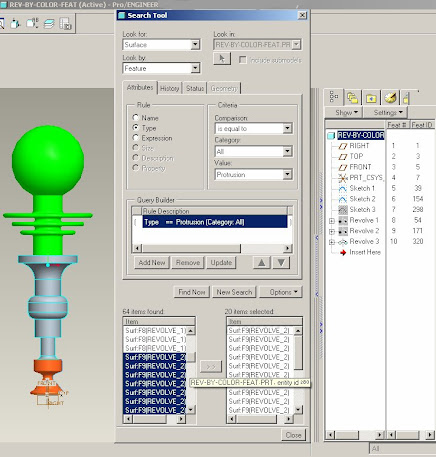
Then to color your features use. -See Image linked above
Look for: Surface
Look by: Feature
[Attributes]
Rule: Type
1 Comparison: is equal to
2 Category: Creation Method
3 Value: Revolved
or you can use the following to include extrudes and other sketch based features.
2 Category: All
3 Value: Protrusion
Give a look at the possible search by optihns to learn more I hope this will make your task easier to accomplish.
Search By
[Attributes]:
[History]:
[Status]:
[Geometry]:
If you'd like me to make a FAQ about this on the site let me know in response to this post.
---------------------------------------------------------------------------
This Message was typed on a Maltron Keyboard with a rectangular key layout.
Staggered keyboards are not ergonomic!
Message was edited by: michael cole Originally created this response by myself and posted on eng-tips.com website listed in response


