Community Tip - Did you get an answer that solved your problem? Please mark it as an Accepted Solution so others with the same problem can find the answer easily. X
- Community
- Creo+ and Creo Parametric
- 3D Part & Assembly Design
- Re: Rendering with a transparent decal
- Subscribe to RSS Feed
- Mark Topic as New
- Mark Topic as Read
- Float this Topic for Current User
- Bookmark
- Subscribe
- Mute
- Printer Friendly Page
Rendering with a transparent decal
- Mark as New
- Bookmark
- Subscribe
- Mute
- Subscribe to RSS Feed
- Permalink
- Notify Moderator
Rendering with a transparent decal
Hi Community,
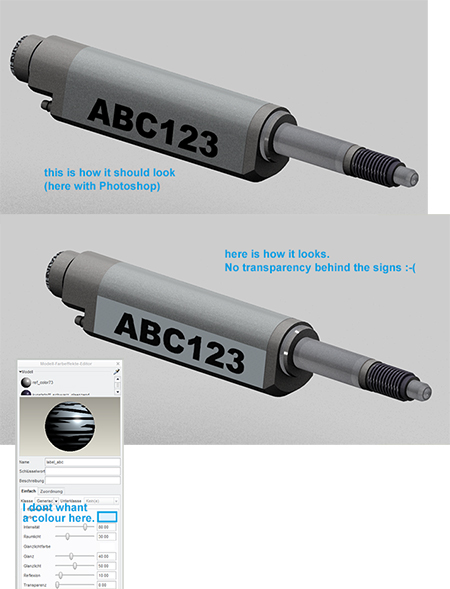
i try to add a decal with big letters on my part. For this i have made a transparent .png file.
Unfortunatelly I am not able to make this decal really transparent, because i must choose a colour.
Please see attached picture and I hope you will understand.
Thanks a lot for your help.
Andreas
------------------
Creo Parametric 2.0 | ARX Renderextension

Solved! Go to Solution.
Accepted Solutions
- Mark as New
- Bookmark
- Subscribe
- Mute
- Subscribe to RSS Feed
- Permalink
- Notify Moderator
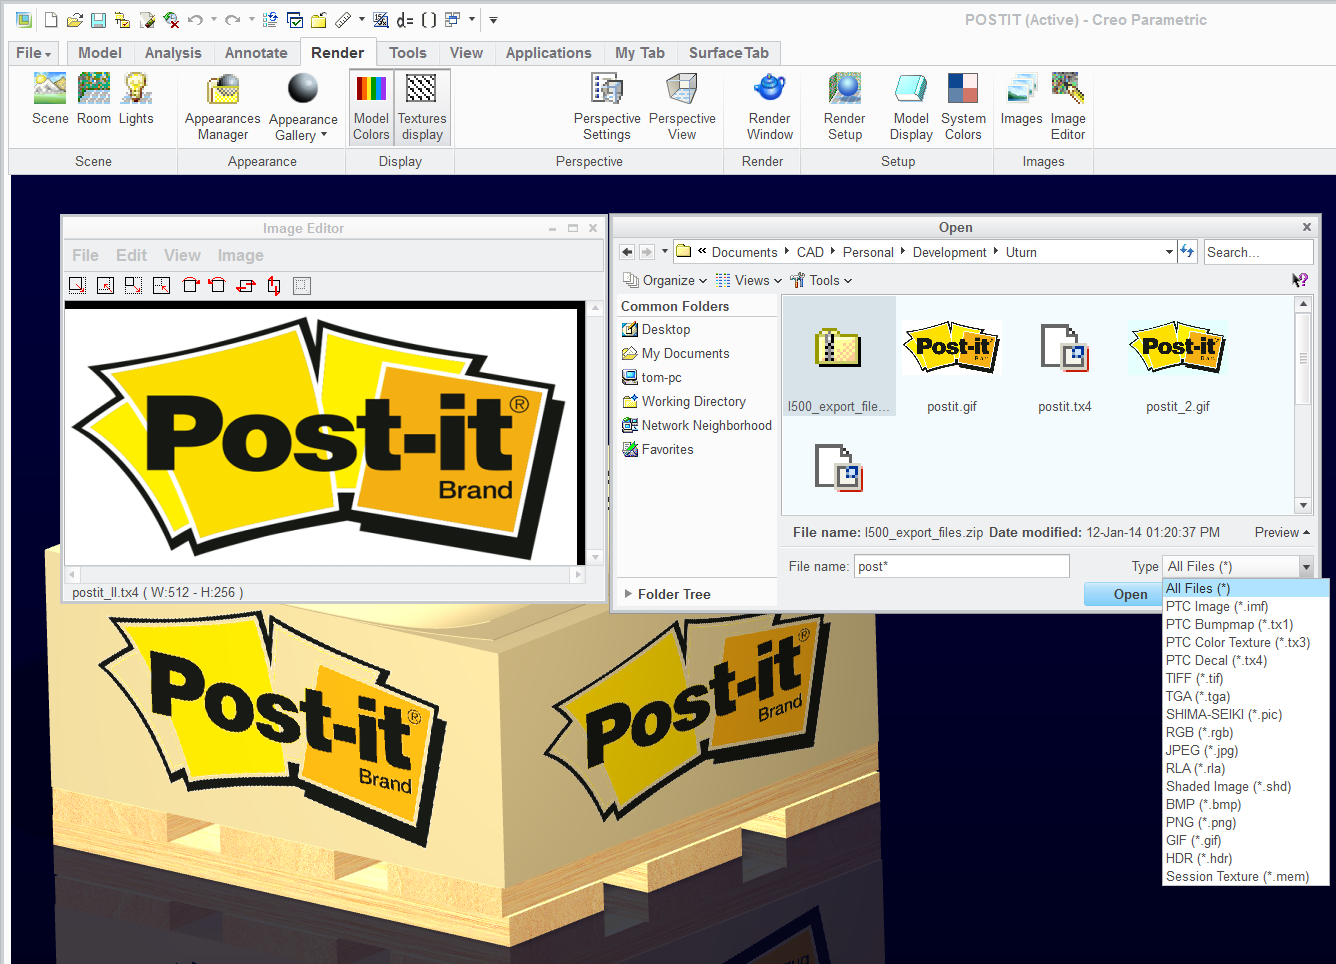
You use the image editor in Creo to set the alpha channel.
It is highly criptic but it does work if you guess correctly.
It is best to make the transparent color either fully black or fully white.
The file is saved as .TX4 to tell the renderer it is a 32bit file (w/alpha channel) IIRC.
- Mark as New
- Bookmark
- Subscribe
- Mute
- Subscribe to RSS Feed
- Permalink
- Notify Moderator
Previous question went unanswered: http://communities.ptc.com/message/192346#192346
Photoshop for the win.
- Mark as New
- Bookmark
- Subscribe
- Mute
- Subscribe to RSS Feed
- Permalink
- Notify Moderator
You use the image editor in Creo to set the alpha channel.
It is highly criptic but it does work if you guess correctly.
It is best to make the transparent color either fully black or fully white.
The file is saved as .TX4 to tell the renderer it is a 32bit file (w/alpha channel) IIRC.
- Mark as New
- Bookmark
- Subscribe
- Mute
- Subscribe to RSS Feed
- Permalink
- Notify Moderator
- Mark as New
- Bookmark
- Subscribe
- Mute
- Subscribe to RSS Feed
- Permalink
- Notify Moderator
In WF5/Creo-Elements it is under Tools/Image Editor, next to Appearance Manager.
- Mark as New
- Bookmark
- Subscribe
- Mute
- Subscribe to RSS Feed
- Permalink
- Notify Moderator
Creo 2.0 has made the editor more accessible: Upper right in the ribbon.

- Mark as New
- Bookmark
- Subscribe
- Mute
- Subscribe to RSS Feed
- Permalink
- Notify Moderator
Makes you wonder what happened with .TX2, doesn't it ![]()
Welcome to the forum, Andreas.
- Mark as New
- Bookmark
- Subscribe
- Mute
- Subscribe to RSS Feed
- Permalink
- Notify Moderator
For those not in on the joke, TX1 = 1 byte/pixel for a bump-map, TX3 = 3 bytes (RGB)/pixel for color, and TX 4 = 4 bytes (RGBA) for color + alpha/pixel. Not much uses 2 bytes/pixel, esp PTC, so no TX2, though some tools handle 3 floating point values per pixel, if your HDR needs are strong enough.
At least you got your wish for the Image tool button to be near the rendering tools.
- Mark as New
- Bookmark
- Subscribe
- Mute
- Subscribe to RSS Feed
- Permalink
- Notify Moderator
Now that makes sense.
- Mark as New
- Bookmark
- Subscribe
- Mute
- Subscribe to RSS Feed
- Permalink
- Notify Moderator
Hi Everybody,
thanks a lot, this was all really helpful. Finaly it works, but it was not easy. Much more complicated than in Solidworks.
A few things i want tell you.
- The alpha channel settings are hard to understand. To eliminate the white backround i have sucsess with these settings:
- Because I have a few surfaces in brushed metal without logo and one surface with logo I just copy the color "brushed metal" and add only to this copy the decal. So my Part now has 2 different brushed metal colors, one for normal surfaces and one for the logo surface.
I am sure, for this problem exist better solutions, right?
Have a good day and greetings from Germany
Andreas
- Mark as New
- Bookmark
- Subscribe
- Mute
- Subscribe to RSS Feed
- Permalink
- Notify Moderator
I took a .png that included transparency and used it as a decal and had no trouble -after- I set the transparency of the highlight color to 100%. No need to use the image editor.
- Mark as New
- Bookmark
- Subscribe
- Mute
- Subscribe to RSS Feed
- Permalink
- Notify Moderator
Agreed - PTC doesn't help much. If the entire part is one color/texture then the decal works OK, but there isn't a facility to simply overlay appearances - I don't believe one can have separate bump, color texture, and decals applied to a single surface; instead PTC makes the user combine them explicitly and apply the combination.
Suppose there is a part with three colors and one bump map. If the bump map changes there are going to be three combinations to change. If a surface gets a decal, then that's a fourth combination. If not all the surfaces get a bump map you could have 2 x 3 x 2 =12 appearances to manage, based on 5 items (1 bump, 3 colors, 1 decal)
If you get the chance, check out POV-Ray. The textures for it are procedural, and they have image maps. Very nicely done and easy to produce beautiful, realistic materials with relatively simple descriptions.
- Mark as New
- Bookmark
- Subscribe
- Mute
- Subscribe to RSS Feed
- Permalink
- Notify Moderator
TX1 and TX3 files are overlayed on top of each other for rendering purposes (for giving a 3D surface effect). Why wouldn't the decal be able to lay on top of that?
- Mark as New
- Bookmark
- Subscribe
- Mute
- Subscribe to RSS Feed
- Permalink
- Notify Moderator
Tested; so yes, you can add a transparent decal over a texture.
You can also independently control the scale and repeats of the texture.
Remember to use the dropper at the upper right to access fine tuning of any of the applied images.
(client ref: http://www.youturnhandles.info/1.html )
- Mark as New
- Bookmark
- Subscribe
- Mute
- Subscribe to RSS Feed
- Permalink
- Notify Moderator
I mean that a single surface can only have one appearance (that can combine a color, highlight color, bumpmap, color map, and decal image) besides a global appearance (that can also combine a color, highlight color, bumpmap, color map, and decal image. In each characteristic**, the surface appearance overrides the part appearance, except for decal transparent areas.
The classic well-traveled suitcase could not be made by building up layers of decal appearances in Pro/E or Creo Parametric. All the images would have to be combined outside of P/E or CP and added as a single decal.
**I'm assuming that surface bumpmaps and color maps override part bumpmap and colormap as they override color assignment, but I haven't checked. It would surprise me if, for example, bumpmaps were cumulative.
- Mark as New
- Bookmark
- Subscribe
- Mute
- Subscribe to RSS Feed
- Permalink
- Notify Moderator
Thanks for that clarification. Yes, the implementation is fairly logical.
You will find limitation to surface assignments when you start using transparencies in animations, for instance. Individually assigned surfaces ignore the transparency setting during the animation. Only the overall assignment will take on transparency in that case. Something similar happens when you output to 3D PDF when the part takes on any one of the many random colors assigned to a single part. These are all things you learn slowly and turn out to be a real let-down when you counted on them working -as expected-.
Since half my work is in technical presentations, learning Creo's limitations during my off-hours is quite important.
- Mark as New
- Bookmark
- Subscribe
- Mute
- Subscribe to RSS Feed
- Permalink
- Notify Moderator
Sorry to wake up an old subject (solved) but I'm not sure to understand the conclusion...
As Andreas, I'm coming from SW where apply transparent decal is simple as drag&drop the *.png file.
With Creo, I'm trying to apply a decal on a surface, BUT i don't want to add specific color with.
Dschenken said, one apperance combine color+HL+bump+map+decal.... except for decal areas. How can I create an appearance with only the decal ?
It seems to be possible with Creo Element, see here : https://youtu.be/LNCwuOHPOkM?t=221
And I've attached a picture with my part.
Can the text "danger" can be on both surface (red+blue) ?
Can I create a single appearance to apply on whatever color surface I want ?
Thanks to all fo your help !
Pierre, 25 years on CAD tools


