Community Tip - Did you get called away in the middle of writing a post? Don't worry you can find your unfinished post later in the Drafts section of your profile page. X
- Community
- Creo+ and Creo Parametric
- 3D Part & Assembly Design
- Re: Show nominal dimension with symetric tolerance...
- Subscribe to RSS Feed
- Mark Topic as New
- Mark Topic as Read
- Float this Topic for Current User
- Bookmark
- Subscribe
- Mute
- Printer Friendly Page
Show nominal dimension with symetric tolerance on drawing with ISO model tolerance standard
- Mark as New
- Bookmark
- Subscribe
- Mute
- Subscribe to RSS Feed
- Permalink
- Notify Moderator
Show nominal dimension with symetric tolerance on drawing with ISO model tolerance standard
Is it possible to show drawing dimensions at nominal with symetric tolerances when the model is using ISO tolerance standard?
Our manufacturing people are used to seeing all drawing dimension displayed as nominal with a symetric +/- tolerance. We are now designing metric parts using the ISO tolerance standards for bores and shafts dimensions. Is it possible to display these dimensions on the drawings as the nominal dimension with symetric +/- tolerance?
Can I model the part this way:
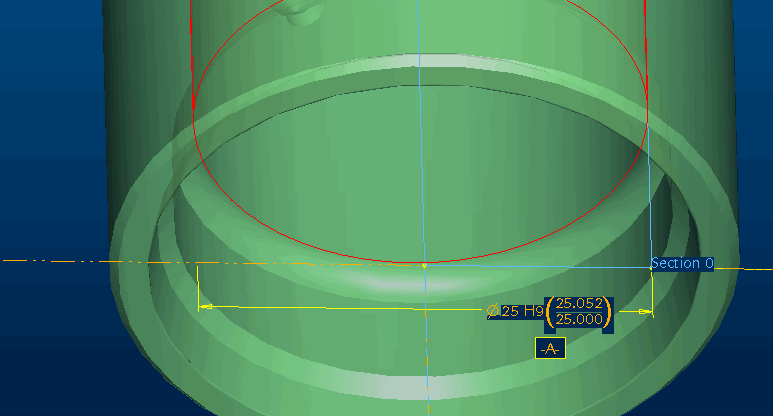
And display the dimension in the drawing this way?
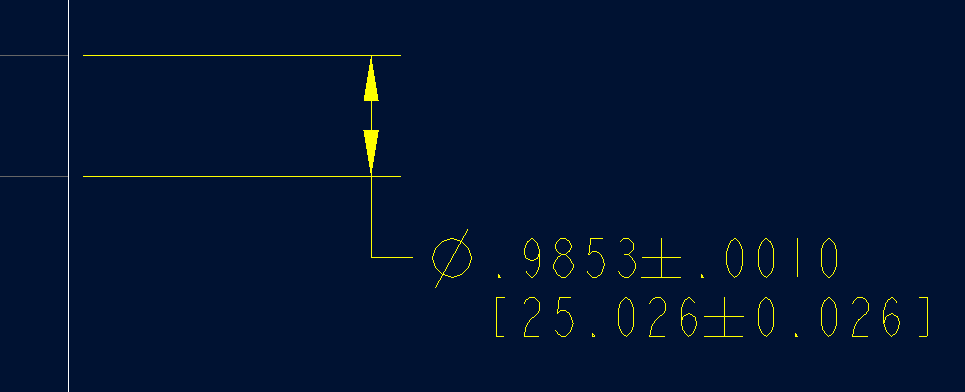
This thread is inactive and closed by the PTC Community Management Team. If you would like to provide a reply and re-open this thread, please notify the moderator and reference the thread. You may also use "Start a topic" button to ask a new question. Please be sure to include what version of the PTC product you are using so another community member knowledgeable about your version may be able to assist.
- Labels:
-
2D Drawing
- Mark as New
- Bookmark
- Subscribe
- Mute
- Subscribe to RSS Feed
- Permalink
- Notify Moderator
This is such an -EXCELLENT- question. Is the 1st image dimension something you edited or is that the default presentation of ISO fit tolerances? I would like to see that file if you can share it.
- Mark as New
- Bookmark
- Subscribe
- Mute
- Subscribe to RSS Feed
- Permalink
- Notify Moderator
Antonius, the dimension in the first image is the default presentation of ISO fit tolernance with limits shown. It is the standard dimension @D = 25H9 (see first image) and then the tolerance mode is set to Limits (see second image).
Sure, I'd be glad to share the file. What is the best way of sending it?
Thanks!
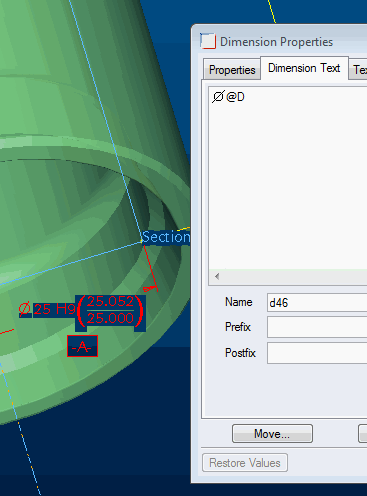
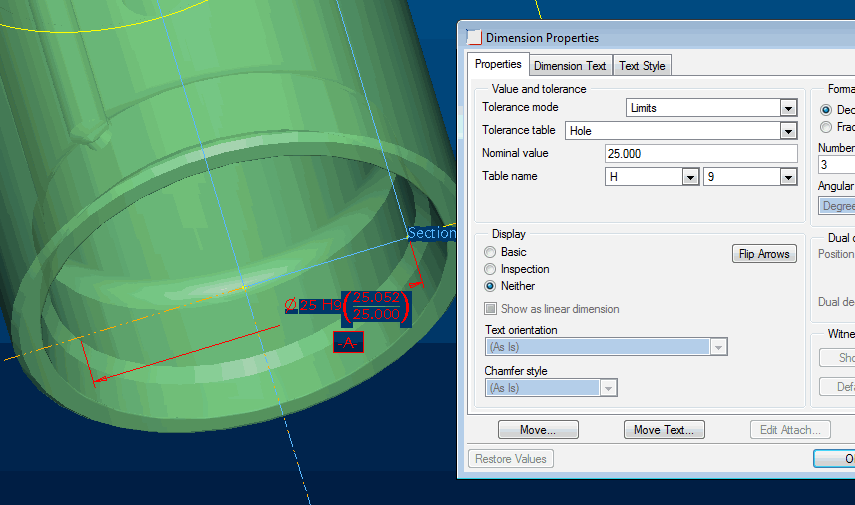
- Mark as New
- Bookmark
- Subscribe
- Mute
- Subscribe to RSS Feed
- Permalink
- Notify Moderator
This is a nice addition. I will have to study the tolerance tables to see if they agree with my Tolerator.
I often run into this issue with American manufacturers where they don't have the secret decoder key for the ISO fit tolerances.
I received your files and I will see if it is easy to extract the data for the drawing as you requested.
- Mark as New
- Bookmark
- Subscribe
- Mute
- Subscribe to RSS Feed
- Permalink
- Notify Moderator
That is a heck of a drawing you have there, Ken.
If I was better at utilizing the annotation feature's parameters, I might be able to format the various data that is available for this dimension in a drafting dimension. In essence, you would be building the text string for that dimension based on some mathematical calculations with the model annotation's parameter.
At least I can show you what is available to manipulate on the drawing... but if it were me, I would rather train the machinists to read the intent rather than letting them shoot for the nominal. The fact that the actual limits are shown, this should be a non-issue with the machinists. Anything different would fail "engineering intent".
- Mark as New
- Bookmark
- Subscribe
- Mute
- Subscribe to RSS Feed
- Permalink
- Notify Moderator
Thanks for looking at this Antonius. Ya, that part has a few features.
So are you saying I can use the "various data that is available for this dimension" and build some relations or something to calculate nominal and +/- symetric tolerance? I'm assuming I can call PTC_DIN_NOMINAL_VAL etc for that dimension, ex. d55 and build equations using the names?
How do I connect the name "PTC_DIN_NOMINAL_VAL" to d55 for example to use in the equation?
I'll give this a try in the morning. I agree with you, training the machinists seems much easier than creating custom dimensional callouts for XX amount of dimensions on a drawing not to mention handling all the family table instances.
- Mark as New
- Bookmark
- Subscribe
- Mute
- Subscribe to RSS Feed
- Permalink
- Notify Moderator
It will take the help of someone very familiar with parameters and relations to format this the way you want. I hesitate when Creo prompts if I want to "save the relation for xxx?". But essentially, yes, you should be able to tie anything to anything else through the properties.
One of the problems I have found in the past is that when you use limit dimensions, the nominal value wants to update the feature to be the "middle" of the value. This is so not appropriate on the design intend side.
- Mark as New
- Bookmark
- Subscribe
- Mute
- Subscribe to RSS Feed
- Permalink
- Notify Moderator
I must say, Ken, I really appreciate you posting this. I have never used the fit tolerance feature in Pro/E. The tables seem to agree with the tolerator on the small sampling I've done.
Can anyone make an interface more archaic? I had to go to the knowledgebase to understand that you must load tables in order to use them. It is very good to know how this functions. I am sure I am missing some of the other things to be aware of but again, this is good to know.
For other not familiar with ISO fit tolerancing in creo but needs to know this:
Knowledge Base: Document - CS36124 Tolerance Table location: <loadpoint>\tol_tables\iso - *.ttl
For Creo. File/Prepare/Model Properties - Features and Geometry: Tolerance - change | Tol Tables/Retrieve and pick the appropriate table to load into your part. This repeats if you need more tables loaded. You can also view the tables in this Menu Manager choices once they are loaded.
The WF interface referenced in the knowledgebase refers to:
Setup > Tol Setup > Standard > ISO/DIN > Tol Tables > Retrieve.
- Mark as New
- Bookmark
- Subscribe
- Mute
- Subscribe to RSS Feed
- Permalink
- Notify Moderator
One of the problems I have found in the past is that when you use limit dimensions, the nominal value wants to update the feature to be the "middle" of the value. This is so not appropriate on the design intend side.
Specifically when using "hole" or "shaft" tolerances, this is (fortunately) not the case - the nominal value is maintained and the limits are shown additionally in the dimension, working purely as tolerances..
Once you've got the tol tables loaded into your start part it all works a treat - this is our standard dim display for tightly toleranced bores and journals.
In terms of displaying nominal on the drawing versus showing mid-limit for the machinists, we frequently use a nominal with asymmetric tolerances. This provides useful extra information about the design intent, especially when a part is found to be outside the tolerance: if the drawing calls for 25 +0.1/0 then we know that 25.12 is probably OK, but 24.98 will have to be rejected and this applies even more with ISO limits and fits.
- Mark as New
- Bookmark
- Subscribe
- Mute
- Subscribe to RSS Feed
- Permalink
- Notify Moderator
Johnathan, you are from the ssame school as me. I tend to go round and round with machinists over such issues.
True about the limit in ISO working as expected. It was in ANSI/ASME mode that I ran into this limitation. I thought there was an over-write in config.pro for that. I was thinking that this may be a limitation in how to present this in the drawing with a drawing dimension.
- Mark as New
- Bookmark
- Subscribe
- Mute
- Subscribe to RSS Feed
- Permalink
- Notify Moderator
Of course, the "WORK AROUND" button does work here but it is asking for trouble ![]()
Overwrite the value of a drawing mode dimension.
- Mark as New
- Bookmark
- Subscribe
- Mute
- Subscribe to RSS Feed
- Permalink
- Notify Moderator
Thanks for the discussion guys.
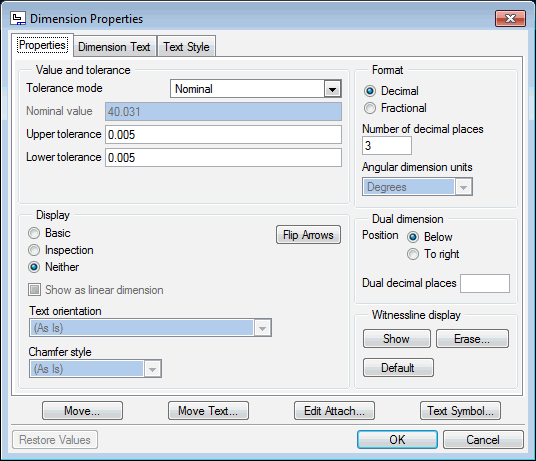
Antonius, I think I understand how you made the "work around" but want some confermation. Since we're stuck in WF3 I may not even have the option for the work around since I cannot see an "override value" option anywhere in the dimension properties dialog box.
I believe you "added" a dimsion (based on seeing "ad234" in the name). Then, I'm assuming you turned the "override value" on and manually typed in the nominal/middle dimension and tolerance. Correct?
And, since these are manually inserted values they have no connection with the actual model and therefore are "asking for trouble" because the model may change but dimensions will not change nor be parametric.
Jonathan, I appreciate your thought on extra information about design intent. I too face making decisions when PQA comes and says a dimension is .0005" out, will I accept the parts? The asymetrical tolerance is helpful in that application.
My Dimesion Properties Dialog Box in WF3:
- Mark as New
- Bookmark
- Subscribe
- Mute
- Subscribe to RSS Feed
- Permalink
- Notify Moderator
Hi Ken,
You can override the dimension display completely via a text code entered in the second tab. Some of the available codes are:
@D The default; shows the dimension
@O Override (blanks display of dimension but shows any other text you enter)
@S Symbol; shows the dimension 'symbol' or name (shown and editable in the second tab below the main text field)
HTH!
- Mark as New
- Bookmark
- Subscribe
- Mute
- Subscribe to RSS Feed
- Permalink
- Notify Moderator
Yes I added the dimension to the drawing. Any overwritten detailing dimension is now "dumb" so to speak.
The @O solution is the original "overwrite" and still functions even in Creo 2. It can be a bit finicky but should work. Not sure how it will handle the tolerances or dual dimensions. Let us know how WF 3 behaves.
- Mark as New
- Bookmark
- Subscribe
- Mute
- Subscribe to RSS Feed
- Permalink
- Notify Moderator
Tom,
Have you figured out how to put these annotation element params into relations? Or anywhere else such that these can be used as model params.
I've actually learned something new today. ![]()
Thanks.
- Mark as New
- Bookmark
- Subscribe
- Mute
- Subscribe to RSS Feed
- Permalink
- Notify Moderator
No I have not, Jakub. Still trying to figure out that @S Symbol option for a dimension.
I cannot find anything in docs or the web on this. Jonathan?
- Mark as New
- Bookmark
- Subscribe
- Mute
- Subscribe to RSS Feed
- Permalink
- Notify Moderator
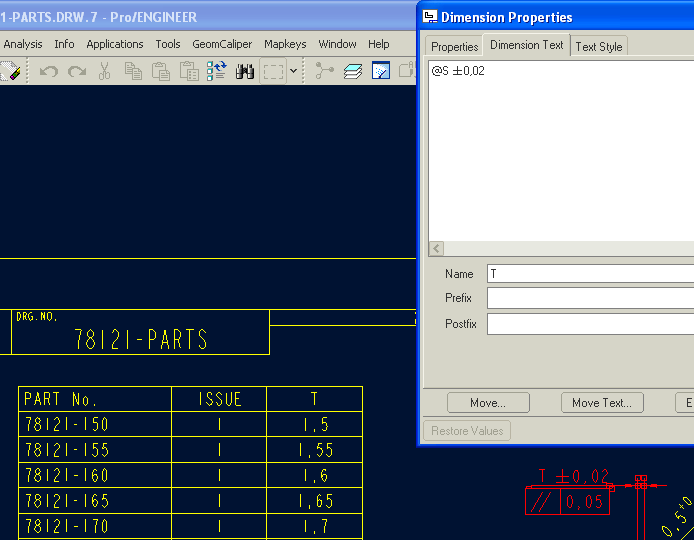
Going a bit off-topic, but here's a detail of a family-tabled shim where the thickness dimension is renamed from d6 (or whatever it was originally) to T.
If it was used in a relation, it would also now be referred to as T - the original name (d6) is gone and forgotten. You can use longer names too - GEAR_OUTSIDE_DIAMETER is also perfectly legal as a dimension name.
@S dimensions don't show tolerances, so you have to just type them in manually if you want them...
WF4, btw.
- Mark as New
- Bookmark
- Subscribe
- Mute
- Subscribe to RSS Feed
- Permalink
- Notify Moderator
Very nice! Thank you.
- Mark as New
- Bookmark
- Subscribe
- Mute
- Subscribe to RSS Feed
- Permalink
- Notify Moderator
Ok, too bad.
You know it's possible to pull parameters from features by using feature ID, but Annotation Elements don't have anything like ID.
With that it would be possible to pull all those Annotation Elements to relations or elsewhere, and tie (make associative) to these almost anything.
Uhh and a model annotation that is not 'shown' but created manually, doesn't get any of these Annotation Elements parameters.
I am guessing there is still too many gaps between 2D drawings and 3D annotations. So why bother with 3D annotations, if then there is always something in 2D drawing that isn't really tied to the 3D model.
- Mark as New
- Bookmark
- Subscribe
- Mute
- Subscribe to RSS Feed
- Permalink
- Notify Moderator
I ecco James reply, "Have you figured out how to put these annotation element params into relations?". Does anyone know how to do this?
I want to call the min and max tolerance limits from the table and use them on the drawing.
- Mark as New
- Bookmark
- Subscribe
- Mute
- Subscribe to RSS Feed
- Permalink
- Notify Moderator
I think we need Brian's help on this one... "BRIAN!"
- Mark as New
- Bookmark
- Subscribe
- Mute
- Subscribe to RSS Feed
- Permalink
- Notify Moderator
I've found a way to get annotation element parameters into relations but I'm not getting all the parameters Antonius did.
I was able to Insert an Annotation (which I chose Driven Dimension) and selected my OD. Then I went to its dimension properties and selected "Shaft" for the Tolerance table and selected Table Name: f8. Then I went to relations, and inserted parameter name from list and selected my added annotation. I was then able to choose "PTC_DIN_UPPER_TOL_VALUE" or "PTC_DIM_LOWER_TOL_VALUE". I made a relation "rod_od=PTC_DIM_UPPER_TOL_VALUE:NID_AE_DRIVEN_DIM0" and it pulled the upper tolerance limit. I then called the parameter I created in the relation "rod_od" in my dimension and the upper tolerance value showed. See below. So far so good.
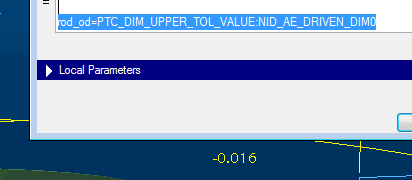
Antonius, in your screen shot of your annotation element parameters it listed 11 different parameters. How did you get those to show up? I can only get 2: upper tol value and lower tol value. Am I limited because I'm in WF3? How can I get to PTC_DIM_NOMINAL_VAL?
- Mark as New
- Bookmark
- Subscribe
- Mute
- Subscribe to RSS Feed
- Permalink
- Notify Moderator
I grabbed the dimension annotation from the model tree. This is likely not available yet in WF3. Each element of a dimension has it's own parameters. It appears you found a child of the dimension.
- Mark as New
- Bookmark
- Subscribe
- Mute
- Subscribe to RSS Feed
- Permalink
- Notify Moderator
hi Ken,
Is WF3 from before the year of 2003?
Well, see the following image, and the button in relations window marked in red box. This button was in WF version from 2003 for sure, could be in WF3 as well then,
This button turns model dims into their symbolics and these symbolic values can then be used in relations.
On the second image you can see the driven dimension with it's tolerances.
Hopefully this solves your problem. It does solve mine for sure. but I am on Creo 2.0 so these things could be different on WF3.
~Jakub
- Mark as New
- Bookmark
- Subscribe
- Mute
- Subscribe to RSS Feed
- Permalink
- Notify Moderator
I think I found some normality in grabbing parameters into relations.
I used an annotation element to select the data:
- Mark as New
- Bookmark
- Subscribe
- Mute
- Subscribe to RSS Feed
- Permalink
- Notify Moderator
Thanks for your posts guys.
Jakub, yes we do have the button "toggle between dimension values and names" in WF3. I found the missing link yesterday to soliving my problem. I always set the tolerance mode to limits and therefore "tpXX" and "tmXX" never were displayed. When the tolerance mode is set to "plus-minus" ProE displays "tpXX" and "tmXX" and I'm able to use these in a relation and dimension my drawing. Our production manager is happy and we are able to model and design in metric and ISO but dimension our drawings like ANSI.
Tolerance Mode set to "plus-minus" and tp/tm shown.
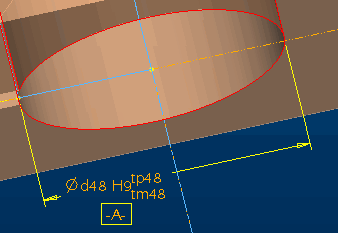
Relations built to calculate nominal dimension and symetric tolerance.
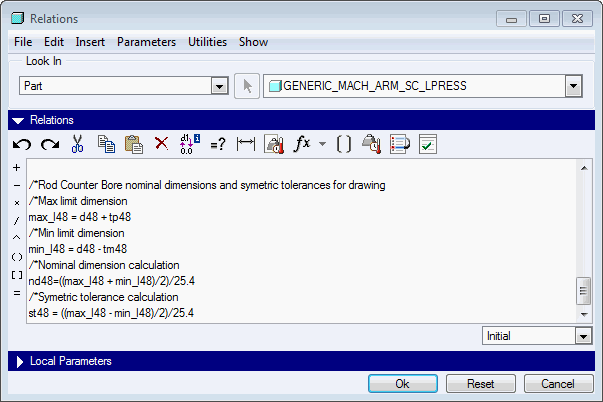
Text String in dimension in drawing.
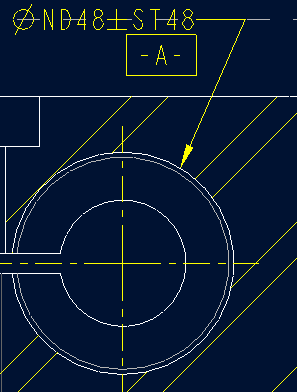
Dimensional values shown to make happy production manager.
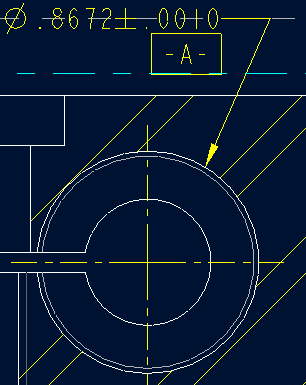
My only complaint is a note must be used to display the relations and text. It cannot be done through a created dimension. My hope was I could do this in the shown dimension.
- Mark as New
- Bookmark
- Subscribe
- Mute
- Subscribe to RSS Feed
- Permalink
- Notify Moderator
You cannot use the {textstring}@O in a diameter dimension property?
Glad you got it worked out.
- Mark as New
- Bookmark
- Subscribe
- Mute
- Subscribe to RSS Feed
- Permalink
- Notify Moderator
You can show your relation results in a driven (not shown) dimension. The model (shown) dimension is actually only your source of params.
Oh, and I am glad this makes a happy production manager ![]()


