Community Tip - Want the oppurtunity to discuss enhancements to PTC products? Join a working group! X
- Community
- Creo+ and Creo Parametric
- 3D Part & Assembly Design
- dimension witness line gap on drawings
- Subscribe to RSS Feed
- Mark Topic as New
- Mark Topic as Read
- Float this Topic for Current User
- Bookmark
- Subscribe
- Mute
- Printer Friendly Page
dimension witness line gap on drawings
- Mark as New
- Bookmark
- Subscribe
- Mute
- Subscribe to RSS Feed
- Permalink
- Notify Moderator
dimension witness line gap on drawings
I've been searching and have not found an answer so I'm creating a new post.
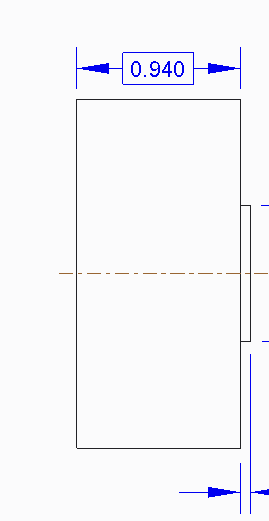
I'm working on a drawing in Creo 2.0. I use Show Model Annotations to include a dimension which then appears on one side of the part with correct offset gaps between the witness lines and the part geometry.

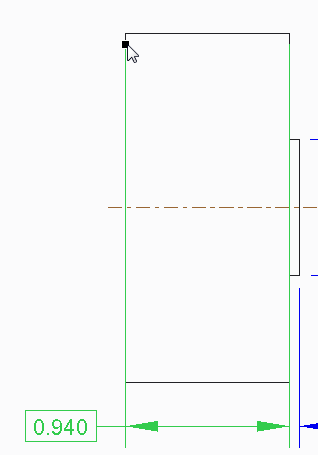
Then I drag it to the other side to fit into the overall dimensioning plan better and the witness lines don't snap to offset properly to the new side. They remain connected to the first side and I need to drag them individually.

Is there any way to change how this works? If not, does anyone know if there is already a PI created to change this or if this will be fixed in 3.0?
This thread is inactive and closed by the PTC Community Management Team. If you would like to provide a reply and re-open this thread, please notify the moderator and reference the thread. You may also use "Start a topic" button to ask a new question. Please be sure to include what version of the PTC product you are using so another community member knowledgeable about your version may be able to assist.
Solved! Go to Solution.
- Labels:
-
2D Drawing
Accepted Solutions
- Mark as New
- Bookmark
- Subscribe
- Mute
- Subscribe to RSS Feed
- Permalink
- Notify Moderator
The gap is not automatically fixed for shown dimensions.
It is fixed in the output when the drawing is plotted/printed if the interface_quality config setting is set to 3.
- Mark as New
- Bookmark
- Subscribe
- Mute
- Subscribe to RSS Feed
- Permalink
- Notify Moderator
Reassociate the dimension to the other end points of the vertical lines. All you have dragged is the dimension text, the extension line associativity is still to the original end points of the vertical lines.
- Mark as New
- Bookmark
- Subscribe
- Mute
- Subscribe to RSS Feed
- Permalink
- Notify Moderator
I'm not sure what you mean by reassociate. I haven't seen that command/action listed anywhere. Do you mean Edit Attachment or delete/recreate it on the other side?
I just discovered that when I create the dimension using the Dimension command, it behaves the way I'd like it to, i.e. it automatically maintains the proper gap as I drag and place the dimension on the other side.
I was hoping that a dimension brought in using Show Model Annotations would do this as well but it seems that it doesn't.
- Mark as New
- Bookmark
- Subscribe
- Mute
- Subscribe to RSS Feed
- Permalink
- Notify Moderator
The gap is not automatically fixed for shown dimensions.
It is fixed in the output when the drawing is plotted/printed if the interface_quality config setting is set to 3.
- Mark as New
- Bookmark
- Subscribe
- Mute
- Subscribe to RSS Feed
- Permalink
- Notify Moderator
Thanks David. This is good to know. I didn't know about this config setting but, now that I do, I still don't know why a setting that eliminates overlapping lines (to create clean plots and save ink) has anything to do with creating the proper gap between dimension witness lines and part geometry. It's disappointing to find yet another inconsistency (shown dimensions act differently than created ones) that makes Creo an overly complicated and very non-intuitive product to use.
- Mark as New
- Bookmark
- Subscribe
- Mute
- Subscribe to RSS Feed
- Permalink
- Notify Moderator
I haven't played with drafting in a while. ![]()
If Edit/Attachment doesn't change the gaps, then delete/recreate may be the only option.
The problem with Show Dimension is what is actually being dimensioned in the sketch. This could also be an issue with create dimension, but not sure.
If your dimesnions is between the 2 vertical lines then it may switch gaps to the other end when you relocate the text.
If your dimension is to the horizontal line, then it will act like you are seeing. The gap has just switched to the other side of the horizontal line when you changed the dimension location.
- Mark as New
- Bookmark
- Subscribe
- Mute
- Subscribe to RSS Feed
- Permalink
- Notify Moderator
Good point about the chosen lines affecting how the dimension acts. In my case, I have selected the two vertical lines in both cases (shown sketch dimension and created dimension). It appears that Creo handles dynamic display of a shown dimension differently than a created one which is misleading and cause of wasted time resulting from What You See Is Not What You Get.


