Community Tip - Your Friends List is a way to easily have access to the community members that you interact with the most! X
- Community
- Creo+ and Creo Parametric
- 3D Part & Assembly Design
- Re: gear teeth and spline hub shaft
- Subscribe to RSS Feed
- Mark Topic as New
- Mark Topic as Read
- Float this Topic for Current User
- Bookmark
- Subscribe
- Mute
- Printer Friendly Page
gear teeth and spline hub shaft
- Mark as New
- Bookmark
- Subscribe
- Mute
- Subscribe to RSS Feed
- Permalink
- Notify Moderator
gear teeth and spline hub shaft
Hi community
I drawing 2 part:
- shaft
- Hub
I want to linked it with gear teeth (involute profile)
i drawing involute on shaft and hub with the same parameter
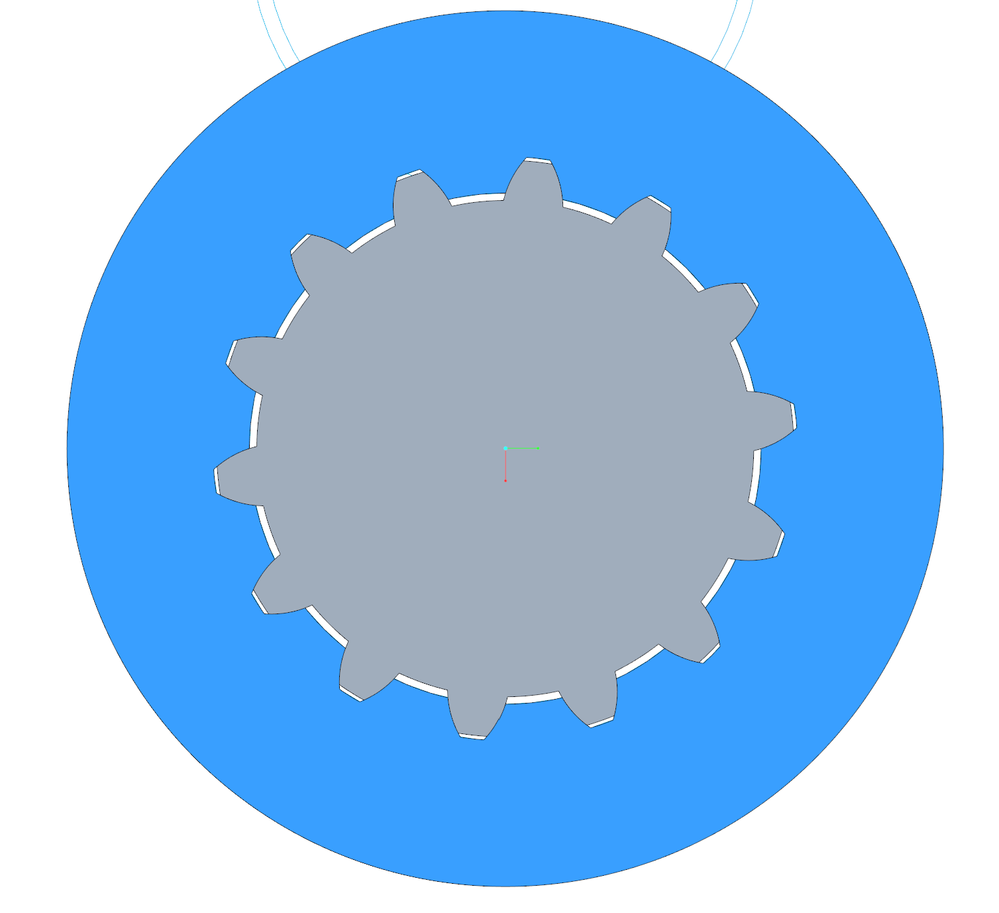
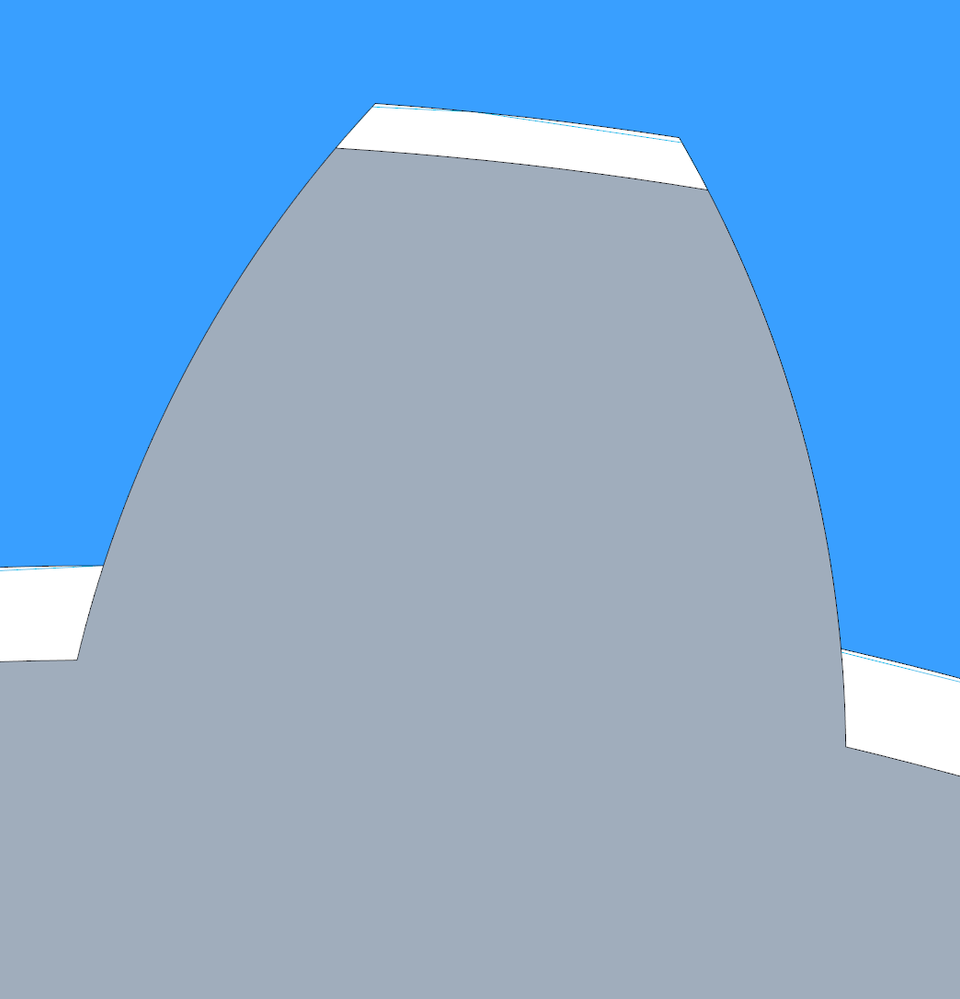
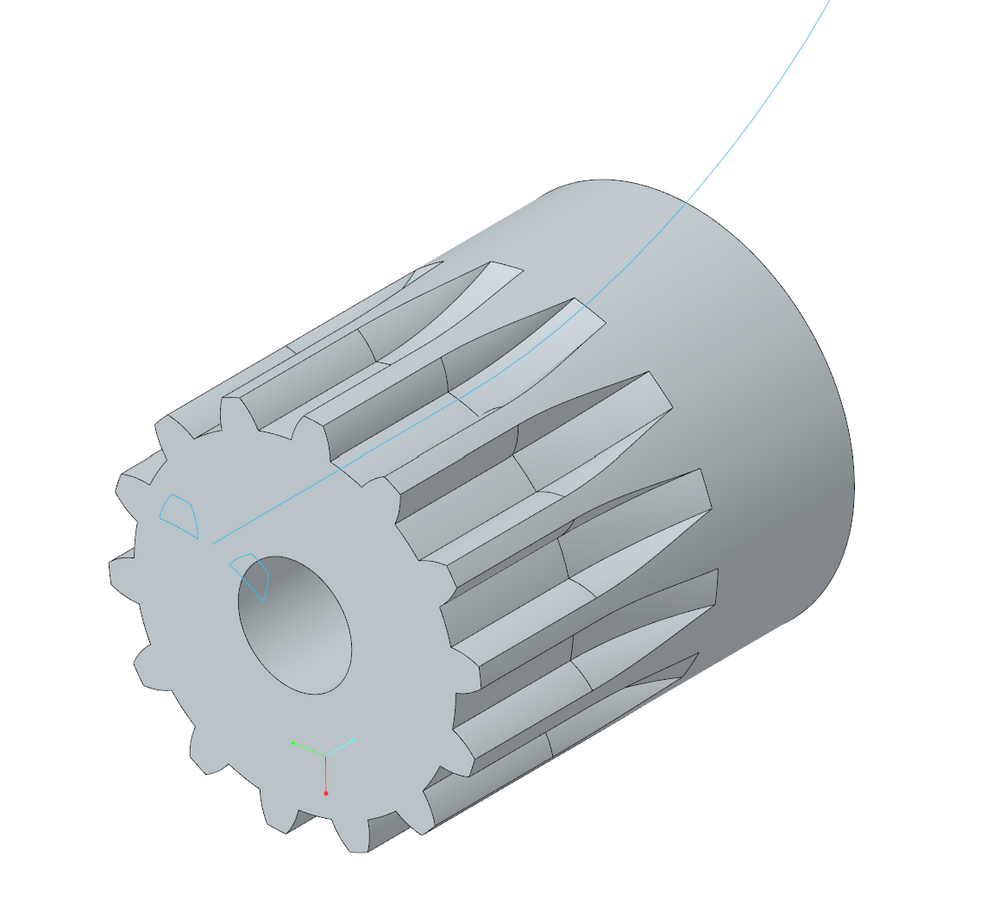
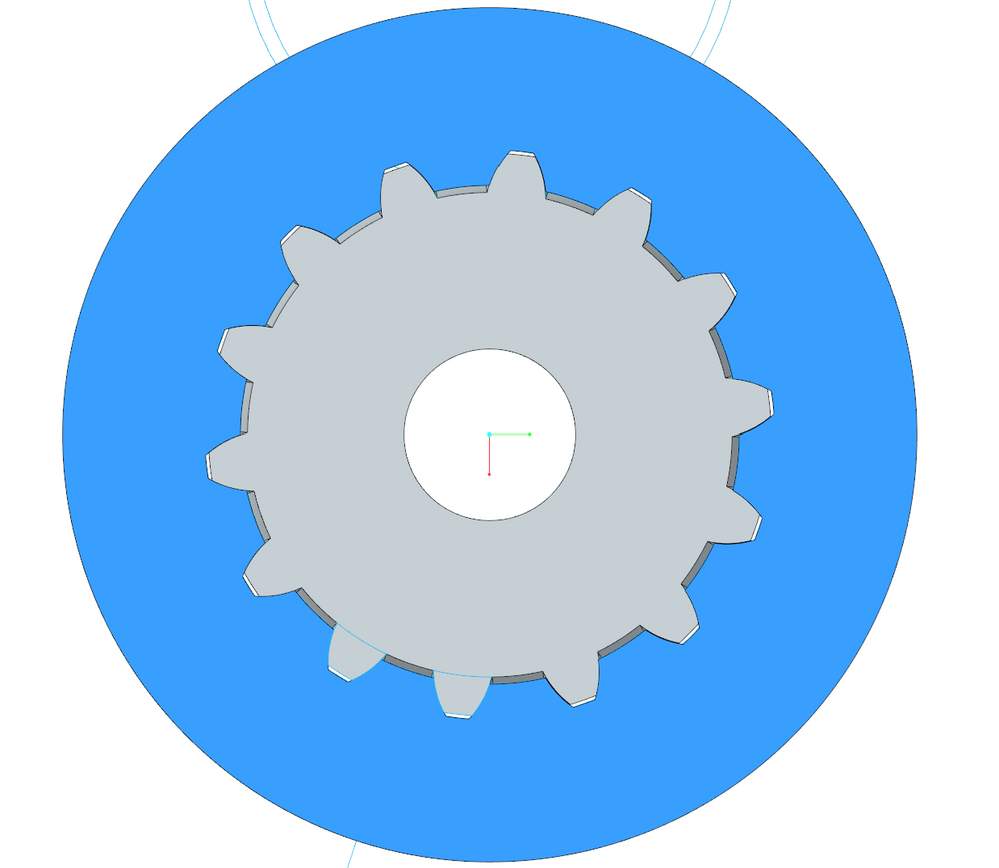
when i assembly shaft and hub i find low profile decal.
in the hub, i use a simple function for cut teeth profile
in the shaft, i use un sweep function
perhaps this decal come from sweep ?
i am sure of my involute
anyone have an idea ?
Solved! Go to Solution.
Accepted Solutions
- Mark as New
- Bookmark
- Subscribe
- Mute
- Subscribe to RSS Feed
- Permalink
- Notify Moderator
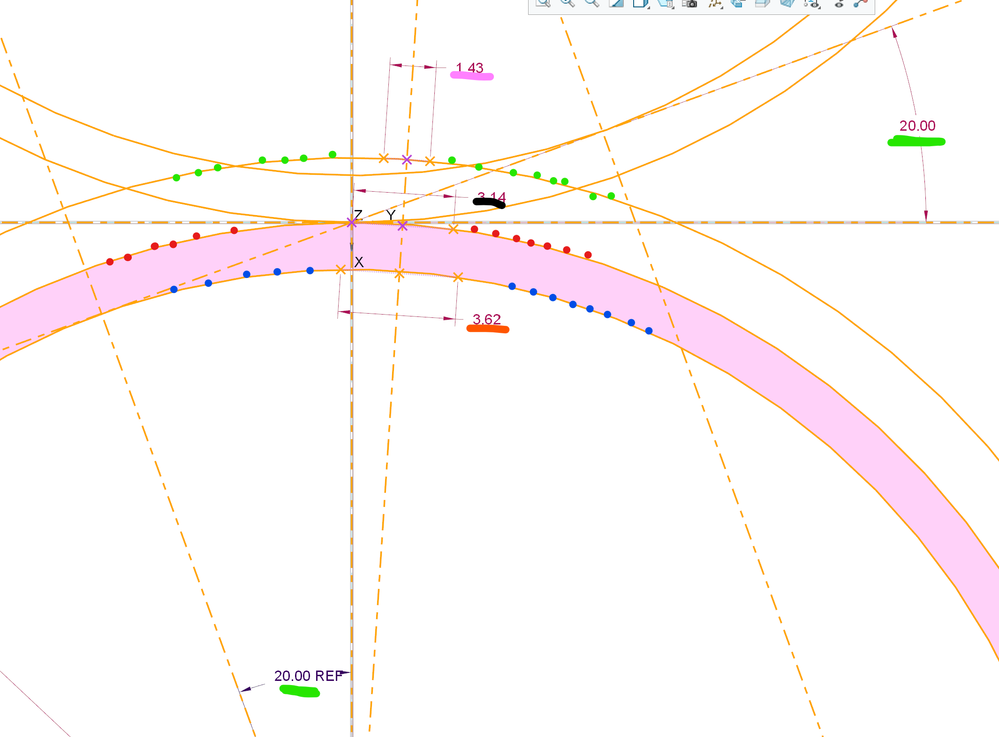
Another way to drawing gear without mirror feature
only use :
- modulus = m (or DP if you want )
- tooth number = Z
- contact angle = ALPHA (green)
1/ make primitive radius : R = (m * Z)/2 (red point)
2/ make head circle : RS= R + m (green point)
3/ make base circle : RB = R*cos(ALPHA) (blue point)
First , we calculate the intermediate angle (angle of incidence)
TETA=acos(cos(alpha)*(R/Rs)) (it possible to check it, after in the sketch)
TETA1=tan(ALPHA)-(ALPHA*(pi/180))
TETA2=tan(TETA)-(TETA*(pi/180))
TETA3=TETA1-TETA2
Note : here i use a involute equation 😉
And now, we calculate the tooth thickness
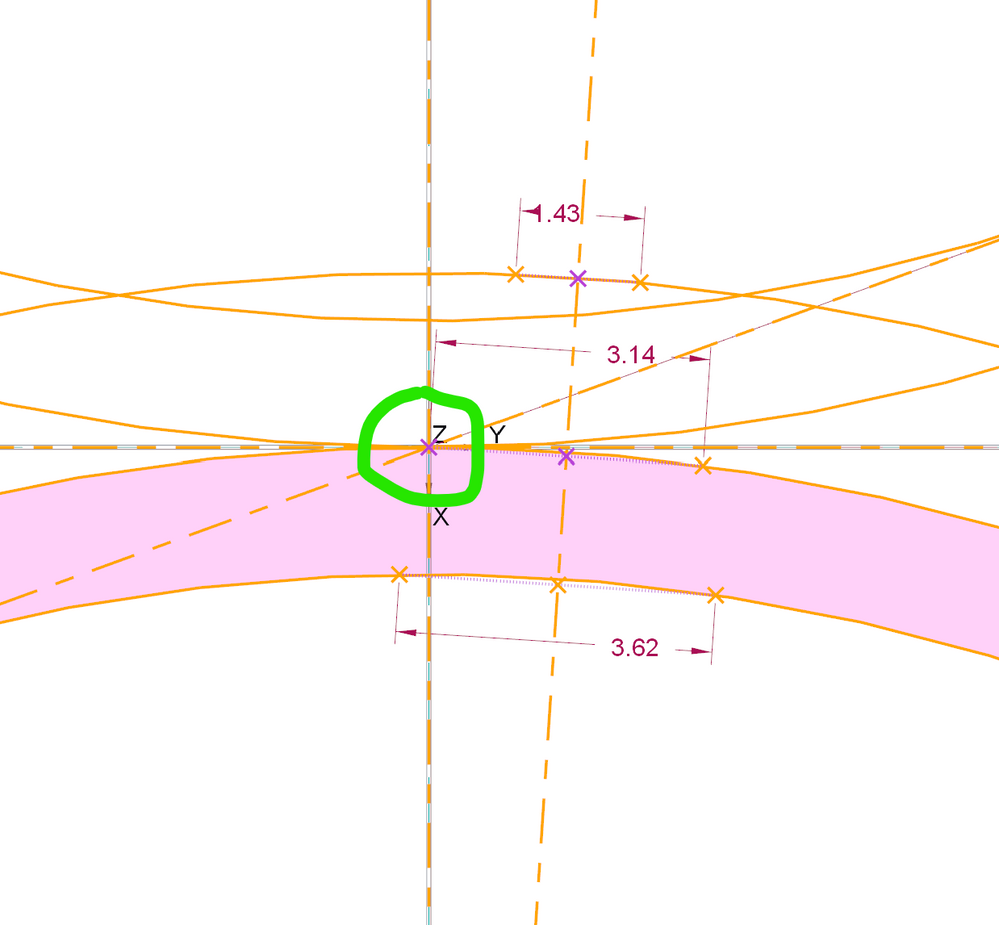
1/ thikness @ primitive circle : E=(Pi*m)/2 (black line)
2/thikness @ base circle : EB=R1* ( (E/R) +2*TETA1 ) (orange line)
3/ thiknesse @ head circle : T=RS*( (E/R) + 2*TETA3 ) (pink line)
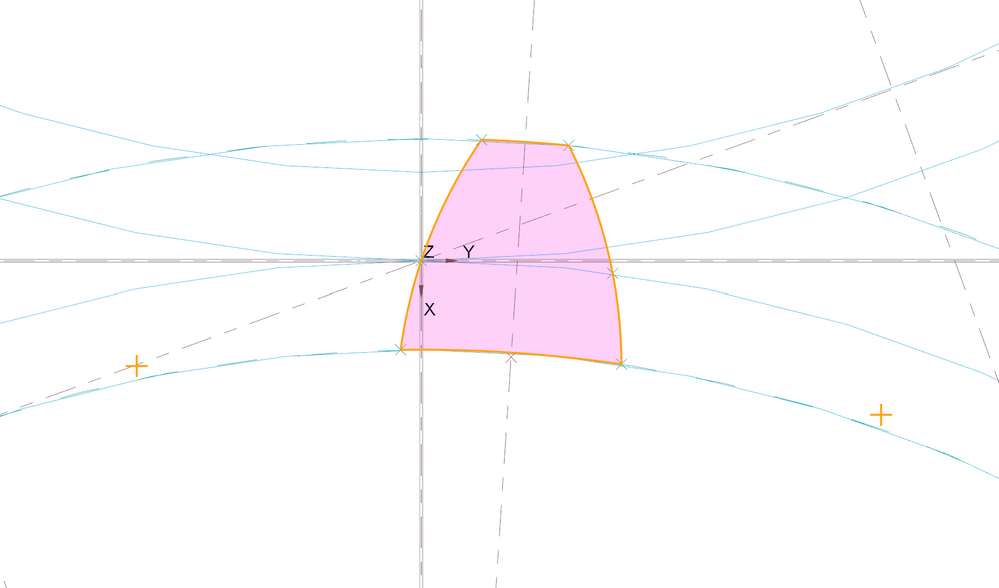
now we can drawing a sketch:
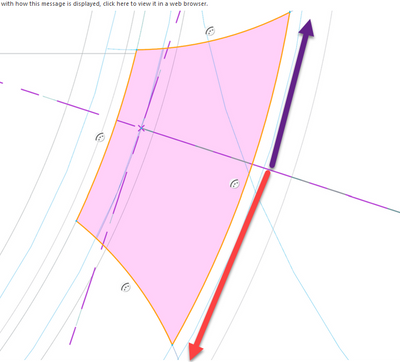
the origin is the contact point of gear pair (green circle)
and finally, you drawing a arc circle with 3 points
obsiouvly, if you use diametral pitch DP instead modulus
use this : M * DP =25.4mm
example DP 4 give :
modulus : 25,4/4= 6.35
now we can apply feature at this sketch ( extrude or sweep) and we don't use mirror feature 🤣
- Mark as New
- Bookmark
- Subscribe
- Mute
- Subscribe to RSS Feed
- Permalink
- Notify Moderator
I don't understand what help you are asking for?
- Mark as New
- Bookmark
- Subscribe
- Mute
- Subscribe to RSS Feed
- Permalink
- Notify Moderator
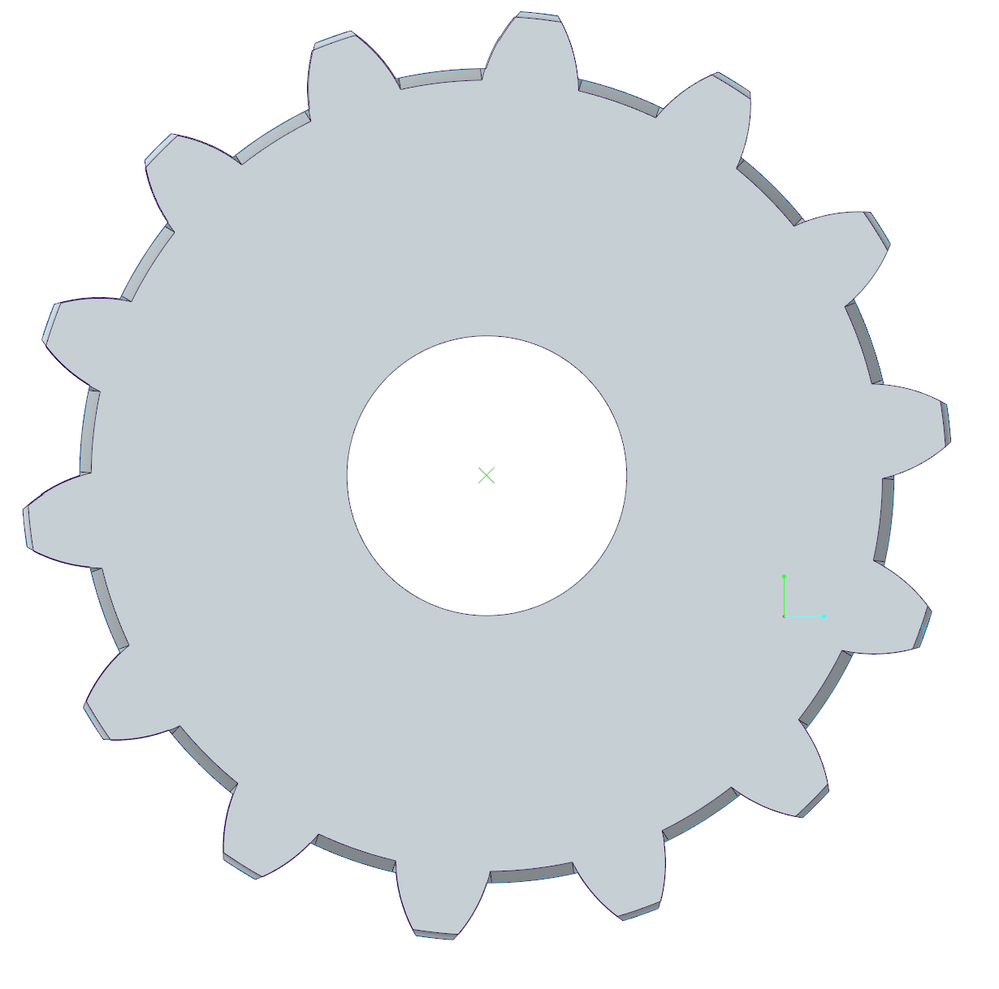
first, i drawing hub and shaft with extrude feature
the involute profile is good, i make it with involute equation
this result is perfect!
see this picture
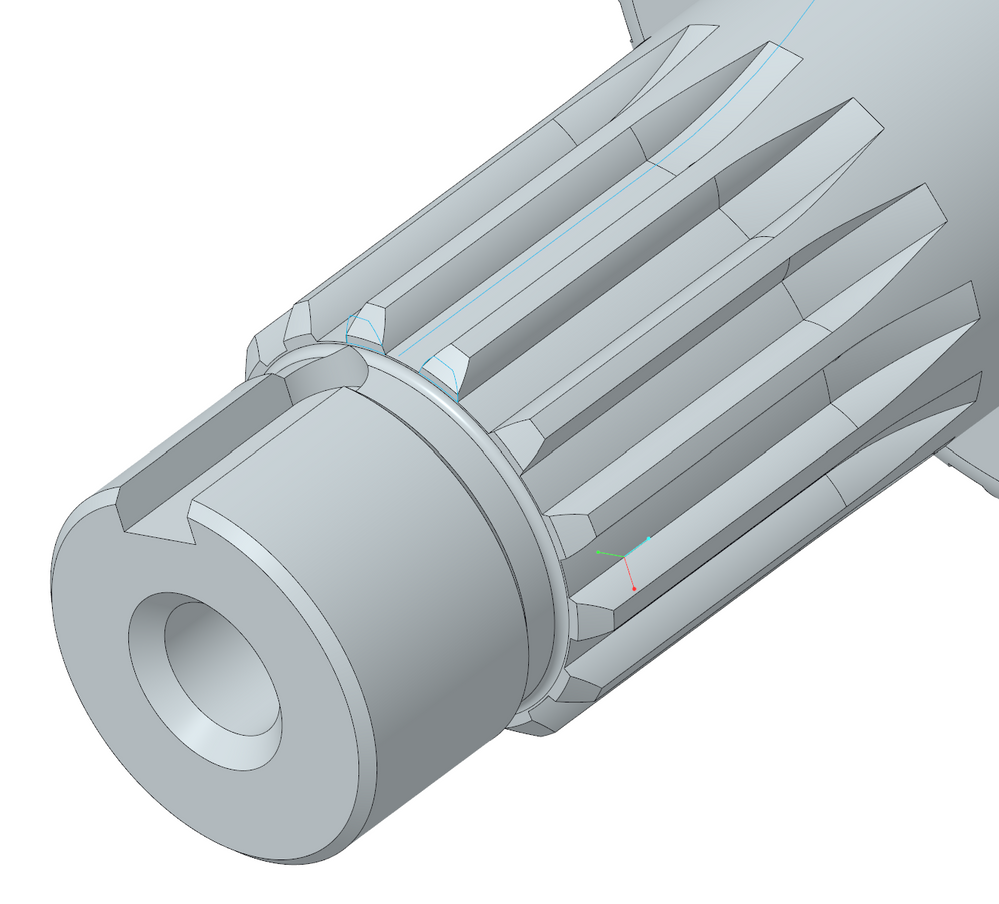
Now, drawing shaft
the sketch is make with the same involute equation
but i use a sweep feature ( not extrusion feature)
because in real life, when i machining the shaft i have the cutting tool geometry
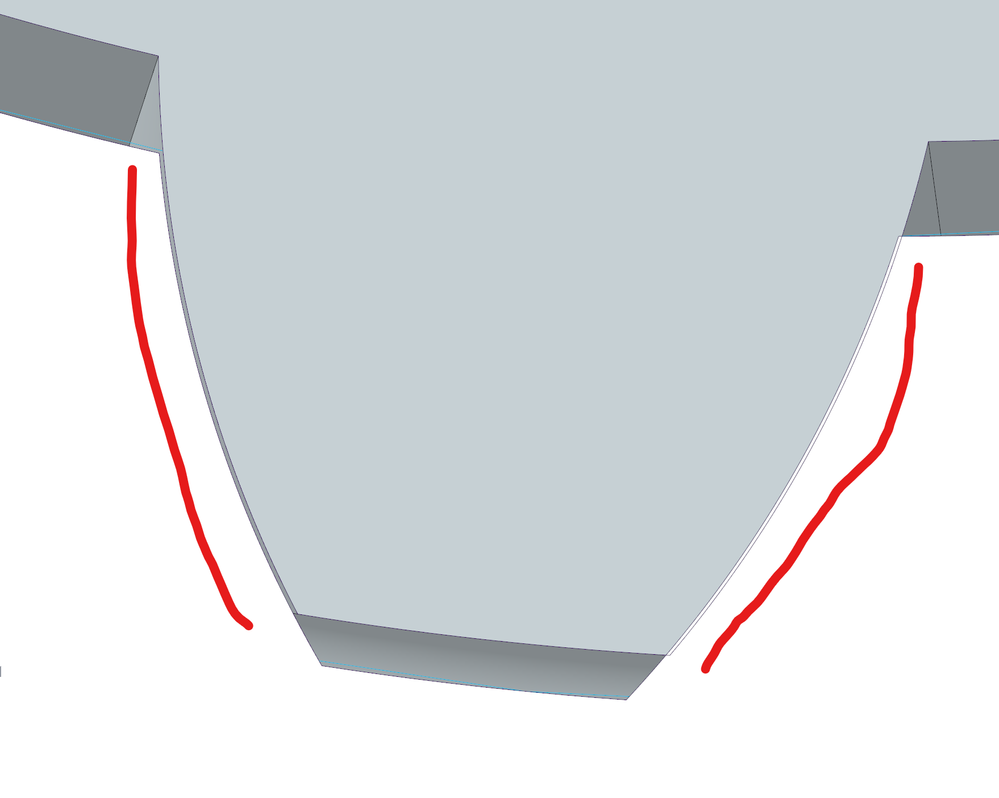
After this, i assembly this part, and now:
i have offset between hub and shaft😱
it is possible th sweep feature make it ?
sweep feature option perhaps
i use Normal To Trajectory
i don't uderstand this options,
Normal To Projection
Constant Normal Direction
thanks
- Mark as New
- Bookmark
- Subscribe
- Mute
- Subscribe to RSS Feed
- Permalink
- Notify Moderator
If you look at this part of the shaft, does your sketch exactly match the sweep cut made?
- Mark as New
- Bookmark
- Subscribe
- Mute
- Subscribe to RSS Feed
- Permalink
- Notify Moderator
yes, the sketch for sweep feature is correctly
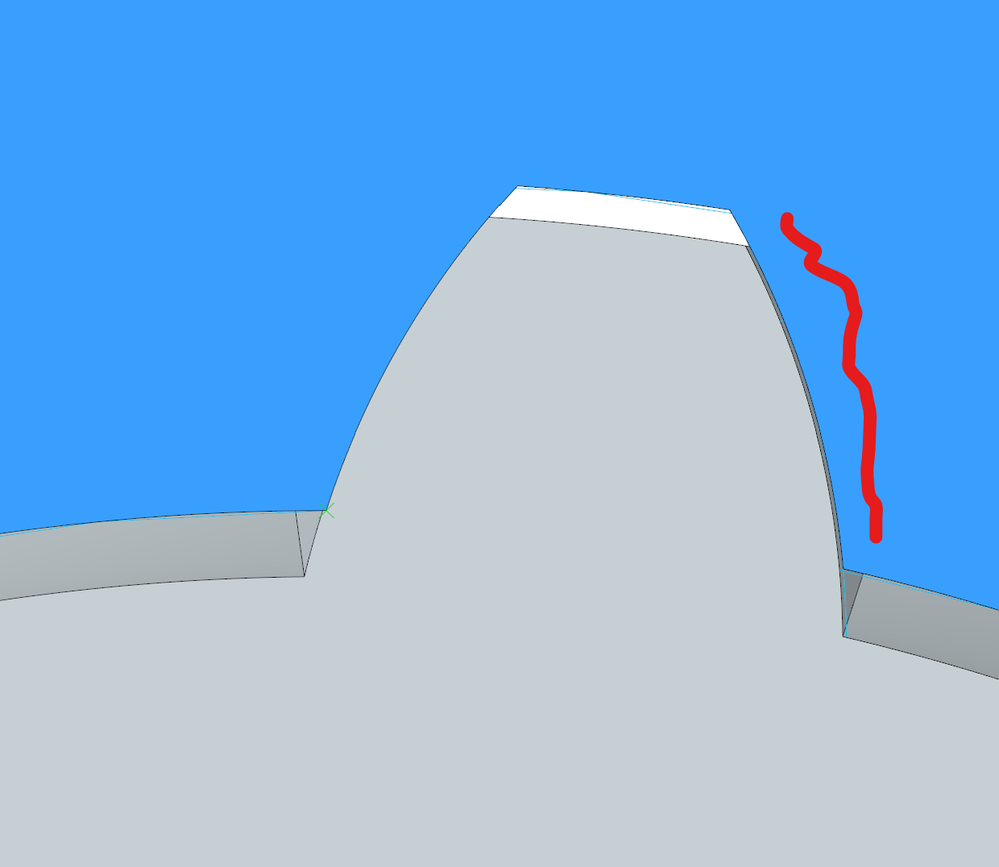
if this picture, you can see the tooth profile
the sketch is only a copy of tooth edges
the problem appear when i make pattern
but i use a parameter for a right division , not approxymativly angle.
in a first sweep, the geometry is perfect
(red circle)
after pattern, the offset appear, and

- Mark as New
- Bookmark
- Subscribe
- Mute
- Subscribe to RSS Feed
- Permalink
- Notify Moderator
If you can, attach them models. You'll need to zip them first. Also state what version of software you are using and if it is student/educational version or commercial.
If it seems correct on the first one and then shows up with the pattern, then I would expect that either your tooth profile isn't on or thru the center of the shaft or your pattern isn't revolving about the center of the shaft
this image looks like it is larger on one side the other but that maybe just the angle of viewing.
- Mark as New
- Bookmark
- Subscribe
- Mute
- Subscribe to RSS Feed
- Permalink
- Notify Moderator
A while back I needed to make a custom gear with involute geometry similar to what you are doing.
My approach was similar to what you were doing:
(1) Make the involute curve using a cylindrical "Curve from Equation". Curve looked perfect.
(2) Sketch and extrude a single tooth using that curve, and mirroring the geometry about a centerline.
(3) Pattern that tooth to create the full gear.
As you state, I used parameters, calculated the angles and all that.
The trouble is, when I sent the model out to have the wheel built, the wire EDM guy told me the geometry was not symmetric for each tooth.
When I checked into it, I found that by iterating on the gear (changing the number of teeth, etc.) the geometry was no longer the same for both sides of the tooth. The side that was a direct projection of the involute curve I'd defined mathematically still matched, but the mirrored curve in the tooth was not right. It was more approximate, curvature didn't match, etc. What I ended up doing to fix it was to build a half tooth extrusion, mirror that about its center plane, group the half tooth and its mirror, then pattern that to create the full gear. This worked exactly right. Maybe this is of interest to you?
Also, in the past we had troubles with patterns around axes because:
(1) The accuracy (File->Prepare->Accuracy) was Relative, the bad default. I have this set by default in my start parts to Absolute 1.0e-05 inch.
(2) The angular pitch for the pattern has "Round Dimension" checked? This was something that happened when someone was using the dimension on a drawing and set it to round to three decimal places, which really has a big effect when the pattern gets to the 50th tooth. Check to make sure, in your config.pro, that "round_displayed_dim_values" is set to "NO", too.
- Mark as New
- Bookmark
- Subscribe
- Mute
- Subscribe to RSS Feed
- Permalink
- Notify Moderator
this is exactly the problem (same machining problem)
in second time, i drawing tooth not directly with involute équation.
i did like this.
1/ I calculate E . Is tooth thickness on primitive circle (d=m*Z)
2 / i calculate T . Is tooth thickness on external circle
3/ I calculate Eb . Is tooth thickness on base circle
After this i drawing arc of a circle passing through 3 points, same line on the other side of the plane of symmetry
If i superimpose the involute from équation, is perfect ! it's obvious, because for calculate thickness i use the involute equation (tan(phi)-phi)
i try to modify config pro
- Mark as New
- Bookmark
- Subscribe
- Mute
- Subscribe to RSS Feed
- Permalink
- Notify Moderator
The main thing I found seemed to cause trouble was when I mirrored involute in SKETCH. It seemed like mirror of the spline was not an precise geometry on mirrored side - it acted more like a "one time" mirror, which approximated the true geometry. What did work was I created a half tooth, using the involute curve as solid geometry EXTRUDE. I then mirrored the solid geometry about its center plane and it was the exact same geometry. It seems that the mirroring for solid geometry is precise, but mirroring the spline in SKETCH is not.
All this happened when I was still using Creo 4, I haven't tested for Creo 9. But I suspect it would be the same.
- Mark as New
- Bookmark
- Subscribe
- Mute
- Subscribe to RSS Feed
- Permalink
- Notify Moderator
yes , I come to the same conclusion ...
under Creo 7
but it's still weird
even if i use curve , at some point i have to make sketch with it ... problem
- Mark as New
- Bookmark
- Subscribe
- Mute
- Subscribe to RSS Feed
- Permalink
- Notify Moderator
Using the CURVE is not a problem.
(1) Make the CURVE. It's really the only way to define the involute.
(2) Make an EXTRUDE, using the CURVE for the side of the tooth. This extrude is a half of a tooth, planar on one side, involute profile on other side.
(3) Mirror this about the planar surface.
(4) Group the extrude and mirror.
(5) Pattern the group about an axis to make the complete gear.
Again, the trouble seems to be that the mirror within a sketch is "imprecise". Mirroring solid geometry apparently is not.
Also, I don't follow the trend I see of people making a sketch, then making a feature. The only time I'm going to make sketch features in a model is if I intend to re-use the sketch for more than one feature. Otherwise it's just useless clutter in the model tree, in my eyes.
- Mark as New
- Bookmark
- Subscribe
- Mute
- Subscribe to RSS Feed
- Permalink
- Notify Moderator
Another way to drawing gear without mirror feature
only use :
- modulus = m (or DP if you want )
- tooth number = Z
- contact angle = ALPHA (green)
1/ make primitive radius : R = (m * Z)/2 (red point)
2/ make head circle : RS= R + m (green point)
3/ make base circle : RB = R*cos(ALPHA) (blue point)
First , we calculate the intermediate angle (angle of incidence)
TETA=acos(cos(alpha)*(R/Rs)) (it possible to check it, after in the sketch)
TETA1=tan(ALPHA)-(ALPHA*(pi/180))
TETA2=tan(TETA)-(TETA*(pi/180))
TETA3=TETA1-TETA2
Note : here i use a involute equation 😉
And now, we calculate the tooth thickness
1/ thikness @ primitive circle : E=(Pi*m)/2 (black line)
2/thikness @ base circle : EB=R1* ( (E/R) +2*TETA1 ) (orange line)
3/ thiknesse @ head circle : T=RS*( (E/R) + 2*TETA3 ) (pink line)
now we can drawing a sketch:
the origin is the contact point of gear pair (green circle)
and finally, you drawing a arc circle with 3 points
obsiouvly, if you use diametral pitch DP instead modulus
use this : M * DP =25.4mm
example DP 4 give :
modulus : 25,4/4= 6.35
now we can apply feature at this sketch ( extrude or sweep) and we don't use mirror feature 🤣
- Mark as New
- Bookmark
- Subscribe
- Mute
- Subscribe to RSS Feed
- Permalink
- Notify Moderator
Hello, do you have creo model from this?

