Turn on suggestions
Auto-suggest helps you quickly narrow down your search results by suggesting possible matches as you type.
Showing results for
Please log in to access translation
Turn on suggestions
Auto-suggest helps you quickly narrow down your search results by suggesting possible matches as you type.
Showing results for
Community Tip - Learn all about PTC Community Badges. Engage with PTC and see how many you can earn! X
- Community
- Creo+ and Creo Parametric
- 3D Part & Assembly Design
- Re: wave curve design
Translate the entire conversation x
Please log in to access translation
Options
- Subscribe to RSS Feed
- Mark Topic as New
- Mark Topic as Read
- Float this Topic for Current User
- Bookmark
- Subscribe
- Mute
- Printer Friendly Page
wave curve design
Oct 27, 2014
04:39 AM
- Mark as New
- Bookmark
- Subscribe
- Mute
- Subscribe to RSS Feed
- Permalink
- Notify Moderator
Please log in to access translation
Oct 27, 2014
04:39 AM
wave curve design
Hi,
Dear All, i have attached a zip file it seems to be diffilcult for me to model this, seeking for some help regarding this(addition of tutorial would be an asset).
This thread is inactive and closed by the PTC Community Management Team. If you would like to provide a reply and re-open this thread, please notify the moderator and reference the thread. You may also use "Start a topic" button to ask a new question. Please be sure to include what version of the PTC product you are using so another community member knowledgeable about your version may be able to assist.
25 REPLIES 25
Oct 29, 2014
02:51 AM
- Mark as New
- Bookmark
- Subscribe
- Mute
- Subscribe to RSS Feed
- Permalink
- Notify Moderator
Please log in to access translation
Oct 29, 2014
02:51 AM
i think no one can make this, using creo.
Oct 29, 2014
03:08 AM
- Mark as New
- Bookmark
- Subscribe
- Mute
- Subscribe to RSS Feed
- Permalink
- Notify Moderator
Please log in to access translation
Oct 29, 2014
03:08 AM
I don't do .rar files, so if you could include an image that would help.
Oct 29, 2014
03:46 AM
- Mark as New
- Bookmark
- Subscribe
- Mute
- Subscribe to RSS Feed
- Permalink
- Notify Moderator
Please log in to access translation
Oct 29, 2014
03:46 AM

Oct 29, 2014
03:47 AM
- Mark as New
- Bookmark
- Subscribe
- Mute
- Subscribe to RSS Feed
- Permalink
- Notify Moderator
Please log in to access translation
Oct 29, 2014
03:47 AM
see if this can be helpful
Oct 29, 2014
03:47 AM
- Mark as New
- Bookmark
- Subscribe
- Mute
- Subscribe to RSS Feed
- Permalink
- Notify Moderator
Please log in to access translation
Oct 29, 2014
03:47 AM
Antonius,
you can use 7-zip program to unzip attached file (1st step) and unrar unzipped file (2nd step). There are three pictures inside the file.
Martin Hanak
Martin Hanák
Oct 29, 2014
05:28 AM
- Mark as New
- Bookmark
- Subscribe
- Mute
- Subscribe to RSS Feed
- Permalink
- Notify Moderator
Please log in to access translation
Oct 29, 2014
05:28 AM
i have attached pictures .... !!!
Oct 29, 2014
12:25 PM
- Mark as New
- Bookmark
- Subscribe
- Mute
- Subscribe to RSS Feed
- Permalink
- Notify Moderator
Please log in to access translation
Oct 29, 2014
12:25 PM
Thanks Martin. I don't open .rar on principle.
Oct 29, 2014
11:03 AM
- Mark as New
- Bookmark
- Subscribe
- Mute
- Subscribe to RSS Feed
- Permalink
- Notify Moderator
Please log in to access translation
Oct 29, 2014
12:41 PM
- Mark as New
- Bookmark
- Subscribe
- Mute
- Subscribe to RSS Feed
- Permalink
- Notify Moderator
Please log in to access translation
Oct 29, 2014
12:41 PM
Nice Darek. Welcome to the forum.
I learned a new trick about splines in sketches... select dimension and click the end of the spline, then place the dimension. Enter 0.5. This is Radius of Curvature.
Trick 2: select dimension; click the spline, click the end of the spline, click a line reference, and place the dimension. Enter an angle.
These tips have some dependencies but as a freshly created spline, you can do both of these.
Jasir, Darek's file was created using a variable named trajpar available in sweep sections. These are Variable Sweep Sections, or VSS. Very powerful capabilities for this type of challenge.
However, since each cell has a true planer-square, you have more options. In fact, there is a hidden command, Section Dome that might be useful. These challenges can take on a life of their own when you involve the industrial design people who want very specific curvatures. You need to take this into account when deciding how best to create a model such as this and how much flexibility you require.
Oct 30, 2014
02:21 AM
- Mark as New
- Bookmark
- Subscribe
- Mute
- Subscribe to RSS Feed
- Permalink
- Notify Moderator
Please log in to access translation
Oct 30, 2014
02:21 AM
its not gonna work for me as file is CREO 2.0 and i am using CREO 1.0
Can u help please...
Oct 30, 2014
03:34 AM
- Mark as New
- Bookmark
- Subscribe
- Mute
- Subscribe to RSS Feed
- Permalink
- Notify Moderator
Please log in to access translation
Oct 30, 2014
06:21 AM
- Mark as New
- Bookmark
- Subscribe
- Mute
- Subscribe to RSS Feed
- Permalink
- Notify Moderator
Please log in to access translation
Oct 30, 2014
06:21 AM
oh great man.....!!! its closest to required part(best than previous i.e made with sweep). very helpful ... can u give its .prt file or tutorial..
i have installed creo 2.0.. now u can send
thank u very much
Oct 30, 2014
02:02 PM
- Mark as New
- Bookmark
- Subscribe
- Mute
- Subscribe to RSS Feed
- Permalink
- Notify Moderator
Please log in to access translation
Oct 30, 2014
02:02 PM
Just make a square Fill feature and use the Warp feature to deform the Fill feature. Then use the copy/paste special to rotate the feature 180 degrees. Repeat the copy/paste special for all the cells you need. Merge the surfaces into a single quilt and thicken. Round the edges and done.
When you copy/paste special, be sure to uncheck the option for hiding the original.
Oct 30, 2014
10:46 PM
- Mark as New
- Bookmark
- Subscribe
- Mute
- Subscribe to RSS Feed
- Permalink
- Notify Moderator
Please log in to access translation
Oct 30, 2014
10:46 PM
I started to do this, then I sort of got bored with it. I rarely use the Warp command, so I wanted to mess it. It seems like I could not get the round marqee small enough to make a nice round warp shape and keep the edges flat, so not sure what I am doing wrong.
Oct 30, 2014
11:00 PM
- Mark as New
- Bookmark
- Subscribe
- Mute
- Subscribe to RSS Feed
- Permalink
- Notify Moderator
Please log in to access translation
Oct 30, 2014
11:00 PM
try this:
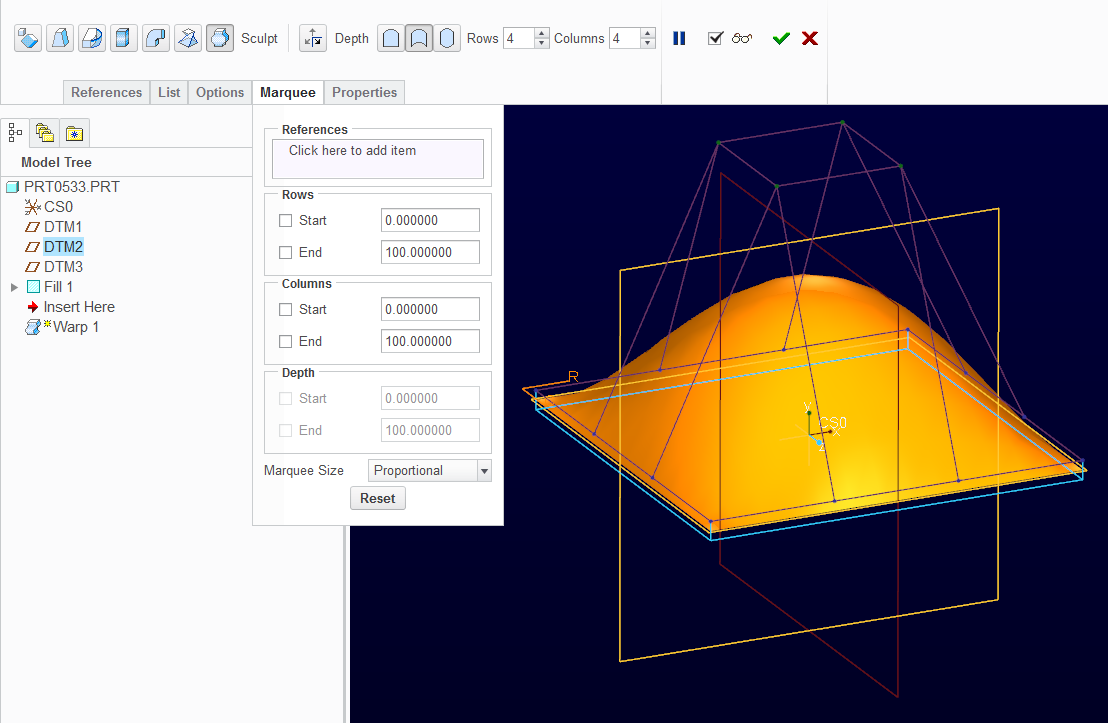
Use the CTRL key to select the 4 drag points.
The problem I have with the warp tool is the lack of control for the dragging offset.
There is no way to duplicate the drag distance exactly on a second feature.
Oct 30, 2014
11:41 PM
- Mark as New
- Bookmark
- Subscribe
- Mute
- Subscribe to RSS Feed
- Permalink
- Notify Moderator
Please log in to access translation
Oct 30, 2014
11:41 PM
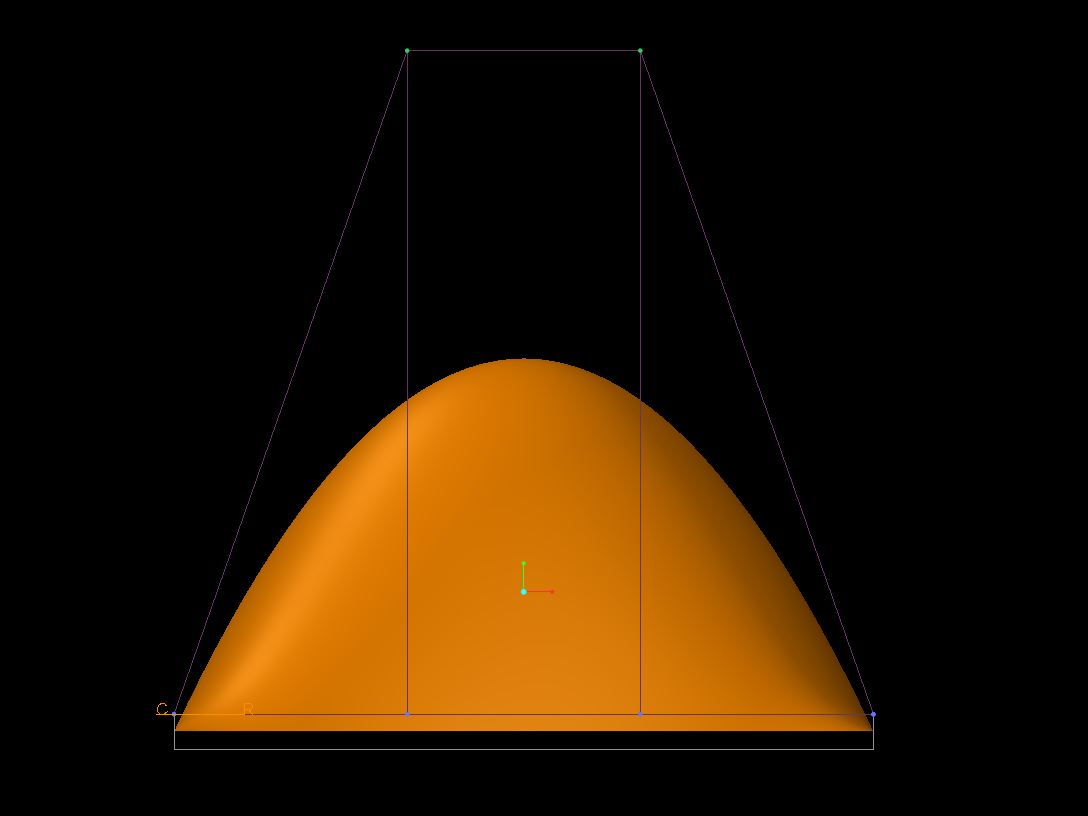
ah ok, that's cool, I was using the Spine type.
Oct 31, 2014
01:01 AM
- Mark as New
- Bookmark
- Subscribe
- Mute
- Subscribe to RSS Feed
- Permalink
- Notify Moderator
Please log in to access translation
Oct 31, 2014
01:01 AM
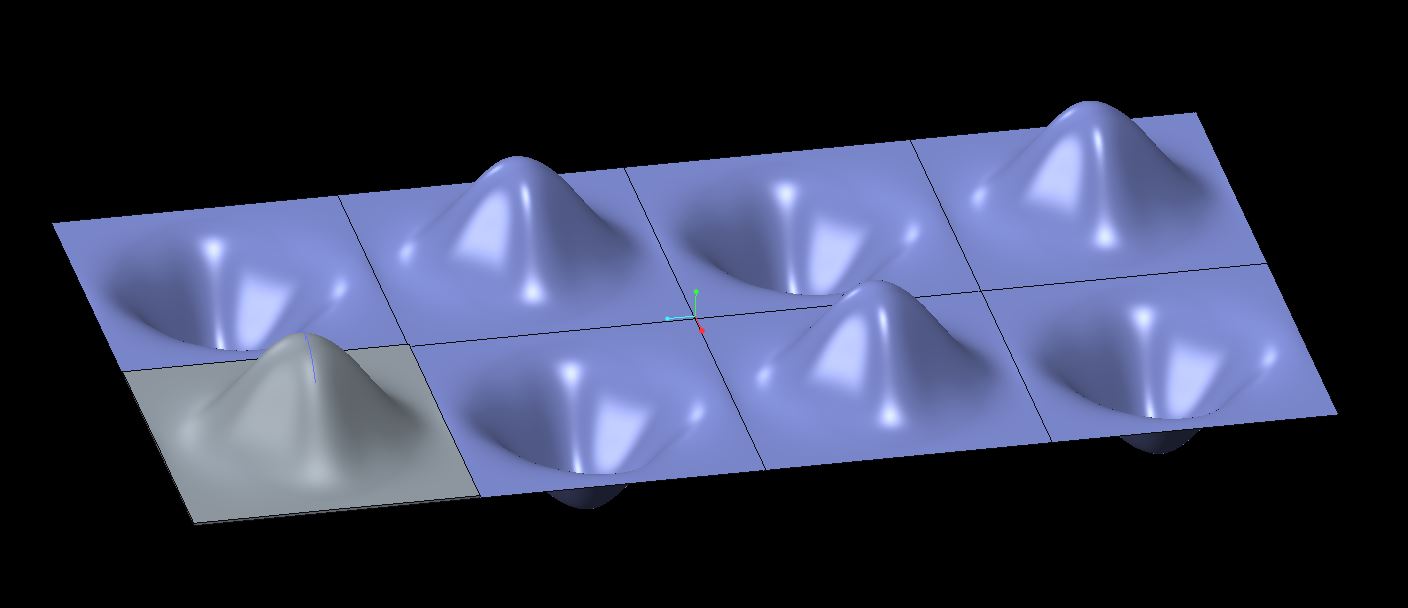
Here is one to play with. It is somewhat tolerant of tweaking the shape of the cups.
Also has successful curvature controlled Boundary Blend for the corners.
Oct 31, 2014
08:08 AM
- Mark as New
- Bookmark
- Subscribe
- Mute
- Subscribe to RSS Feed
- Permalink
- Notify Moderator
Please log in to access translation
Oct 31, 2014
08:08 AM
Thanks a lot i got it... it was very helpful session..
again thanks and keep it up....
Oct 31, 2014
12:59 PM
- Mark as New
- Bookmark
- Subscribe
- Mute
- Subscribe to RSS Feed
- Permalink
- Notify Moderator
Please log in to access translation
Oct 31, 2014
12:59 PM
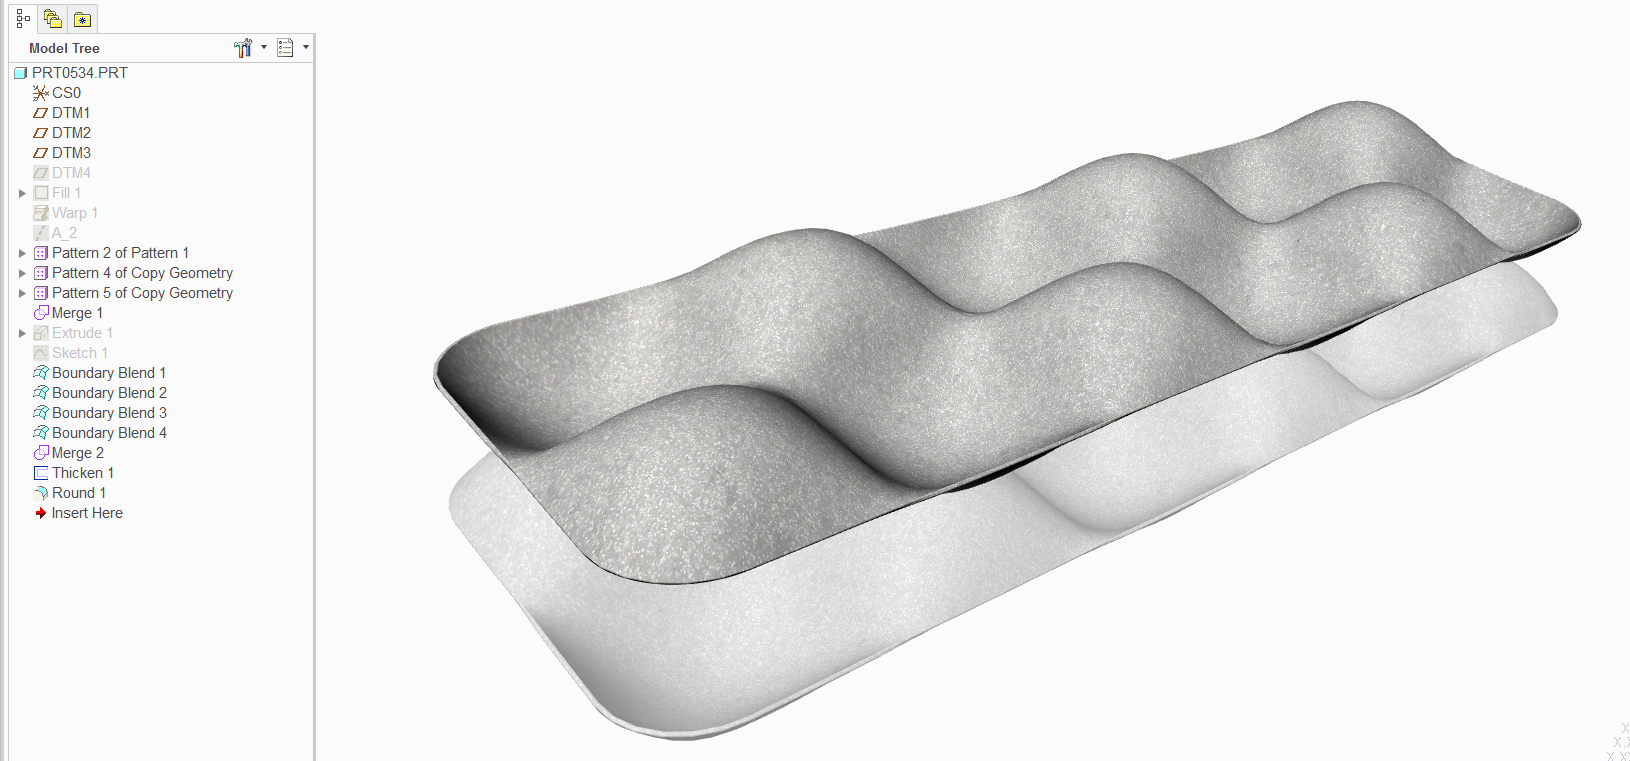
One other method to look at. It has a few more restrictions but better control over the profile. The sweep fails if the slopes are too steep.
Oct 31, 2014
09:40 PM
- Mark as New
- Bookmark
- Subscribe
- Mute
- Subscribe to RSS Feed
- Permalink
- Notify Moderator
Please log in to access translation
Oct 31, 2014
09:40 PM
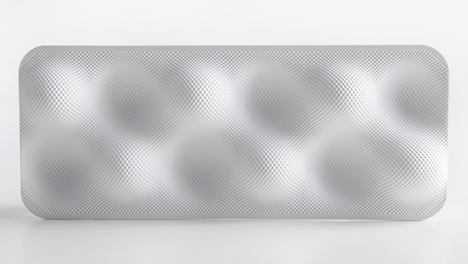
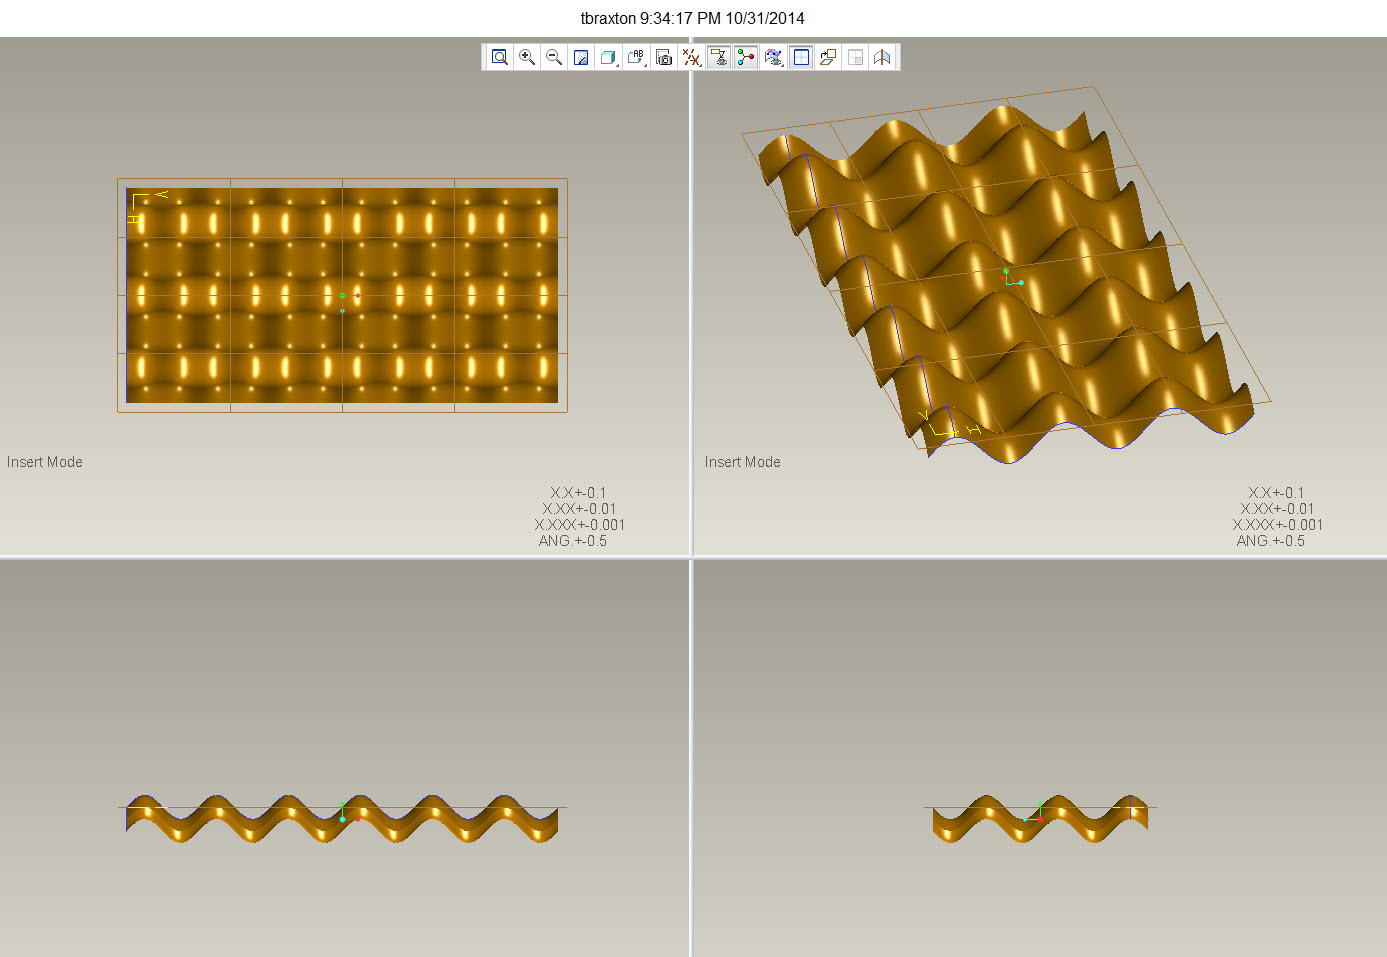
It is possible to create the pattern by sweeping a curve along a curve. The enclosed example is built using two planar curves and a sweep. The second curve is swept along the first with a constant normal direction. This geometry is using two sinusoidal functions. The curves were created by equation where both sinusoids are expressed in parametric equations. You can change the shape by manipulation of the equation parameters. This is a single quilt that can be trimmed and matched to an arbitrary perimiter shape. Creo 2 model enclosed for reference.
========================================
Involute Development, LLC
Consulting Engineers
Specialists in Creo Parametric
Involute Development, LLC
Consulting Engineers
Specialists in Creo Parametric
Oct 31, 2014
09:58 PM
- Mark as New
- Bookmark
- Subscribe
- Mute
- Subscribe to RSS Feed
- Permalink
- Notify Moderator
Please log in to access translation
Oct 31, 2014
09:58 PM
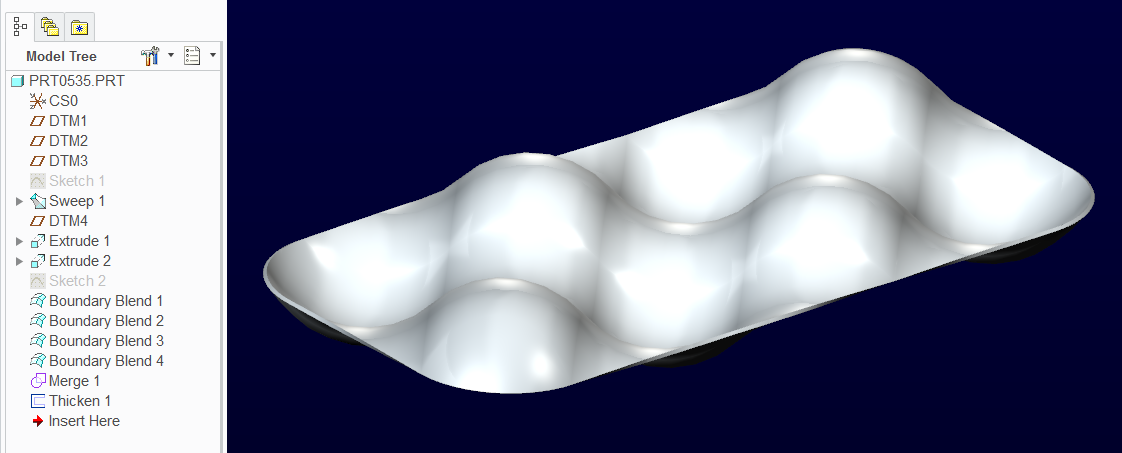
Yep, that is what I did in prt0535.prt.
Nov 01, 2014
07:42 AM
- Mark as New
- Bookmark
- Subscribe
- Mute
- Subscribe to RSS Feed
- Permalink
- Notify Moderator
Please log in to access translation
Nov 01, 2014
07:42 AM
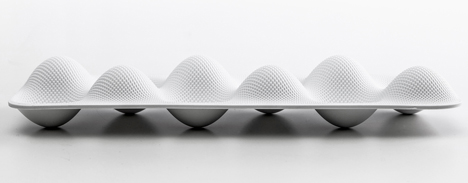
It still doesn't have the offset between rows. If you put eggs in this design they would still line up with each other. It's the offset that makes the original design so unique. How could you use this concept but still get the shift?
Nov 01, 2014
09:20 AM
- Mark as New
- Bookmark
- Subscribe
- Mute
- Subscribe to RSS Feed
- Permalink
- Notify Moderator
Please log in to access translation
Nov 01, 2014
09:20 AM
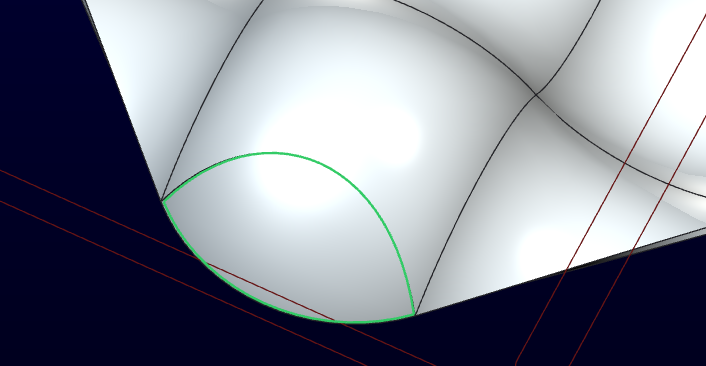
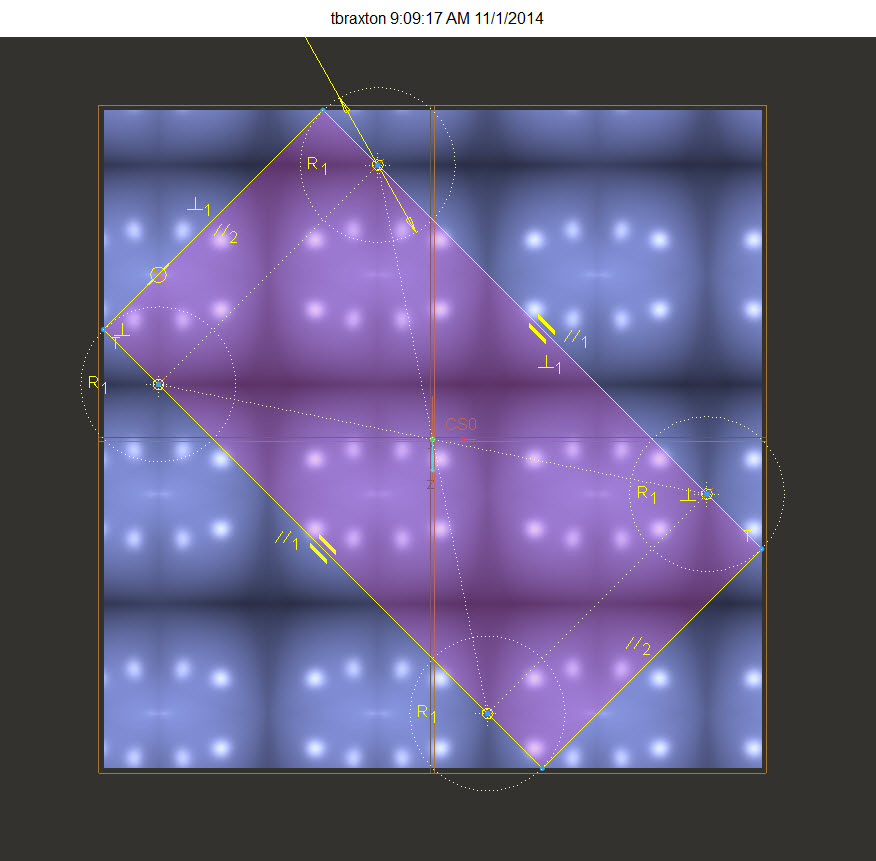
The offet is there, it is just not easliy visualized. I used Antonius D.'s model to grab an image to make this clear as he has a more complete model.
The "offset" is achieved by trimming the quilt on a bias. Antonius has a valid solution. I am showing in my example how to employ equation driven curves using periodic functions as an alternative to get the "wave" quilt. You should be able to employ graphs to control the quilt shape as another option.
========================================
Involute Development, LLC
Consulting Engineers
Specialists in Creo Parametric
Involute Development, LLC
Consulting Engineers
Specialists in Creo Parametric
Nov 01, 2014
09:36 AM
- Mark as New
- Bookmark
- Subscribe
- Mute
- Subscribe to RSS Feed
- Permalink
- Notify Moderator
Please log in to access translation
Nov 01, 2014
09:36 AM
Ah, that makes sense.
On the other hand, if you cut it this way you won't end up with a level edge all the way around, right? Or is there this one perfect spot where everthing is the same height when cutting on an angle?
Nov 01, 2014
01:24 PM
- Mark as New
- Bookmark
- Subscribe
- Mute
- Subscribe to RSS Feed
- Permalink
- Notify Moderator
Please log in to access translation
Nov 01, 2014
01:24 PM
That's the neat thing, Tom; with both waves being exactly the same, there is a perfectly flat square for each cell. However putting the radius on the corner requires a boundary blend to get it back to the same elevation. Turns out this is one that Creo doesn't mind developing as a curvature blend.