Community Tip - If community subscription notifications are filling up your inbox you can set up a daily digest and get all your notifications in a single email. X
- Community
- Creo+ and Creo Parametric
- Analysis
- Re: detection of force at constraints
- Subscribe to RSS Feed
- Mark Topic as New
- Mark Topic as Read
- Float this Topic for Current User
- Bookmark
- Subscribe
- Mute
- Printer Friendly Page
detection of force at constraints
- Mark as New
- Bookmark
- Subscribe
- Mute
- Subscribe to RSS Feed
- Permalink
- Notify Moderator
detection of force at constraints
Hello all,
I am working on part in which i want to know the reaction forces acting on the constraints.
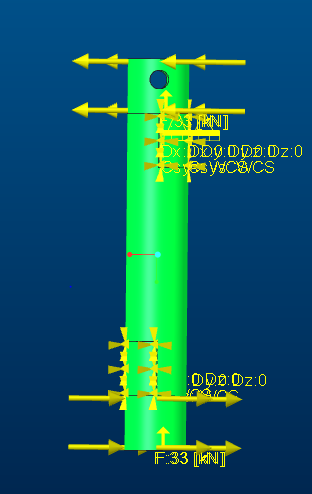
For that i have build a example in which you can see the forces acting on it and some constraints
is it possible to calculate the reaction forces in creo?
Thanks in advance for help
Solved! Go to Solution.
- Labels:
-
Simulate
Accepted Solutions
- Mark as New
- Bookmark
- Subscribe
- Mute
- Subscribe to RSS Feed
- Permalink
- Notify Moderator
The theory for a bolt in shear is just F/A so for this we might hand calculate 33kN / 256mm^2 = 146 MPa.
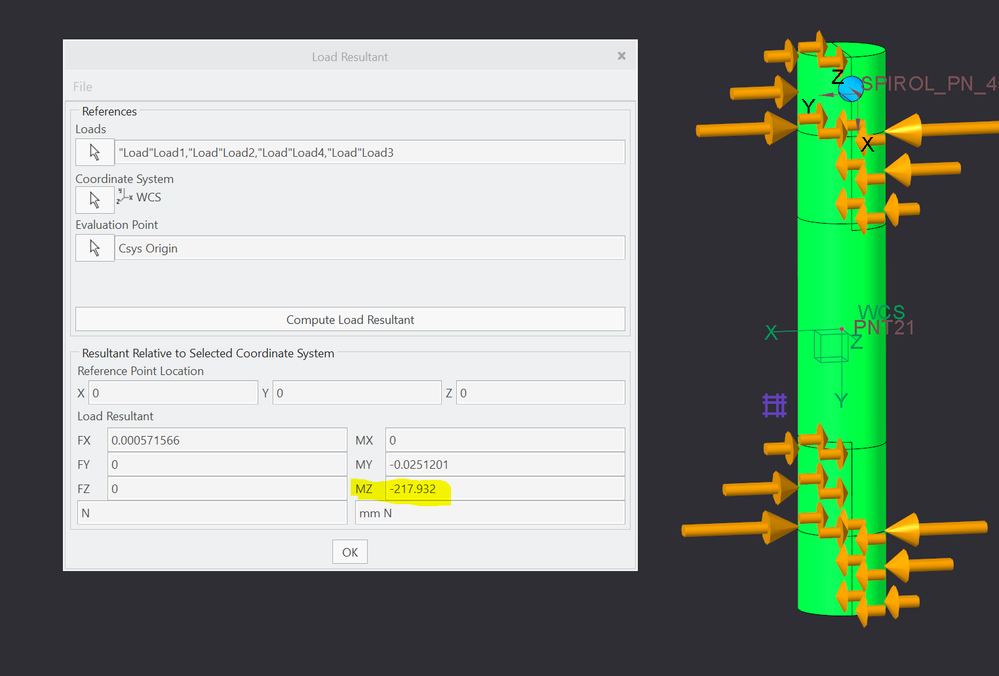
The problem is we need real boundary conditions that add 3 dimensional stresses and the loads cannot be on an infinitely thin shear plane. To avoid problems with stress near constraints, we use inertia relief and balance our forces. To simulate the actual contact force distribution we make some assumptions that the bearing load tapers like a cosine around the cylinder to zero at the "sides" (Z direction). Since the components doing shearing are not infinitely thin, we assume a ramp force where the force distribution is 0.0 at the contact away from the shear plane and 1.0 at the shear plane. (y direction) As the thickness where the taper occurs reduces, the bending stresses reduce, however local contact forces increase. The hand calculation for shear ignores these affects and only looks at the average stress in the cross section. In a real situation other stresses are present due to bending because of the thickness of the "shears". As shown, if you carefully examine the stresses near the center of the component using sections, you will see that there is a center stress approaching the 146MPa, however as we move out from the center we add other, real stresses.
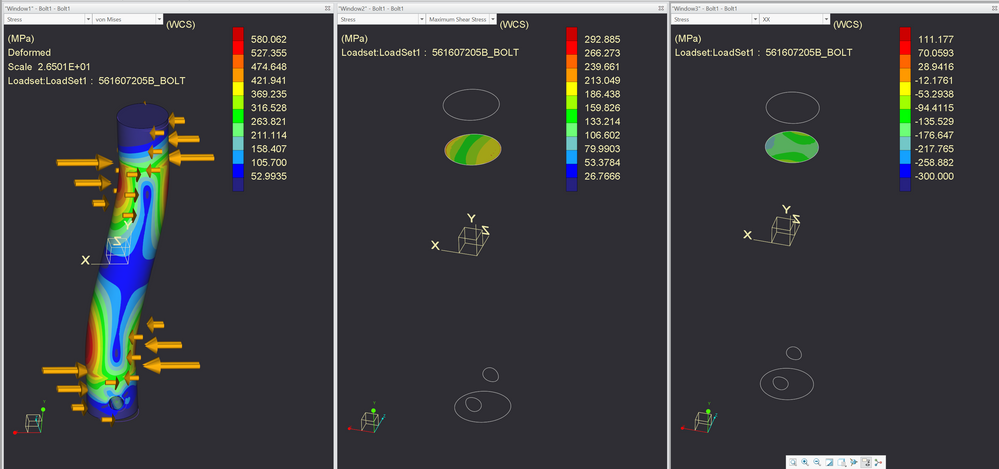
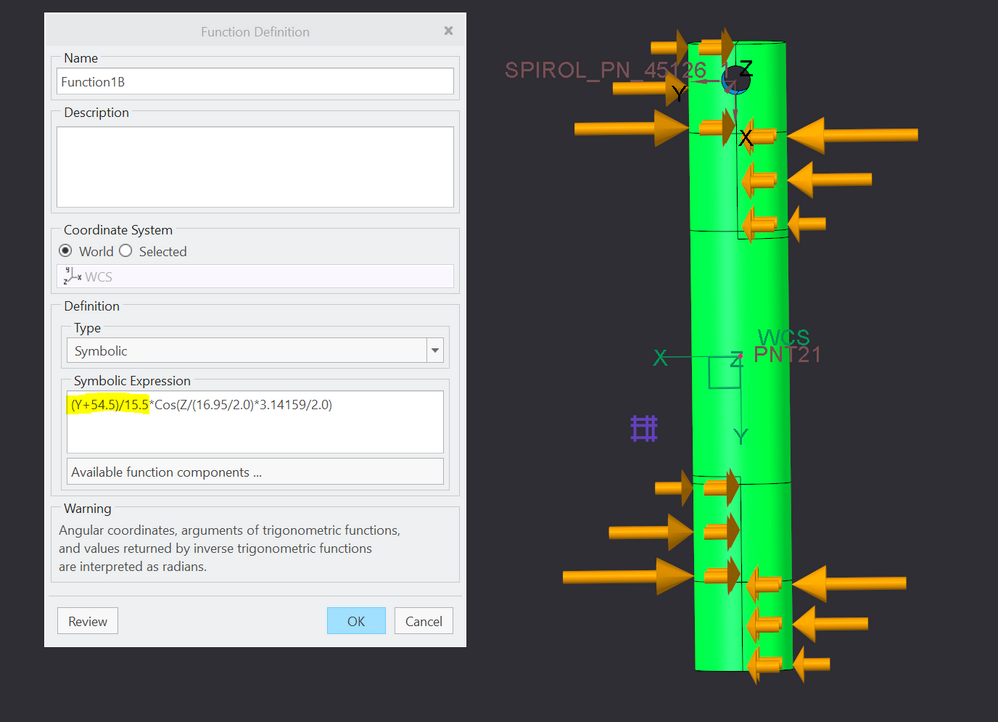
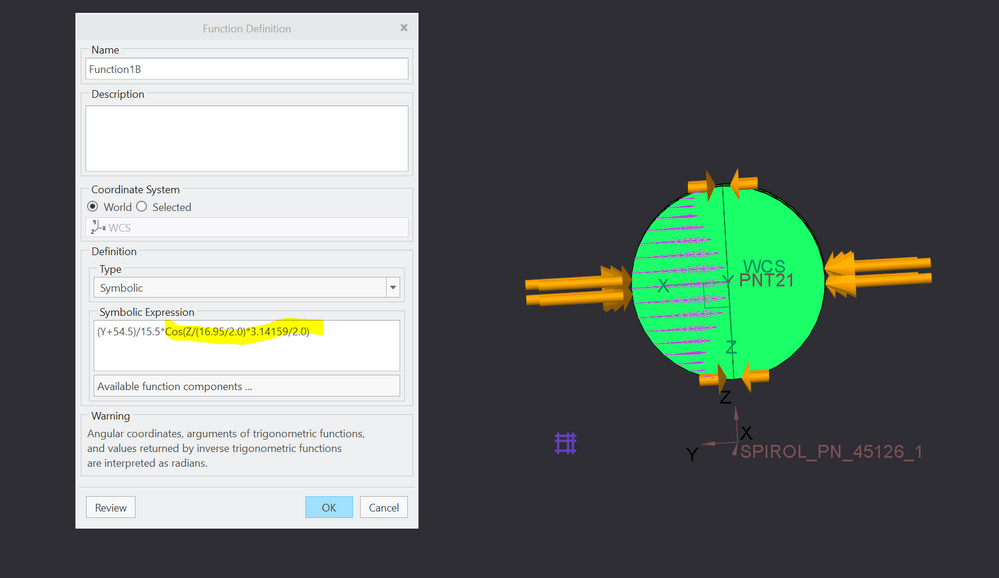
For the load magnitude where you previously had constraints, you can use a FBD to calculate, assuming the force is applied 2/3 along the ramped force. Then you can use "review total load" as shown below the hand calculation to determine the residual moment and adjust/tweak to minimize this residual. Once the residual is small, inertia relief can be used.

Now I have some final thoughts on shear failure. When the shear stress = failure by the hand calculation this means the stress through the entire section averages at failure. The effect is essentially an instant catastrophic failure through the section However, when there are bending stresses at failure on the outside of the component, damage occurs but it is not catastrophic depending on how brittle the material is. As some of the material is damaged or yielded, this damaged material then follows a tangent modulus much lower than the elastic modulus. The nearby un-yielded material still follows the elastic modulus and absorbs the force. This allows the force to climb above initial damage conditions much more rapidly than in shear stress. In shear the whole cross section reaches damage at relatively the same force.
It is for these reasons that the engineers judgment determines when the situation is pure shear and therefore F/A = shear stress hand calculation is appropriate. Also, I assume that the shear capability of a design is the maximum capability. It only goes down from there. Furthermore if it can reasonably shear up to 45 degrees to the load, and anywhere that is a smaller cross section than in the load direction, I use that section for the shear failure hand calculation. This does not apply to your pin since the section is smallest parallel to the load.
Finally, how close your design comes to meeting the pure shear/maximum strength condition will depend on many things such as dimensions/fits/materials/heat treatment/wear affecting the actual contact force distribution and how the components absorb damage. One example is that as the components wear, the contact forces smooth out, which might seem good however the fit becomes looser such that more bending of the shaft can happen, and thus bending stress + shear stress. Also, the smoother contact forces are probably moving the applied force "center" away from the shear plane, adding to bending.
Anyway, hopefully this helps someone, and if the community would please criticize if I am wrong in my thoughts anywhere? How do your industries approach this?
- Mark as New
- Bookmark
- Subscribe
- Mute
- Subscribe to RSS Feed
- Permalink
- Notify Moderator
Hi, you have to make measures on the target constraint (see pic).
One can also has a graph of displacement, stress and so on over a specified edge or chain.
- Mark as New
- Bookmark
- Subscribe
- Mute
- Subscribe to RSS Feed
- Permalink
- Notify Moderator
Hey gfraulini,
thank you for your reply
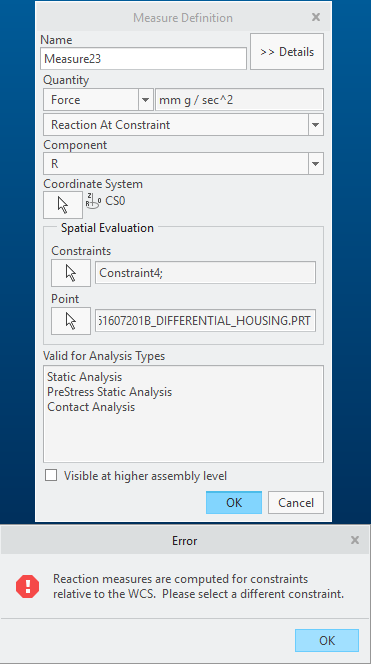
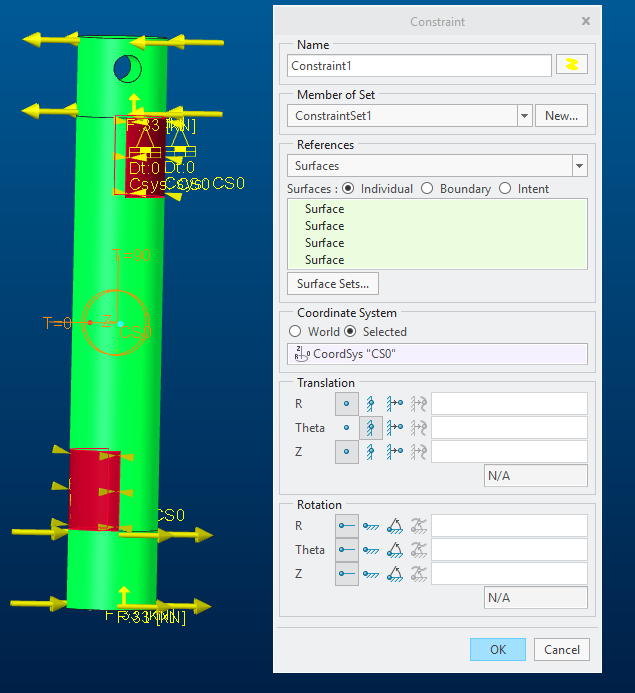
Actually, I have defined my constraints in a cylindrical coordinate system and as I am trying to define a measure with it. Creo is showing an error. I have also tried to change the coordinate system of the forces as cylindrical.
But still, it is showing the same error.
Is there any other method to it for cylindrical system?
- Mark as New
- Bookmark
- Subscribe
- Mute
- Subscribe to RSS Feed
- Permalink
- Notify Moderator
Might you attach the model?
- Mark as New
- Bookmark
- Subscribe
- Mute
- Subscribe to RSS Feed
- Permalink
- Notify Moderator
- Mark as New
- Bookmark
- Subscribe
- Mute
- Subscribe to RSS Feed
- Permalink
- Notify Moderator
I don't see any cylindrical system...
- Mark as New
- Bookmark
- Subscribe
- Mute
- Subscribe to RSS Feed
- Permalink
- Notify Moderator
I am not able to see it also but it is defines and the constraints are related to the cylindrical system only.
if you just open the constraints then you can see it clearly
- Mark as New
- Bookmark
- Subscribe
- Mute
- Subscribe to RSS Feed
- Permalink
- Notify Moderator
Ok. I have not seen it on screen but it is in the tree.
It seems measure needs the constraint might be relative to the WCS.
I advise you the model is insufficiently constrained.
- Mark as New
- Bookmark
- Subscribe
- Mute
- Subscribe to RSS Feed
- Permalink
- Notify Moderator
It seems measure needs the constraint might be relative to the WCS.
--So you are saying that it is not possible with cylindrical constraints?--
I advise you the model is insufficiently constrained
--thanks, i would look into it. but how do you know? as a newbie i cant understand what u r actually saying.--
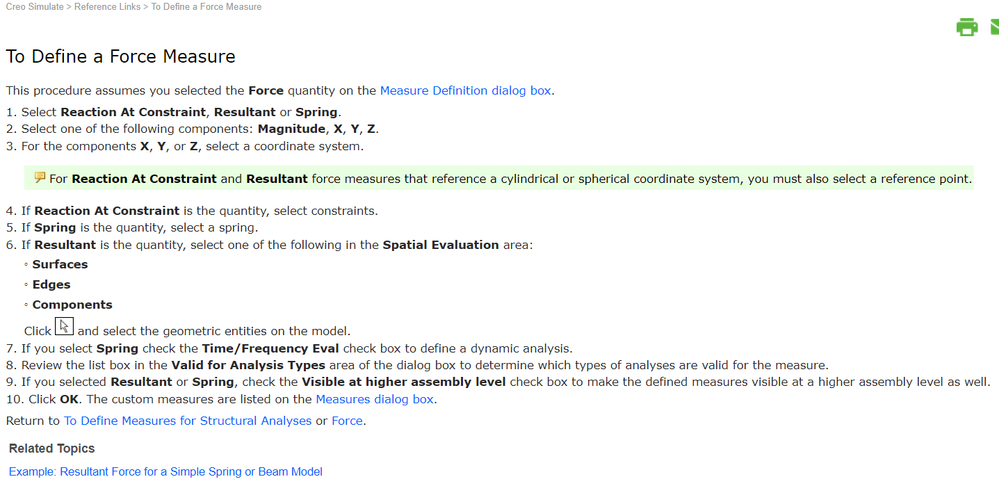
The documentation in the creo website shows that it is possible to create a measure in cylindrical coordinate
please follow the 3rd point
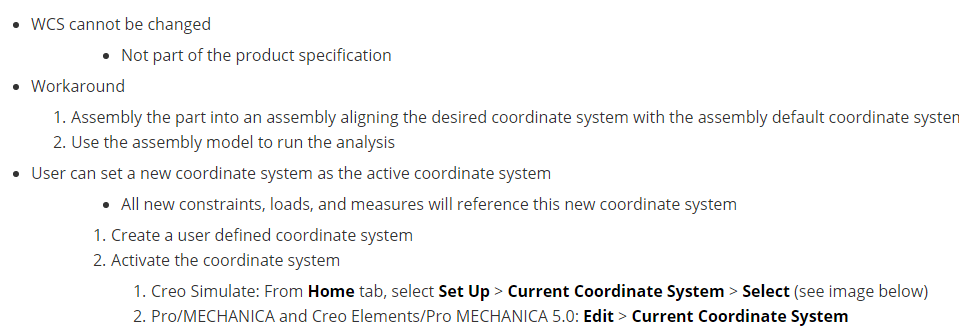
And also it is nor possible to change the world coordinate system.(https://www.ptc.com/en/support/article/CS71234)
What should i do in this case?
- Mark as New
- Bookmark
- Subscribe
- Mute
- Subscribe to RSS Feed
- Permalink
- Notify Moderator
I did some trials and you can make a measure like that, on a cil sys BUT the constraint MUST be related on the WCS.
Then, you can make your other cys and obtain the correspondents components.
Other topic: the lability.
As you can see in the previus pic, if you run the total load calculation it returns components in directions you leaved free. Furthermore if you run the analysis it tells you.
Bye
- Mark as New
- Bookmark
- Subscribe
- Mute
- Subscribe to RSS Feed
- Permalink
- Notify Moderator
The theory for a bolt in shear is just F/A so for this we might hand calculate 33kN / 256mm^2 = 146 MPa.
The problem is we need real boundary conditions that add 3 dimensional stresses and the loads cannot be on an infinitely thin shear plane. To avoid problems with stress near constraints, we use inertia relief and balance our forces. To simulate the actual contact force distribution we make some assumptions that the bearing load tapers like a cosine around the cylinder to zero at the "sides" (Z direction). Since the components doing shearing are not infinitely thin, we assume a ramp force where the force distribution is 0.0 at the contact away from the shear plane and 1.0 at the shear plane. (y direction) As the thickness where the taper occurs reduces, the bending stresses reduce, however local contact forces increase. The hand calculation for shear ignores these affects and only looks at the average stress in the cross section. In a real situation other stresses are present due to bending because of the thickness of the "shears". As shown, if you carefully examine the stresses near the center of the component using sections, you will see that there is a center stress approaching the 146MPa, however as we move out from the center we add other, real stresses.


For the load magnitude where you previously had constraints, you can use a FBD to calculate, assuming the force is applied 2/3 along the ramped force. Then you can use "review total load" as shown below the hand calculation to determine the residual moment and adjust/tweak to minimize this residual. Once the residual is small, inertia relief can be used.


Now I have some final thoughts on shear failure. When the shear stress = failure by the hand calculation this means the stress through the entire section averages at failure. The effect is essentially an instant catastrophic failure through the section However, when there are bending stresses at failure on the outside of the component, damage occurs but it is not catastrophic depending on how brittle the material is. As some of the material is damaged or yielded, this damaged material then follows a tangent modulus much lower than the elastic modulus. The nearby un-yielded material still follows the elastic modulus and absorbs the force. This allows the force to climb above initial damage conditions much more rapidly than in shear stress. In shear the whole cross section reaches damage at relatively the same force.
It is for these reasons that the engineers judgment determines when the situation is pure shear and therefore F/A = shear stress hand calculation is appropriate. Also, I assume that the shear capability of a design is the maximum capability. It only goes down from there. Furthermore if it can reasonably shear up to 45 degrees to the load, and anywhere that is a smaller cross section than in the load direction, I use that section for the shear failure hand calculation. This does not apply to your pin since the section is smallest parallel to the load.
Finally, how close your design comes to meeting the pure shear/maximum strength condition will depend on many things such as dimensions/fits/materials/heat treatment/wear affecting the actual contact force distribution and how the components absorb damage. One example is that as the components wear, the contact forces smooth out, which might seem good however the fit becomes looser such that more bending of the shaft can happen, and thus bending stress + shear stress. Also, the smoother contact forces are probably moving the applied force "center" away from the shear plane, adding to bending.
Anyway, hopefully this helps someone, and if the community would please criticize if I am wrong in my thoughts anywhere? How do your industries approach this?

