
Turn on suggestions
Auto-suggest helps you quickly narrow down your search results by suggesting possible matches as you type.
Showing results for
Please log in to access translation
Turn on suggestions
Auto-suggest helps you quickly narrow down your search results by suggesting possible matches as you type.
Showing results for
Community Tip - Have a PTC product question you need answered fast? Chances are someone has asked it before. Learn about the community search. X
- Community
- Creo+ and Creo Parametric
- Customization
- Re: Counting the numbers of perimeters using J-lin...
Translate the entire conversation x
Please log in to access translation
Options
- Subscribe to RSS Feed
- Mark Topic as New
- Mark Topic as Read
- Float this Topic for Current User
- Bookmark
- Subscribe
- Mute
- Printer Friendly Page
Counting the numbers of perimeters using J-link
Aug 04, 2014
02:38 PM
- Mark as New
- Bookmark
- Subscribe
- Mute
- Subscribe to RSS Feed
- Permalink
- Notify Moderator
Please log in to access translation
Aug 04, 2014
02:38 PM
Counting the numbers of perimeters using J-link
Hi!
I need to know the numbers of perimeters of sheetmetal, because I use the value to calculate the LASER machine timing.
The image below shows an example.
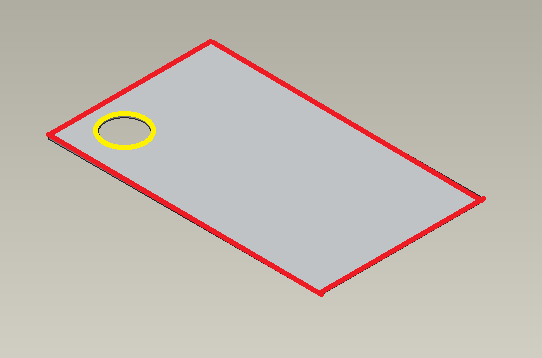
As you can see, the red area is 1 (one) perimeter, and the yellow area is 1 (one) perimeter, totaling 2 (two) perimeters. The result that I’m looking for is the 2 (two).
I tried to use development tools like Jlink and Weblink, but didn’t find anything as expected.
Has anyone done something similar?
Thank you!
Labels:
- Labels:
-
Jlink
- Tags:
- group discussion
6 REPLIES 6
Aug 05, 2014
11:30 AM
- Mark as New
- Bookmark
- Subscribe
- Mute
- Subscribe to RSS Feed
- Permalink
- Notify Moderator
Please log in to access translation
Aug 05, 2014
11:30 AM
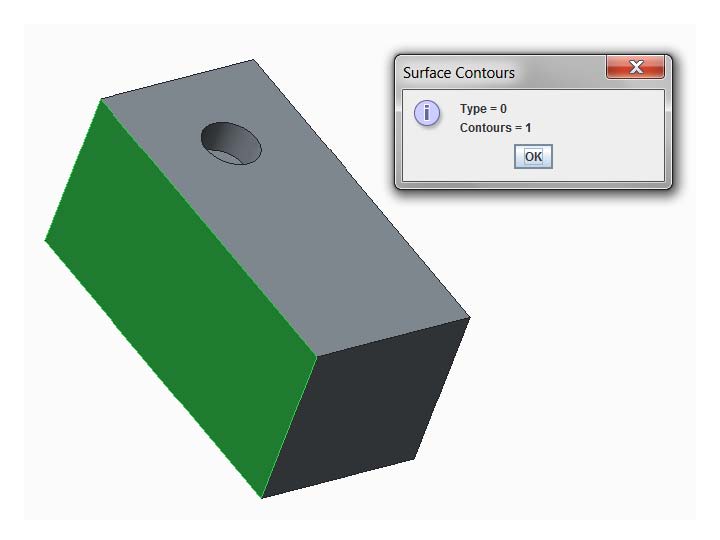
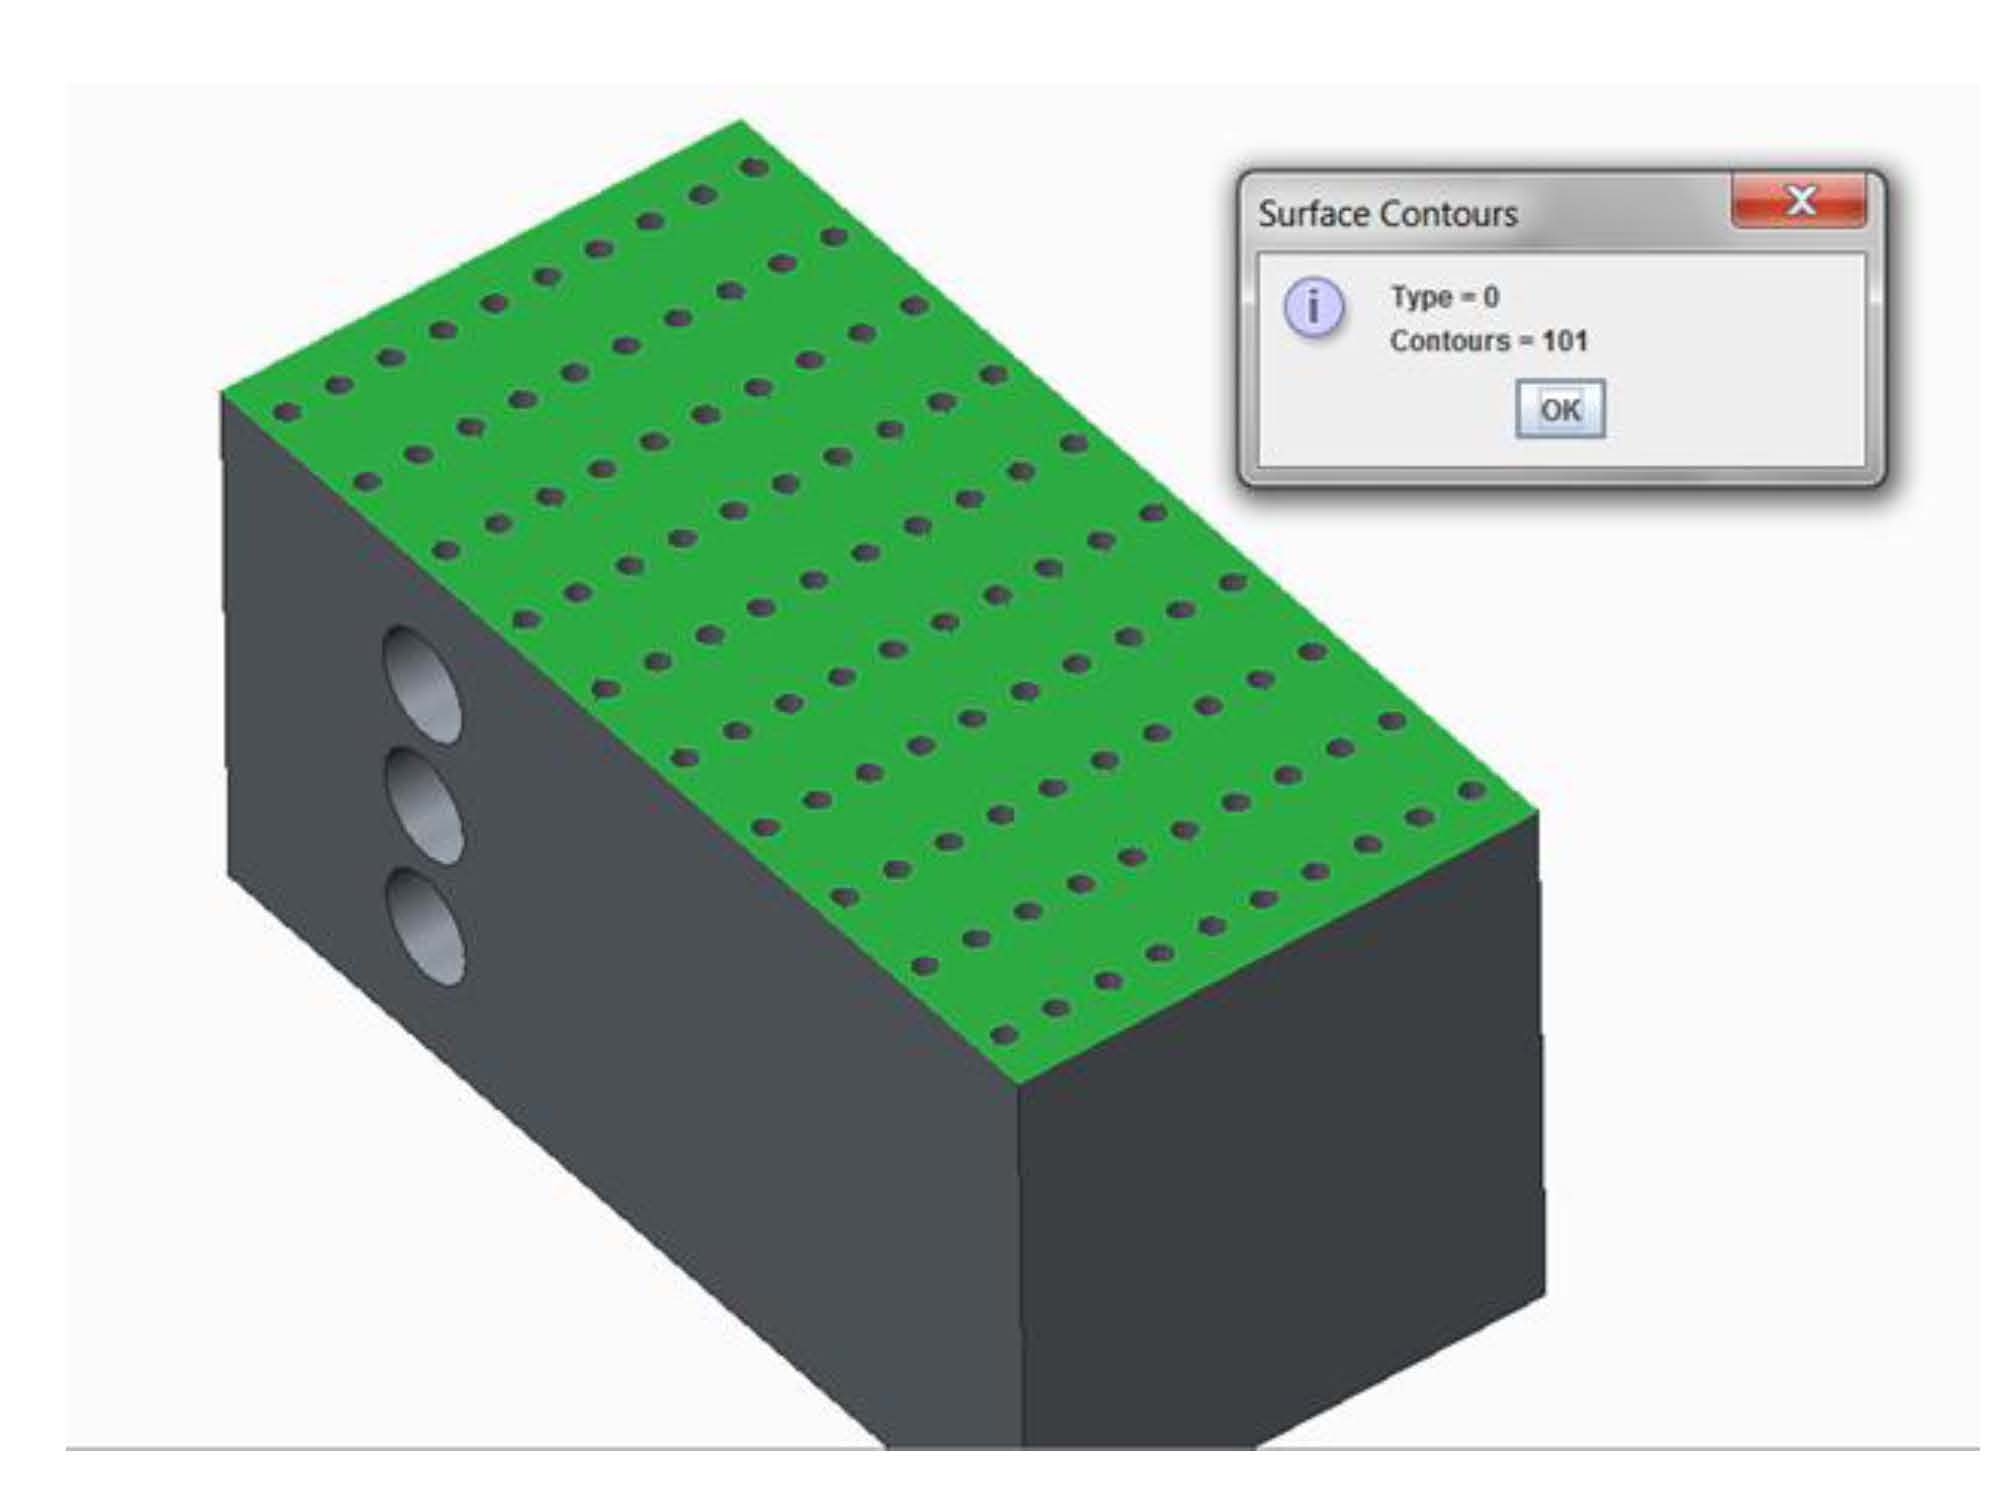
J-Link will get that for you. Those are Contours. You need to get the feature, get the surface, then get the contours.
Try This...It will let you interactively select a surface and outputs a message box with the Contour count.
It works on a standard part. Since I don't use sheetmetal parts very often we may need to tweek it a bit but I think it should work.
try {
//Get current Model
Model model = curSession.GetCurrentModel();
//Set Selection options
//NOTE: See "Interactive Selection" in the jlinkug for options other than "surface"
SelectionOptions options = pfcSelect.SelectionOptions_Create ("surface");
//Set the maximum number of items that you can pick
options.SetMaxNumSels (new Integer (1));
//Run the method using the set options
while(true){
selectSurface(curSession, options);
}
} catch (jxthrowable e) {
e.printStackTrace();
}
}
private static void selectSurface(Session curSession, SelectionOptions options) throws jxthrowable{
//Get the selection
Selections selections = curSession.Select (options, null);
//Cycle thru all items in the selection array (In this case its just 1)
for(int j=0; j<selections.getarraysize();j++){
//Select the current item
ModelItem item = selections.get(j).GetSelItem();
//get the surface feature
Surface surf = (Surface)item;
//get the surface type
SurfaceType sfType = surf.GetSurfaceType();
//Check surface Type & Visibility
if (sfType == SurfaceType.SURFACE_PLANE && surf.GetIsVisible())
{
//If True List all Contours on the surface
Contours contours = surf.ListContours();
//Output to message box or wherever you want the info
JOptionPane.showMessageDialog(null, "Type = " +sfType.getValue()+"\nContours = " +contours.getarraysize(),
"Surface Contours",JOptionPane.INFORMATION_MESSAGE);
}else {
//If False skip or add a message if you like
}
}
}
}
Aug 06, 2014
09:46 AM
- Mark as New
- Bookmark
- Subscribe
- Mute
- Subscribe to RSS Feed
- Permalink
- Notify Moderator
Please log in to access translation
Aug 06, 2014
09:46 AM
Thanks for answering.
If it’s not too much trouble, would you make a brief step by step of how to start it on J-link? I’m a beginner on J-link.
I work with Java, however, I’d like to know what I should do, if there is any special feature to create the classes, how to setup Creo and if I use the classes or the “*.jar” files.
Thank you!
Aug 06, 2014
12:47 PM
- Mark as New
- Bookmark
- Subscribe
- Mute
- Subscribe to RSS Feed
- Permalink
- Notify Moderator
Please log in to access translation
Aug 06, 2014
12:47 PM
This is the route that I took. Since you know Java already it sould be pretty easy.
1) Install a good Java IDE. I use Eclipse. Unless you like using a text editor.
One note, if using an IDE make sure you set it up to compile in the correct Java version for the ProE version you are running and you also need to attach the pfc.jar library found in your PTC installation folder (<Install Dir>/Common Files/<Build>/text/java) to your Java Build Path.
2) Go thru the jlink users guide. (search for jlinkug.pdf in the install folder). The first section, Setting Up J-Link, is how to install and get JLink up and running. You will most likely be confused but maybe not.
3) Go to http://inversionconsulting.blogspot.com/search/label/J-Link. Part 1 and 2 give you more insight on getting JLink started. They do a good job of explaning the protk.dat file. They also have a "HelloWorld" program. Note: I am not affiliated with Inversion in any way but I did gain more insight using their blog. Parts 3 & 4 are good for later on when you get going.
4) Go back to the Users Guide it should make a little more sence now.
5) There are tutorials on PTC that go with the exercises found in your installation directory. They are hard to find. Search eSupport for "JLink Tutorial Exercise". Start with Exercise 1. If you are familliar with Java, this should get you up and running.
6) Finish the rest of the Exercises (2-6). By then you should be ready to voyage on your own.
7) When stumped don't be affraid to call PTC. They have a really good support Engineer Mr. Seshu Gudla that has helped me on numerous occasions.
😎 Repeat steps 2-7 randomly until you get it to work!!!
***************************************************************************************************************************
This is how I set up Creo for initial programming.
Create a special JLink working directory (ex: C:\Workspace\jlink_tools\)
Notice there are no spaces in the directory name. Spaces can cause problems.
Place/Create your program in this directory. (Your *.java files)
Compile your program which creates a Bin directory with *.class files.
Place the protk.dat file in the same directory as the compiled files. (C:\Workspace\jlink_tools\Bin)
On your desktop, make a copy of the Creo Icon and rename it to something like "Creo JLink"
Modify the new Icon to startup in the compiled directory. (C:\Workspace\jlink_tools\Bin)
Start Creo using the new Icon. If no errors occur on startup, open a part, select "Auxiliary Applications from the Tools tab. If all is good, the Aux App. window will list the status as "Running".
From there it depends on how you have your program set up. Some API's start by themselves others create Icons that you pick from the Ribbon.
Note: If you want to startup outside the Bin directory add "java_app_classpath" to the protk.dat file
Example:
name JlinkTools
startup java
java_app_class Tools
java_app_start start
java_app_stop stop
allow_stop true
delay_start false
java_app_classpath C:\Workspace\jlink_tools\Bin\JlinkTools <-- Add this line
text_dir C:\Workspace\jlink_tools\Bin\JlinkTools/text
REVISION 0.0
end
Hope that helps...
Oct 06, 2014
09:41 AM
- Mark as New
- Bookmark
- Subscribe
- Mute
- Subscribe to RSS Feed
- Permalink
- Notify Moderator
Please log in to access translation
Oct 06, 2014
09:41 AM
I understood and made J-link work.
I started working on the perimeter counting. For solid parts, it worked perfectly, but for sheetmetal parts, it’s not getting as I expected.
We use lots of sheetmetal, nearly 90%. I thought to do this way:
1) To create the Flat Pattern;
2) To create a Section Planar;
3) To create a Curve from Cross Section;
After that, I would count through the Curve. I tried all sorts of ways but didn’t succeed.
Is there anyone who could help?
Thank you!
Oct 06, 2014
03:15 PM
- Mark as New
- Bookmark
- Subscribe
- Mute
- Subscribe to RSS Feed
- Permalink
- Notify Moderator
Please log in to access translation
Oct 06, 2014
03:15 PM
Can you post a screen shot of what you are picking and what the results are?
Oct 08, 2014
09:46 AM
- Mark as New
- Bookmark
- Subscribe
- Mute
- Subscribe to RSS Feed
- Permalink
- Notify Moderator
Please log in to access translation
Oct 08, 2014
09:46 AM
I managed to make it work!
Thank you!
Announcements


Top Tags
