Community Tip - Did you get an answer that solved your problem? Please mark it as an Accepted Solution so others with the same problem can find the answer easily. X
- Community
- Creo+ and Creo Parametric
- 3D Part & Assembly Design
- Creo Ribbon User Interface
- Subscribe to RSS Feed
- Mark Topic as New
- Mark Topic as Read
- Float this Topic for Current User
- Bookmark
- Subscribe
- Mute
- Printer Friendly Page
Creo Ribbon User Interface
- Mark as New
- Bookmark
- Subscribe
- Mute
- Subscribe to RSS Feed
- Permalink
- Notify Moderator
Creo Ribbon User Interface
You can read the Desktop Tip of the Month here also authored by Scot Zundel and you can also read the Enterprise Product Focus of the Month here and the Enterprise Tip of the Month here authored by John Peng.
| PTC Technical Specialists Newsletter - Summer 2011 |
Desktop Product Focus : Creo Ribbon User Interface |
|---|
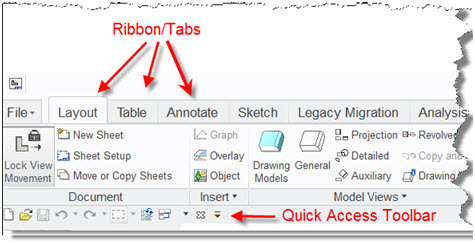
PTC started implementing the Ribbon User Interface in detailing section of Pro/ENGINEER Wildfire 5.0 following the Microsoft Office 2007 paradigm. The reason for the switch is that the Ribbon User Interface makes it easier and quicker to find functions and explore more advanced function with greater ease (click for more information). In the Ribbon UI, functions are logically categorized on different tabs by tasks that they are associated with. For example, in detailing Layout tab has the functions to insert model views and the Table tab has functions to create BOM tables. Another benefit of the Ribbon User Interface is that there is one common location for commands which saves space and focuses attention to one area on the screen.
A common objection to changing the User Interface is the difficulty finding the commands people use often. In Creo 1.0, there is the Command Search utility to make it easier to find task desired. Users can search for commands by typing all or part of the command name with no wildcards needed! Creo provides instant results feedback and when a command is selected the software will start the command and change tabs if necessary.
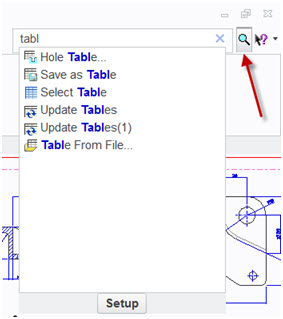
If you hover over a command, a tool tip will appear and it will highlight the function on the appropriate ribbon. This can be used to learn the location of commands for verification or teach you the location for future use.


At the bottom of the results are the Setup options. The match criteria can help filter unwanted results by limiting where the search word or letters are within the commands that match.
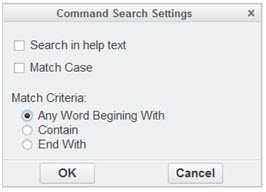
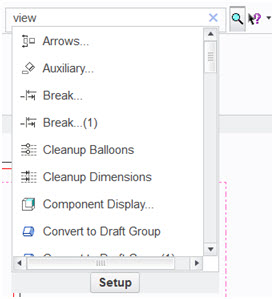
The Search in help text option will search the help center text and return results with the keyword in the text. For example, search for “view” and there are commands that do not “view” in the name, but the help text does contain “view” so it appears in the results. This can be helpful if you do not know the exact name of the command but know what it does.
In addition to advanced searching, users can switch tabs via keyboard shortcuts using the ALT key. Press and release the ALT key and letters will display next to the ribbon names, select the key of the appropriate ribbon e.g. Annotate and “S.”

New letters will appear will next to the commands on the selected tab which can be entered to start a command from the keyboard e.g. “A” to Show Model Annotations. Also, you can left click to deactivate the ALT selection process and pick the commands as usual. Using this shortcut requires less mouse travel and time when switching tabs between tasks.

For specialized tasks and user preference, the ribbon interface is easily customizable from what is displayed to how it is displayed. Now users can have large icons displayed for commonly used functions; toggle the display of icon labels; add and remove commands; add your own custom tabs; and many other options.
Right click in the ribbon space and select Customize the Ribbon. To change the display style of a command, select Modify and choose from Default Style, Small Button, Small Button - No Icon, Large Button, and Hide Common Label.

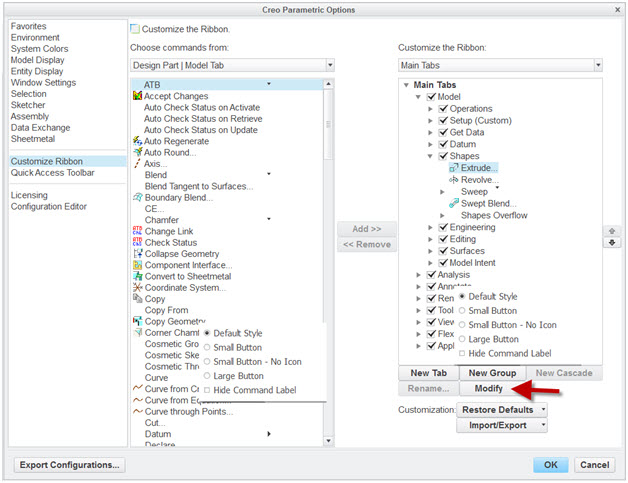
In this example, the command label is hidden for extrude and revolve is changed to a large button.

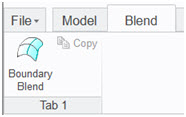
From the same dialogue box, there is the option to create a new major tab. This provides the uses the ultimate flexibility to organize the commands in a manner to fit their needs. To create a new tab, select new tab, select commands, and then Add >>.

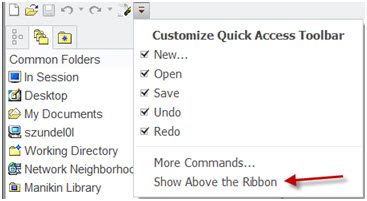
Lastly, there is a Quick Access Toolbar that is always displayed independent of the tab displayed for maximum visibility to commands of your choice. There are not options to change the display style, but there are two options of its location: above the Ribbon and below the Ribbon. Options for the Quick Access Toolbar are located under the drop-down arrow at the end of the toolbar.
- Labels:
-
2D Drawing
- Mark as New
- Bookmark
- Subscribe
- Mute
- Subscribe to RSS Feed
- Permalink
- Notify Moderator
The new ribbon interface is a mayor change and i think people will try to customize creating tabs. I am doing this but can´t replicate some features like 'overflow'.
For example: Part mode>Model tab>Operations section:

It is a drop-down list with more options. When i create a new tab i can´t configure this drop-down overflow. How could i do this?
- Mark as New
- Bookmark
- Subscribe
- Mute
- Subscribe to RSS Feed
- Permalink
- Notify Moderator
Javier,
You can configure the overflow with the tabs you created too. First create the operations you want. Next go back to the Ribbon in the UI (with customize the ribbon operation still active) and select an operation you want to move to the overflow. Hold the left move button and begin to move as shown below.

While still having it selected, move it to the Group name area, in this case Import Geometry, and release. Now you have that operation on the overflow.

- Mark as New
- Bookmark
- Subscribe
- Mute
- Subscribe to RSS Feed
- Permalink
- Notify Moderator
Hey John, it works! ![]()
My colleagues were asking for new tabs with tools more suited to our work. This way i can make it. Thanks for the tip!
- Mark as New
- Bookmark
- Subscribe
- Mute
- Subscribe to RSS Feed
- Permalink
- Notify Moderator
Another thing, I´ve created a custom tab in part mode. When i switch to assembly mode i would like to reuse the previously created tab but does not appear. Is there any way to copy or reuse the tab?
- Mark as New
- Bookmark
- Subscribe
- Mute
- Subscribe to RSS Feed
- Permalink
- Notify Moderator
I have submitted a new feature idea on this issue. Please vote it up.
https://community.ptc.com/t5/Creo-Parametric-Ideas/Ribbon-UI-Copy-Paste/idi-p/580540
- Mark as New
- Bookmark
- Subscribe
- Mute
- Subscribe to RSS Feed
- Permalink
- Notify Moderator
When will PTC complete the transition to the MS-like ribbon interface and implement feature driven tabs, so that when a feature is selected, the appropriate tab is activated?
The way it is now in Creo 2 the tab must be selected in order to select a feature.


