cancel
Showing results for 
Search instead for 
Did you mean: 
cancel
Showing results for 
Search instead for 
Did you mean: 

Community Tip - Learn all about the Community Ranking System, a fun gamification element of the PTC Community. X

Designing a cycloidal gear help

thegreenmachine
3-Visitor

Designing a cycloidal gear help

I recently found a tutorial using fusion 360 to design a cycloid, but it does not really line up to how creo works (https://www.youtube.com/watch?v=jQ6LQBFZXmU).


Is there any way i do an axial pattern as in the step at -8:25- and offset the same as -9:03-?


If there is any easy way do design a cycloid in creo im all ears, i have found a document creating one using parameters and relations but its all in mandarin and the relations dont make any sense or match up with other equations ive seen.

1 ACCEPTED SOLUTION

Accepted Solutions

Hi There,


For grins I just ran through this same exercise following what the guy did in the video. It's not too difficult. Let me give you the synopsis. The cycloid disc is the hardest part.

  1. Create a sketch. In that sketch create the exact same construction geometry that the video did (2 circles, one of diameter 33, the next constrained tangent to the first one at a diameter of 3.30).
  2. Create and dimension the two construction line angles exactly like the guy did in the video.
  3. You can now create 2 simple sketcher relations, exactly as the guy did in the video (except in Creo you do it in the Relations dialog box for the Sketcher dimensions):
    1. Set the diameter of the smaller circle to that of the larger diameter divided by 10 (his gear ratio).
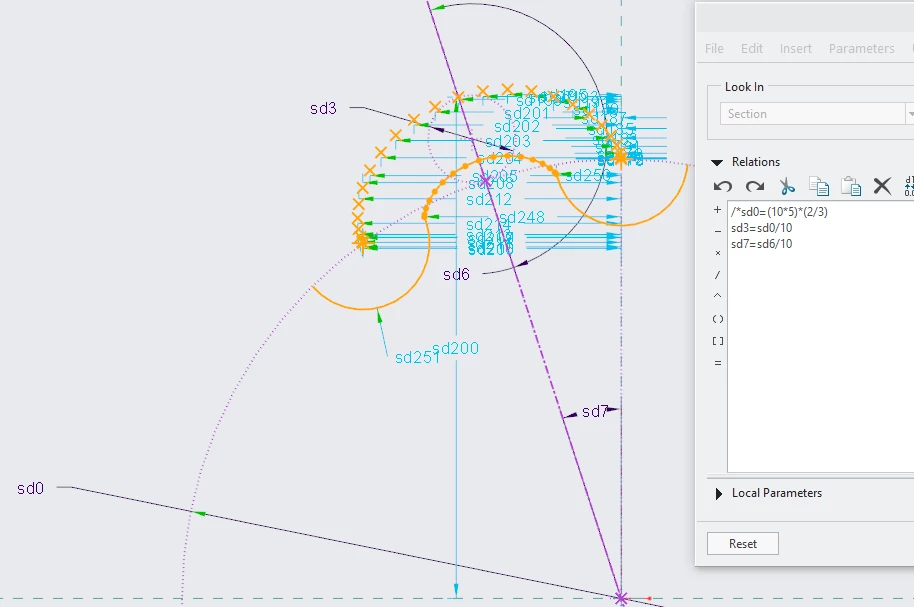
    2. Set the angle of the small circle location to that of the angle of the small straight line angle divided by 10 (his gear ratio).In the image here my final angle of the small circle location is 180 degree. In my image here I've already created the points and curves I explain next.
      1.png
  4. Now do exactly what the guy in the video did by starting the angle off at 5 degrees. Zoom in real close and place a geometry point at the same spot he did. Also create a point at the zero location, just as he did. Vary the angle for the first few points at 5 degree increments, then vary by 15 degrees, each time placing a point at the location of the small straight line and construction circle intersection. You have to delete the single Coincident constraint for each one of these points, which in turn creates 1 weak dimension per point.
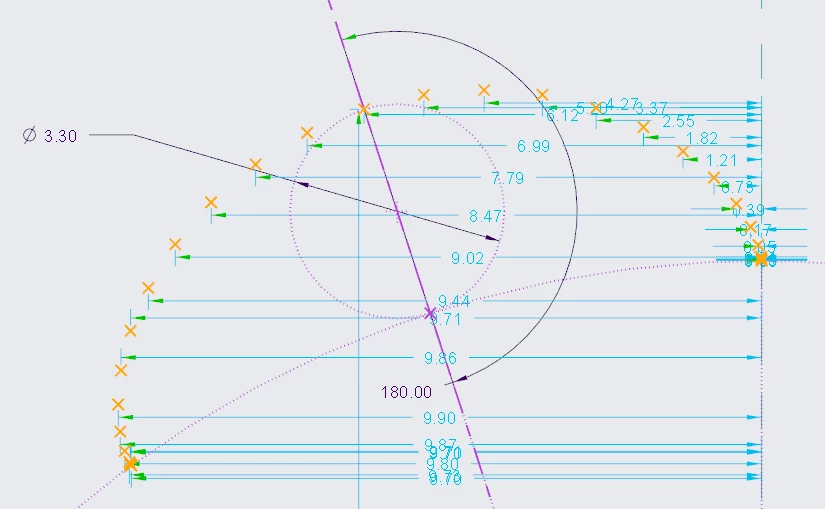
  5. Then create a centerline through the small construction circle centerpoint and the point at 180 degrees and mirror the points on the right so that you have an equivalent number of points on the left.
    2.png
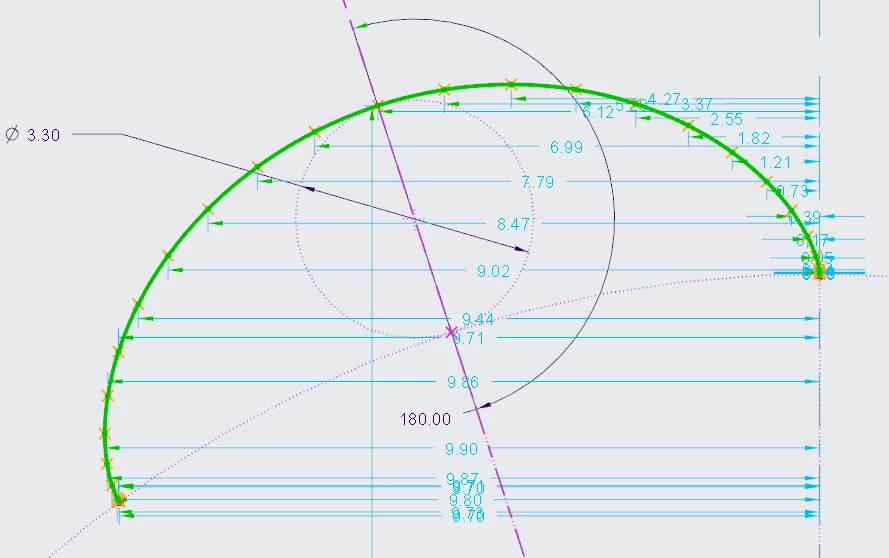
  6. Sketch a spline through all the points.
    3.png
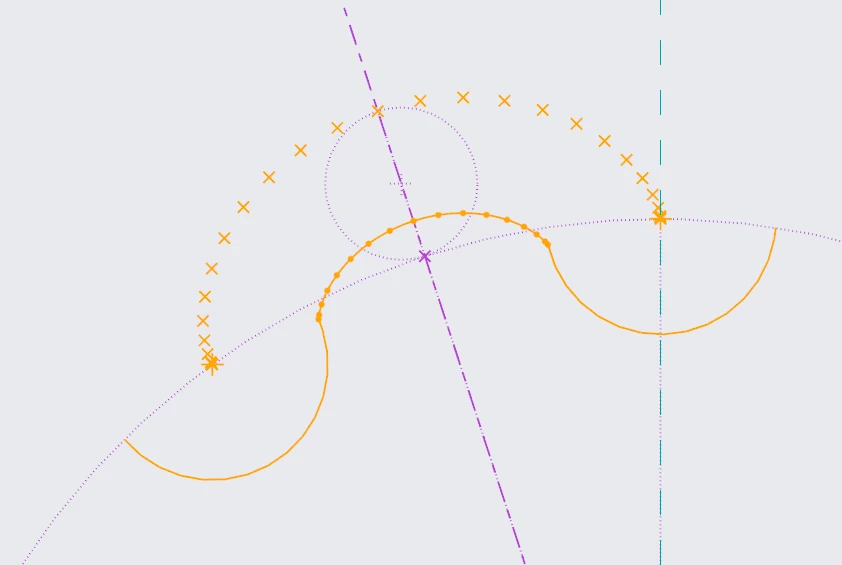
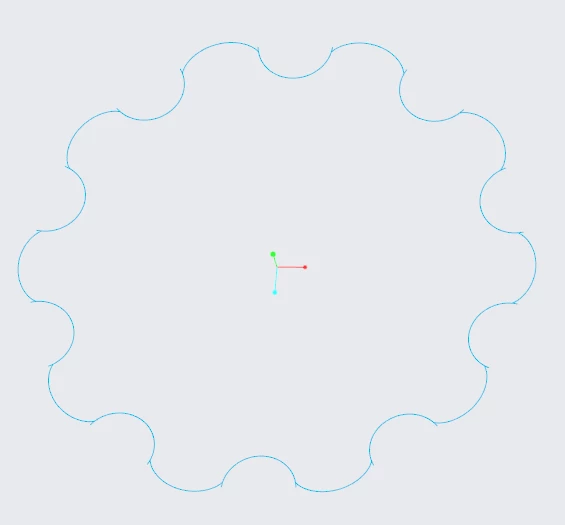
  7. Select the spline and offset it -2.50 (so that it goes inward). Then at the point at 0 degrees and 180 degrees sketch 2 circles that are of diameter 5 using those points as the circle centers. Divide the circles at the large construction circle intersection, then dynamically trim the circle segments you don't need. You also do have to trim a little of the spline at each end. You now end up with what I show here. (I also deleted the original spline, too, but kept the points).
    4.png
  8. Complete the sketch.
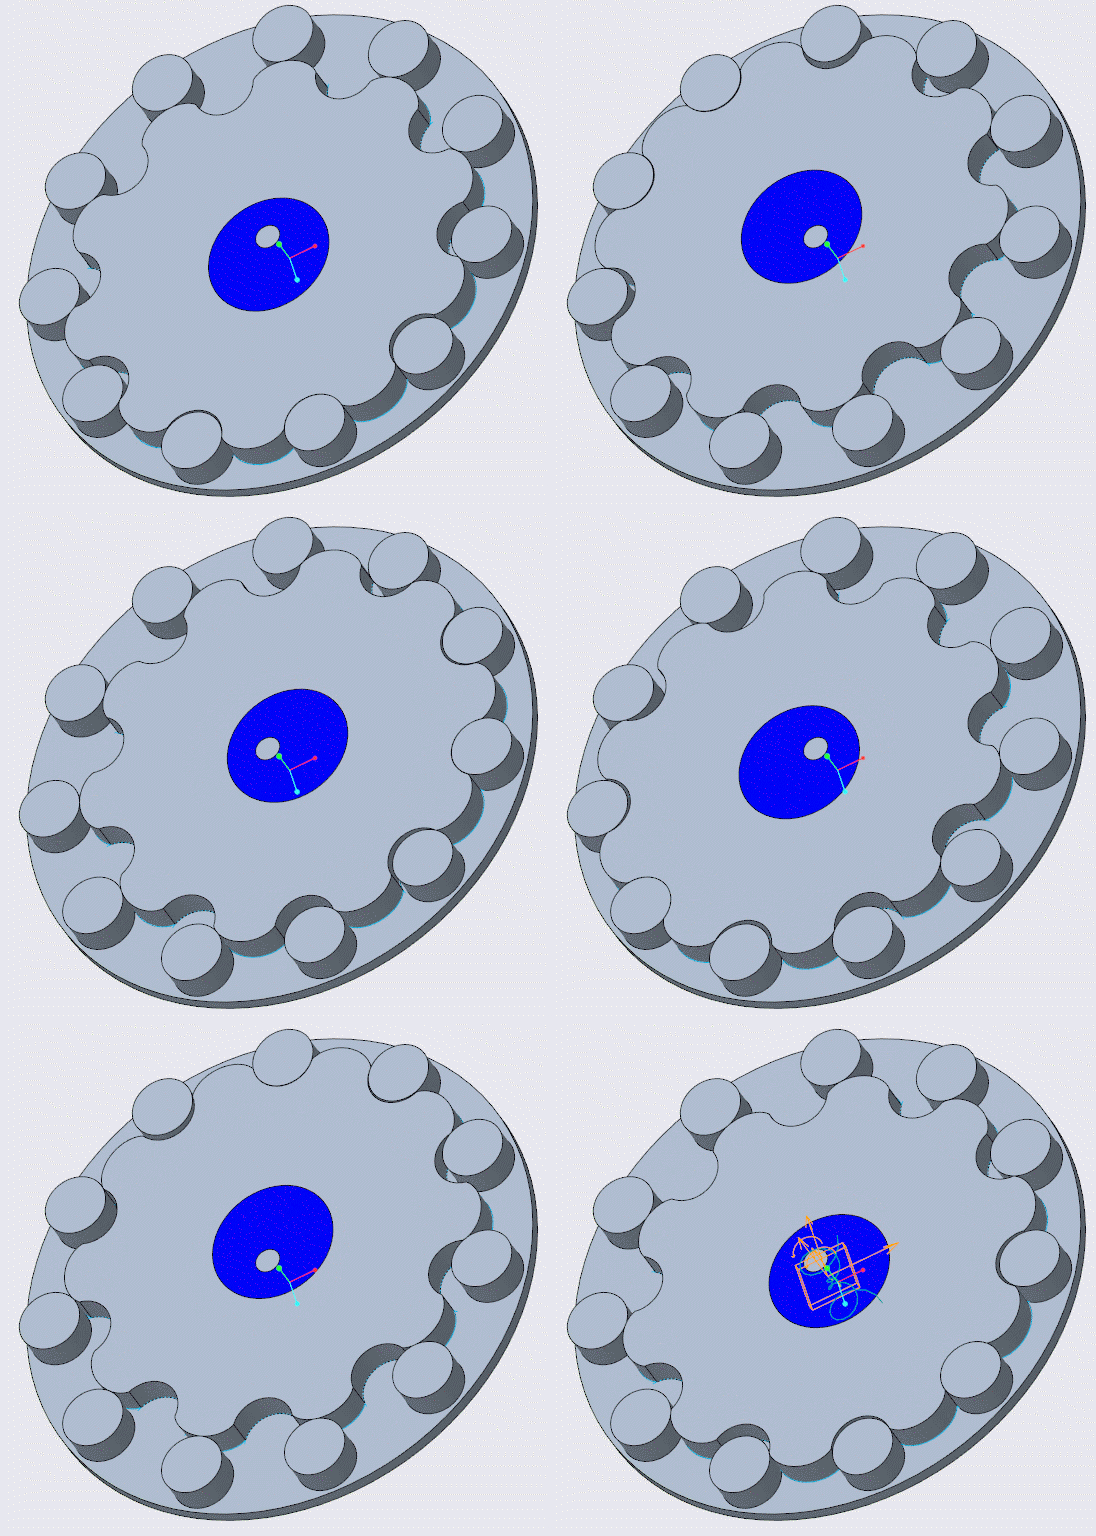
  9. Select the sketch and do an Axis pattern about the origin of 10 members and setting the angular extent (the system automatically equally spaces the 10 members about 360 degrees). You get this.
    5.png
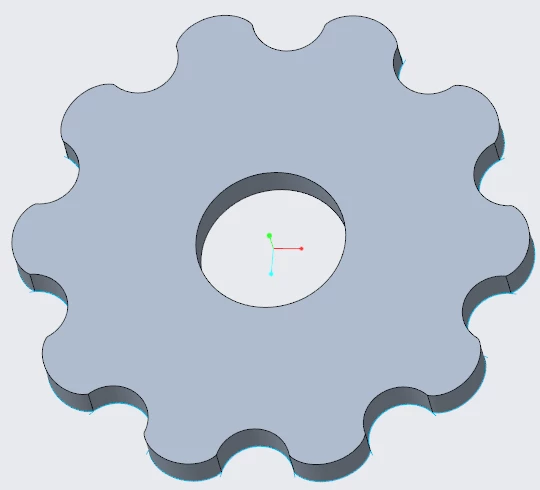
  10. I ended up using Sketch Region as my selection filter and selecting the whole region and extruding it up. I did this because I appear to have a few overhanging sketch entities that would not have created a successful extrude.
  11. Create the hole in the middle and you have the completed gear.
    6.png
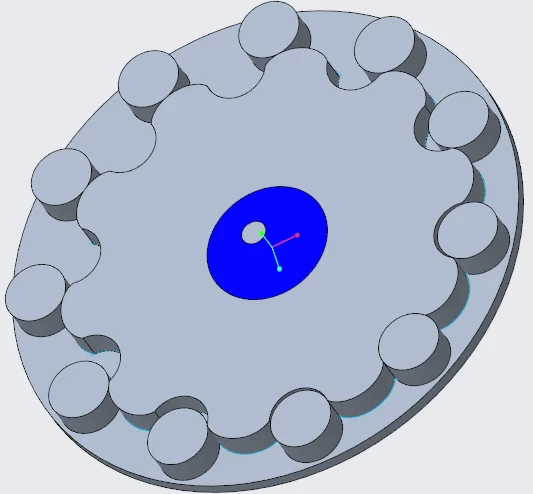
  12. Create the other 2 components and assemble them together using connections. I assembled the base first as Rigid, then the middle component using a Pin connection, and finally the gear around the center component using another Pin connection. That does it for any of the modeling stuff. You COULD create a parameter that specifies what the desired gear ratio is, and then use that parameter in the relations instead of dividing by 10. This was more a proof of concept for me so I didn't go that far into it. I manually just kind of tweaked the rotation so it looks right. I didn't set any initial conditions or anything that one could do. Again, proof of concept here...
    7.png
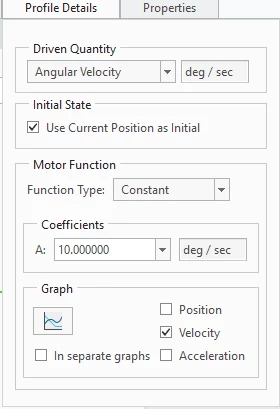
  13. At this point, enter into Mechanism mode and create 2 servo motors, specifying the Pin connection motion axes, one for each motor. Both servo motors should be Constant Function type and Driven Quantity of Angular Velocity. The motor for the center part I specified as 10 degrees/second, and the motor for the cycloidal gear at 11 degrees/sec, which is basically what the guy did with his revolute thing that he added the 360/10 part.
    8.png
  14. Then create a new analysis using both motors, give it a time (I specified 72 seconds), and Run it.
    cycloidal.gif
-------
Matt Huybrecht

View solution in original post

9 REPLIES 9

Adding @SRajoelina - Do we have this topic covered in our training courses? 

Hi There,


For grins I just ran through this same exercise following what the guy did in the video. It's not too difficult. Let me give you the synopsis. The cycloid disc is the hardest part.

  1. Create a sketch. In that sketch create the exact same construction geometry that the video did (2 circles, one of diameter 33, the next constrained tangent to the first one at a diameter of 3.30).
  2. Create and dimension the two construction line angles exactly like the guy did in the video.
  3. You can now create 2 simple sketcher relations, exactly as the guy did in the video (except in Creo you do it in the Relations dialog box for the Sketcher dimensions):
    1. Set the diameter of the smaller circle to that of the larger diameter divided by 10 (his gear ratio).
    2. Set the angle of the small circle location to that of the angle of the small straight line angle divided by 10 (his gear ratio).In the image here my final angle of the small circle location is 180 degree. In my image here I've already created the points and curves I explain next.
      1.png
  4. Now do exactly what the guy in the video did by starting the angle off at 5 degrees. Zoom in real close and place a geometry point at the same spot he did. Also create a point at the zero location, just as he did. Vary the angle for the first few points at 5 degree increments, then vary by 15 degrees, each time placing a point at the location of the small straight line and construction circle intersection. You have to delete the single Coincident constraint for each one of these points, which in turn creates 1 weak dimension per point.
  5. Then create a centerline through the small construction circle centerpoint and the point at 180 degrees and mirror the points on the right so that you have an equivalent number of points on the left.
    2.png
  6. Sketch a spline through all the points.
    3.png
  7. Select the spline and offset it -2.50 (so that it goes inward). Then at the point at 0 degrees and 180 degrees sketch 2 circles that are of diameter 5 using those points as the circle centers. Divide the circles at the large construction circle intersection, then dynamically trim the circle segments you don't need. You also do have to trim a little of the spline at each end. You now end up with what I show here. (I also deleted the original spline, too, but kept the points).
    4.png
  8. Complete the sketch.
  9. Select the sketch and do an Axis pattern about the origin of 10 members and setting the angular extent (the system automatically equally spaces the 10 members about 360 degrees). You get this.
    5.png
  10. I ended up using Sketch Region as my selection filter and selecting the whole region and extruding it up. I did this because I appear to have a few overhanging sketch entities that would not have created a successful extrude.
  11. Create the hole in the middle and you have the completed gear.
    6.png
  12. Create the other 2 components and assemble them together using connections. I assembled the base first as Rigid, then the middle component using a Pin connection, and finally the gear around the center component using another Pin connection. That does it for any of the modeling stuff. You COULD create a parameter that specifies what the desired gear ratio is, and then use that parameter in the relations instead of dividing by 10. This was more a proof of concept for me so I didn't go that far into it. I manually just kind of tweaked the rotation so it looks right. I didn't set any initial conditions or anything that one could do. Again, proof of concept here...
    7.png
  13. At this point, enter into Mechanism mode and create 2 servo motors, specifying the Pin connection motion axes, one for each motor. Both servo motors should be Constant Function type and Driven Quantity of Angular Velocity. The motor for the center part I specified as 10 degrees/second, and the motor for the cycloidal gear at 11 degrees/sec, which is basically what the guy did with his revolute thing that he added the 360/10 part.
    8.png
  14. Then create a new analysis using both motors, give it a time (I specified 72 seconds), and Run it.
    cycloidal.gif
-------
Matt Huybrecht

Wow that is super thorough! It looks like the process is very similar up until you need to offset the spline, which is done in the sketch instead of out of it. I thought i tried that but maybe i did it wrong. I will give this a go, looks like i should have good luck with this walk through!


Thanks for jumping in, @Matt_Huybrecht ! Just for my own education - is this topic covered in any PTC University tutorials or classes?

Hey Bettina,


No, there is nothing like this in any of our PTCU content. We are going to start creating courses we refer to as "outcome-based" courses, and this would be a great example of an outcome-based course. The outcome is that you have a completed cycloidal gear assembly. That course would cover Sketcher, Part mode, Assembly mode, Assembly Connections, Relations, Parameters, and Mechanism. I think it would be really cool course, but also very niche.

-------
Matt Huybrecht

Any chance you have these models and could share I am struggling with the sane problem and would really appreciate the hand.

Thanks

Kevin

There are better options in Creo than in fusion 360

So instead of fitting trough points you can use either sweep trajpar equations or even easier if you just use datum -> curve from equation. The entire hypocycloid equation is simply


    radius = 20
    pins = 8
    eccentricity = 2

    x = radius * cos(t) + eccentricity * cos( t * pins)
    z = radius * sin(t) + eccentricity * sin( t * pins)

    y = 0


Set the range to 0 to 360, you can promote the named variables as parameters if you wish. Then just create a sketch chose offset and that curve type in your roller radius, done.


cycloid.png


NOTE: This works if you don't have a point where the point skids (which makes your design last longer, if you set parameters that skids then your function will just loop). If you do then you need to do it in segments like in the example, but still its better to use curve fitting instead of point fitting as the curve fitting ets it right even at the start of the curve.

Top Tags