Community Tip - Learn all about PTC Community Badges. Engage with PTC and see how many you can earn! X
- Community
- Augmented Reality
- Vuforia Studio and Chalk Tech Tips
- Using Area Targets in Vuforia Studio
- Subscribe to RSS Feed
- Mark as New
- Mark as Read
- Bookmark
- Subscribe
- Printer Friendly Page
- Notify Moderator
Using Area Targets in Vuforia Studio
With release 9.1.0, Vuforia Studio now supports Area Targets. Area Targets can be used when creating spatial instructions using the surroundings as interactive elements to be explored. For example, you can use an Area Target when you want to deliver augmentations to stationary objects in a scanned environment. You'll need to create an Area Target before you can import it into Vuforia Studio to leverage the Area Target widget. Below is an overview of the required steps to create and upload Area Targets for Vuforia Studio.
Step 1: Create a Vuforia Engine Developer Account
This account is separate from your regular PTC support account and is required to generate Area Targets.
Step 2: Download a Target Generator
Once you've created a Developer account, you'll need to download a target generator. The target generator you download will depend on the device used to scan your environment.
Vuforia Studio currently supports scans created with:
- Matterport Pro2 Camera
- Requires the Area Target Generator desktop application.
- iOS devices with LiDAR sensors
- Requires the iOS app Vuforia Area Target Creator to scan and create Area Targets
Step 3: Create an Area Target
Creating an Area Target using the Matterport Pro2 Camera:
- Log into the Vuforia Area Target Generator with your Vuforia Developer Credentials
- Select New Area Target from Matterport Scan
- Enter your Matterport token information
-
See Retrieving Models with the Matterport™ API Token for instructions on obtaining your token ID
-
- Enter the Scanned Space ID and Area Target Name
- The Scanned Space field is the Matterport™ SpaceID and a unique 11-digit ID that is associated with your individual scans.
- Find the unique ID of your scan by opening the scanned space from your Matterport™ account.
- Copy the entire URL, or just the SpaceID portion as illustrated and paste it into the Scanned Space field.
- Area Target name must not contain any spaces
- Select Create Area Target to generate an Area Target of your scan.
Full instructions for creating a scan and area target using the Matterport Pro2 Camera can be found here.
Creating an Area Target using the Vuforia Area Target Creator (requires internet connection):
- Login with your Vuforia Developer Credentials from step 1.
- Select the Plus Button to create a new scan and enter a scan name
- Start the scan
- Press the Stop Button to finish the scan
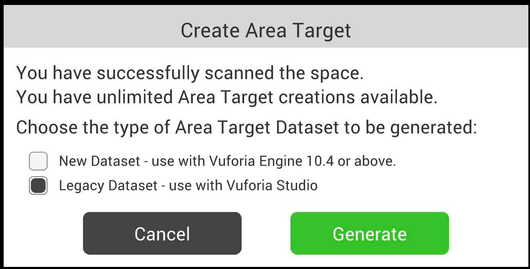
- Select the Legacy Dataset option, then select Generate to generate an Area Target database
Step 4: Prepare your files for Studio
NOTE: All filenames are case sensitive
Area Targets created with the Vuforia Area Target Generator:
- Navigate to the location you entered when creating your Area Target
- Location defaults to C:/Users/<username>/Documents/Vuforia Areas
- Create a zip file titled <target_name>.zip that contains ONLY:
- <target_name>.dat
- <target_name>.xml
- <target_name>_authoring.glb
Area Targets created with the Vuforia Area Target Creator:
- Share your files to your Studio authoring machine
- Press the Container button and swipe one of the Area Target datasets listed to the left. A share icon will appear.
- Press the Share icon next to a listed dataset
- Select your transfer method
- It is possible to manually pull the files directly from your device. Using iTunes or a similar file explorer, navigate to the app's AreaTargetData folder and copy the desired Area Target directory.
- Ensure that your <target_name>.zip file contains ONLY:
- <target_name>.dat
- <target_name>.xml
- <target_name>_authoring.glb
Step 5: Upload your Area Target file to Vuforia Studio
- Add an Area Target widget your canvas
- Select the green plus button next to Data set
- Browse to the location of your <target_name>.zip file and select open
See our Help Center for more information on Area Targets in Vuforia Studio.
- Mark as Read
- Mark as New
- Bookmark
- Permalink
- Notify Moderator
What is the best way to occlude the scan, so that when moving around the AR objects appear as if they are behind the walls and objects that are in the scan?
- Mark as Read
- Mark as New
- Bookmark
- Permalink
- Notify Moderator
@randerson-3 Occlusion is not yet supported. This will be enabled in a future release - it is currently targeted for the next Studio release (9.2.0).


