
Turn on suggestions
Auto-suggest helps you quickly narrow down your search results by suggesting possible matches as you type.
Showing results for
Please log in to access translation
Turn on suggestions
Auto-suggest helps you quickly narrow down your search results by suggesting possible matches as you type.
Showing results for
Community Tip - Need to share some code when posting a question or reply? Make sure to use the "Insert code sample" menu option. Learn more! X
- Community
- Creo+ and Creo Parametric
- 3D Part & Assembly Design
- Surface color seperated by a cut/groove
Translate the entire conversation x
Please log in to access translation
Options
- Subscribe to RSS Feed
- Mark Topic as New
- Mark Topic as Read
- Float this Topic for Current User
- Bookmark
- Subscribe
- Mute
- Printer Friendly Page
Surface color seperated by a cut/groove
Jan 09, 2013
01:35 PM
- Mark as New
- Bookmark
- Subscribe
- Mute
- Subscribe to RSS Feed
- Permalink
- Notify Moderator
Please log in to access translation
Jan 09, 2013
01:35 PM
Surface color seperated by a cut/groove
I've been using Pro/E for years; currently with Creo/WF5. Still couldn't find an easy way to make the same surface that are seperated by a cut, rib, groove, etc. to be different color. Basically, make surface 1 and 2 different color/texture to show how that area might be painted.
2 ways I've done are: both more time consuming than it should be.
- make a copy of the surface that is slightly offset and remove the unwanted surface.
- make a decal in Photoshop, or post process the image in Photoshop.
Anyone knows a way to leave out the surrounding surface that the color should not change similar to an option for copying surfaces?
Solved! Go to Solution.
ACCEPTED SOLUTION
Accepted Solutions
Jan 09, 2013
05:42 PM
- Mark as New
- Bookmark
- Subscribe
- Mute
- Subscribe to RSS Feed
- Permalink
- Notify Moderator
Please log in to access translation
Jan 09, 2013
05:42 PM
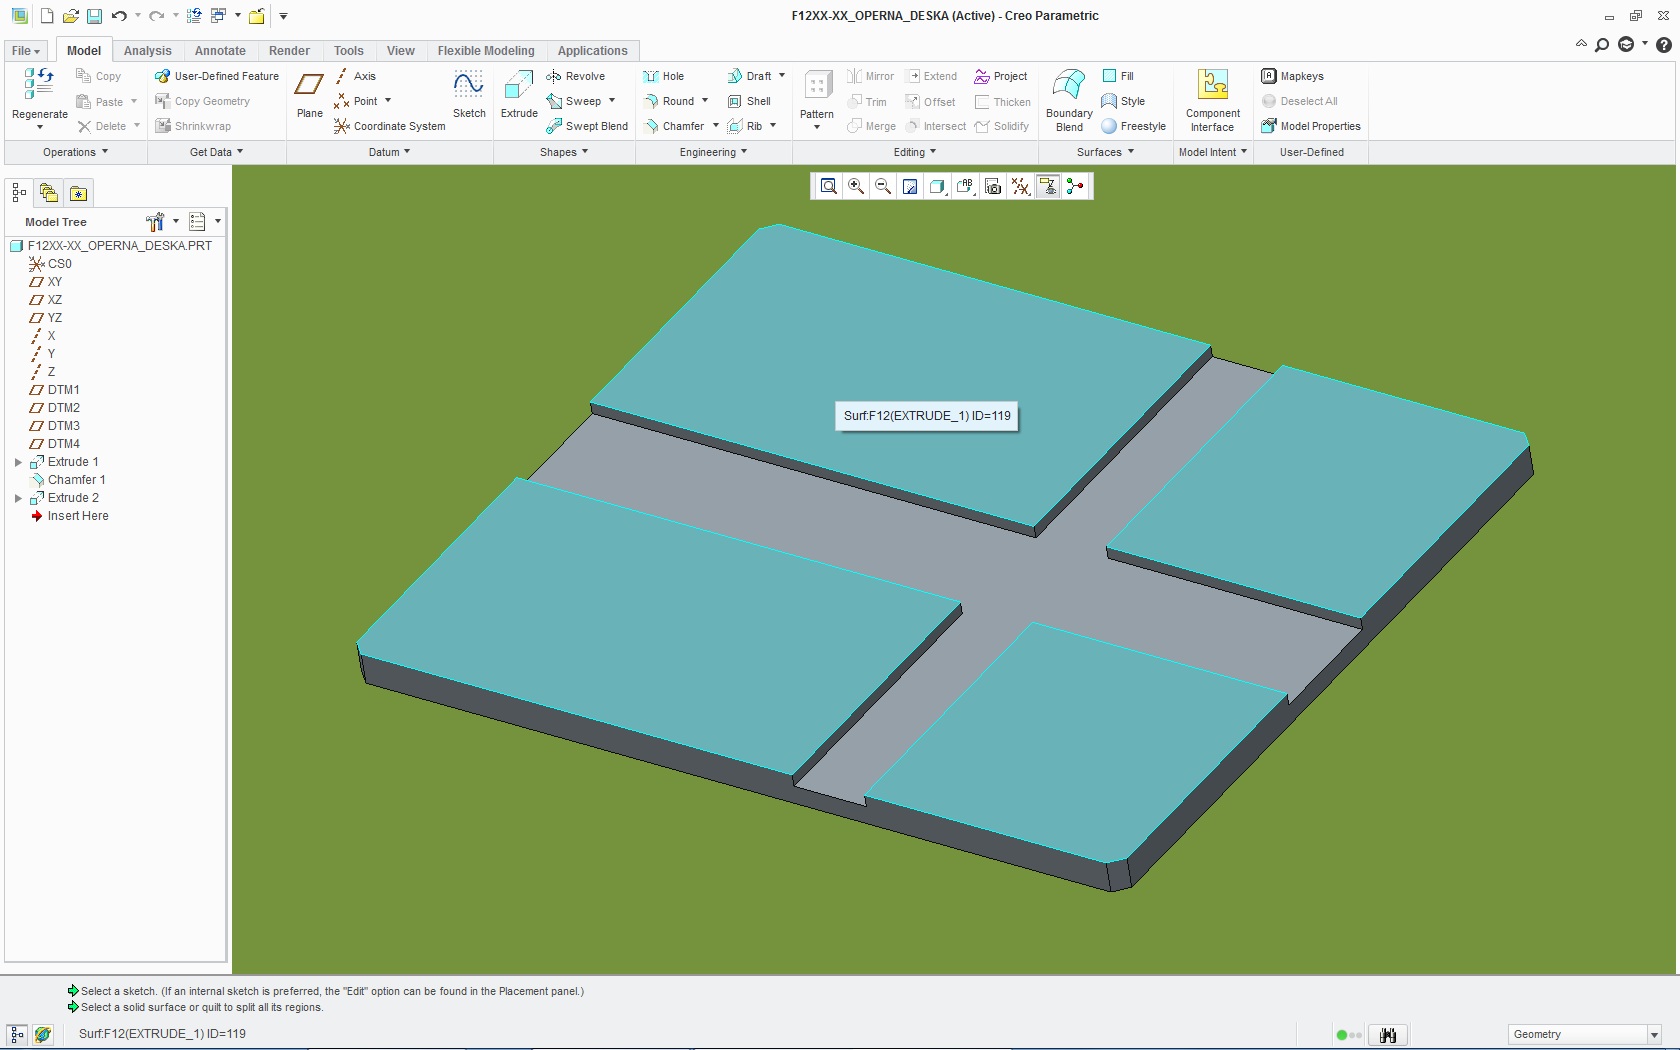
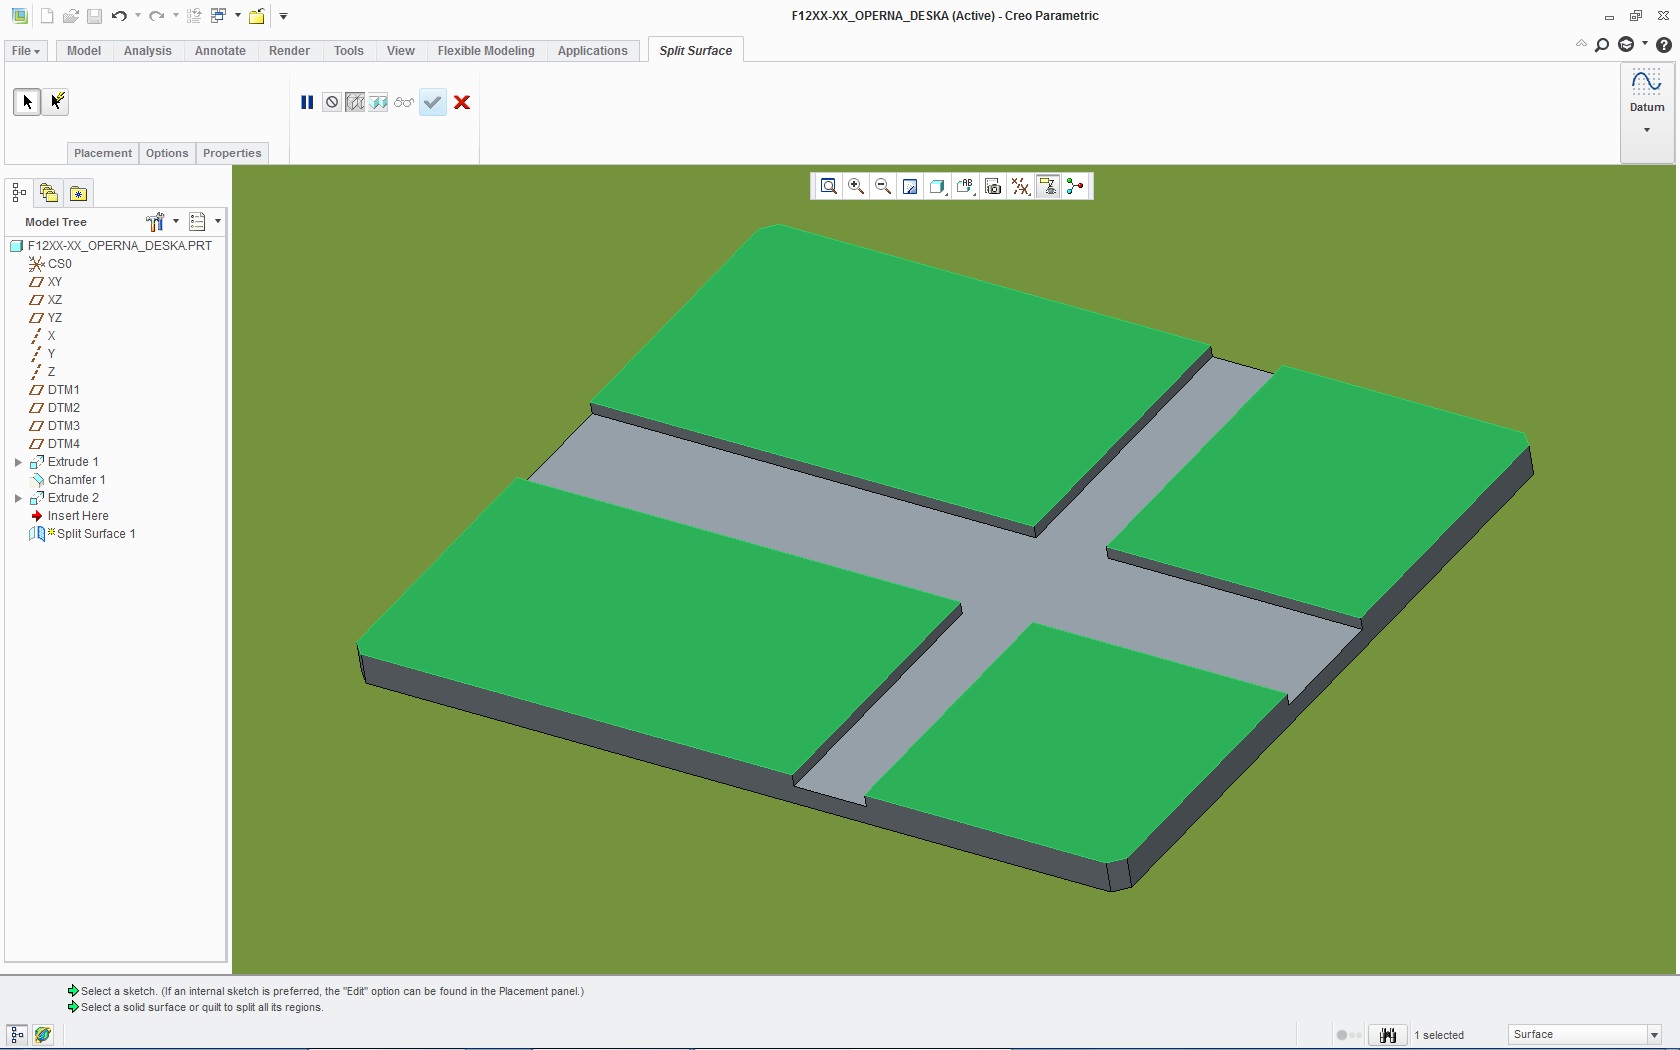
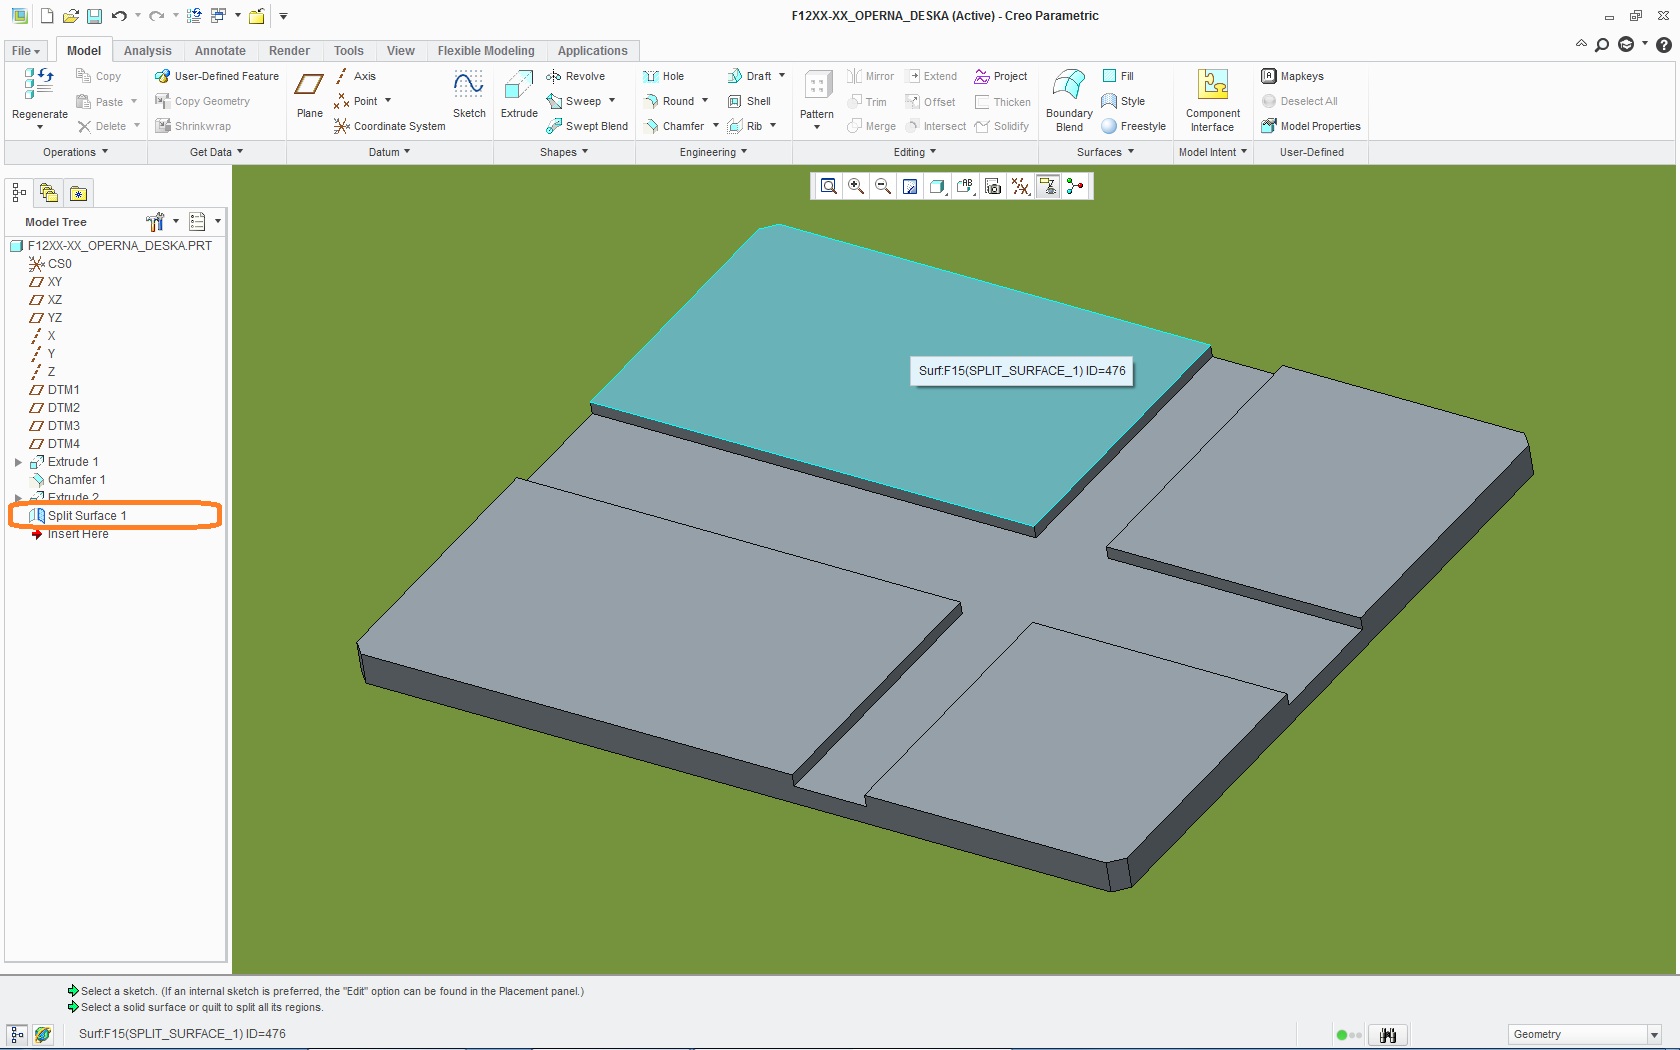
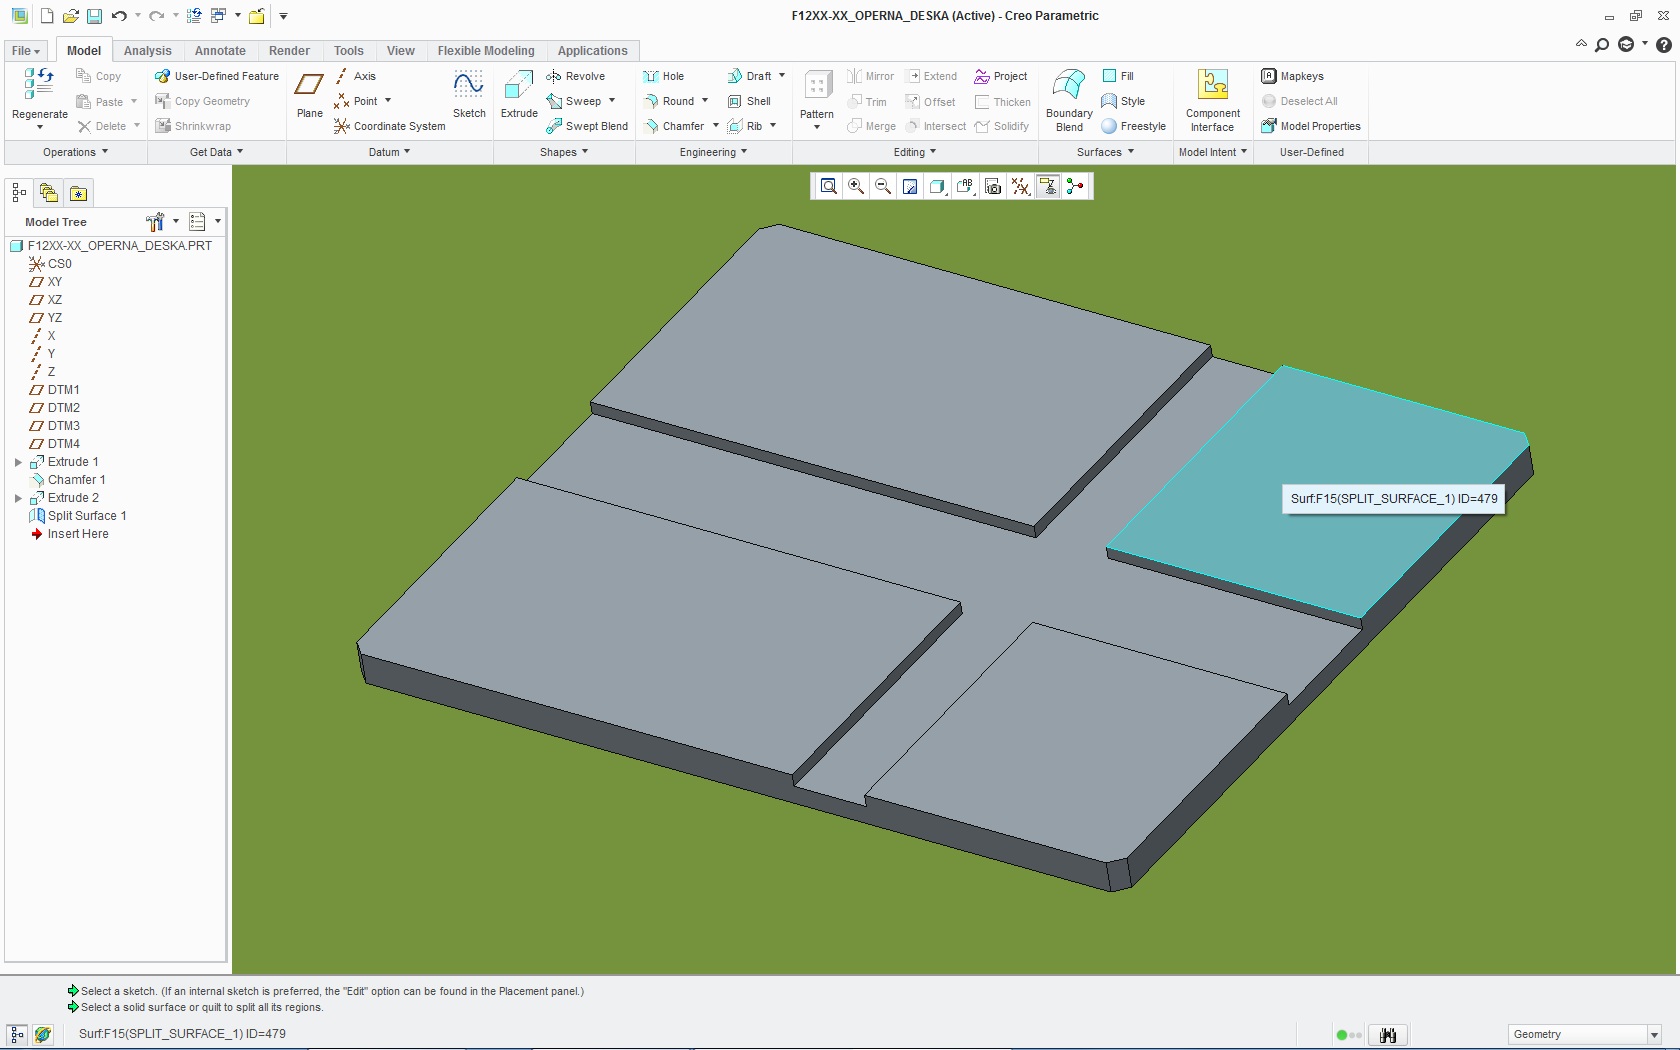
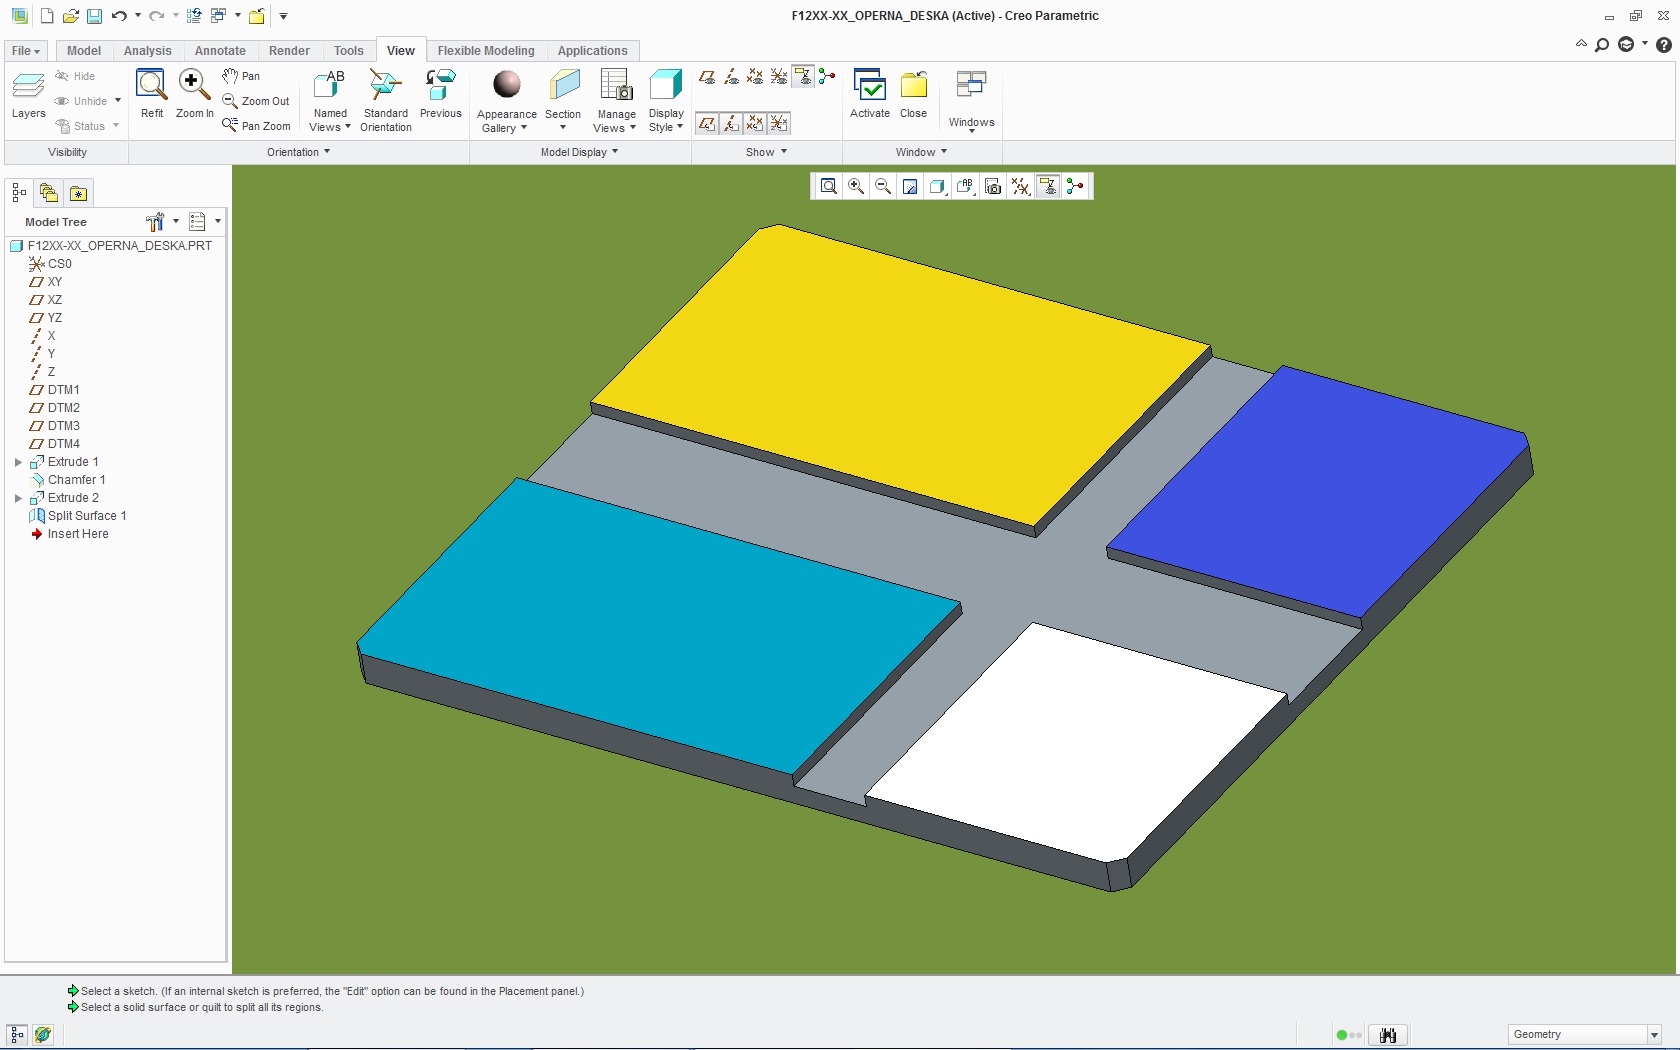
Not sure about WF5 or Creo Elements/Pro, but in Creo Parametric there is a feature called Split Surface.
It's under Model tab --> Editing dropdown --> Split Surface
That will let you split surface into regions with different IDs so you can apply different colors to them.
23 REPLIES 23
Jan 09, 2013
03:12 PM
- Mark as New
- Bookmark
- Subscribe
- Mute
- Subscribe to RSS Feed
- Permalink
- Notify Moderator
Please log in to access translation
Jan 09, 2013
03:12 PM
Your second process is probably the best to use. I say this only to maintain comprehensive geometry.
But I would keep the image simple and manipulate it in the appearance manager. In this case, you can apply a solid color texture to a smaller region by manipulating the texture once it is applied. You have to edit the Model Appearance and use the eye dropper to select the appearance you want to edit (cannot be default).
Here is the image from Creo 2.0 that lets you modify the application of the texture/decal/ whatever.
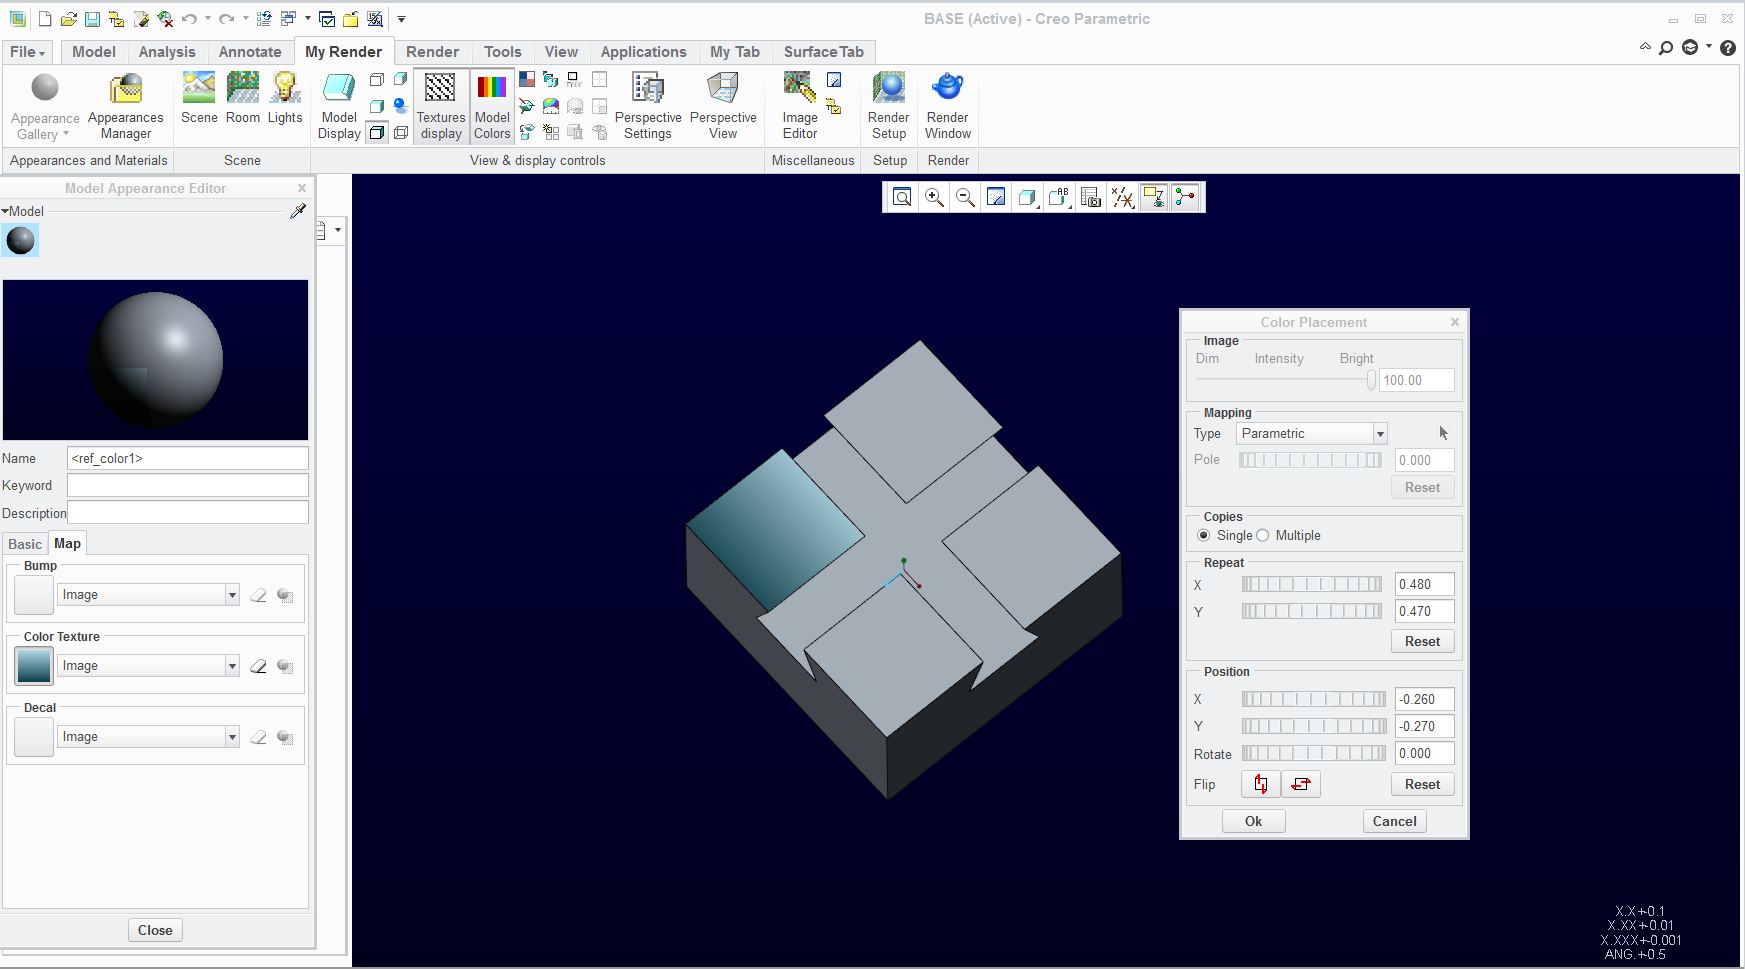
edit: remember to change the Copies to Single
Jan 09, 2013
04:39 PM
- Mark as New
- Bookmark
- Subscribe
- Mute
- Subscribe to RSS Feed
- Permalink
- Notify Moderator
Please log in to access translation
Jan 09, 2013
04:39 PM
Thanks.
I use the decal method for simple stuff like you've shown. However, it is difficult to do this if the surface becomes complicated. Let's say I want to color 2 sections in different color with a non-geometric cut thru them. Just to create a decal to folow the shape would be difficult enough, but trying to align that in Pro/e again is almost impossible. Additionally, the decal used has to be in the same directory for someone else to pull up the model to display the correct color.
All I want is to be able to isolate the selection when applying color. Maybe there is a config file? What about in Creo 2.0?
Jan 09, 2013
04:58 PM
- Mark as New
- Bookmark
- Subscribe
- Mute
- Subscribe to RSS Feed
- Permalink
- Notify Moderator
Please log in to access translation
Jan 09, 2013
04:58 PM
Would be nice if you could do that, huh  maybe post an idea to that fact? This has always been a limitation in Pro/E
As for this type of shape, I would do a simple screen capture and edit it, even in MS Paint. Then use the same process.The fortunate thing is that you have the recesses that allow you to spill some of the image. Of course, I would make the main body the prominent color but the decal would be in just the region of the features.
I think you can also use surface features by copying faces, but graphics quality would get in the way of this in general.
Jan 09, 2013
05:05 PM
- Mark as New
- Bookmark
- Subscribe
- Mute
- Subscribe to RSS Feed
- Permalink
- Notify Moderator
Please log in to access translation
Jan 09, 2013
05:05 PM
Of course, if you cut each face to depth individually or extrude them independently, they become independent for the appearance feature. That seems to work fine. This just requires a little planning in the model creation. You could still use relations to make sure they all remain at the same elevation. I can see how this would be problematic if it was a sweep feature. But if they started off as individual members later connected with a base, that might work also.
I feel your pain, though. This is one of those things that every other CAD system seems to handle with ease.
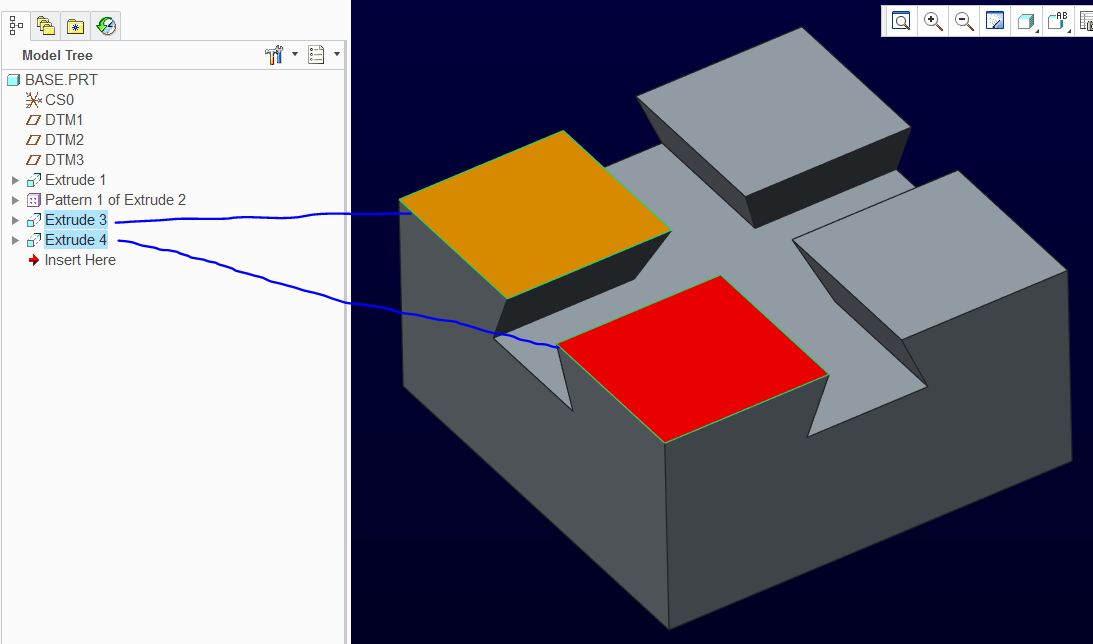
Both faces were extruded 1mm (material removed) so they are the same elevation. Each surface is recognized as individual.
Jan 09, 2013
05:13 PM
- Mark as New
- Bookmark
- Subscribe
- Mute
- Subscribe to RSS Feed
- Permalink
- Notify Moderator
Please log in to access translation
Jan 09, 2013
05:13 PM
I will add that textures do add to overhead in Creo. In Creo 2.0 M030, I took a serious performance hit to have a texture on all surfaces. It is always preferred to have simple colors applied if you need the differentiation. If you have horsepower in your computer, no issue, but I am on a laptop that likes to breath, so to speak. Multi-cores means little to Creo.
Jan 09, 2013
05:40 PM
- Mark as New
- Bookmark
- Subscribe
- Mute
- Subscribe to RSS Feed
- Permalink
- Notify Moderator
Please log in to access translation
Jan 09, 2013
05:40 PM
Yah, tried all these methods before. It's just frustrating that something so simple takes so much effort and time. I work on a lot of toys where I need to color the model like this all the time. Copying surfaces for me produce the most consistant result, but need to be removed (more time involved) when it is sent to manufacturing so it doesn't confuse anyone.
Jan 09, 2013
05:42 PM
- Mark as New
- Bookmark
- Subscribe
- Mute
- Subscribe to RSS Feed
- Permalink
- Notify Moderator
Please log in to access translation
Jan 09, 2013
05:42 PM
Not sure about WF5 or Creo Elements/Pro, but in Creo Parametric there is a feature called Split Surface.
It's under Model tab --> Editing dropdown --> Split Surface
That will let you split surface into regions with different IDs so you can apply different colors to them.
Jan 09, 2013
06:11 PM
- Mark as New
- Bookmark
- Subscribe
- Mute
- Subscribe to RSS Feed
- Permalink
- Notify Moderator
Please log in to access translation
Jan 09, 2013
06:11 PM
Ok. There is no split surface tool in WF5. However, there is the surface trimming tool. This allows me to split the quilt by selecting the edges around the area that I wanted to have different color. Again, the feature will need to be removed or merge the surfaces back for manufacturing. Well, this seem to work better for surface models.
Thanks.
Jan 09, 2013
09:07 PM
- Mark as New
- Bookmark
- Subscribe
- Mute
- Subscribe to RSS Feed
- Permalink
- Notify Moderator
Please log in to access translation
Jan 09, 2013
09:07 PM
Jakub, I must be missing something. I have used and found the (surface) Trim command in Creo but I cannot, for the life of me get the Editing/Split Surface to activate. Trim give you 3 Flip options and let you keep side 1, side 2, or both sides. I suspect that is what Nia finally ended up usinig.
Also it appears that this is only applicable to surface features so this won't work in a solid model. What is the fastest way to make a solid body a surface body? or do you have to copy faces and join them?
Jan 10, 2013
03:15 AM
- Mark as New
- Bookmark
- Subscribe
- Mute
- Subscribe to RSS Feed
- Permalink
- Notify Moderator
Please log in to access translation
Jan 10, 2013
03:15 AM
No idea, Tom, see the following pictures.
Oh, and surface trim requires a surface or a quilt.

Jan 10, 2013
11:40 AM
- Mark as New
- Bookmark
- Subscribe
- Mute
- Subscribe to RSS Feed
- Permalink
- Notify Moderator
Please log in to access translation
Jan 10, 2013
11:40 AM
Do you have the Style extension? I select the face and still no joy.
Jan 10, 2013
01:04 PM
- Mark as New
- Bookmark
- Subscribe
- Mute
- Subscribe to RSS Feed
- Permalink
- Notify Moderator
Please log in to access translation
Jan 10, 2013
01:04 PM
Yes, I've got ISDX, but they say it's only for Style feature.
So you don't have this Split Surface icon at all on your toolbar?
Jan 10, 2013
01:34 PM
- Mark as New
- Bookmark
- Subscribe
- Mute
- Subscribe to RSS Feed
- Permalink
- Notify Moderator
Please log in to access translation
Jan 10, 2013
01:34 PM
Yes, it is there but it never becomes active even following your example. There are a lot of Style icons that say I need to obtain a license for the option, contact you reseller. There are a lot of "little" functions that are not available without the ISDX extension... one being All Views (as I'm being told).
Jan 10, 2013
01:48 PM
- Mark as New
- Bookmark
- Subscribe
- Mute
- Subscribe to RSS Feed
- Permalink
- Notify Moderator
Please log in to access translation
Jan 10, 2013
01:48 PM
Hmm, All Views is only accesible from inside Style feature.
Well, guess I should dig around and see what's ISDX bringing into the table.
I also have got FMX (Flexible Modeling Extension), but this one has it's own tab in Creo Parametric.
Jan 10, 2013
01:57 PM
- Mark as New
- Bookmark
- Subscribe
- Mute
- Subscribe to RSS Feed
- Permalink
- Notify Moderator
Please log in to access translation
Jan 10, 2013
01:57 PM
Hahaha, yes, I've been driving CS nuts over that one
I use to have All Views but PTC is insisting it has never been part of Pro/E, only the short lived low end Designer product (pre Pro/E 18.0) had it.
Jan 10, 2013
01:51 PM
- Mark as New
- Bookmark
- Subscribe
- Mute
- Subscribe to RSS Feed
- Permalink
- Notify Moderator
Please log in to access translation
Jan 10, 2013
01:51 PM
I certainly don't mean to hijack this thread but it seems relavant. I can trim surfaces without issue but this option doesn't seem to exist. Here is what I am getting in the Creo 2.0 M030 core product:
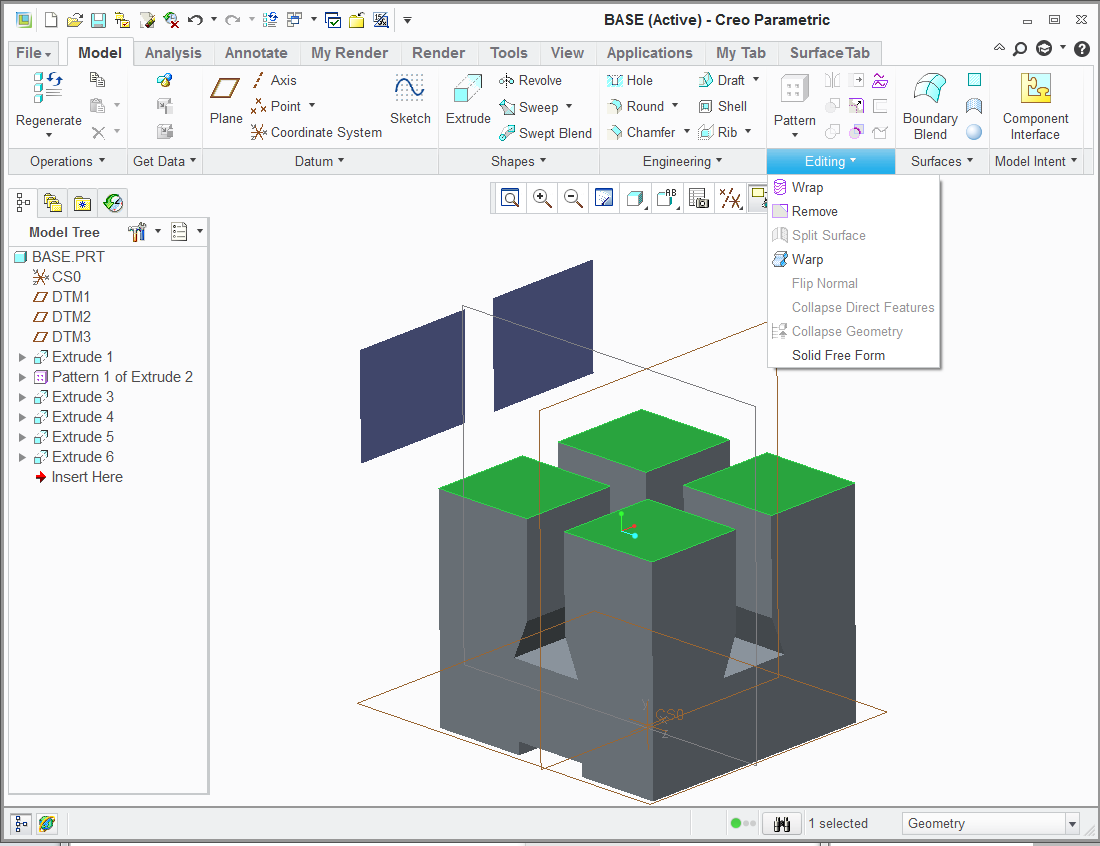 Solid part extruded
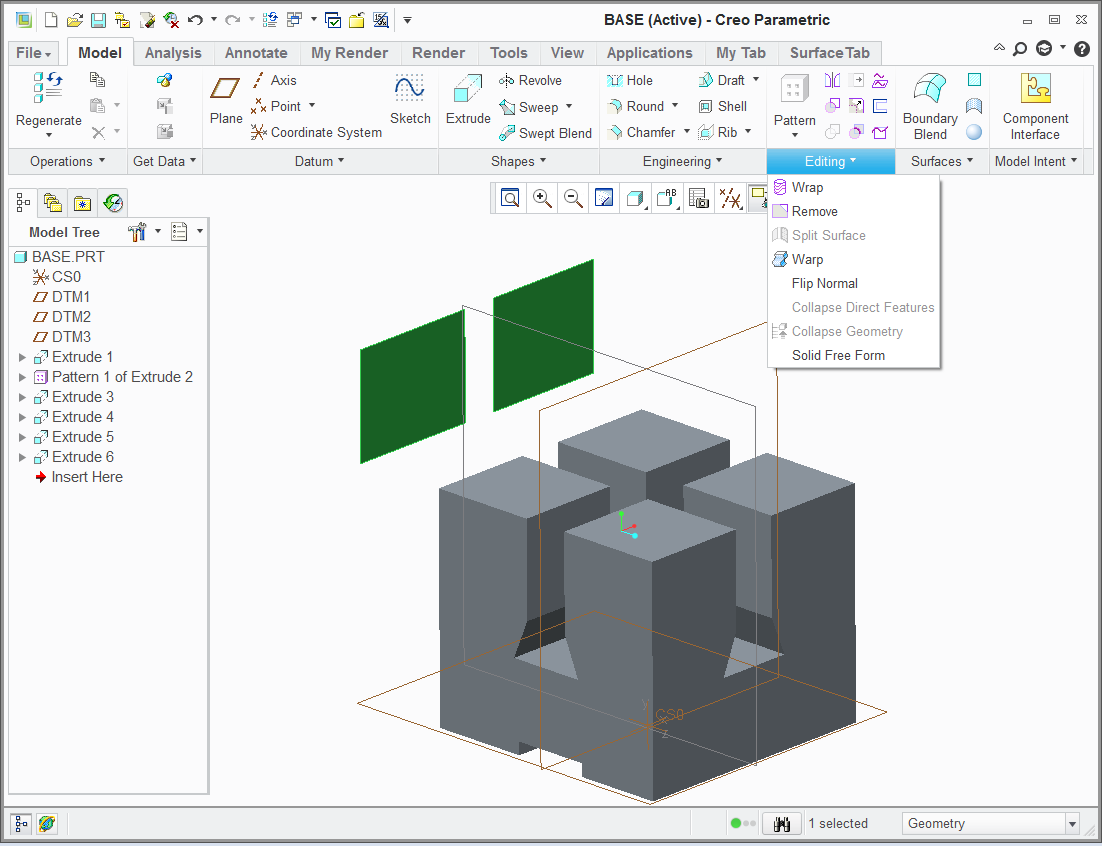 surface feature cut with extrude
Jan 10, 2013
04:23 PM
- Mark as New
- Bookmark
- Subscribe
- Mute
- Subscribe to RSS Feed
- Permalink
- Notify Moderator
Please log in to access translation
Jan 10, 2013
04:23 PM
Why is that your Split Surface feature is greyed out?
I doubt this is some sort of advanced surface feature. Actually if you've got FMX you can select portions of each surface just when you switch to FMX tab. No Split Surface feature required.
Oh, and some people at the support are rather naive, they just try to give you first solution they have in mind, thinking that is all right for you. Well, in time they always wake up, and finally come up with the good stuff.
Anyway, I like the All Four Views in Rhinoceros, it's pretty neat. Not using it very often in Creo Style.
Jan 10, 2013
04:45 PM
- Mark as New
- Bookmark
- Subscribe
- Mute
- Subscribe to RSS Feed
- Permalink
- Notify Moderator
Please log in to access translation
Jan 10, 2013
04:45 PM
I will ask support the question about split surfaces. Now it is bugging me. 
I went all the way to escalating the All Views and they insist is has never been there in the core Pro/E.
So now I must prove otherwise or eat my words. I am working on loading 2001.
Jan 10, 2013
05:31 PM
- Mark as New
- Bookmark
- Subscribe
- Mute
- Subscribe to RSS Feed
- Permalink
- Notify Moderator
Please log in to access translation
Jan 10, 2013
05:31 PM
CS reply:
Model > Editing > Split Surface feature requires Flexible_modeling License.
https://www.ptc.com/appserver/cs/view/solution.jsp?n=CS38251
So I created this Idea: Hide All Icons related to Unavailable Extensions
Please vote if you can.
Jan 11, 2013
11:33 AM
- Mark as New
- Bookmark
- Subscribe
- Mute
- Subscribe to RSS Feed
- Permalink
- Notify Moderator
Please log in to access translation
Jan 11, 2013
11:33 AM
Uhh, once again, this shows that the people who introduce new features to Creo never really work with it.
Jan 10, 2013
04:04 AM
- Mark as New
- Bookmark
- Subscribe
- Mute
- Subscribe to RSS Feed
- Permalink
- Notify Moderator
Please log in to access translation
Jan 10, 2013
04:04 AM
If you want to show milled surfaces of a cast part there is another way:
- give your part the color you want to see in the grooves
- give all surfaces your standard color **
- then create grooves, holes, cuts etc.
You should set a mark in model tree where you set the colors because adding material later on must be done before that mark.
** In WF4 I could select all surfaces by RMB, could not find this option in Creo 2.
Greets
Reinhard
Jan 13, 2013
06:22 AM
- Mark as New
- Bookmark
- Subscribe
- Mute
- Subscribe to RSS Feed
- Permalink
- Notify Moderator
Please log in to access translation
Jan 13, 2013
06:22 AM
They stuffed SOLID SURFACES selection inside the tool when they introduced the new Appearance Manager in WF5.
You have to select solid surfaces before entering Appearance Manager otherwise you have to do each surface separately. So much for the object-action action-object methodology - boundary selection techniques dont work either.
None of this has ever been fixed.
Another example of PTCs sloppy QC - big holes and nonexitant specification.
Jan 14, 2013
03:41 PM
- Mark as New
- Bookmark
- Subscribe
- Mute
- Subscribe to RSS Feed
- Permalink
- Notify Moderator
Please log in to access translation
Jan 14, 2013
03:41 PM
creo.......welcome to my nightmare!


