Community Tip - You can subscribe to a forum, label or individual post and receive email notifications when someone posts a new topic or reply. Learn more! X
- Community
- Creo+ and Creo Parametric
- 3D Part & Assembly Design
- Re: Tolerance display in annotation note
- Subscribe to RSS Feed
- Mark Topic as New
- Mark Topic as Read
- Float this Topic for Current User
- Bookmark
- Subscribe
- Mute
- Printer Friendly Page
Tolerance display in annotation note
- Mark as New
- Bookmark
- Subscribe
- Mute
- Subscribe to RSS Feed
- Permalink
- Notify Moderator
Tolerance display in annotation note
Hi, I'm trying to create an annotation note in the model. Below is an example of how the annotation is constructed.
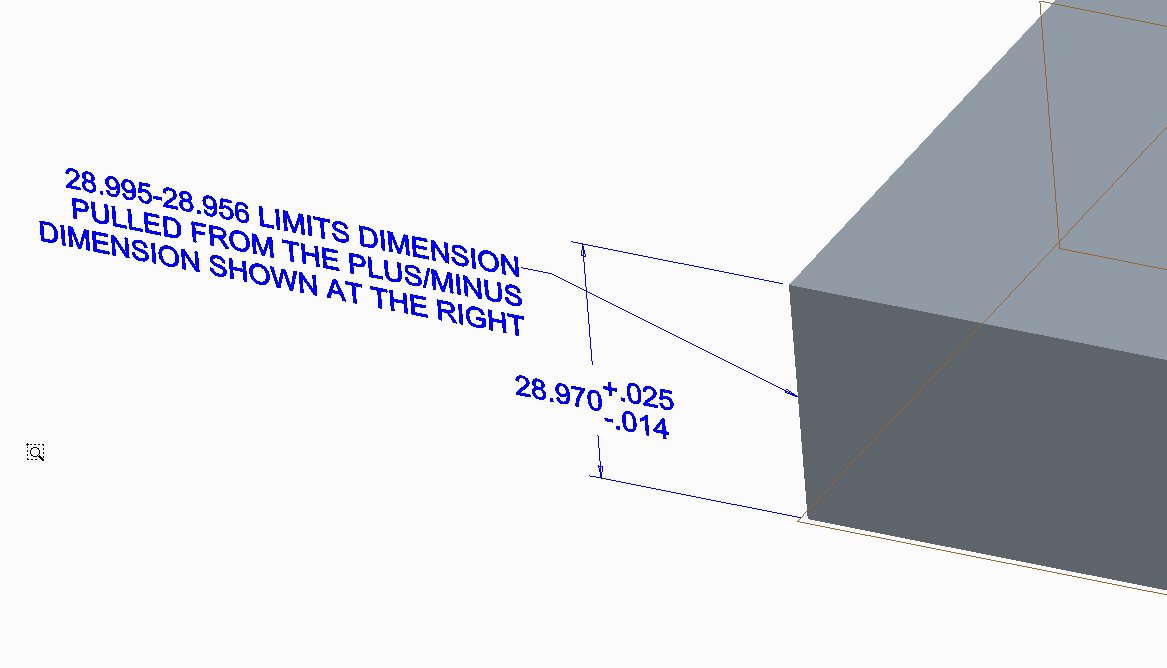
And here is what the note looks like with dimensional values shown.
I would like to display the tolerance as a side-by-side limits, not over/under limits (ex. .0937-.0962... .112-.172).
Any ideas?
Thanks,
Jason
This thread is inactive and closed by the PTC Community Management Team. If you would like to provide a reply and re-open this thread, please notify the moderator and reference the thread. You may also use "Start a topic" button to ask a new question. Please be sure to include what version of the PTC product you are using so another community member knowledgeable about your version may be able to assist.
Solved! Go to Solution.
- Labels:
-
Sheet Metal Design
Accepted Solutions
- Mark as New
- Bookmark
- Subscribe
- Mute
- Subscribe to RSS Feed
- Permalink
- Notify Moderator
Wow... I'm just getting to all these posts from back in August! I'm really sorry I fell off the map but the world caved in on me over the past 6 weeks or so...
I realize this is probably so old no one even cares anymore... but there is a way to do what you're asking for.
First, rule #1: never take anything PTC technical support says as gospel...ever. At least half the time they'll tell you something is impossible even when it is possible. Often PTC technical support doesn't understand their own product as well as the designers and engineers that use it every single day. They're not very flexible. If the "answer" to your question is not in their system, "it's impossible".
Sometimes you get lucky and you'll get a support tech that actually attempts to help you. Maybe they spend 5 minutes trying to resolve your issue. They try all the same buttons and switches you've already tried, fail, throw their hands up, and proclaim "it's impossible".
Well, no, it's not impossible. It's a little bit of a pain in the neck but it's certainly not impossible. In my opinion, PTC's technical support personnel should know this software inside and out. They should be able to give you an answer and then let you decide if the method required to incorporate that answer is too much work. But the tech support personnel do not know the software... they're basically about as good as your everyday average "power user". They know a bit more than the basics- and the rest they get from their knowledgebase. If the answer isn't there- :shrug: oh well, it's impossible.
But enough pontificating... what's the solution?
Whenever you have a dimension with a plus/minus or symmetric dimension, you can access the values of those dimensions using parameters in a relation. Here's an excerpt from the help files:

So then... set your dimensions in the model to plus/minus even though you want to display limits. This will allow you to access the tp (positive tolerance) and tm (negative tolerance) values for the dimension as well as the dimension itself. Create a relation to generate the limit values. If you were interested in generating the limits for dimensions &d14, the relations might look like this:
x1 = d14 + tp14
x2 = d14 - tm14
d14 is the dimension number (use switch symbols to see the dimension numbers)
tp14 is the upper tolerance value for the d14 dimension
tm14 is the lower tolerance value for the d14 dimension
Change the "14" to whatever number dimension you're intersted in.
In your note, simply use &x1 and &x2 to access the limits dimensions.

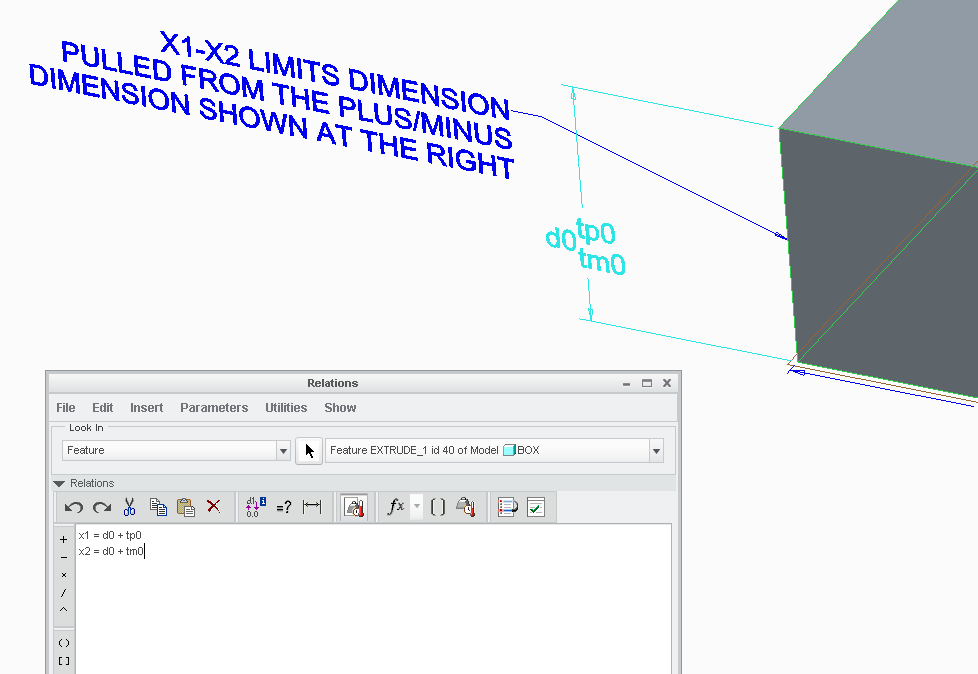
The only trick here is where to place these relations. You can put them in the part- but this is cumbersome. I'd suggest putting them in feature relations. In the image below, notice the relations window is set to "FEATURE" (upper left hand corner of the relations window). The relations I used are displayed. Also, you can see the dimension values toggled using the switch symbols command. You can see that the dimension number is "0" (zero). The relations do not clutter the part because they're stored in the feature. Those relations give you the ability to display your limits dimensions however you wish in your note. (Click the image to see a larger version)
Pretty doggone simple... and not nearly as "impossible" as you were led to believe.

The just serves to illustrate my earlier point... surely someone working for PTC as a full time tech support person should be able to offer up such a simple, convenient solution. Why don't they? Anyone... anyone... Bueller?
Hope that helps!
-Brian
- Mark as New
- Bookmark
- Subscribe
- Mute
- Subscribe to RSS Feed
- Permalink
- Notify Moderator
See if this works:
default_tolerance_display_style
Controls the spacing and vertical justification of tolerance values relative to the nominal dimension according to ASME or ISO drawing standards.For dimensions set to limits tolerance, this Detail option additionally controls the appearance of limits as in-line (next to each other separated by a dash) or stacked (one on top of the other). That is, when the value is set to std_asme, limits will appear in-line, and when the value is set to std_iso, limits will appear stacked.
NoteThis Detail option controls the display style of dimensions when their tolerance mode is set to anything other than nominal.
Default and Available Settings
- std_asme*–Applies American Society of Mechanical Engineers (ASME). Limits appear in-line.
- std_iso—Applies International Organization for Standardization (ISO). Limits appear stacked.
- Mark as New
- Bookmark
- Subscribe
- Mute
- Subscribe to RSS Feed
- Permalink
- Notify Moderator
Thank you for the reply.
default_tolerance_display_style is already set to std_asme*
I just received confirmation that it is not an option to have side-by-side limit tolerance in an annotation from our PTC Technical Specialist.
I was hoping there was a way, but apparently not.
Thanks,
Jason
- Mark as New
- Bookmark
- Subscribe
- Mute
- Subscribe to RSS Feed
- Permalink
- Notify Moderator
This is pretty ugly.
I made notes from 2 displayed dimensions.
The inline dimension was dimensioned from the end of the cylinder, and the over/under was using a dimension in section of the cylinder.
I'd say there is a bug here somewhere. ...and huge opportunity for some enhancements (Brian?).
Obviously, neither is acceptable.
- Mark as New
- Bookmark
- Subscribe
- Mute
- Subscribe to RSS Feed
- Permalink
- Notify Moderator
Right, I noticed that if the dimension was shown in an end view that the tolerance was side-by-side, but if dimension was shown in a section, that it was over/under.
The issue with that is I don't want to display the dimensions anywhere on the drawing, except for in the note. If the dimensions are not shown on the drawing, the tolerance display reverts back to over/under.
From what I can tell, depths (linear dimesions) will always display over/under regardless of what view they are placed in.
Again, thanks for the reply.
- Mark as New
- Bookmark
- Subscribe
- Mute
- Subscribe to RSS Feed
- Permalink
- Notify Moderator
Yes, the problem with the two examples came about with the default diameter symbol.
Somewere you have to edit this in the dimension so it doesn't show up in the dimension variable.
That's a lot of manipulation to get what should be simple option to work.
I'll post an idea to add the in-line and over/under option to the dimension dialog.
- Mark as New
- Bookmark
- Subscribe
- Mute
- Subscribe to RSS Feed
- Permalink
- Notify Moderator
Product Idea created. Please comment and vote if you can.
We need better control over limit dimension display.
Regardless of standard settings, the dimension dialog should allow the option to show limit dimensions in-line or over/under.
Currently, in ASME mode, diameter limit dimensions display over/under in section view and in-line in the circle's plane. A user should have direct control of this display when choosing limit as a tolerance type. This option should apply to all limit type dimensions on a case by case basis. This is why the preference to control this in the dimension properties dialog is requested. An overall default in the config.pro and config.dtl should also be added.
As it stands, I do not see any way to control this requirement except to annotate the dimension in a note.
There is also a bug in using diameter limit dimensions that place the diameter symbol in the wrong place when the dimension is use in a note. This needs to be corrected. Depending on the origin of the dimension (previously placed on the drawing), you get one of the two outcomes. Neither is acceptable and require cumbersome editing before they can be used in this fashion since you cannot edit the dimension style directly from the note.
Using the diameter dimension directly from the drawing. Top one from the circle's plane view and the bottom one from the cylinder's section. Both dimensions are prefixed with the diameter symbol during feature generation.
Proper display required editing the dimension to remove the diameter symbol from the dimension prefix and adding the symbol back in the note. Lots of mouse clicks! Control over how the dimension is displayed too is extremely cumbersome.
- Mark as New
- Bookmark
- Subscribe
- Mute
- Subscribe to RSS Feed
- Permalink
- Notify Moderator
Wow... I'm just getting to all these posts from back in August! I'm really sorry I fell off the map but the world caved in on me over the past 6 weeks or so...
I realize this is probably so old no one even cares anymore... but there is a way to do what you're asking for.
First, rule #1: never take anything PTC technical support says as gospel...ever. At least half the time they'll tell you something is impossible even when it is possible. Often PTC technical support doesn't understand their own product as well as the designers and engineers that use it every single day. They're not very flexible. If the "answer" to your question is not in their system, "it's impossible".
Sometimes you get lucky and you'll get a support tech that actually attempts to help you. Maybe they spend 5 minutes trying to resolve your issue. They try all the same buttons and switches you've already tried, fail, throw their hands up, and proclaim "it's impossible".
Well, no, it's not impossible. It's a little bit of a pain in the neck but it's certainly not impossible. In my opinion, PTC's technical support personnel should know this software inside and out. They should be able to give you an answer and then let you decide if the method required to incorporate that answer is too much work. But the tech support personnel do not know the software... they're basically about as good as your everyday average "power user". They know a bit more than the basics- and the rest they get from their knowledgebase. If the answer isn't there- :shrug: oh well, it's impossible.
But enough pontificating... what's the solution?
Whenever you have a dimension with a plus/minus or symmetric dimension, you can access the values of those dimensions using parameters in a relation. Here's an excerpt from the help files:

So then... set your dimensions in the model to plus/minus even though you want to display limits. This will allow you to access the tp (positive tolerance) and tm (negative tolerance) values for the dimension as well as the dimension itself. Create a relation to generate the limit values. If you were interested in generating the limits for dimensions &d14, the relations might look like this:
x1 = d14 + tp14
x2 = d14 - tm14
d14 is the dimension number (use switch symbols to see the dimension numbers)
tp14 is the upper tolerance value for the d14 dimension
tm14 is the lower tolerance value for the d14 dimension
Change the "14" to whatever number dimension you're intersted in.
In your note, simply use &x1 and &x2 to access the limits dimensions.

The only trick here is where to place these relations. You can put them in the part- but this is cumbersome. I'd suggest putting them in feature relations. In the image below, notice the relations window is set to "FEATURE" (upper left hand corner of the relations window). The relations I used are displayed. Also, you can see the dimension values toggled using the switch symbols command. You can see that the dimension number is "0" (zero). The relations do not clutter the part because they're stored in the feature. Those relations give you the ability to display your limits dimensions however you wish in your note. (Click the image to see a larger version)
Pretty doggone simple... and not nearly as "impossible" as you were led to believe.

The just serves to illustrate my earlier point... surely someone working for PTC as a full time tech support person should be able to offer up such a simple, convenient solution. Why don't they? Anyone... anyone... Bueller?
Hope that helps!
-Brian
- Mark as New
- Bookmark
- Subscribe
- Mute
- Subscribe to RSS Feed
- Permalink
- Notify Moderator
Nice solution, Brian. now what's up with that image server! Looks like my old pix are missing on my end.
- Mark as New
- Bookmark
- Subscribe
- Mute
- Subscribe to RSS Feed
- Permalink
- Notify Moderator
I noticed that! I've never seen missing images before on this site... it was weird
I hope that solution helps Jason (original poster). The longer I've been in the role of application engineer for PTC products, the more I am amazed at how many times the community here is able to solve a problem that PTC's own CS people deem unsolveable. Once or twice, that's understandable. Looking back over the past year and a half I've been here, I think we're closing in on 50 or more.
I've given the PTC UX (User Interface) people a bunch of suggestions to improve the customer support website and interface. One of my biggest suggestions was to figure out a way to leverage the community as a resource instead of just relying on the PTC internal knowledgebase. Maybe soon we'll see a shift- when CS fails, maybe the community can step in.
Anyway... it's good to be able to come back and contribute an answer to a problem that CS gave up on. I'm spending this weekend working, catching up on school work, and catching up on PTC Community messages. Maybe by Monday, I'll be all caught up!
- Mark as New
- Bookmark
- Subscribe
- Mute
- Subscribe to RSS Feed
- Permalink
- Notify Moderator
Thank you for finding a solution Brian. That is exactly what I was looking for.
Thanks,
Jason
- Mark as New
- Bookmark
- Subscribe
- Mute
- Subscribe to RSS Feed
- Permalink
- Notify Moderator
Glad I could help Jason...
One thing I needed to clarify... I showed the relations two places in my post but in one of those places I got it wrong.
The correct relations are:
(Fill in "#" for the dimension number)
x1 = d# + tp#
x2 = d# + tm#
At one point I showed that second relation as x2 = d# - tm# and this is incorrect. That lower (minus) dimension is already set to be a negative value. Therefore that number should be added to the dimension nominal value not subtracted. If you subtract it, you'll get the wrong value.
Just wanted to clarify that small tidbit. The relations show correctly in the screen grab which shows the relations window.
Thanks again!
-Brian
- Mark as New
- Bookmark
- Subscribe
- Mute
- Subscribe to RSS Feed
- Permalink
- Notify Moderator
Thanks. I was searching for how to do this and came across this post. Just what I was looking for. I'd also been told you couldn't do this ![]()
One weird thing though is that in my version (Creo 2.0), I do have to use the negastive sign in the x2 eqauation:
x1 = d# + tp#
x2 = d# - tm#
to get the correct result. For example using the above equations and setting:
Nominal Value = 2.000
Tolerance mode = Plus-Minus
Upper tolerance = +.005
Lower tolerance = -.005
gives me:
x1 = 2.005
x2 = 1.995
Interestingly the Tolerance Mode setting affects this. With Limits; Plus-Minus, Symmetric, and Symmetric (Superscript), I get the result above. However, if I change the Tolerance mode = Nominal I then get
x1 = 2.005
x2 = 2.005
and then I do have to change the relations to a + sign to get the correct result, as in:
x1 = d# + tp#
x2 = d# + tm#
Also, is there any way to use a dimension name with these parameters? A lot of the drawings I work with have dimension names, such as cyl_od. Of course the Relations dialog will show me the number I need but it would be easier if I could use something like tpcyl_od and tmcyl_od (which don't work). Is there a syntax that allows use of a name with the parameters?
- Mark as New
- Bookmark
- Subscribe
- Mute
- Subscribe to RSS Feed
- Permalink
- Notify Moderator
These are probably next level parameters or relations that simply call the dimension out or are assigned to dimensions. If you drive parts with a lot of common values, this is the easiest way to maintain relations as you build your model.


