Hi All,
I'm using PTC Creo 8.0 with simulate basic extension.
I'm running into a very simple problem but can't find the right solution yet.
To visualize the issue I made a simple strip with holes on both ends.
In one hole I created a bearing load in the length direction of the strip.
In the other hole a pin contraint.
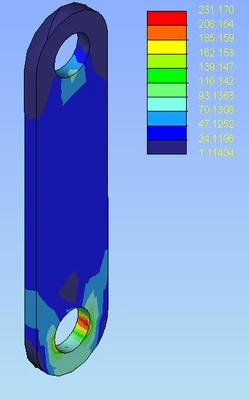
I my world this should give the same stress results in both holes. After all: "For every action in nature there is an equal and opposite reaction". But as shown in the screenshot below it isn't the same at all..
I've already been testing with different solutions, but none of them resulted in equal results.
Most close so far was to divide the hole in different regions and connect the upper region with a point in the center with a rigid link. However this means a lot of trial and error with the size of the region which is not very practical and very time consuming
Somebody here knows what the right solution is?
Thanks in advance!
Solved! Go to Solution.
Simply put, the distribution of the load at your boundary conditions are not identical.
The pin constraint assumes the pin is rigid and welded inside the hole and that some other part it connects to allows the rotational motion. The bearing load loads in the approximate tapered load pattern to represent the contact forces that a pin in the hole would create.
Instead use a bearing load at both ends and turn on inertia relief or use a constraint method for only arresting rigid body motion. I think the trouble here is that you assumed a "pin" constraint also modelled the contact like the bearing load.
It is very obvious from your image that the pin constraint is at the top and the bearing load at the bottom. With the pin constraint in the top hole, the hole diameter is kept and does not stretch open (like welded to a rigid rod)
Another way would be to put the actual pins and actual contacts into your model, but I would personally use inertia relief.
It is very good that you are making sure results make sense!
-regards
You should elaborate on your boundary conditions and the model. Screen shots of geometry and the tree and upload the models if possible. I strongly suspect your boundary conditions are not consistent with your intent to simulate the reaction forces.
Your topology plot has no units and is meaningless in the context of troubleshooting.
I'm happy to share some more boundary conditions however I don't see how this should affect the results. On a symmetric part with bearing load on one side and a pin constraint on the other side the result should show a symmetric distribution off the stress in the part as well. It's a very basic rule of physics.
Regardless of the above this is what I used in this particular example:
- Strip size 60x10, length 260mm.
- Holes Ø30mm with 200mm distance.
- Pin contraint with axial movement fixed in the upper hole.
- Bearing load of 20kN in the length direction of the strip in the lower hole.
- Stress results in MPA.
- Used calculation method Von Mises.
Forgot to mention:
- Used material is Steel grade S355MC.
Simply put, the distribution of the load at your boundary conditions are not identical.
The pin constraint assumes the pin is rigid and welded inside the hole and that some other part it connects to allows the rotational motion. The bearing load loads in the approximate tapered load pattern to represent the contact forces that a pin in the hole would create.
Instead use a bearing load at both ends and turn on inertia relief or use a constraint method for only arresting rigid body motion. I think the trouble here is that you assumed a "pin" constraint also modelled the contact like the bearing load.
It is very obvious from your image that the pin constraint is at the top and the bearing load at the bottom. With the pin constraint in the top hole, the hole diameter is kept and does not stretch open (like welded to a rigid rod)
Another way would be to put the actual pins and actual contacts into your model, but I would personally use inertia relief.
It is very good that you are making sure results make sense!
-regards
Yes this makes sense. It seems like the rotational degree of freedom is on the outside of the model indeed.
I know I can use the inertia relief function and in fact this is what is usually do when doing calculations on simple products like this.
Also credits for SKUNKS who mentioned this as well!
However this function usually helps me out it doesn't alway represents a realistic result in more complex assemblies. With this function you have to calculate your reaction forces prior to running the analyses. I my opinion there should be something like a "bearing constraint".
If you sort of know the load direction on the bearing you can constrain a 45 degree portion of the cylinder.
When I get fancy, I divide the 45 degree segment into several regions with their own CSY so I can point the constraint vector in the radial direction but still use cartesian systems so I can do nonlinear analysis. (at least I think that was a restriction at the time) Then I can look at the deflection and stress pattern and adjust my guess direction if needed. I like pizza so I will call it the pizza method 😀
For reference if you don't know this also, look up St Venant's principal. When failure is near a boundary condition more care needs to be taken and maybe whatever part/device that provides the boundary condition added to the model, or some other consideration taken.