
Turn on suggestions
Auto-suggest helps you quickly narrow down your search results by suggesting possible matches as you type.
Showing results for
Please log in to access translation
Turn on suggestions
Auto-suggest helps you quickly narrow down your search results by suggesting possible matches as you type.
Showing results for
Community Tip - Need to share some code when posting a question or reply? Make sure to use the "Insert code sample" menu option. Learn more! X
- Community
- Creo (Previous to May 2018)
- Creo Modeling Questions
- someone can repair heal the dimples that are corru...
Translate the entire conversation x
Please log in to access translation
Options
- Subscribe to RSS Feed
- Mark Topic as New
- Mark Topic as Read
- Float this Topic for Current User
- Bookmark
- Subscribe
- Mute
- Printer Friendly Page
someone can repair heal the dimples that are corrupted?
Jun 09, 2014
02:35 PM
- Mark as New
- Bookmark
- Subscribe
- Mute
- Subscribe to RSS Feed
- Permalink
- Notify Moderator
Please log in to access translation
Jun 09, 2014
02:35 PM
someone can repair heal the dimples that are corrupted?
Please see the attached stp file if you can.
36 REPLIES 36
Jun 09, 2014
04:55 PM
- Mark as New
- Bookmark
- Subscribe
- Mute
- Subscribe to RSS Feed
- Permalink
- Notify Moderator
Please log in to access translation
Jun 09, 2014
04:55 PM
I was just going to delete them all out and put them back in. But I can not figure out a simple way to get the pattern to work. Can draw in 100+ points, but that's a lot of work.
Jun 09, 2014
04:58 PM
- Mark as New
- Bookmark
- Subscribe
- Mute
- Subscribe to RSS Feed
- Permalink
- Notify Moderator
Please log in to access translation
Jun 09, 2014
04:58 PM
thank you but sorry I can't do that.
Jun 09, 2014
05:32 PM
- Mark as New
- Bookmark
- Subscribe
- Mute
- Subscribe to RSS Feed
- Permalink
- Notify Moderator
Please log in to access translation
Jun 09, 2014
05:32 PM
One surface is easy.
Jun 09, 2014
09:47 PM
- Mark as New
- Bookmark
- Subscribe
- Mute
- Subscribe to RSS Feed
- Permalink
- Notify Moderator
Please log in to access translation
Jun 09, 2014
09:47 PM
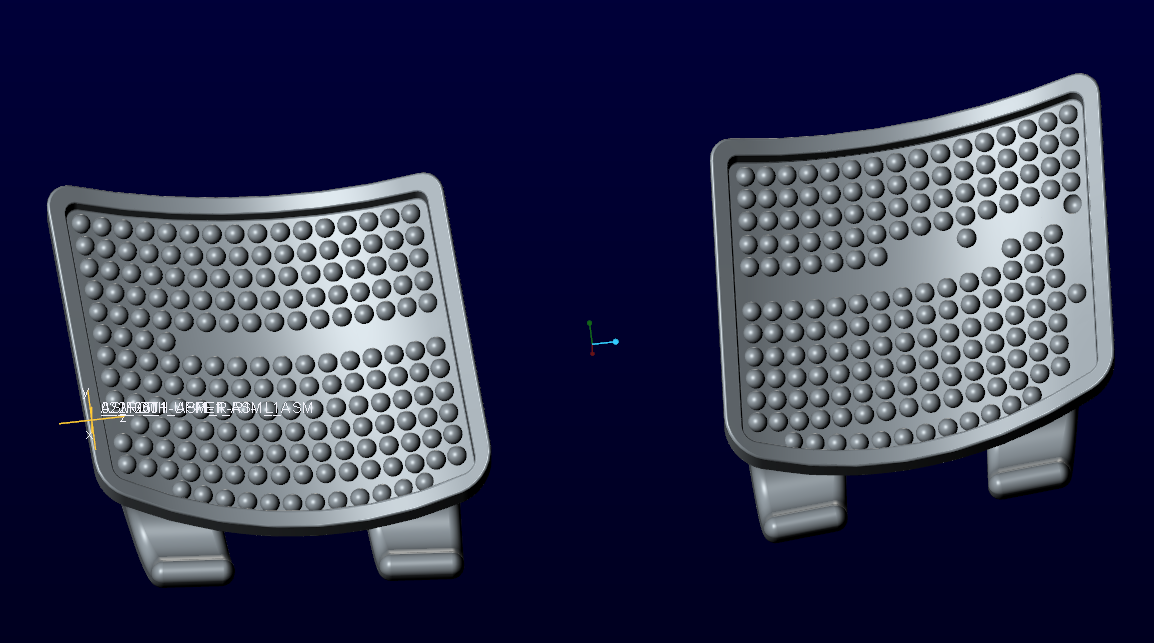
IDD is -still- a big pain...
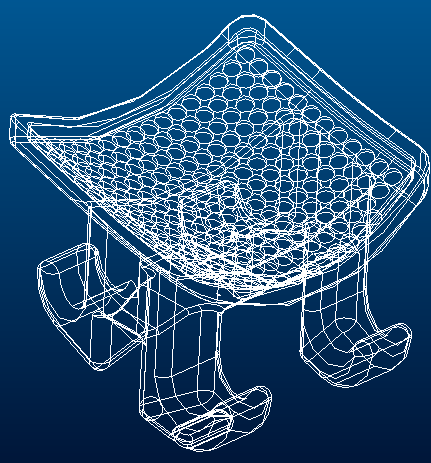
I got these solid but they are missing a lot of dimples.
There really is no rhyme or reason with how IDD is working.
But also, the import files really are not very good.
Creo 2.0 attached.
Jun 09, 2014
10:05 PM
- Mark as New
- Bookmark
- Subscribe
- Mute
- Subscribe to RSS Feed
- Permalink
- Notify Moderator
Please log in to access translation
Jun 09, 2014
10:05 PM
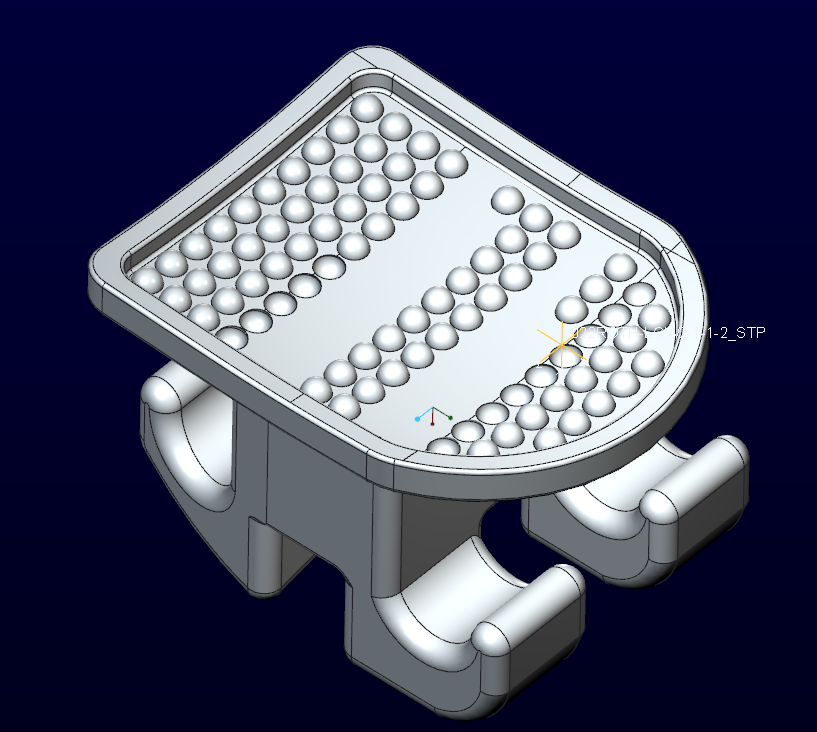
This one too is pretty bad. It is now a matter of replacing the missing bumps.
Jun 10, 2014
11:06 AM
- Mark as New
- Bookmark
- Subscribe
- Mute
- Subscribe to RSS Feed
- Permalink
- Notify Moderator
Please log in to access translation
Jun 10, 2014
11:06 AM
will you please repair and solid this file? its better for me you make video
Jun 10, 2014
05:40 PM
- Mark as New
- Bookmark
- Subscribe
- Mute
- Subscribe to RSS Feed
- Permalink
- Notify Moderator
Please log in to access translation
Jun 10, 2014
05:40 PM
Antonius got you mostly there, you should be able to take his models and just draw in the missing balls.
Jun 10, 2014
10:53 AM
- Mark as New
- Bookmark
- Subscribe
- Mute
- Subscribe to RSS Feed
- Permalink
- Notify Moderator
Please log in to access translation
Jun 10, 2014
02:03 AM
- Mark as New
- Bookmark
- Subscribe
- Mute
- Subscribe to RSS Feed
- Permalink
- Notify Moderator
Please log in to access translation
Jun 10, 2014
02:03 AM
Adnan,
I not experienced user in Import area, so I did simple test.
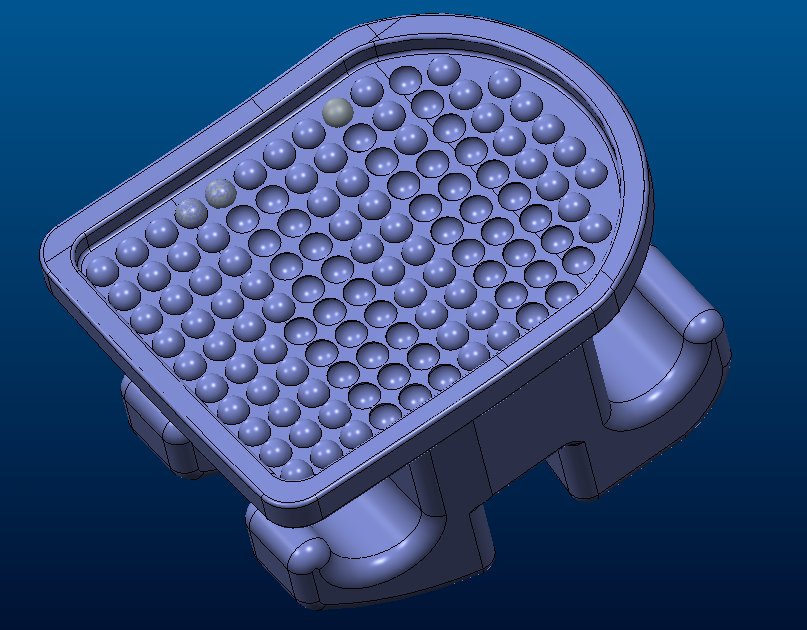
- I opened STEP file in Notepad and looked for accuracy info ... 1.959893631850E-5
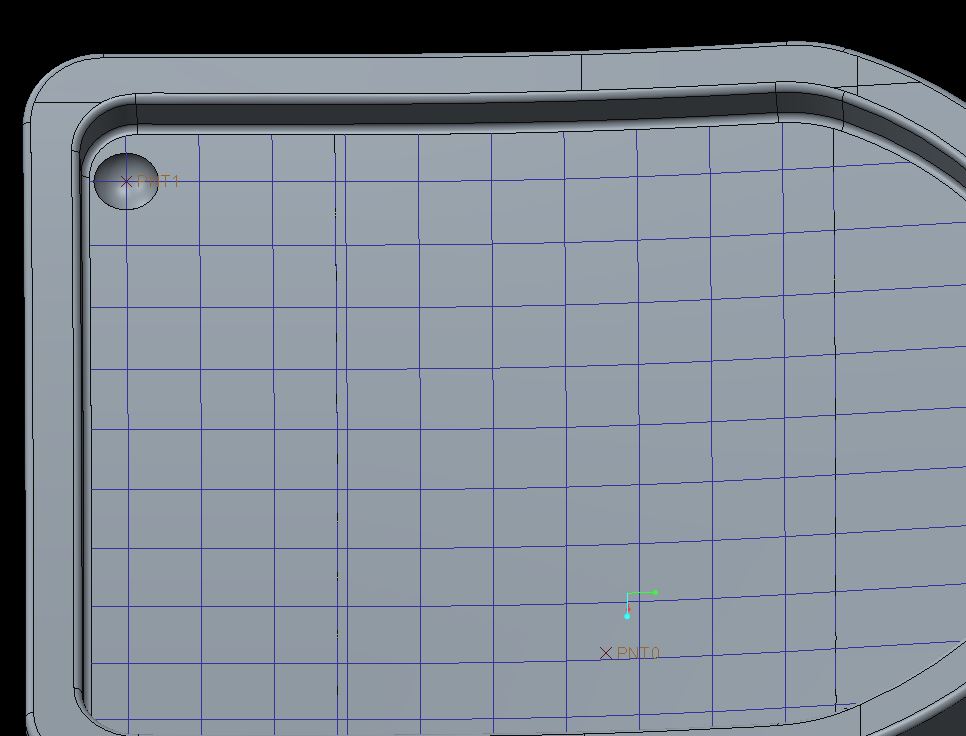
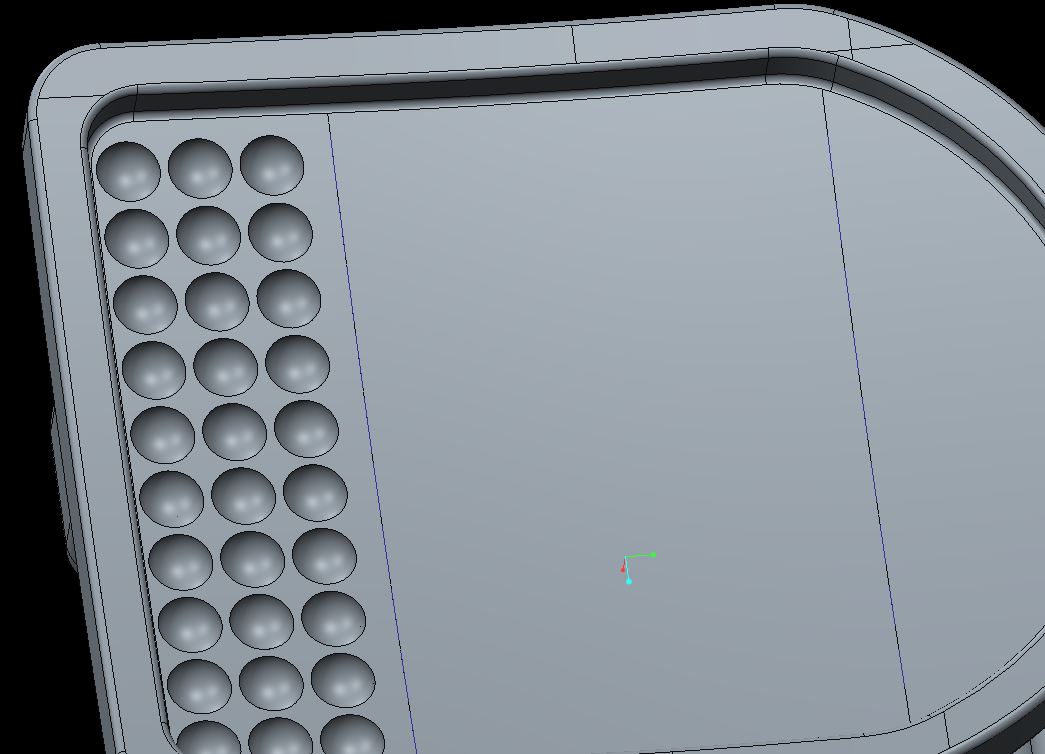
- I created new part in Creo Parametric 2.0 M070 (in millimeters) and set minimum possible absolute accuracy 0.000073
- I imported STEP into this part
- result is the part containing geometry checks and a lot of inverted dimples ... see attached pictures
Martin Hanak
Martin Hanák
Jun 10, 2014
02:52 AM
- Mark as New
- Bookmark
- Subscribe
- Mute
- Subscribe to RSS Feed
- Permalink
- Notify Moderator
Please log in to access translation
Jun 10, 2014
02:52 AM
thank you very much is that possible you will make a video?
Jun 10, 2014
04:01 AM
- Mark as New
- Bookmark
- Subscribe
- Mute
- Subscribe to RSS Feed
- Permalink
- Notify Moderator
Please log in to access translation
Jun 10, 2014
04:01 AM
Adnan,
what do you want to see in the video ? You are not able to reproduce my procedure ? What Creo/ProE version do you use ?
Martin Hanak
Martin Hanák
Jun 10, 2014
04:06 AM
- Mark as New
- Bookmark
- Subscribe
- Mute
- Subscribe to RSS Feed
- Permalink
- Notify Moderator
Please log in to access translation
Jun 10, 2014
04:06 AM
Sir,
I want to see very thing step by step i am using creo 2.0
Jun 10, 2014
04:16 AM
- Mark as New
- Bookmark
- Subscribe
- Mute
- Subscribe to RSS Feed
- Permalink
- Notify Moderator
Please log in to access translation
Jun 10, 2014
04:16 AM
Adnan,
I am not able to record video. I try to describe my steps.
How to enable absolute accuracy
Put the following option into config.pro file.
enable_absolute_accuracy YES
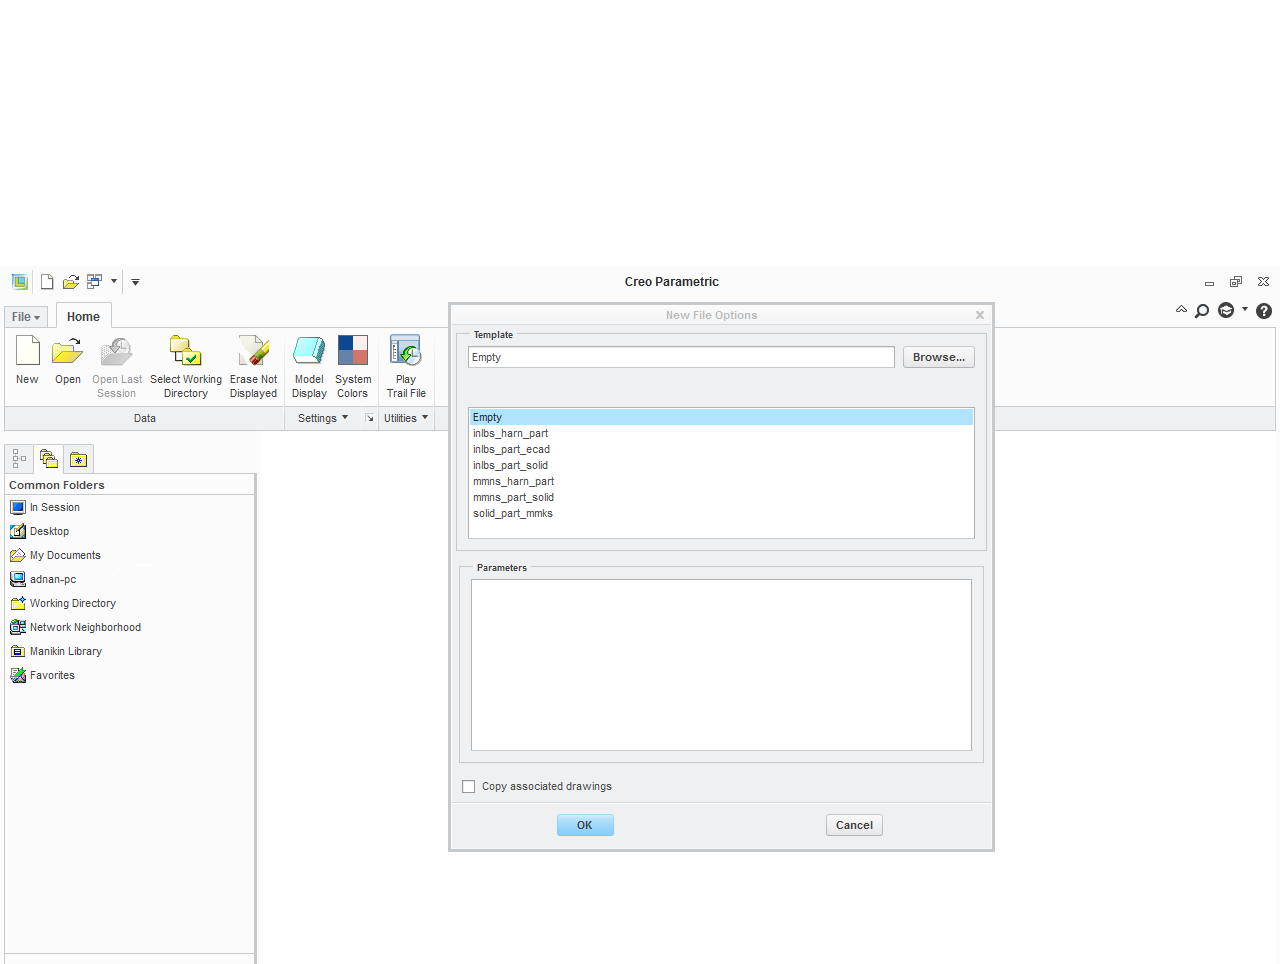
How to create new model
File > New > Part > uncheck Use default template > OK
select template model in millimeters > OK
How to set accuracy
File > Prepare > Model properties
click change on 3rd line (Accuracy)
in Accuracy dialog box set Absolute option and enter 0.000073 value > Regenerate model > Close
How to import STEP file
activate Model tab
click Get Data > Import > select STEP file > Open
in File dialog box click Details > uncheck Use templates option > OK
in File dialog box click OK
click green check mark button in Import tab
That is all ...
Martin Hanak
Martin Hanák
Jun 10, 2014
04:31 AM
- Mark as New
- Bookmark
- Subscribe
- Mute
- Subscribe to RSS Feed
- Permalink
- Notify Moderator
Please log in to access translation
Jun 10, 2014
04:31 AM
 what next Sir?
Jun 10, 2014
04:44 AM
- Mark as New
- Bookmark
- Subscribe
- Mute
- Subscribe to RSS Feed
- Permalink
- Notify Moderator
Please log in to access translation
Jun 10, 2014
04:44 AM
Adnan,
I interrupted my previous response by mistake. Now it is complete and you can continue. So go two messages upward  .
.
Martin Hanak
Martin Hanák
Jun 10, 2014
05:11 AM
- Mark as New
- Bookmark
- Subscribe
- Mute
- Subscribe to RSS Feed
- Permalink
- Notify Moderator
Please log in to access translation
Jun 10, 2014
05:11 AM
 which one Sir?
Jun 10, 2014
05:19 AM
- Mark as New
- Bookmark
- Subscribe
- Mute
- Subscribe to RSS Feed
- Permalink
- Notify Moderator
Please log in to access translation
Jun 10, 2014
05:19 AM
mmns_part_solid
Martin Hanák
Jun 10, 2014
07:39 AM
- Mark as New
- Bookmark
- Subscribe
- Mute
- Subscribe to RSS Feed
- Permalink
- Notify Moderator
Please log in to access translation
Jun 10, 2014
07:51 AM
- Mark as New
- Bookmark
- Subscribe
- Mute
- Subscribe to RSS Feed
- Permalink
- Notify Moderator
Please log in to access translation
Jun 10, 2014
07:51 AM
Adnan,
I am not able to heal the geometry of your model. I suggest you to ask the creator of STEP file to send you geometry in other format, eg. IGES.
Martin Hanak
Martin Hanák
Jun 10, 2014
05:48 PM
- Mark as New
- Bookmark
- Subscribe
- Mute
- Subscribe to RSS Feed
- Permalink
- Notify Moderator
Please log in to access translation
Jun 10, 2014
05:48 PM
I only have an older version of creo. If you have a version of Solidworks, use that to export a STEP file. Sometimes when I get vendor STEP files, I import it into Solidworks, and that usually automatically fixes it. If not, I use their version of IDD, fix as much as possible, then STEP out to Pro/E. That usually fixes most everything.
Jun 25, 2014
05:27 PM
- Mark as New
- Bookmark
- Subscribe
- Mute
- Subscribe to RSS Feed
- Permalink
- Notify Moderator
Please log in to access translation
Jun 25, 2014
05:27 PM
If I understand your problem is replacing the damaged spheres.
It´s not difficult. Inside IDD select a good quality complete sphere (with just two surfaces), the copy it and paste special.
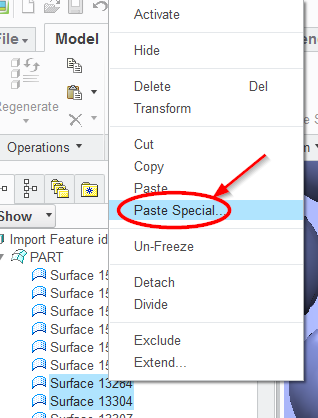
Now, the transform interface appears. Select "centered" and select one of the damaged surfaces and one of the copied ones.
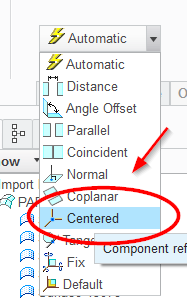
This process will make a copy of a sphere and center it with the center of a damaged one. Repeat the process through all the damaged ones.
Now delete the damaged surfaces and merge the new surfaces with the base surfaces and solidify.
Done.
I can make a small tutorial if you want, but not in the following days.
Jose
Jun 25, 2014
05:33 PM
- Mark as New
- Bookmark
- Subscribe
- Mute
- Subscribe to RSS Feed
- Permalink
- Notify Moderator
Please log in to access translation
Jun 25, 2014
05:33 PM
Dear Jose,
yes you are right. may I know when you able to make tutorial that will be very help full to me.
thanks,
Jun 26, 2014
11:43 AM
- Mark as New
- Bookmark
- Subscribe
- Mute
- Subscribe to RSS Feed
- Permalink
- Notify Moderator
Please log in to access translation
Jun 26, 2014
11:43 AM
Excellent, thanks Jose! I find IDD to be a pain, actually. I want something automatic, like Solidworks does.
Jun 26, 2014
12:33 PM
- Mark as New
- Bookmark
- Subscribe
- Mute
- Subscribe to RSS Feed
- Permalink
- Notify Moderator
Please log in to access translation
Jun 26, 2014
12:33 PM
I have to do this in various steps.
This first video shows how to copy the spheres and how to merge them with base surfaces.
If you have to repeat a operation several times, use mapkeys to speed up the process like I do in the video.
Let´s see if tomorrow I can do another one.
Jose
Jun 26, 2014
02:41 PM
- Mark as New
- Bookmark
- Subscribe
- Mute
- Subscribe to RSS Feed
- Permalink
- Notify Moderator
Please log in to access translation
Jun 26, 2014
02:41 PM
Hello Jose,
any option to download this video?
Jun 27, 2014
04:02 PM
- Mark as New
- Bookmark
- Subscribe
- Mute
- Subscribe to RSS Feed
- Permalink
- Notify Moderator
Please log in to access translation
Jun 27, 2014
04:02 PM
I don´t think so.
Jun 29, 2014
04:34 AM
- Mark as New
- Bookmark
- Subscribe
- Mute
- Subscribe to RSS Feed
- Permalink
- Notify Moderator
Please log in to access translation
Jun 29, 2014
04:34 AM
Jose,
am waiting your next video.
Jun 30, 2014
10:08 AM
- Mark as New
- Bookmark
- Subscribe
- Mute
- Subscribe to RSS Feed
- Permalink
- Notify Moderator
Please log in to access translation
Jun 30, 2014
10:08 AM
Jun 30, 2014
10:16 AM
- Mark as New
- Bookmark
- Subscribe
- Mute
- Subscribe to RSS Feed
- Permalink
- Notify Moderator
Please log in to access translation
Jun 30, 2014
10:16 AM
Hello Jose,
thanks you very much but can't fine any futures which to make?
