Community Tip - Did you get called away in the middle of writing a post? Don't worry you can find your unfinished post later in the Drafts section of your profile page. X
- Community
- PTC Education
- PTC Education Forum
- Dimension holes that are on a slant.
- Subscribe to RSS Feed
- Mark Topic as New
- Mark Topic as Read
- Float this Topic for Current User
- Bookmark
- Subscribe
- Mute
- Printer Friendly Page
Dimension holes that are on a slant.
- Mark as New
- Bookmark
- Subscribe
- Mute
- Subscribe to RSS Feed
- Permalink
- Notify Moderator
Dimension holes that are on a slant.
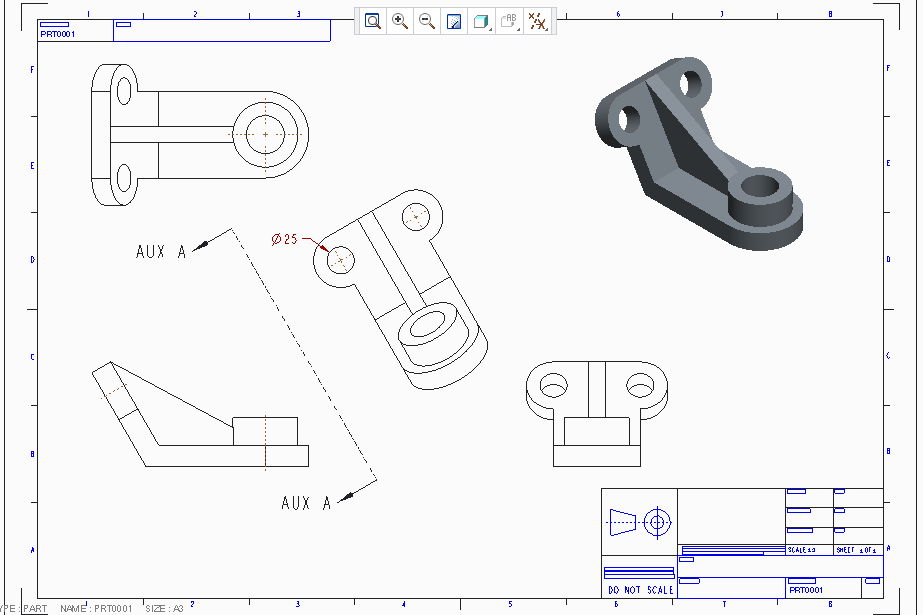
I have students create a part where there is a hole created on a work plane that is 30 degrees off the RIGHT work plane. No problems making them, but when in a DRAWING for the part I can not get a regular dimension for the holes. See attached PDF for example. Other then modifying the dimension for the "ellipse" is there a way to tell Creo that it should display the circle diameter? Any help would be greatly appreciated. Thanks.
- Mark as New
- Bookmark
- Subscribe
- Mute
- Subscribe to RSS Feed
- Permalink
- Notify Moderator
If your hole is not displayed normal to the paper, that is the dimension you will get. You could add an Auxilary view where the surface the hole is placed on, is oriented parallel to the paper.
I noticed that your drawing is not created using one of our drawing templates. You may want to configure Creo to use the Academic program standards as amoung other usability improvements, you will also be able to use our drawing templates. You will find the configuration instructions here.


