Community Tip - New to the community? Learn how to post a question and get help from PTC and industry experts! X
- Community
- Augmented Reality
- Vuforia Studio
- How to extract the components with properties from...
- Subscribe to RSS Feed
- Mark Topic as New
- Mark Topic as Read
- Float this Topic for Current User
- Bookmark
- Subscribe
- Mute
- Printer Friendly Page
How to extract the components with properties from a pvz file
- Mark as New
- Bookmark
- Subscribe
- Mute
- Subscribe to RSS Feed
- Permalink
- Notify Moderator
How to extract the components with properties from a pvz file
In the post “How to select model components in a 3d model without explicit definition of model Items”
there is one point where we did require a list of component items. Often we have the case where we have a Creo View .pvz file which was published by Creo Illustrate. In this case Creo Illustrate will do additional changes for the occurrence Id path so that if we have a bom list coming from Creo Parametric it will be not usable. So the question here is : Is it possible to extract a bom list for any *.pvz files.
The answer is Yes. We can do this using the Creo View Toolkit API.
Creo View API Toolkit consist of many parts : Java Toolkit , Web Toolkit (only Internet Explorer related) Office Toolkit and the new introduced in the current release module WebGL Toolkit.
We can extract BOM list with Java Toolkit but it requires more complex programming environment. Therefore I think it is more easily to use Creo View WebGL toolkit
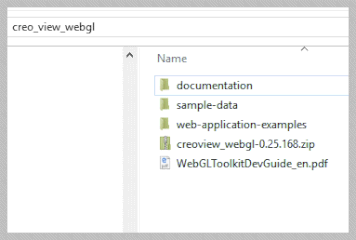
The Toolkit WebGl is based on the Thingview.js library. When we install Creo View Toolkit we will find the following directory structure:
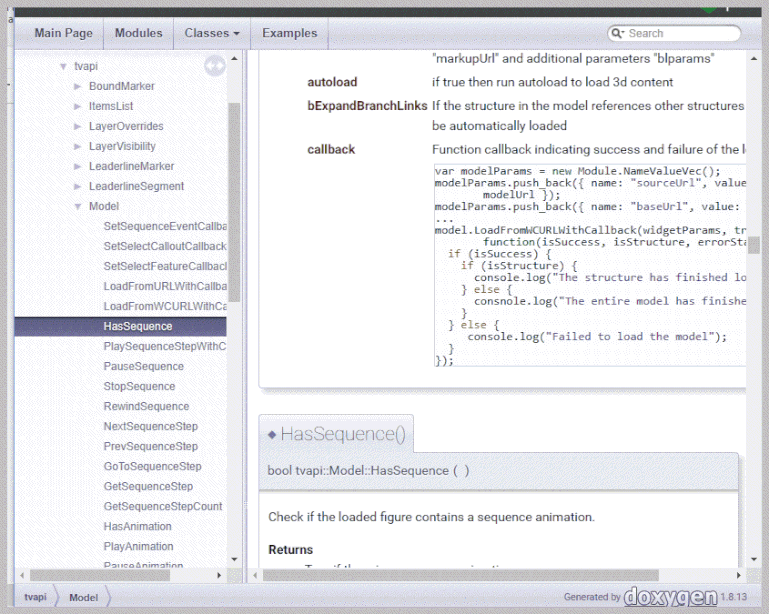
In the web-application-examples directory we can find some sample files which could be a good introduction how to use this API. The documentation is the WebGLToolkitDevGuide_en.pdf and also in html(doxygen) in the documentation sub directory:
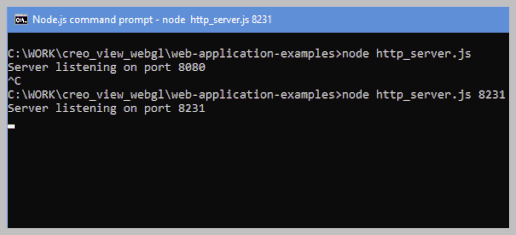
The CreoWebGL Toolkit requires a node.js environment. So start it we have first to start the Toolkit server: >>>node http_server.js [port]
The port parameter is optional and if we do not use it then it takes by default 8080 :
The next step is to open the localhost:port/ ExtractBomPVZ.html which implement our program
For example an simple version which will print the components with some properties to the chrome console could looks like:
<!DOCTYPE html>
<html style="height: 100%">

<head>
    <meta charset="utf-8" />
    <meta name="author" content="PTC">
    <title>Creo View WebGL Viewer</title>
</head>
<script src="js/ptc/thingview/thingview.js"></script>
<body style="height: 100%; margin: 0px">
  <div id="TITLE" style="width: 100%;height: 20%;border:2; float: left"></div>
  <div id="CreoViewWebGLDiv" style="width: 100%;height: 80%;border:0; float: left"></div>
</body>
<script type="text/javascript">
    var thingview;
    var session;
    var model;
    var model1;
    var model2;
    var MODELPATH = "sample-data/thingview_test/Machine-complete-CV.PVZ";

    var MODELNAME = "";
    var global_number_generated = false;
    var BOM_LIST = [];
    var USE_LOG = false;

    var CUR_MODELPATH = getAllUrlParams().modpath ? decodeURIComponent(getAllUrlParams().modpath) : MODELPATH;

	document.getElementById('TITLE').innerHTML = "<h3>Extract Bom List </h3><hr><h4>"+CUR_MODELPATH+"</h4><hr>";
    window.onload = function() {
        //return;
        ThingView.init("js/ptc/thingview", function() { // ThingView should only be initialised once per frame

            BOM_LIST = new Array();
            console.log("Creo View WebGL Viewer is now initialised");
            global_number_generated = false;
            GLOBAL_COUNT = 0;
            session = ThingView.CreateSession("CreoViewWebGLDiv");

             //----------------------------------
            model = session.MakeModel();

            ////================= Selecton Call back function definition

            model.SetSelectionCallback(function(type, si, idPath, selected, selType) {

                var JSON_OBJ = new Object;
                var shapeInst = session.GetShapeInstanceFromIdPath(idPath)
                var color = shapeInst.GetColor()
                var instId = shapeInst.GetIdPath();
                //the shape instance  instId now contains a prefix "SI_" which is bug
                //or at least not wanted - here remove it
                var instId_corrected = instId.replace(/SI_/g, '');
                var instIdPath = shapeInst.GetInstanceIdPath();
                console.log("idPath=" + idPath) //contains the id path e.g /1/23/3
                var description = model.GetPropertyValue(idPath, "PROE Parameters", "DESCRIPTION")
                if (!(description == null)) console.log("description=" + description);
                else desciption = "---";

                var sBOMPath = instId;
                var sBOMPath = instId_corrected; //replaced with the corrected string
                var sBOMIDPath = instIdPath;
                var sBOMID = sBOMIDPath.substring(sBOMIDPath.lastIndexOf("/") + 1)
                var sBOMName = sBOMPath.substring(sBOMPath.lastIndexOf("/") + 1)
                var sBOMDepth = instIdPath.split("/").length - 1;

               {

                    console.log("NAME=part&VALUE=" + sBOMName);
                    console.log("NAME=sBOMDepth&VALUE=" + sBOMDepth);
                    console.log("NAME=sBOMID &VALUE=" + sBOMID);
                    console.log("NAME=sBOMIDPath&VALUE=" + sBOMIDPath);
                    console.log("NAME=PARTPATH&VALUE=" + sBOMName);
                    console.log("NAME=DESCRIPTION&VALUE=" + description);
					console.warn("color (a=" + color.a + " b=" + color.b + " g=" + color.g + " r=" + color.r + ")");
                }
            });

            ////==================LoadFromURL with Callback
           model.LoadFromURLWithCallback(CUR_MODELPATH, true, true, false, function(success, isStructure, errorStack) {
           console.log("Model(2) LoadFromURLWithCallback - success: " + success + ", isStructure: " + isStructure);
                if (success) {

                    ////=============
                    session.SelectAllInstances()
                    var num = session.GetSelectionCount()
                    console.log("Number of selections =" + num)

                }
            });
            ///model load from URL funciton end
            /////////////
        }); // ThingView.init( ) end
    }; //window onload function end


    //// URL parameter handling found in the WWW Overflow and works quite good
    function getAllUrlParams(url) {
        // get query string from url (optional) or window
        var queryString = url ? url.split('?')[1] : window.location.search.slice(1);

        // we'll store the parameters here
        var obj = {};

        // if query string exists
        if (queryString) {

            // stuff after # is not part of query string, so get rid of it
            queryString = queryString.split('#')[0];

            // split our query string into its component parts
            var arr = queryString.split('&');

            for (var i = 0; i < arr.length; i++) {
                // separate the keys and the values
                var a = arr[i].split('=');

                // set parameter name and value (use 'true' if empty)
                var paramName = a[0];
                var paramValue = typeof(a[1]) === 'undefined' ? true : a[1];

                // (optional) keep case consistent
                paramName = paramName.toLowerCase();
                if (typeof paramValue === 'string') paramValue = paramValue.toLowerCase();

                // if the paramName ends with square brackets, e.g. colors[] or colors[2]
                if (paramName.match(/\[(\d+)?\]$/)) {

                    // create key if it doesn't exist
                    var key = paramName.replace(/\[(\d+)?\]/, '');
                    if (!obj[key]) obj[key] = [];

                    // if it's an indexed array e.g. colors[2]
                    if (paramName.match(/\[\d+\]$/)) {
                        // get the index value and add the entry at the appropriate position
                        var index = /\[(\d+)\]/.exec(paramName)[1];
                        obj[key][index] = paramValue;
                    } else {
                        // otherwise add the value to the end of the array
                        obj[key].push(paramValue);
                    }
                } else {
                    // we're dealing with a string
                    if (!obj[paramName]) {
                        // if it doesn't exist, create property
                        obj[paramName] = paramValue;
                    } else if (obj[paramName] && typeof obj[paramName] === 'string') {
                        // if property does exist and it's a string, convert it to an array
                        obj[paramName] = [obj[paramName]];
                        obj[paramName].push(paramValue);
                    } else {
                        // otherwise add the property
                        obj[paramName].push(paramValue);
                    }
                }
            }
        }

        return obj;
    }
</script>
</html>
The next step is to open the localhost:port/ ExtractBomPVZ.html which implement our program
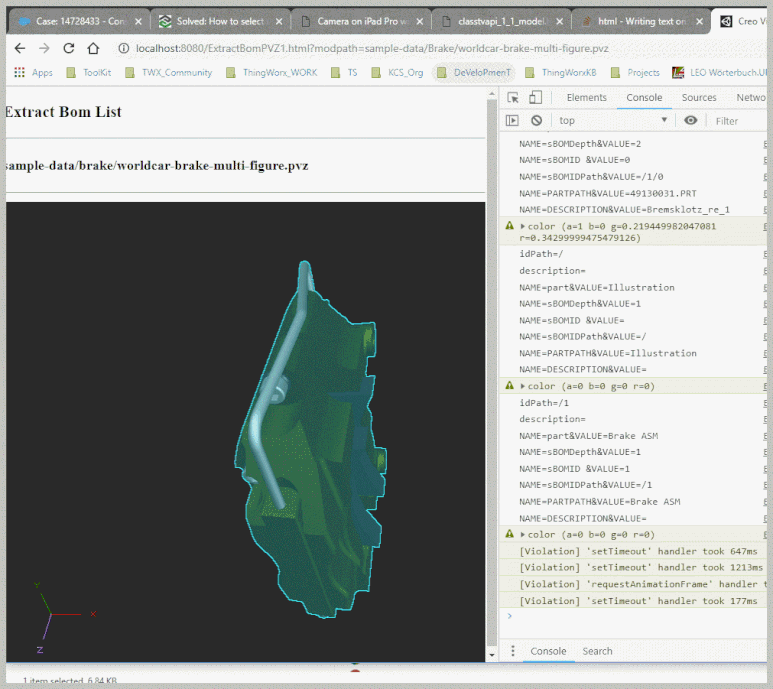
For example here is a simple version which will print the components with some properties to the chrome console It could looks like:
We can call the Creo View WebGl Toolkit program above in chrome with a parameter which will specify a path of the .pvz model – example:
http://localhost:8080/ExtractBomPVZ.html?modpath=sample-data/Brake/worldcar-brake-multi-figure.pvz
The program will selects all visible components and will print to the console the idPah, partname , color etc…
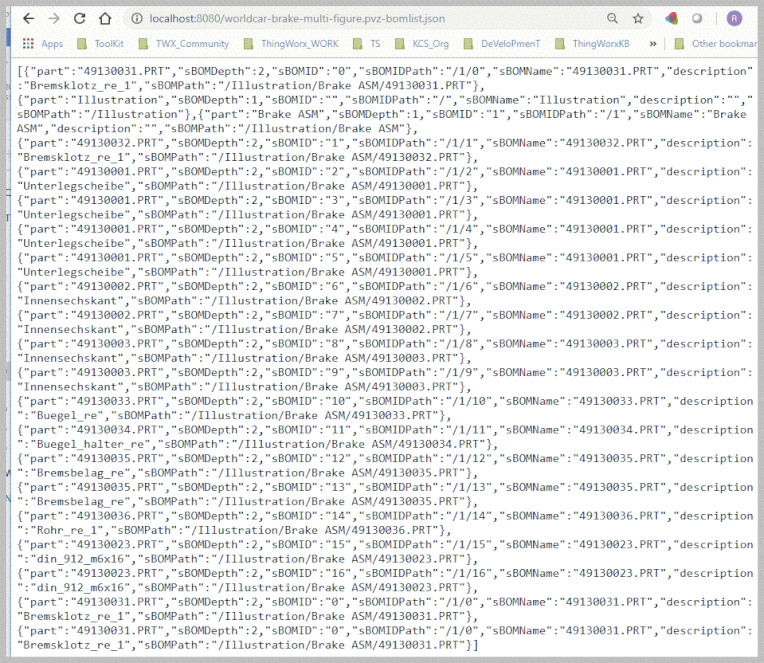
One problem we have here is that we could not print it to a local file because of the security restriction of the browser. A possible solution is to sent them back to the server e.g. as Json object and save them to the server root directory. Later we can download these file if required e.g. calling the json:
http://localhost:8080/worldcar-brake-multi-figure.pvz-bomlist.json
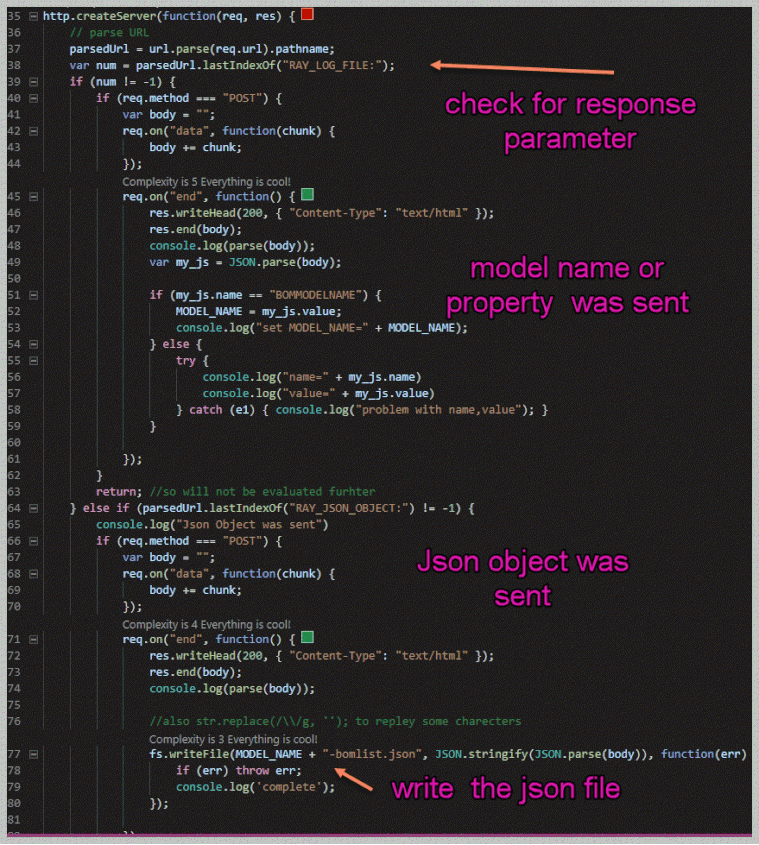
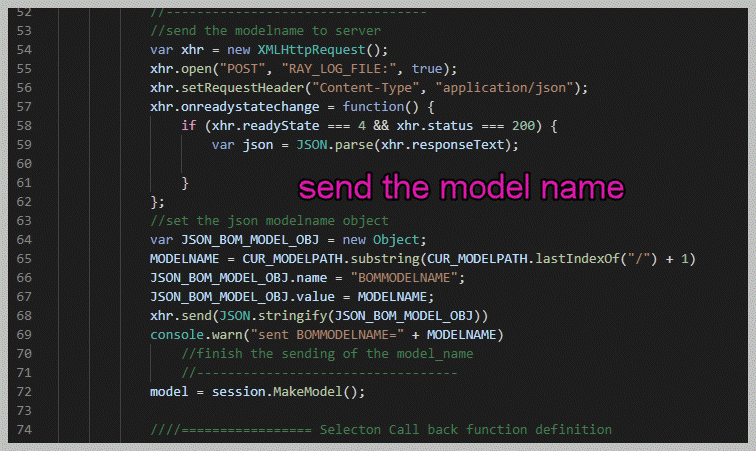
To implement json file creation we need to change the CreoWeb.Toolkit html file to send data to the server but also we need to modify/extend the server http.createServer() callback function to handle also the received data.
Also as next we will extend the Creo View Toolkit program file by adding a XMLHttpRequest() will will send the modelname and the generated json object to the http server
The Toolkit html file with parameter we can also call from a javascript or other html file:
<!DOCTYPE html>
<html style="height: 100%">

<head>
    <meta charset="utf-8" />
    <meta name="author" content="PTC">
    <title>Creo View WebGL Viewer</title>
</head>
<script>

function callBomPVZ(path)
{
//window.location.href = "http://localhost:8080/ExtractBomPVZ.html?modpath="+path;
var myWindow = window.open("http://localhost:8080/ExtractBomPVZ.html?modpath="+path,  "_blank", "height=600,width=500",false);

//setTimeout(function(){  browser.refresh(); }, 1500);
}
</script>

<body>
<hr><p>
<button type="button" onclick="callBomPVZ('sample-data/thingview_test/Machine-complete-CV.PVZ')">callBomPVZ:: Machine-complete-CV.PVZ</button>
<hr><p><hr>
<button type="button" onclick="callBomPVZ('sample-data/Brake/worldcar-brake-multi-figure.pvz')">callBomPVZ:: worldcar-brake-multi-figure.pvz</button>
</body>
- Labels:
-
Best Practices
- Tags:
- art
- Mark as New
- Bookmark
- Subscribe
- Mute
- Subscribe to RSS Feed
- Permalink
- Notify Moderator
Thanks! this has been helpful. But I couldn't find "CreoWeb.Toolkit html" file and also not sure about the purpose of "GLOBAL_NUM_INS" variable?
- Mark as New
- Bookmark
- Subscribe
- Mute
- Subscribe to RSS Feed
- Permalink
- Notify Moderator
Hi @harshdeep_1991 ,
yes, it is correct -there is no CreoWebToolkit.html - what here I intended to say is the server file which we need to start with node.js - which serves the request from the browser. By default the name is http_server.js and we can rename it to any name. The default call of the server is to start the Toolkit server: >>>node http_server.js [port]
And then we can connect with the browser to the server and could perform some operations with the Web.GL Toolkit API . Actually we do not need to change the http_server.js to be able to use the Web.Gl API , because the Web.GL Toolkit API is working on the client side in the chrome browser. But we have there one significant problem. We are not able to save a data. Let say we want to check the structure of the PVZ file and then create a json file containing the BOM information of an assembly. We will not be able to save this file from browser. So , we need to send it back to the server. And to be able to achieve this goal we need to send json back to server and this is a feature which is not by default implemented in the http_server.js file. Therefore, I wanted to demonstrate here some customization of this file to achieve the sending back of this info to the server. May be, it is not perfect and there is possibly better more efficient way to do .
I wrote different version/ articles - where I modified the same scripts /html file and created different version. I think here the variable GLOBAL_NUM_INS is something I forgotten to remove. The check of this variable does not make here sense in the example ExtractBomPVZ.html -> your right.
It is coming form another version named CreateBoomPVZ.html where I tried to select all instances and then used this variable to track the number of the selected instances something like this:
...
           ////==================LoadFromURL Callback
            model.LoadFromURLWithCallback(CUR_MODELPATH, true, true, false, function(success, isStructure, errorStack) {
                console.log("Model(2) LoadFromURLWithCallback - success: " + success + ", isStructure: " + isStructure);
                if (success) {

                    ////=============
                    session.SelectAllInstances()
                    var num = session.GetSelectionCount()
                    console.log("Number of selections =" + num)
                    GLOBAL_NUM_INS = num;
                    global_number_generated = true;
                    if (USE_LOG) {
                        xhttp.open("POST", "RAY_LOG_FILE:", true);
                        xhttp.send("NAME=NEXT&NUMINST=" + GLOBAL_NUM_INS);
                    }
                    //model.ShowAllModelAnnotations()
                }

            });
            ///model load from URL funciton
...- Mark as New
- Bookmark
- Subscribe
- Mute
- Subscribe to RSS Feed
- Permalink
- Notify Moderator
Very cool! I didn't realize the WebGL toolkit was finally out. I will enjoy getting a chance to play with it!
As an alternative to sending the BOM structure back to the server to save, and then downloading as a separate step, you could simply write it as text to a new browser window, and then the user can use Right-click->Save As to get a local copy of the BOM structure. That would avoid the extra network traffic and server overhead.
Also, I'm thinking of how this might work for a Vuforia experience, where, say, I want to be able to display part information for any part in an assembly. Would there be a way to make this work in that context? Or would the reliance on node.js force us to set up another server to run the toolkit code, which the device running the experience sends a request to and gets back the BOM data?
- Mark as New
- Bookmark
- Subscribe
- Mute
- Subscribe to RSS Feed
- Permalink
- Notify Moderator
Hi @ClayHelberg ,
currently the concept of the WebGl Toolkit is the client server.
We have on the one side the http server which is started by node.js >>>node http_server.js [port].. and on the other side the javaScript program in browser - chrome which will call the API inside a Thingview component (here as part of the Web.GL Toolkit – but it is also a part of Vuforia Studio preview) Therefore, probably calling the toolkit form Studio could work in in Preview mode - means that we can call form preview mode some toolkit functions - but I do not believe that we will be able to perform such operation on mobile device)
The concept currently is the following.
We have a tool where we will extract some data from the pvz file an pack it to a json file. The json file will be saved on the server. We will download this file from the server to e.g. to upload folder of Studio project and then we will use it as metadata in the project - e.g. to have information occurrence of modelitems or component without modelitems (the component ID path) and association to part name or some part parameter (coming form Creo)
If we can involve this tool on demand when it is required in an experience is some point I did not considered and is very good question!
Currently the tool is called manually
If you could provide some more details of your idea - mean what should be the goal of the integration -I will investigate more deep and will check if is possible to be implemented.
Thank you!
- Mark as New
- Bookmark
- Subscribe
- Mute
- Subscribe to RSS Feed
- Permalink
- Notify Moderator
Hello Roland,
Could you provide more info about RAY_LOG_FILE and RAY_JSON_VIEWABLE_STEP variables used in your app?
I'm getting these errors in console:
Failed to load resource: the server responded with a status of 500 (Internal Server Error) RAY_LOG_FILE::1
POST http://localhost:8080/RAY_JSON_VIEWABLE: 500 (Internal Server Error)
Thanks
- Mark as New
- Bookmark
- Subscribe
- Mute
- Subscribe to RSS Feed
- Permalink
- Notify Moderator
Hi @anickolsky ,
before we consider your question further I need to point that the original topic /first post was created because there was no way to access the data in the pvz file (called meta data) in Vuforia Studio and therefore I tried in a couple of posts to give an advise how to extract them from the pvz file. The suggested techniques were based on Creo View Toolkit / Web.GL. This particular post the solution was based on Weg.Gl toolkit and the solution form server side contains the library which is provided with the installation of the Web.Gl toolkit/ with some modifications. It contains 2 part one server and one client. Here in the original post it was only shown ridementary the server solution, because it is a part of the Web.Gl solution packet as could not be published without the proper license.
BUT in the meantime I think we have a much better solution implemented inside Vuforia Studio since the last version 8.5.13 . Therefore, could you, please, check the new solution (Vuforia Studio API) if this will be helpful for you.
Please check the following post:
- in Vuforia Studio and Chalk Tech Tips:"Incorporate CAD Metadata Into an Experience ( version 8.5.13 and later)" Also 2 sample projects are uploaded there
- And the documentation in the PTC help: Navigating Vuforia Studio > Project Pane > Resources > Incorporate CAD Metadata Into an Experience
- Vuforia Studio - introduction to MetaData Video
- Mark as New
- Bookmark
- Subscribe
- Mute
- Subscribe to RSS Feed
- Permalink
- Notify Moderator
Thanks a lot Roland!
Regards

