
Turn on suggestions
Auto-suggest helps you quickly narrow down your search results by suggesting possible matches as you type.
Showing results for
Please log in to access translation
Turn on suggestions
Auto-suggest helps you quickly narrow down your search results by suggesting possible matches as you type.
Showing results for
Community Tip - Learn all about PTC Community Badges. Engage with PTC and see how many you can earn! X
- Community
- Creo+ and Creo Parametric
- 3D Part & Assembly Design
- Re: Simplify a Assembly into a part
Translate the entire conversation x
Please log in to access translation
Options
- Subscribe to RSS Feed
- Mark Topic as New
- Mark Topic as Read
- Float this Topic for Current User
- Bookmark
- Subscribe
- Mute
- Printer Friendly Page
Simplify a Assembly into a part
Oct 01, 2015
09:15 AM
- Mark as New
- Bookmark
- Subscribe
- Mute
- Subscribe to RSS Feed
- Permalink
- Notify Moderator
Please log in to access translation
Oct 01, 2015
09:15 AM
Simplify a Assembly into a part
Hello All,
Just wondering how people go about creating simplified models of sub assemblies.
The specific thing I am working on is an assembly with several different bearings. While I want to keep the bearings in the assembly and it is nice they look like bearings when sectioned etc I would like to to simplify them. By simplify I mean ideally turn them into a single part. The bearings currently are as downloaded from the bearing supplier and each one has a dozen different parts. For this project I want to keep everything in a single folder and having lots of bearing parts is making it more difficult to see the other parts. Also I have to email assemblies and it would be better if the bearing was then just one part, instead of several.
I could remodel the, but this seems time consuming and unnecessary.
I also could Shrinkwrap them, but this creates external surfaces only.
Any recommendations would be appreciated.
Thank you.
Solved! Go to Solution.
Labels:
- Labels:
-
Assembly Design
ACCEPTED SOLUTION
Accepted Solutions
Oct 25, 2021
07:14 AM
- Mark as New
- Bookmark
- Subscribe
- Mute
- Subscribe to RSS Feed
- Permalink
- Notify Moderator
Please log in to access translation
Oct 25, 2021
07:14 AM
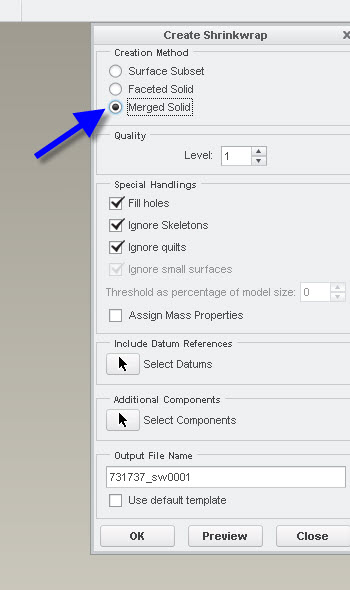
To close this community thread on the ability to Simplify a Assembly into a part.
Summary of the proposed solutions, also detailed in article CS29678 :
- Convert the assembly to a Solid Shrinkwrap
- Use the File > Save as > Save a Copy command to save the assembly with the Type Shrinkwrap
- Then select the Merged Solid option.
- You can increase the Quality and also uncheck the box to Fill holes if you want to keep some more details.

Advanced Assembly Extension(AAX) or Pro/ASSEMBLY module or Assembly Performance Extension(APX) is required to save model as shrinkwrap model
See how to verify the modules included in your Creo license in article CS165589, and review Creo Design packages in CS298294
- You can also export the assembly to another file format like STEP / IGES or Neutral and import it back as a part
- Use the File > Save as > Save a Copy command to save the assembly with the Type of your choice
- Then use the File > Open command to browse All Files Type to the retrieve the new created file
- If selecting STEP file format you may need to set the hidden config.pro option intf3d_in_as_part to yes to avoid misplaced components, see article CS10021
- Note that starting with Creo 8.0 Inseparable Assemblies with Embedded Components have been introduced
20 REPLIES 20
Oct 01, 2015
09:26 AM
- Mark as New
- Bookmark
- Subscribe
- Mute
- Subscribe to RSS Feed
- Permalink
- Notify Moderator
Please log in to access translation
Oct 01, 2015
09:26 AM
Shrinkwrap is used to create solid geometry and depending on the quality level you choose, the part can be identical, internally and externally, to the original model. It is definitely the easiest method. If the option isnt' available, there is some problem with the original model such as it contains surface models or has some sort of geometry that can't be converted.
Other options are external merge/inheritance (may be an option not available to all), merge (creates a reference to the original model and a merge part in the original model) and using a step export and re-import with the option to make as a single part (there is an option to do this but it eludes my memory at the moment).
Oct 01, 2015
09:48 AM
- Mark as New
- Bookmark
- Subscribe
- Mute
- Subscribe to RSS Feed
- Permalink
- Notify Moderator
Please log in to access translation
Oct 01, 2015
09:48 AM
Hello Stephen, thanks for the quick response. Using shrinkwrap it is always fills the internals for me. I am selecting the Merged Solid option already.
I have tried putting the level to 10, and it makes no difference. Unless I unclick all the special handling boxes it justs gives me a single cylinder with rounded edges (So loses all the shield and race details.
Thanks
Oct 01, 2015
09:55 AM
- Mark as New
- Bookmark
- Subscribe
- Mute
- Subscribe to RSS Feed
- Permalink
- Notify Moderator
Please log in to access translation
Oct 01, 2015
09:55 AM
Can you upload the vendor bearing?
Oct 01, 2015
10:13 AM
- Mark as New
- Bookmark
- Subscribe
- Mute
- Subscribe to RSS Feed
- Permalink
- Notify Moderator
Please log in to access translation
Oct 01, 2015
10:13 AM
The particular file I am working on currently is attached. But I am also interested more generally in what people do with their own sub assemblies.
Thanks for any help
Oct 01, 2015
10:27 AM
- Mark as New
- Bookmark
- Subscribe
- Mute
- Subscribe to RSS Feed
- Permalink
- Notify Moderator
Please log in to access translation
Oct 01, 2015
10:27 AM
I exported your assy as a STEP and re-imported as a prt. Creo will recogize it as an assy, you'll need to check part in the import dialog:
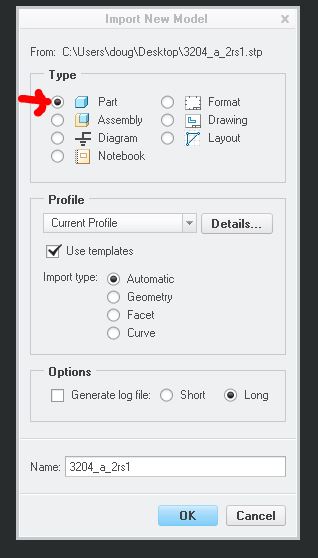
The only hiccup was that it only brought in one of the balls, instead of all 16. I've attached my part here.
Oct 01, 2015
11:13 AM
- Mark as New
- Bookmark
- Subscribe
- Mute
- Subscribe to RSS Feed
- Permalink
- Notify Moderator
Please log in to access translation
Oct 01, 2015
11:13 AM
The problem with importing step file assemblies as parts is Creo will simply "pile" all the different parts on top of each other (based on the coordinate system). To fix this, set intf3d_in_as_part to yes in your config.pro file before attempting to import the file. Now assemblies can be brought in as single parts but still maintain the proper spatial relationships between the different components.
Oct 01, 2015
11:34 AM
- Mark as New
- Bookmark
- Subscribe
- Mute
- Subscribe to RSS Feed
- Permalink
- Notify Moderator
Please log in to access translation
Oct 01, 2015
11:34 AM
Interesting. Unfortunately, that option also make importing as a part the default, which I definately don't want/
Also, when importing with that option set, Creo created a bunch of extra layers, with the solid geom on every layer. But the balls were all there. Without it set, no extra layers but only the two balls. I tried in both Creo 2 & Creo 3 with the same results.
Oct 01, 2015
11:46 AM
- Mark as New
- Bookmark
- Subscribe
- Mute
- Subscribe to RSS Feed
- Permalink
- Notify Moderator
Please log in to access translation
Oct 01, 2015
11:46 AM
Unfortunately, that option also make importing as a part the default, which I definately don't want/
It does default to part, but you can still pick assembly and it will come in just like it used to without the option set. Just one click. 
Oct 01, 2015
11:58 AM
- Mark as New
- Bookmark
- Subscribe
- Mute
- Subscribe to RSS Feed
- Permalink
- Notify Moderator
Please log in to access translation
Oct 01, 2015
11:58 AM
Or you could just change it for your current session. If you need to switch this option often, you can add it to your Favorites in the Options dialog. It will show a check box that you can toggle for your session.
May 08, 2018
10:40 PM
- Mark as New
- Bookmark
- Subscribe
- Mute
- Subscribe to RSS Feed
- Permalink
- Notify Moderator
Please log in to access translation
May 08, 2018
10:40 PM
this worked perfectly for me on Creo 3.0...thanks again...
although not that option doesn't show up when you search so i had to manually input it.
Oct 01, 2015
11:17 AM
- Mark as New
- Bookmark
- Subscribe
- Mute
- Subscribe to RSS Feed
- Permalink
- Notify Moderator
Please log in to access translation
Oct 01, 2015
11:17 AM
Here is the bearing following your process but with that config option enabled. (Creo 3.0)
Feb 15, 2021
12:50 AM
- Mark as New
- Bookmark
- Subscribe
- Mute
- Subscribe to RSS Feed
- Permalink
- Notify Moderator
Please log in to access translation
Feb 15, 2021
12:50 AM
internal features are still visible.
Oct 01, 2015
10:29 AM
- Mark as New
- Bookmark
- Subscribe
- Mute
- Subscribe to RSS Feed
- Permalink
- Notify Moderator
Please log in to access translation
Oct 01, 2015
10:29 AM
It's CREO 3 models. Unfortunately I am unable to read Creo 3 models at this time. I was supposed to already be testing it but haven't taken the time to install it yet.
Oct 02, 2015
01:55 PM
- Mark as New
- Bookmark
- Subscribe
- Mute
- Subscribe to RSS Feed
- Permalink
- Notify Moderator
Please log in to access translation
Oct 02, 2015
01:55 PM
I used this thread a driver to load up CREO 3....It was awesome except I corrupted my local PDMLINK workspace...I discovered how big a pain it is to recover non-uploaded data...fun fun fun
Let the testing begin.
Oct 02, 2015
12:44 AM
- Mark as New
- Bookmark
- Subscribe
- Mute
- Subscribe to RSS Feed
- Permalink
- Notify Moderator
Please log in to access translation
Oct 02, 2015
12:44 AM
I use the method of merging bodies into a single part.
First of all remember that merged bodies will join and you will not have all the crosshatching options that assemblies give you.
In the bearing assembly, designate a part, say the outer race, as the active part. Now go to GetData and select merge. You can then merge a solid into the part you have active. You have to do this one at a time, but it does work. A little playing with it and you can also make sure you clean up the merging bodies so not too much information is retained.
This is not foolproof. Some merge operations fail. Not much can be done about this other than to make sure appropriate clearances are maintained.
Oct 05, 2015
03:15 AM
- Mark as New
- Bookmark
- Subscribe
- Mute
- Subscribe to RSS Feed
- Permalink
- Notify Moderator
Please log in to access translation
Oct 05, 2015
03:15 AM
Hello Gavin,
I've already done this because one of my customers was sending me electronic boards assemblies made of hundreds of parts and it was really putting down my computer.
I found a method to convert those assemblies into a single part.
I export the assembly as an iges file using the config shown bellow, then open the iges file as a part. You'll find attached the bearing made in a single part using this method.

Feb 25, 2016
03:59 AM
- Mark as New
- Bookmark
- Subscribe
- Mute
- Subscribe to RSS Feed
- Permalink
- Notify Moderator
Please log in to access translation
Feb 25, 2016
03:59 AM
Hello All,
I am trying to this again and my now default way of doing it, by exporting as an Iges keep crashing so instead I tried changing my option in Config .pro. (As suggested by Tom Uminn) But I don't appear to have the "intf3d_in_as_part " setting or anything that looks similar. Anyone got any idea if it has been renamed or moved?
I can't post the file I am trying to simplify this time.
Feb 25, 2016
08:16 AM
- Mark as New
- Bookmark
- Subscribe
- Mute
- Subscribe to RSS Feed
- Permalink
- Notify Moderator
Please log in to access translation
Feb 25, 2016
08:16 AM
It's a hidden option. Just type it in.

Oct 25, 2021
07:14 AM
- Mark as New
- Bookmark
- Subscribe
- Mute
- Subscribe to RSS Feed
- Permalink
- Notify Moderator
Please log in to access translation
Oct 25, 2021
07:14 AM
To close this community thread on the ability to Simplify a Assembly into a part.
Summary of the proposed solutions, also detailed in article CS29678 :
- Convert the assembly to a Solid Shrinkwrap
- Use the File > Save as > Save a Copy command to save the assembly with the Type Shrinkwrap
- Then select the Merged Solid option.
- You can increase the Quality and also uncheck the box to Fill holes if you want to keep some more details.
Advanced Assembly Extension(AAX) or Pro/ASSEMBLY module or Assembly Performance Extension(APX) is required to save model as shrinkwrap model
See how to verify the modules included in your Creo license in article CS165589, and review Creo Design packages in CS298294
- You can also export the assembly to another file format like STEP / IGES or Neutral and import it back as a part
- Use the File > Save as > Save a Copy command to save the assembly with the Type of your choice
- Then use the File > Open command to browse All Files Type to the retrieve the new created file
- If selecting STEP file format you may need to set the hidden config.pro option intf3d_in_as_part to yes to avoid misplaced components, see article CS10021
- Note that starting with Creo 8.0 Inseparable Assemblies with Embedded Components have been introduced
Feb 28, 2025
08:30 AM
- Mark as New
- Bookmark
- Subscribe
- Mute
- Subscribe to RSS Feed
- Permalink
- Notify Moderator
Please log in to access translation
Feb 28, 2025
08:30 AM
Exposrt as *.igs. Import back as *.prt


