Community Tip - Did you get called away in the middle of writing a post? Don't worry you can find your unfinished post later in the Drafts section of your profile page. X
- Community
- Creo+ and Creo Parametric
- 3D Part & Assembly Design
- Re: using external references in sketched holes
- Subscribe to RSS Feed
- Mark Topic as New
- Mark Topic as Read
- Float this Topic for Current User
- Bookmark
- Subscribe
- Mute
- Printer Friendly Page
using external references in sketched holes
- Mark as New
- Bookmark
- Subscribe
- Mute
- Subscribe to RSS Feed
- Permalink
- Notify Moderator
using external references in sketched holes
I've been making more use of sketched holes in my designs recently, but I noticed that when you use this this type of hole, I lose the ability to set a parametric end condition, so if a plate that contains the hole feature changes thickness, the hole may become short. So far, the only way I can deal with this is to write a direct relation to force the hole length to match the plate thickness, but is there anyway to establish a reference to another part inside the sketch from the hole feature so that my sketched hole automatically adjust to changes in plate thickness, or is the only way to accomplish this through a relation?
Solved! Go to Solution.
- Labels:
-
General
Accepted Solutions
- Mark as New
- Bookmark
- Subscribe
- Mute
- Subscribe to RSS Feed
- Permalink
- Notify Moderator
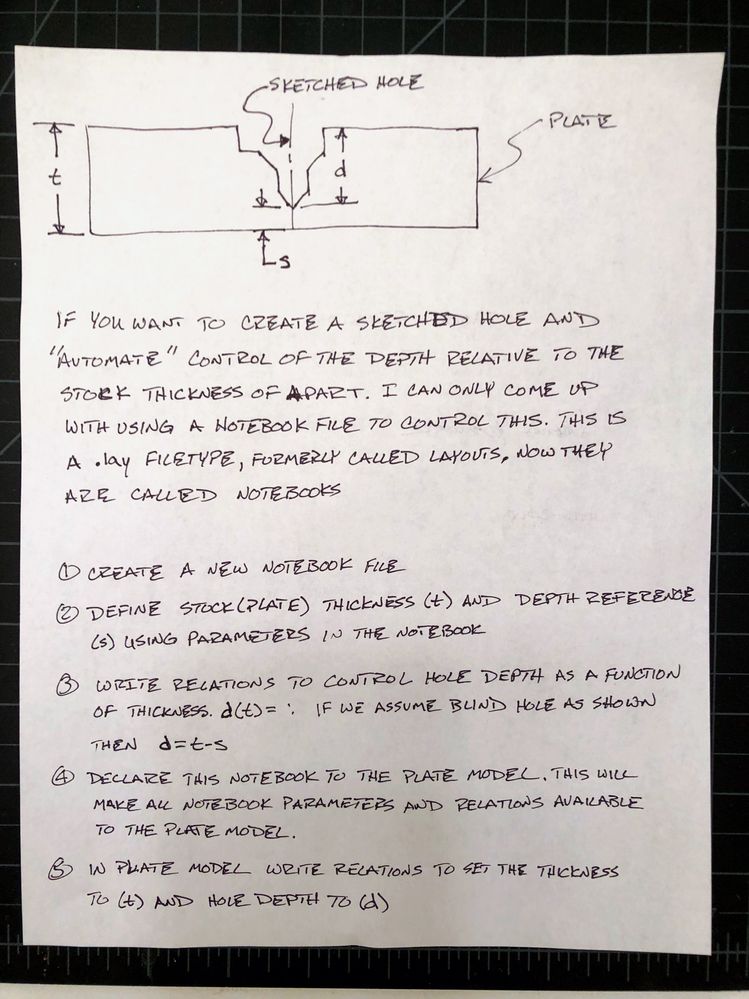
A notebook declared to the plate with one or more sketched holes should handle this situation. It will use relations but can automate if you have defined design standards that you can capture. I would not use sketch relations for this, use feature relations to control the hole in the plate.
See the pic of the written steps for a given hole depth control scenario. This assumes that the plate thickness is the same at the location of all holes of this type. If the thickness varies then you would employ an analysis feature to define the stock thickness at each hole location and incorporate that into the relations to maintain stock of thickness "s" below each hole of this type.
If you can standardize plate thickness to discrete sizes then you could use a single Notebook file to define the depth of hole for each of the stock plates in a single file and declare that to any new plate design to control the hole depths. As long as the layout is declared to the model with the holes in it then the hole depth will update is the thickness changes.
Depending on what your hole looks like it may be easier to make a UDF for the custom "hole" and define the depth reference in the feature which would not require the use of a Notebook as described here.

Involute Development, LLC
Consulting Engineers
Specialists in Creo Parametric
- Mark as New
- Bookmark
- Subscribe
- Mute
- Subscribe to RSS Feed
- Permalink
- Notify Moderator
A notebook declared to the plate with one or more sketched holes should handle this situation. It will use relations but can automate if you have defined design standards that you can capture. I would not use sketch relations for this, use feature relations to control the hole in the plate.
See the pic of the written steps for a given hole depth control scenario. This assumes that the plate thickness is the same at the location of all holes of this type. If the thickness varies then you would employ an analysis feature to define the stock thickness at each hole location and incorporate that into the relations to maintain stock of thickness "s" below each hole of this type.
If you can standardize plate thickness to discrete sizes then you could use a single Notebook file to define the depth of hole for each of the stock plates in a single file and declare that to any new plate design to control the hole depths. As long as the layout is declared to the model with the holes in it then the hole depth will update is the thickness changes.
Depending on what your hole looks like it may be easier to make a UDF for the custom "hole" and define the depth reference in the feature which would not require the use of a Notebook as described here.

Involute Development, LLC
Consulting Engineers
Specialists in Creo Parametric
- Mark as New
- Bookmark
- Subscribe
- Mute
- Subscribe to RSS Feed
- Permalink
- Notify Moderator
Unfortunately, declaring a notebook is a non-starter for the engineering manager here. He had a bad experience once when trying to modify an assembly that had a declared notebook, but couldn't break the parameter he needed to redefine, despite having removed every parameter and relation in the notebook. I still think we were missing something, but now I can't bring up the Notebook as a means of improving design workflow without risking a trauma response.
Using a UDF would be a more palatable solution probably, unless the intersecting surface wasn't planar. Maybe I can set the hole to intersect the next geometric surface in the UDF definition.
- Mark as New
- Bookmark
- Subscribe
- Mute
- Subscribe to RSS Feed
- Permalink
- Notify Moderator
If you have not seen this thread it may be relevant to the issue you had with the layout.
Involute Development, LLC
Consulting Engineers
Specialists in Creo Parametric
- Mark as New
- Bookmark
- Subscribe
- Mute
- Subscribe to RSS Feed
- Permalink
- Notify Moderator
I've had this discussion before, shown here:
We don't have the necessary licenses to use the Layout capabilities of Creo, so a governing, or "master" assembly is used. Maybe this approach will be acceptable for your organization?
- Mark as New
- Bookmark
- Subscribe
- Mute
- Subscribe to RSS Feed
- Permalink
- Notify Moderator
Hi Ken,
How does the master assembly method work?
- Mark as New
- Bookmark
- Subscribe
- Mute
- Subscribe to RSS Feed
- Permalink
- Notify Moderator
It's explained in the discussion the link goes to. That's why I put the link in, so I don't have to retype all that old stuff I already put in.
- Mark as New
- Bookmark
- Subscribe
- Mute
- Subscribe to RSS Feed
- Permalink
- Notify Moderator
My mistake, I thought the link led to a broader discussion, and you were referring immediately after to an approach that you'd developed on your own as a separate aside. It's clear on a second reading that you meant exactly what you said. I'll make the time to delve deeper in that thread, thank you.
- Mark as New
- Bookmark
- Subscribe
- Mute
- Subscribe to RSS Feed
- Permalink
- Notify Moderator
Yeah, the method there is what I have adopted for most relatively complex designs that rely on components having compatible features like holes that need to line up, rods that need to be a specific length with respect to other components and their positions, etc. If you're going to be iterating a lot on the design, it can save a huge amount of time and prevent annoying mistakes (like updating part A and B but forgetting C which is just slightly different enough that it looks okay but isn't).


